1 MediaRecorder介绍
https://developer.android.google.cn/reference/android/media/MediaRecorder
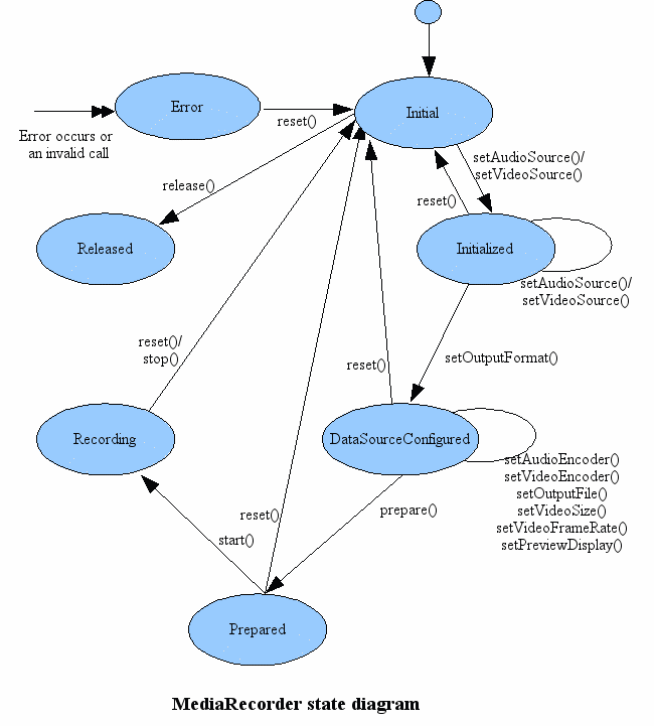
MediaRecorder可用于录制音频和视频,本篇只讲解MediaRecorder录音功能,录音控制是基于一个简单的状态机:
MediaRecorder要严格遵守各个状态之间的变化,否则会出错。
Initial:初始状态,创建一个新的MediaRecorder对象或者调用了reset()方法时,MediaRecorder对象处于Initial状态。通过调用reset()方法都可以使MediaRecorder进入Initial状态。在设定视频源或者音频源之后将转换为Initialized状态。
Initialized:已初始化状态,在Initial状态下调用setAudioSource()
或setVideoSource()方法会转变成Initialized状态。这个状态可以通过setOutputFormat()方法设置输出格式,此时MediaRecorder转换为DataSourceConfigured状态。
DataSourceConfigured:数据源配置状态,这个状态下可以设定编码方式、输出文件、屏幕旋转、预览显示等等。可以在Initialized状态通过setOutputFormat()方法进入该状态。这个状态下可以通过reset()方法回到Initial状态,或者通过prepare()方法到达Prepared状态。
Prepared:就绪状态,在DataSourceConfigured状态通过prepare()方法进入该状态。在这个状态可以通过start()进入录制状态。
Recording:录制状态,可以在Prepared状态通过调用start()方法进入该状态。它可以通过stop()方法或reset()方法回到Initial状态。
Released:释放状态也叫作Idle state空闲状态,可以通过在Initial状态调用release()方法来进入这个状态,这时将会释放所有和MediaRecorder对象绑定的资源。
Error:错误状态,当错误发生的时候进入这个状态,可以通过调用reset()方法进入Initial状态。
2 利用MediaRecorder录制音频的模板
android Developer 使用模板
MediaRecorder recorder = new MediaRecorder();
 recorder.setAudioSource(MediaRecorder.AudioSource.MIC);
 recorder.setOutputFormat(MediaRecorder.OutputFormat.THREE_GPP);
 recorder.setAudioEncoder(MediaRecorder.AudioEncoder.AMR_NB);
 recorder.setOutputFile(PATH_NAME);
 recorder.prepare();
 recorder.start();   // Recording is now started
 ...
 recorder.stop();
 recorder.reset();   // You can reuse the object by going back to setAudioSource() step
 recorder.release(); // Now the object cannot be reused
MediaRecorder构造函数:
MediaRecorder(),只有一个默认的无参构造函数。
** setAudioSource(int audio_source)**
设置声音来源,一般传入 MediaRecorder. AudioSource.MIC参数指定录制来自麦克风的声音,在AudioRecord中已经讲解。
void setOutputFormat(int output_format)
设置所录制的音视频文件的格式。
源码说明:
public final class OutputFormat {
  /* Do not change these values without updating their counterparts
   * in include/media/mediarecorder.h!
   */
    private OutputFormat() {}
    public static final int DEFAULT = 0;
    /** 3GPP media file format*/
    public static final int THREE_GPP = 1;
    /** MPEG4 media file format*/
    public static final int MPEG_4 = 2;

    /** The following formats are audio only .aac or .amr formats */

    /**
     * AMR NB file format
     * @deprecated  Deprecated in favor of MediaRecorder.OutputFormat.AMR_NB
     */
    public static final int RAW_AMR = 3;

    /** AMR NB file format */
    public static final int AMR_NB = 3;

    /** AMR WB file format */
    public static final int AMR_WB = 4;

    /** @hide AAC ADIF file format */
    public static final int AAC_ADIF = 5;

    /** AAC ADTS file format */
    public static final int AAC_ADTS = 6;

    /** @hide Stream over a socket, limited to a single stream */
    public static final int OUTPUT_FORMAT_RTP_AVP = 7;

    /** H.264/AAC data encapsulated in MPEG2/TS */
    public static final int MPEG_2_TS = 8;

    /** VP8/VORBIS data in a WEBM container */
    public static final int WEBM = 9;
};
对于音频:THREE_GPP对应3gp,MPEG_4对应mp4,m4a,
RAW_AMR,AMR_NB,AMR_WB对应arm,AAC_ADIF,AAC_ADTS对应aac格式。
void setAudioChannels(int numChannels)
设置录制的音频通道数。
void setAudioEncoder(int audio_encoder)
设置所录制的声音的编码格式。
包括:
AAC(AAC低复杂度(AAC-LC)音频编解码器)
AAC_ELD(增强型低延迟AAC(AAC-ELD)音频编解码器)
AMR_NB(AMR(窄带)音频编解码器)
AMR_WB(AMR(宽带)音频编解码器)
DEFAULT
HE_AAC(高效率AAC(HE-AAC)音频编解码器)
VORBIS(Ogg Vorbis音频编解码器
void setAudioEncodingBitRate(int bitRate)
设置所录制的声音的编码位率,音频一秒钟包含多少数据位。
void setAudioSamplingRate(int samplingRate)
设置所录制的声音的采样率,例如44100。
void setMaxDuration(int max_duration_ms)
设置录制会话的最长持续时间(以ms为单位)。
void setMaxFileSize(long max_filesize_bytes)
设置录制文件的最大文件大小。
void setOnErrorListener(MediaRecorder.OnErrorListener l)
注册一个用于记录录制时出现的错误的监听器。
void setOutputFile(FileDescriptor fd)
设置录制的音频文件的保存位置。
void setOutputFile(String path)
设置录制的音频文件的保存位置。
final static int getAudioSourceMax()
获取音频源的最大值。
int getMaxAmplitude()
获取在前一次调用此方法之后录音中出现的最大振幅,主要用于设置录音时的一些波形动画。
void prepare()
准备录制。
void release()
释放资源。
void reset()
将MediaRecorder设为空闲状态,即Initial状态。
void start()
开始录制。
void stop()
停止录制。
3 简单使用
public void  startRecord2(){
    try {
        //创建MediaRecorder
        mMediaRecorder = new MediaRecorder();
        //创建录音文件
        File mRecorderFile = new File(voicePath+armvoiceName);
        if (!mRecorderFile.getParentFile().exists()) mRecorderFile.getParentFile().mkdirs();
        mRecorderFile.createNewFile();
        //从麦克风采集
        mMediaRecorder.setAudioSource(MediaRecorder.AudioSource.MIC);
        //最终的保存文件为arm格式
        mMediaRecorder.setOutputFormat(MediaRecorder.OutputFormat.AMR_NB);
        //所有android系统都支持的适中采样的频率
        mMediaRecorder.setAudioSamplingRate(44100);
        //通用的ARM编码格式
        mMediaRecorder.setAudioEncoder(MediaRecorder.AudioEncoder.AMR_NB);
        //设置音质频率
        mMediaRecorder.setAudioEncodingBitRate(1024*1024);
        //设置文件录音的位置
        mMediaRecorder.setOutputFile(mRecorderFile.getAbsolutePath());
        //开始录音
        mMediaRecorder.prepare();
        mMediaRecorder.start();

    } catch (Exception e) {

    }

}

public void stopMediarecorder(){
    if (mMediaRecorder != null){
        mMediaRecorder.stop();
        mMediaRecorder.release();
        mMediaRecorder = null;
    }
}

4 SoundPool
前面讲解了播放音频用到的MediaPlayer,AudioTrack,其中AudioTrack只能用于播放PCM编码文件,MediaPlayer功能更加强大但是它资源占用较多,不支持多个音频同时播放,加载延迟长,所以MediaPlayer不适合播放一些短促,密集,延迟小的音频,SoundPool可以用于这些场景。SoundPool类似MediaPlayer,AudioTrack可以管理和播放audio 资源。SoundPool是一个声音的集合(pool 池),支持从文件系统和apk资源文件加载音频资源,主要用于播放一些短促的声音片段。SoundPool库利用MediaPayer服务把audio资源编码成单声道或立体声道16bit的PCM流。
SoundPoolCPU的资源占用少,延迟小,并且可以加载多个音频到SoundPool中,通过资源ID来管理SoundPool,还支持执行设置声音的品质、音量、播放速度等参数。
4.1 构造函数:
SoundPool(int maxStreams, int streamType, int srcQuality)
Api 21+ 还可以利用SoundPool.Builder()进行构造,参数和SoundPool的参数传输是一样的,Builder 利用setAudioAttributes和setMaxStreams进行参数填充。
在API 21后SoundPool的构造利用Builder方法:
SoundPool sp = new SoundPool.Builder().setMaxStreams(y).setAudioAttributes().build();
参数说明:
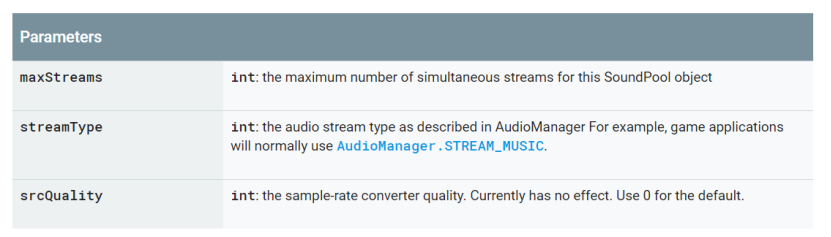
**maxStream:**设置支持的声音个数,android系统一个设备只允许同时有32个音效文件播放,所以同时播放的音频不能设置过多。
**streamType:**声音类型,一般传入AudioManager.STREAM_MUSIC
**srcQuality:**音频,质量,目前没有效果,传入默认0即可
4.2 SoundPool函数说明:
加载音频Load函数:
- load(Context context, int resId, int priority)
从apk资源中加载,priority加载音频的优先级,目前没有效果,传入1即可,load函数有关priority参数意义相同。
resId:为资源id,SoundPool可以加载wav,oog,mp3等,所以不要在res/raw目录下,存在类型不同,名字相同的资源,否则不知道加载哪个。
返回值为sound ID,soundId用于播放或者卸载资源。 - load(String path, int priority)
从给定存储路径加载,返回值也为soundId,用于播放或者卸载资源。 - load(AssetFileDescriptor afd, int priority)
从asset 文件描述中加载,返回值也为soundId,用于播放或者卸载资源。 - load(FileDescriptor fd, long offset, long length, int priority)
从文件描述中加载,返回值也为soundId,用于播放或者卸载资源,offset和length意义为从文件的offset开始截取length长度的音频。
注意:
- load函数可以反复调用,每次都用都会返回soundId,可以利用soundId播放或者卸载资源。
- 流的加载过程是一个将音频解压为原始16位PCM数据的过程,由一个后台线程来进行处理异步,所以初始化后不能立即播放,需要等待一点时间,所以加载之后不能立即播放,需要设置监听。
- 加载的资源不能过大,否则play播放时会出错,一般所有资源整体不超过1M,单个资源几十到100KB。
播放play函数:
play(int soundID, float leftVolume, float rightVolume, int priority, int loop, float rate)
**soundID:**load加载资源的返回值,
leftVolume,rightVolume:左声道,右声道的音量,范围0.0 to 1.0
**priority:**播放声音的优先级,0为优先级最低,值越大,优先级越高。
**loop:**循环次数,-1,表示无限循环。
**rate:**播放速度,1.0为正常速度,范围为0.5 to 2.0
play调用后会返回streamId,streamId用于后面暂停,重新播放,停止音频。
其他控制函数:
pause(int streamId):暂停播放,streamId为play的返回值。
resume(int streamId): 继续播放,streamId为play的返回值。
stop(int streamId) :停止播放,streamId为play的返回值。
unload(int soundId):卸载资源,soundId为load函数返回值。
release()释放SoundPool的资源,会释放所有被SoundPool对象使用的内存和本地资源,之后不能再使用,需要手动设置SoundPool对象为null。
4.4的系统上调用release之前需要先把所有的播放都停止,否则会导致系统ANR。7.1系统上则没有这个问题,需要大家注意。
4.3 设置监听:
soundPool.setOnLoadCompleteListener(new OnLoadCompleteListener() {
@Override
public void onLoadComplete(SoundPool soundPool, int sampleId,
int status) {
}
});
onLoadComplete(SoundPool soundPool, int sampleId,int status)
每次一个文件加载完成都会调用onLoadComplete函数
sampleId:为加载完成的文件soundId,在4.4版本模拟器上测试发现只调用了一次。在高版本模拟器上每个文件加载完成都会调用一次,并且当sampleId等于加载的文件个数时,所有的文件都加载完成。
虽然说SoundPool加载文件很小,但可能调用load函数之后,直接调用play会由于异步加载未加载完成发生错误,所以利用setOnLoadCompleteListener可以监听加载完成,然后在回调函数中播放音频,保证加载完成后才播放。
5 SoundPool 使用
每次调用load函数都会返回一个soundId,一般代码中利用HashMap进行管理。
public class Main17Activity extends AppCompatActivity {
    private Button btn1;
    private Button btn2;
    private Button btn3;
    private Button btn4;
    private SoundPool mSoundPool;
    private HashMap <Integer,Integer> soundIds;
    @Override
    protected void onCreate(Bundle savedInstanceState) {
        super.onCreate(savedInstanceState);
        setContentView(R.layout.activity_main17);
        btn1 = findViewById(R.id.btn1);
        btn2 = findViewById(R.id.btn2);
        btn3 = findViewById(R.id.btn3);
        btn4 = findViewById(R.id.btn4);
        init();

        btn1.setOnClickListener(new View.OnClickListener() {
            @Override
            public void onClick(View v) {
                if (mSoundPool != null){
                    //每次播放多个
		//此处真正使用时,需要在onLoadComplete四个资源都回调加载完成后
		//才能调用play
                    mSoundPool.play(soundIds.get(1), 1f, 1f, 0, -1, 1.0f);
                    mSoundPool.play(soundIds.get(2), 1f, 1f, 0, -1, 1.0f);
                    mSoundPool.play(soundIds.get(3), 1f, 1f, 0, -1, 1.0f);
                    mSoundPool.play(soundIds.get(4), 1f, 1f, 0, -1, 1.0f);
                }
            }
        });

        btn2.setOnClickListener(new View.OnClickListener() {
            @Override
            public void onClick(View v) {
               if (mSoundPool != null){
                   mSoundPool.pause(soundIds.get(1));
                   mSoundPool.pause(soundIds.get(2));
                   mSoundPool.pause(soundIds.get(3));
                   mSoundPool.pause(soundIds.get(4));
               }
            }
        });

        btn3.setOnClickListener(new View.OnClickListener() {
            @Override
            public void onClick(View v) {
                if (mSoundPool != null){
                    mSoundPool.resume(soundIds.get(1));
                    mSoundPool.resume(soundIds.get(2));
                    mSoundPool.resume(soundIds.get(3));
                    mSoundPool.resume(soundIds.get(4));
                }
            }
        });

        btn4.setOnClickListener(new View.OnClickListener() {
            @Override
            public void onClick(View v) {
                mSoundPool.stop(soundIds.get(1));
                mSoundPool.stop(soundIds.get(2));
                mSoundPool.stop(soundIds.get(3));
                mSoundPool.stop(soundIds.get(4));
                mSoundPool.release();
                mSoundPool = null;
            }
        });
    }

    private void init() {
        soundIds = new HashMap<>();
        mSoundPool = new SoundPool(5, AudioManager.STREAM_MUSIC,0);

        if (mSoundPool != null){
            soundIds.put(1, mSoundPool.load(Main17Activity.this,R.raw.music1,1));
            soundIds.put(2, mSoundPool.load(Main17Activity.this,R.raw.music2,1));
            soundIds.put(3, mSoundPool.load(Main17Activity.this,R.raw.music3,1));
            soundIds.put(4, mSoundPool.load(Main17Activity.this,R.raw.music4,1));
            mSoundPool.setOnLoadCompleteListener(new SoundPool.OnLoadCompleteListener() {
                @Override
                public void onLoadComplete(SoundPool soundPool, int sampleId, int status) {
                    System.out.println("===========onLoadComplete==========="+sampleId);
                    if (sampleId == soundIds.size()){
                        //全部加载完成
                    }
                }
            });
        }

    }
}
输出:onLoadComplete函数
=onLoadComplete=1
=onLoadComplete=2
=onLoadComplete=3
=onLoadComplete=4