作业要求:
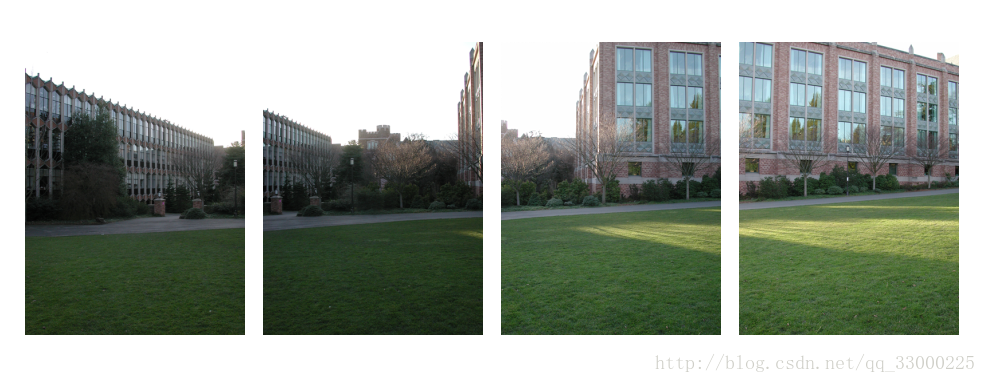
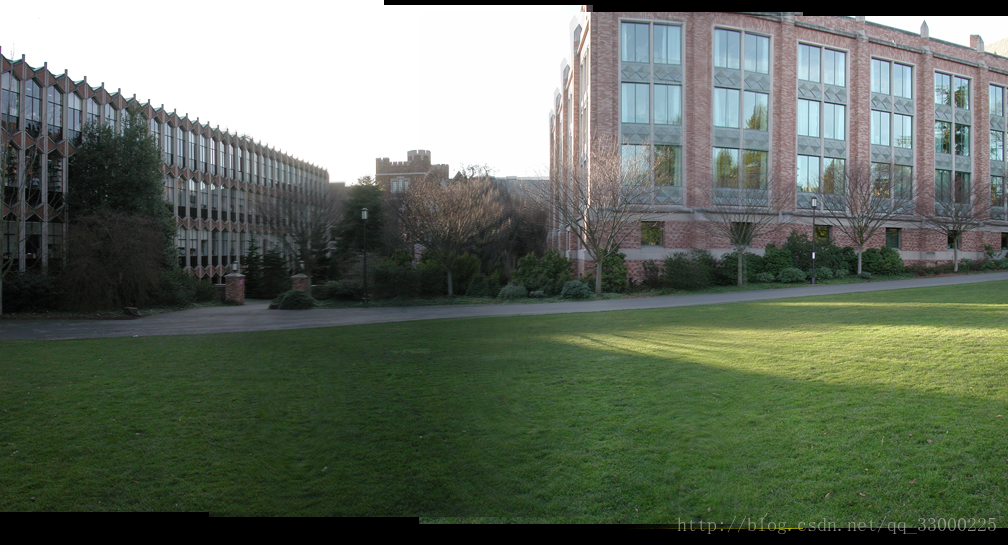
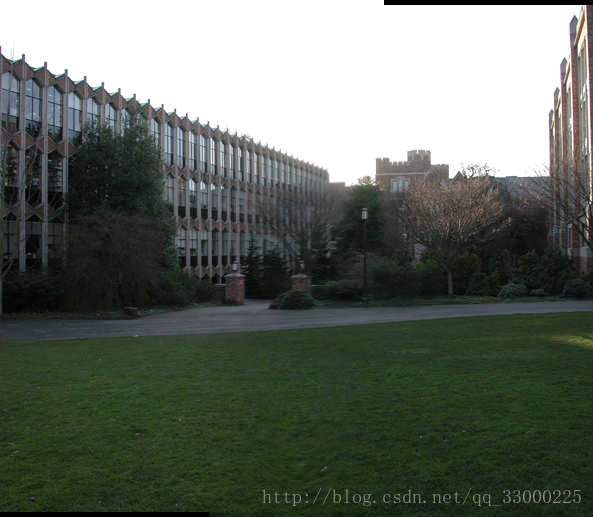
1、将多张图片合并拼接成一张全景图(看下面效果图)
2、尽量用C/C++(老师说用matlab会给很低的分_(:зゝ∠)_,所以下面的代码全部都用C++来写)
完整代码见:https://github.com/MarkMoHR/ImageStitching
效果图:
实现大致步骤:
1、SIFT算法进行图像特征提取(SIFT算法是http://blog.csdn.net/v_JULY_v/article/details/6245939找的,不过是用C写,不太好获得中间结果。为了方便我们这次作业使用,我改写成C++代码)
2、利用RANSAC算法进行图像特征匹配
3、利用匹配关键点进行图像拼接(Blending)
实现步骤详解:
1、SIFT算法进行图像特征提取:
SIFT算法在这里就不详细说了,上面的链接已经讲的很详细了(使用上面的代码要配置opencv环境,挺简单的,网上很多教程)。我是将上面链接的代码改写成C++,封装了一些方法,使得能够提取中间结果。
SIFT算法的输入是图片,我们需要的输出是各个关键点的位置、128维描述子(用于关键点匹配)。而代码把一个关键点的这些信息都封装在一个结构体Keypoint里面。同时,代码将所有的关键点Keypoint保存为一个链表List形式,即可以根据第一个节点访问到所有的Keypoint节点。
因此我在改写后的MySift.h文件里,添加了几个方法,一个是SIFT的方法入口SiftMainProcess(),一个是获取处理后得到的关键点的头结点方法getFirstKeyDescriptors()。
MySift.h:
#ifdef _CH_
#pragma package <opencv>
#endif

#ifndef _EiC
#include <stdio.h>

#include "stdlib.h"
#include "string.h"
#include "malloc.h"
#include "math.h"
#include <assert.h>
#include <ctype.h>
#include <time.h>
#include <cv.h>
#include <cxcore.h>
#include <highgui.h>
#include <vector>
#include <iostream>
using namespace std;
#endif

#ifdef _EiC
#define WIN32
#endif

#define NUMSIZE 2
#define GAUSSKERN 3.5
#define PI 3.14159265358979323846

//Sigma of base image -- See D.L.'s paper.
#define INITSIGMA 0.5
//Sigma of each octave -- See D.L.'s paper.
#define SIGMA sqrt(3)//1.6//

//Number of scales per octave.  See D.L.'s paper.
#define SCALESPEROCTAVE 2
#define MAXOCTAVES 4

#define CONTRAST_THRESHOLD   0.02
#define CURVATURE_THRESHOLD  10.0
#define DOUBLE_BASE_IMAGE_SIZE 1
#define peakRelThresh 0.8
#define LEN 128
#define min(a,b)            (((a) < (b)) ? (a) : (b))
#define max(a,b)            (((a) > (b)) ? (a) : (b))

//特征描述点,网格
#define GridSpacing 4

//Data structure for a float image.
typedef struct ImageSt {        /*金字塔每一层*/
	float levelsigma;
	int levelsigmalength;
	float absolute_sigma;
	CvMat *Level;       //CvMat是OPENCV的矩阵类,其元素可以是图像的象素值
} ImageLevels;

typedef struct ImageSt1 {      /*金字塔每一阶梯*/
	int row, col;          //Dimensions of image.
	float subsample;
	ImageLevels *Octave;
} ImageOctaves;

//keypoint数据结构,Lists of keypoints are linked by the "next" field.
typedef struct KeypointSt {
	float row, col;     /* 反馈回原图像大小,特征点的位置 */
	float sx, sy;       /* 金字塔中特征点的位置 */
	int octave, level;  /* 金字塔中,特征点所在的阶梯、层次 */

	float scale, ori, mag;    /* 所在层的尺度sigma,主方向orientation (range [-PI,PI]),以及幅值 */
	float *descrip;           /* 特征描述字指针:128维或32维等 */
	struct KeypointSt *next;  /* Pointer to next keypoint in list. */
} *Keypoint;

class MySift {
public:
	MySift();
	~MySift();

	MySift(char* _filename, int _isColor);

	CvMat * halfSizeImage(CvMat * im);     //缩小图像:下采样
	CvMat * doubleSizeImage(CvMat * im);   //扩大图像:最近临方法
	CvMat * doubleSizeImage2(CvMat * im);  //扩大图像:线性插值
	float getPixelBI(CvMat * im, float col, float row);//双线性插值函数
	void normalizeVec(float* vec, int dim);//向量归一化
	CvMat* GaussianKernel2D(float sigma);  //得到2维高斯核
	void normalizeMat(CvMat* mat);        //矩阵归一化
	float* GaussianKernel1D(float sigma, int dim); //得到1维高斯核

	//在具体像素处宽度方向进行高斯卷积
	float ConvolveLocWidth(float* kernel, int dim, CvMat * src, int x, int y);
	//在整个图像宽度方向进行1D高斯卷积
	void Convolve1DWidth(float* kern, int dim, CvMat * src, CvMat * dst);
	//在具体像素处高度方向进行高斯卷积
	float ConvolveLocHeight(float* kernel, int dim, CvMat * src, int x, int y);
	//在整个图像高度方向进行1D高斯卷积
	void Convolve1DHeight(float* kern, int dim, CvMat * src, CvMat * dst);
	//用高斯函数模糊图像
	int BlurImage(CvMat * src, CvMat * dst, float sigma);


	//SIFT算法第一步:图像预处理
	CvMat *ScaleInitImage(CvMat * im);                  //金字塔初始化

	//SIFT算法第二步:建立高斯金字塔函数
	ImageOctaves* BuildGaussianOctaves(CvMat * image);  //建立高斯金字塔

	//SIFT算法第三步:特征点位置检测,最后确定特征点的位置
	int DetectKeypoint(int numoctaves, ImageOctaves *GaussianPyr);
	void DisplayKeypointLocation(IplImage* image, ImageOctaves *GaussianPyr);

	//SIFT算法第四步:计算高斯图像的梯度方向和幅值,计算各个特征点的主方向
	void ComputeGrad_DirecandMag(int numoctaves, ImageOctaves *GaussianPyr);

	int FindClosestRotationBin(int binCount, float angle);  //进行方向直方图统计
	void AverageWeakBins(double* bins, int binCount);       //对方向直方图滤波
															//确定真正的主方向
	bool InterpolateOrientation(double left, double middle, double right, double *degreeCorrection, double *peakValue);
	//确定各个特征点处的主方向函数
	void AssignTheMainOrientation(int numoctaves, ImageOctaves *GaussianPyr, ImageOctaves *mag_pyr, ImageOctaves *grad_pyr);
	//显示主方向
	void DisplayOrientation(IplImage* image, ImageOctaves *GaussianPyr);

	//SIFT算法第五步:抽取各个特征点处的特征描述字
	void ExtractFeatureDescriptors(int numoctaves, ImageOctaves *GaussianPyr);

	//为了显示图象金字塔,而作的图像水平、垂直拼接
	CvMat* MosaicHorizen(CvMat* im1, CvMat* im2);
	CvMat* MosaicVertical(CvMat* im1, CvMat* im2);

	/* 以下为在源代码基础上添加部分 */
	void SiftMainProcess();
	int getKeyPointsCount();            //获取keypoint总数
	Keypoint getFirstKeyDescriptors();  //获取第一个keyDescriptor结点

	void saveImgWithKeypoint(char* filename);

private:
	char* filename;
	int isColor;

	int numoctaves;

	ImageOctaves *DOGoctaves;
	//DOG pyr,DOG算子计算简单,是尺度归一化的LoG算子的近似。

	ImageOctaves *mag_thresh;
	ImageOctaves *mag_pyr;
	ImageOctaves *grad_pyr;

	int keypoint_count = 0;

	//定义特征点具体变量
	Keypoint keypoints = NULL;      //用于临时存储特征点的位置等
	Keypoint keyDescriptors = NULL; //用于最后的确定特征点以及特征描述字


	//声明当前帧IplImage指针
	IplImage* src = NULL;
	IplImage* image_kp = NULL;
	IplImage* image_featDir = NULL;
	IplImage* grey_im1 = NULL;

	IplImage* mosaic1 = NULL;
	IplImage* mosaic2 = NULL;

	CvMat* mosaicHorizen1 = NULL;
	CvMat* mosaicHorizen2 = NULL;
	CvMat* mosaicVertical1 = NULL;

	CvMat* image1Mat = NULL;
	CvMat* tempMat = NULL;

	ImageOctaves *Gaussianpyr;
};
MySift.cpp:
由于.cpp代码有1000+行,由于篇幅问题,在这里就不放出来了_(:зゝ∠)_。有需要的可以私聊下我哈_(:зゝ∠)_或者直接对着上面链接给的代码找一下就好了,函数名都一样的。
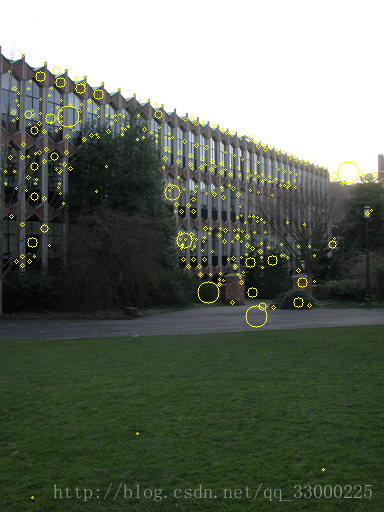
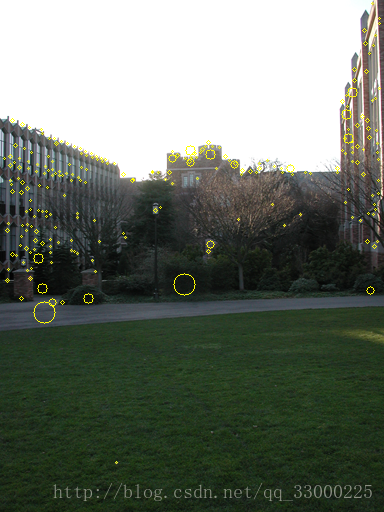
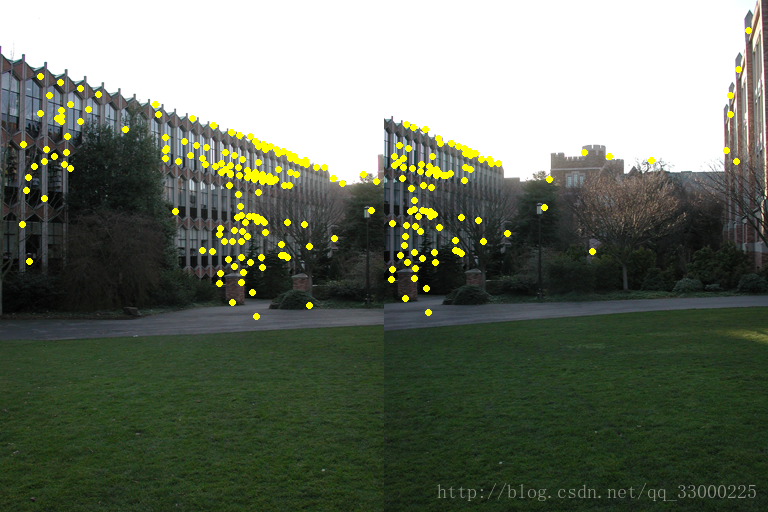
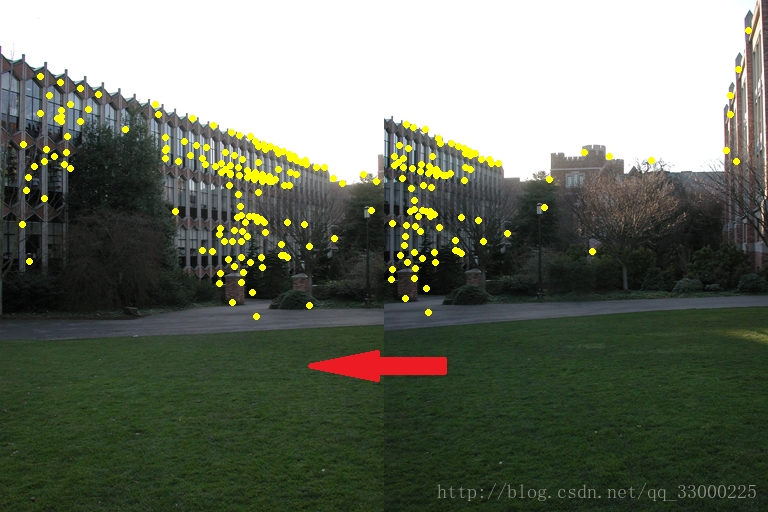
阶段结果:
黄色圈圈的就是识别出来的关键点。
2、利用RANSAC算法进行图像特征匹配:
由于从上面步骤1得到的结果只是每张图片自身的特征点,即两张图片的特征点之间还没对应关系。因此我们需要先通过上面得到的128维描述子先进行大致的特征点匹配(结果可能包括outliers)。匹配方法不难理解,只需计算两个128维特征描述子的距离差,小于某阈值即可视为相同的特征点。
处理后得到下面的结果,黄色点为匹配的特征点,另外再给每对特征点连线:
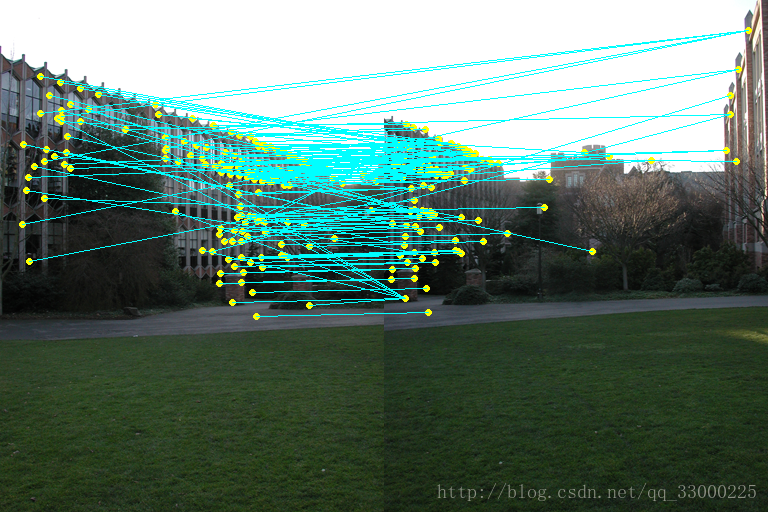
可以看到连线特别杂乱,说明其中夹杂着很多outliers。因此需要用下面的RANSAC算法去排除outliers。
其实我用的可以说是伪RANSAC算法_(:зゝ∠)_,简单的说就是:
(1)对每一对关键点P,得到位置间的转移向量v(位置相减)
(2)对其他的每一对关键点P' ,计算位置间的转移向量v'。若v与v' 距离(计算欧拉距离即可)小于一定阈值,则认为P' 与P有相同的特征点位置转移,即为inlier(看下图应该好理解一点)。
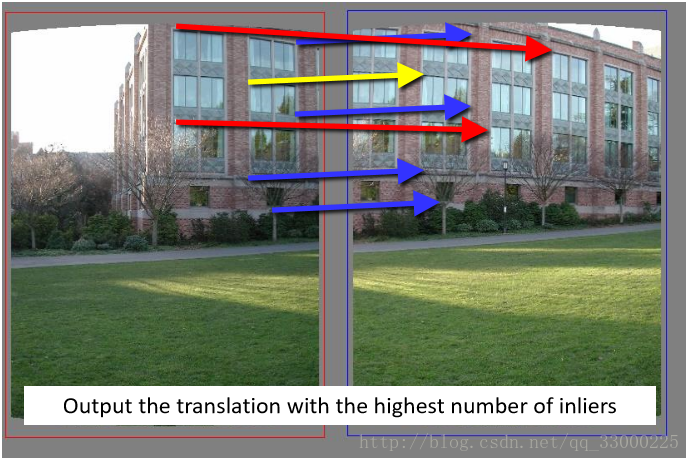
(3)计算拥有最多inliers的转移向量v,即可视为两张图特征点位置转移向量V。
(4)再重新扫描所有的关键点对,属于此特征点位置转移向量V的关键点对则视为两张图真正的特征匹配点。
MyMatching.h:
#ifndef MYMATCHING_H
#define MYMATCHING_H

#include "MySift.h"
#include "CImg.h"
#include <vector>
using namespace cimg_library;

#define FeatureDescGap 1.0
#define InliersGap 500.0

struct Point {
	int col;    //x
	int row;    //y
	Point() : col(-1), row(-1) {}
	Point(int _col, int _row) : col(_col), row(_row) {}
};

struct MatchedPair {
	Point keyPointA;
	Point keyPointB;
	float minDis;
	MatchedPair(Point _pa, Point _pb, float _minDis) : keyPointA(_pa), keyPointB(_pb), minDis(_minDis) {}
};

class MyMatching
{
public:
	MyMatching();
	~MyMatching();
	MyMatching(int _kp_count_A, Keypoint _firstKeyDesc_A, int _kp_count_B, Keypoint _firstKeyDesc_B);

	/* 特征匹配主函数,得到匹配点pair集 matchedPairSet */
	void featureMatchMainProcess();

	/* 在原图上画出当前得到的匹配点(不全是真正的匹配点) */
	void drawOriKeypointOnImg(char* _filenameA, char* _filenameB, char* _saveAddrA, char* _saveAddrB);

	/* 将两张图片拼在同一张图片上,同时画出匹配点之间连线 */
	void mixImageAndDrawPairLine(char* mixImgAddr, char* mixImgWithLineAddr);

	/* 使用RANSAC算法找到真正的匹配点,并画出来 */
	void myRANSACtoFindKpTransAndDrawOut(char* _filename);
	void drawRealKeypointOnImg(char* _filename, int maxIndex);

	Point getMatchVec();

private:
	int keypoint_count_A, keypoint_count_B;
	Keypoint firstKeyDescriptor_A, firstKeyDescriptor_B;

	vector<MatchedPair> matchedPairSet;
	Point matchVec;

	CImg<int> srcImgA, srcImgB;
	CImg<int> srcImgWithKpA, srcImgWithKpB;
	CImg<int> mixImg;
	CImg<int> fixedMatchedImg;
};

#endif
MyMatching.cpp
#include "MyMatching.h"

MyMatching::MyMatching() {
}

MyMatching::~MyMatching() {
}

MyMatching::MyMatching(int _kp_count_A, Keypoint _firstKeyDesc_A, int _kp_count_B, Keypoint _firstKeyDesc_B) {
	keypoint_count_A = _kp_count_A;
	keypoint_count_B = _kp_count_B;
	firstKeyDescriptor_A = _firstKeyDesc_A;
	firstKeyDescriptor_B = _firstKeyDesc_B;
}

void MyMatching::featureMatchMainProcess() {
	Keypoint tempDescA = firstKeyDescriptor_A;
	while (tempDescA) {
		float colA = tempDescA->col;
		float rowA = tempDescA->row;
		float* kp_desc_A = tempDescA->descrip;

		Keypoint tempDescB = firstKeyDescriptor_B;

		float minSSD = 100.0;
		int minIndex = -1;
		int colB = -1;
		int rowB = -1;
		while (tempDescB) {    //对A图每个点,找B图各个点,计算距离
			float ssd = 0;
			for (int i = 0; i < LEN; i++) {
				float descA = *(kp_desc_A + i);
				float descB = *(tempDescB->descrip + i);
				ssd += abs(descA - descB);
			}
			if (ssd < minSSD) {
				minSSD = ssd;
				colB = tempDescB->col;
				rowB = tempDescB->row;
			}
			tempDescB = tempDescB->next;
		}

		if (minSSD < FeatureDescGap) {    //当距离小于阈值,即当作一对匹配点
			Point pa(tempDescA->col, tempDescA->row);
			Point pb(colB, rowB);

			MatchedPair mpair(pa, pb, minSSD);
			matchedPairSet.push_back(mpair);
		}
		tempDescA = tempDescA->next;
	}

	for (int i = 0; i < matchedPairSet.size(); i++) {
		cout << "A col: " << matchedPairSet[i].keyPointA.col << ", row: " << matchedPairSet[i].keyPointA.row << endl;
		cout << " with B col: " << matchedPairSet[i].keyPointB.col << ", row: " << matchedPairSet[i].keyPointB.row << " , minSSD: " << matchedPairSet[i].minDis << endl;
	}
	cout << ">>> matchedPairSet.size: " << matchedPairSet.size() << endl;
}

void MyMatching::drawOriKeypointOnImg(char* _filenameA, char* _filenameB, char* _saveAddrA, char* _saveAddrB) {
	srcImgA.load_bmp(_filenameA);
	srcImgWithKpA = CImg<int>(srcImgA._width, srcImgA._height, 1, 3, 0);
	cimg_forXY(srcImgWithKpA, x, y) {
		srcImgWithKpA(x, y, 0, 0) = srcImgA(x, y, 0, 0);
		srcImgWithKpA(x, y, 0, 1) = srcImgA(x, y, 0, 1);
		srcImgWithKpA(x, y, 0, 2) = srcImgA(x, y, 0, 2);
	}

	srcImgB.load_bmp(_filenameB);
	srcImgWithKpB = CImg<int>(srcImgB._width, srcImgB._height, 1, 3, 0);
	cimg_forXY(srcImgWithKpB, x, y) {
		srcImgWithKpB(x, y, 0, 0) = srcImgB(x, y, 0, 0);
		srcImgWithKpB(x, y, 0, 1) = srcImgB(x, y, 0, 1);
		srcImgWithKpB(x, y, 0, 2) = srcImgB(x, y, 0, 2);
	}

	const double yellow[] = { 255, 255, 0 };
	for (int i = 0; i < matchedPairSet.size(); i++) {
		cout << "A col: " << matchedPairSet[i].keyPointA.col << ", row: " << matchedPairSet[i].keyPointA.row << endl;
		cout << " with B col: " << matchedPairSet[i].keyPointB.col << ", row: " << matchedPairSet[i].keyPointB.row << " , minSSD: " << matchedPairSet[i].minDis << endl;
		srcImgWithKpA.draw_circle(matchedPairSet[i].keyPointA.col, matchedPairSet[i].keyPointA.row, 3, yellow, 1.0f);
		srcImgWithKpB.draw_circle(matchedPairSet[i].keyPointB.col, matchedPairSet[i].keyPointB.row, 3, yellow, 1.0f);
	}
	srcImgWithKpA.display("srcImgWithKpA");
	srcImgWithKpA.save(_saveAddrA);
	srcImgWithKpB.display("srcImgWithKpB");
	srcImgWithKpB.save(_saveAddrB);

}

void MyMatching::mixImageAndDrawPairLine(char* mixImgAddr, char* mixImgWithLineAddr) {
	mixImg = CImg<int>(srcImgA._width + srcImgB._width, MAX(srcImgA._height, srcImgB._height), 1, 3, 0);
	cimg_forXY(mixImg, x, y) {
		if (x < srcImgA._width) {
			if (y < srcImgA._height) {
				mixImg(x, y, 0, 0) = srcImgWithKpA(x, y, 0, 0);
				mixImg(x, y, 0, 1) = srcImgWithKpA(x, y, 0, 1);
				mixImg(x, y, 0, 2) = srcImgWithKpA(x, y, 0, 2);
			}
			else {
				mixImg(x, y, 0, 0) = 0;
				mixImg(x, y, 0, 1) = 0;
				mixImg(x, y, 0, 2) = 0;
			}
		}
		else {
			if (y < srcImgB._height) {
				mixImg(x, y, 0, 0) = srcImgWithKpB(x - srcImgA._width, y, 0, 0);
				mixImg(x, y, 0, 1) = srcImgWithKpB(x - srcImgA._width, y, 0, 1);
				mixImg(x, y, 0, 2) = srcImgWithKpB(x - srcImgA._width, y, 0, 2);
			}
			else {
				mixImg(x, y, 0, 0) = 0;
				mixImg(x, y, 0, 1) = 0;
				mixImg(x, y, 0, 2) = 0;
			}
		}
	}
	mixImg.display("mixImg");
	mixImg.save(mixImgAddr);

	const double blue[] = { 0, 255, 255 };
	for (int i = 0; i < matchedPairSet.size(); i++) {
		int xa = matchedPairSet[i].keyPointA.col;
		int ya = matchedPairSet[i].keyPointA.row;

		int xb = matchedPairSet[i].keyPointB.col + srcImgA._width;
		int yb = matchedPairSet[i].keyPointB.row;

		mixImg.draw_line(xa, ya, xb, yb, blue);
	}
	mixImg.display("mixImgWithLine");
	mixImg.save(mixImgWithLineAddr);
}

void MyMatching::myRANSACtoFindKpTransAndDrawOut(char* _filename) {
	int maxInliers = 0;
	int maxIndex = -1;
	int inliersCount;

	//对每一对匹配点,求匹配向量v
	for (int i = 0; i < matchedPairSet.size(); i++) {
		inliersCount = 0;
		int xa = matchedPairSet[i].keyPointA.col;
		int ya = matchedPairSet[i].keyPointA.row;

		int xb = matchedPairSet[i].keyPointB.col + srcImgA._width;
		int yb = matchedPairSet[i].keyPointB.row;

		int deltaX = xb - xa;
		int deltaY = yb - ya;

		//对每一个v,找其他所有匹配向量与其距离。若小于阈值,则作为inlier
		for (int j = 0; j < matchedPairSet.size(); j++) {
			if (j != i) {
				int txa = matchedPairSet[j].keyPointA.col;
				int tya = matchedPairSet[j].keyPointA.row;

				int txb = matchedPairSet[j].keyPointB.col + srcImgA._width;
				int tyb = matchedPairSet[j].keyPointB.row;

				int tdeltaX = txb - txa;
				int tdeltaY = tyb - tya;

				int vectorGap = (tdeltaX - deltaX) * (tdeltaX - deltaX) + (tdeltaY - deltaY) * (tdeltaY - deltaY);
				//cout << "i: " << i << ", j: " << j << "  vectorGap: " << vectorGap << endl;

				if (vectorGap < InliersGap) {
					inliersCount++;
				}
			}
		}
		//计算最多inliers的匹配向量v,此匹配向量即视为所有关键点的匹配向量
		if (inliersCount > maxInliers) {
			maxInliers = inliersCount;
			maxIndex = i;
		}
	}

	cout << "maxIndex: " << maxIndex << ", maxInliers: " << maxInliers << endl;

	drawRealKeypointOnImg(_filename, maxIndex);
}


void MyMatching::drawRealKeypointOnImg(char* _filename, int maxIndex) {
	//在新的合并图上,画出属于该匹配关系的匹配点pair
	fixedMatchedImg = CImg<int>(srcImgA._width + srcImgB._width, srcImgA._height, 1, 3, 0);
	cimg_forXY(fixedMatchedImg, x, y) {
		if (x < srcImgA._width) {
			if (y < srcImgA._height) {
				fixedMatchedImg(x, y, 0, 0) = srcImgWithKpA(x, y, 0, 0);
				fixedMatchedImg(x, y, 0, 1) = srcImgWithKpA(x, y, 0, 1);
				fixedMatchedImg(x, y, 0, 2) = srcImgWithKpA(x, y, 0, 2);
			}
			else {
				fixedMatchedImg(x, y, 0, 0) = 0;
				fixedMatchedImg(x, y, 0, 1) = 0;
				fixedMatchedImg(x, y, 0, 2) = 0;
			}
		}
		else {
			if (y < srcImgB._height) {
				fixedMatchedImg(x, y, 0, 0) = srcImgWithKpB(x - srcImgA._width, y, 0, 0);
				fixedMatchedImg(x, y, 0, 1) = srcImgWithKpB(x - srcImgA._width, y, 0, 1);
				fixedMatchedImg(x, y, 0, 2) = srcImgWithKpB(x - srcImgA._width, y, 0, 2);
			}
			else {
				fixedMatchedImg(x, y, 0, 0) = 0;
				fixedMatchedImg(x, y, 0, 1) = 0;
				fixedMatchedImg(x, y, 0, 2) = 0;
			}
		}
	}

	int mxa = matchedPairSet[maxIndex].keyPointA.col;
	int mya = matchedPairSet[maxIndex].keyPointA.row;

	int mxb = matchedPairSet[maxIndex].keyPointB.col + srcImgA._width;
	int myb = matchedPairSet[maxIndex].keyPointB.row;

	int mdeltaX = mxb - mxa;
	int mdeltaY = myb - mya;    //得到真实匹配关系的匹配向量v

	matchVec = Point(mdeltaX, mdeltaY);
	cout << "Real match vector: (" << mdeltaX << ", " << mdeltaY << ")" << endl;

	const double blue[] = { 0, 255, 255 };
	for (int j = 0; j < matchedPairSet.size(); j++) {    //计算所有匹配向量与v的距离d
		int txa = matchedPairSet[j].keyPointA.col;
		int tya = matchedPairSet[j].keyPointA.row;

		int txb = matchedPairSet[j].keyPointB.col + srcImgA._width;
		int tyb = matchedPairSet[j].keyPointB.row;

		int tdeltaX = txb - txa;
		int tdeltaY = tyb - tya;

		int vectorGap = (tdeltaX - mdeltaX) * (tdeltaX - mdeltaX) + (tdeltaY - mdeltaY) * (tdeltaY - mdeltaY);

		if (vectorGap < InliersGap) {    //距离d小于阈值,则视为正确的匹配点
			fixedMatchedImg.draw_line(txa, tya, txb, tyb, blue);
		}
	}

	fixedMatchedImg.display("mixImgWithLine_fixed");
	fixedMatchedImg.save(_filename);
}

Point MyMatching::getMatchVec() {
	return matchVec;
}
阶段结果:
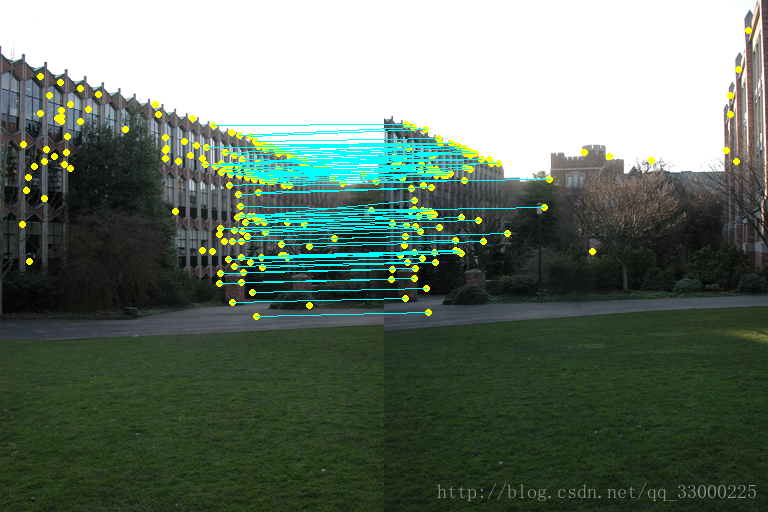
(可以看到转移向量V基本一致了)
3、利用匹配关键点进行图像拼接(Blending)
我使用的图像拼接方法其实只是最简单的平移+像素RGB值插值的方法(好在这次的数据集图像不存在太大的放缩,不然就不能用这种方法了_(:зゝ∠)_ 涉及到放缩的图片暂时还想不到怎么做_(:зゝ∠)_)。
可以直观的从下面的图(用ppt拼凑的哈哈)看到,由于输入图像始终保持左图在右图的左侧,即两图并排的时候,右图需要向左移动:
变成:
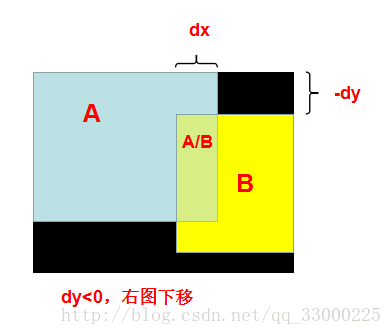
从上面可以看到,右图不仅需要向左平移,还需要向下/上平移。回想我们第2步得到的转移向量V(dx, dy),就不难理解转移向量V的作用了:dy<0,右图向下平移;dy>=0,右图向上平移。
如果右图是向下平移时,可以得到如下的模型图,而区域的划分我们可以通过简单的数学关系计算出来。明显,A和B单独的区域可以直接取原图像素RGB值;由于两张图长宽可能不一致,以及平移的原因,可能产生黑边(黑色部分)。
最后剩下两图混合部分A/B。如果只是简单的,对混合区域,两张图上对应点像素RGB值各取50%,则容易造成上面那张图那样,在分界处有明显的边缘,以及边缘两边匹配不上。因此我使用了插值的方法,即:根据混合区域内点P的与两边边缘的水平距离,按不同比例取两张图上对应点像素RGB值组合成点P的RGB值(即越靠近左边边缘的点,取左图对应点RGB值的占比越大)。这样就可以实现较好的过渡。
MyBlending.h:
#ifndef MYBLENDING_H
#define MYBLENDING_H

#include "CImg.h"
#include <iostream>
using namespace cimg_library;
using namespace std;

struct TransVector {
	int dx;
	int dy;
	TransVector() : dx(-1), dy(-1) {}
	TransVector(int _dx, int _dy) : dx(_dx), dy(_dy) {}
};

class MyBlending
{
public:
	MyBlending();
	~MyBlending();
	MyBlending(int sx, int sy);

	void blendingMainProcess(char* _filenameA, char* _filenameB);
	void saveBlendedImg(char* blendedImgAddr);

private:
	TransVector matchVec;    //x为合并图上的水平距离,y
	CImg<int> srcImgA, srcImgB;
	CImg<int> blendedImg;
};


#endif
MyBlending.cpp:
#include "MyBlending.h"

MyBlending::MyBlending() {
}

MyBlending::~MyBlending() {
}

MyBlending::MyBlending(int sx, int sy) {
	matchVec.dx = sx;
	matchVec.dy = sy;
}

void MyBlending::blendingMainProcess(char* _filenameA, char* _filenameB) {
	srcImgA.load_bmp(_filenameA);
	srcImgB.load_bmp(_filenameB);

	blendedImg = CImg<int>(srcImgA._width + srcImgB._width - matchVec.dx,
		srcImgA._height + abs(matchVec.dy), 1, 3, 0);

	cimg_forXY(blendedImg, x, y) {
		if (matchVec.dy <= 0) {    //右侧图片需要往下左移动
			if (x < srcImgA._width && y < srcImgA._height) {
				if (x >= (srcImgA._width - matchVec.dx) && y >= (0 - matchVec.dy)) {    //混合
					blendedImg(x, y, 0, 0) = (float)srcImgA(x, y, 0, 0)
						* (float)(srcImgA._width - x) / (float)abs(matchVec.dx)
						+ (float)srcImgB(x - (srcImgA._width - matchVec.dx), y - (0 - matchVec.dy), 0, 0)
						* (float)(x - (srcImgA._width - matchVec.dx)) / (float)abs(matchVec.dx);
					blendedImg(x, y, 0, 1) = (float)srcImgA(x, y, 0, 1)
						* (float)(srcImgA._width - x) / (float)abs(matchVec.dx)
						+ (float)srcImgB(x - (srcImgA._width - matchVec.dx), y - (0 - matchVec.dy), 0, 1)
						* (float)(x - (srcImgA._width - matchVec.dx)) / (float)abs(matchVec.dx);
					blendedImg(x, y, 0, 2) = (float)srcImgA(x, y, 0, 2)
						* (float)(srcImgA._width - x) / (float)abs(matchVec.dx)
						+ (float)srcImgB(x - (srcImgA._width - matchVec.dx), y - (0 - matchVec.dy), 0, 2)
						* (float)(x - (srcImgA._width - matchVec.dx)) / (float)abs(matchVec.dx);
				}
				else {    //A独在部分
					blendedImg(x, y, 0, 0) = srcImgA(x, y, 0, 0);
					blendedImg(x, y, 0, 1) = srcImgA(x, y, 0, 1);
					blendedImg(x, y, 0, 2) = srcImgA(x, y, 0, 2);
				}
			}
			else if (x >= (srcImgA._width - matchVec.dx)
				&& y >= (0 - matchVec.dy) && y < (0 - matchVec.dy) + srcImgB._height) {    //B独在部分
				blendedImg(x, y, 0, 0) = srcImgB(x - (srcImgA._width - matchVec.dx), y - (0 - matchVec.dy), 0, 0);
				blendedImg(x, y, 0, 1) = srcImgB(x - (srcImgA._width - matchVec.dx), y - (0 - matchVec.dy), 0, 1);
				blendedImg(x, y, 0, 2) = srcImgB(x - (srcImgA._width - matchVec.dx), y - (0 - matchVec.dy), 0, 2);
			}
			else {    //黑色部分
				blendedImg(x, y, 0, 0) = 0;
				blendedImg(x, y, 0, 1) = 0;
				blendedImg(x, y, 0, 2) = 0;
			}
		}
		else {    //matchVec.dy > 0; 右侧图片需要往上左移动
			if (x < srcImgA._width && y >= matchVec.dy) {
				if (x >= (srcImgA._width - matchVec.dx) && y < srcImgB._height) {    //混合
					blendedImg(x, y, 0, 0) = (float)srcImgA(x, y - matchVec.dy, 0, 0)
						* (float)(srcImgA._width - x) / (float)abs(matchVec.dx)
						+ (float)srcImgB(x - (srcImgA._width - matchVec.dx), y, 0, 0)
						* (float)(x - (srcImgA._width - matchVec.dx)) / (float)abs(matchVec.dx);
					blendedImg(x, y, 0, 1) = (float)srcImgA(x, y - matchVec.dy, 0, 1)
						* (float)(srcImgA._width - x) / (float)abs(matchVec.dx)
						+ (float)srcImgB(x - (srcImgA._width - matchVec.dx), y, 0, 1)
						* (float)(x - (srcImgA._width - matchVec.dx)) / (float)abs(matchVec.dx);
					blendedImg(x, y, 0, 2) = (float)srcImgA(x, y - matchVec.dy, 0, 2)
						* (float)(srcImgA._width - x) / (float)abs(matchVec.dx)
						+ (float)srcImgB(x - (srcImgA._width - matchVec.dx), y, 0, 2)
						* (float)(x - (srcImgA._width - matchVec.dx)) / (float)abs(matchVec.dx);
				}
				else {    //A独在部分
					blendedImg(x, y, 0, 0) = srcImgA(x, y - matchVec.dy, 0, 0);
					blendedImg(x, y, 0, 1) = srcImgA(x, y - matchVec.dy, 0, 1);
					blendedImg(x, y, 0, 2) = srcImgA(x, y - matchVec.dy, 0, 2);
				}
			}
			else if (x >= (srcImgA._width - matchVec.dx) && y < srcImgB._height) {    //B独在部分
				blendedImg(x, y, 0, 0) = srcImgB(x - (srcImgA._width - matchVec.dx), y, 0, 0);
				blendedImg(x, y, 0, 1) = srcImgB(x - (srcImgA._width - matchVec.dx), y, 0, 1);
				blendedImg(x, y, 0, 2) = srcImgB(x - (srcImgA._width - matchVec.dx), y, 0, 2);
			}
			else {    //黑色部分
				blendedImg(x, y, 0, 0) = 0;
				blendedImg(x, y, 0, 1) = 0;
				blendedImg(x, y, 0, 2) = 0;
			}
		}
	}
	blendedImg.display("blendedImg");
}


void MyBlending::saveBlendedImg(char* blendedImgAddr) {
	blendedImg.save(blendedImgAddr);
}
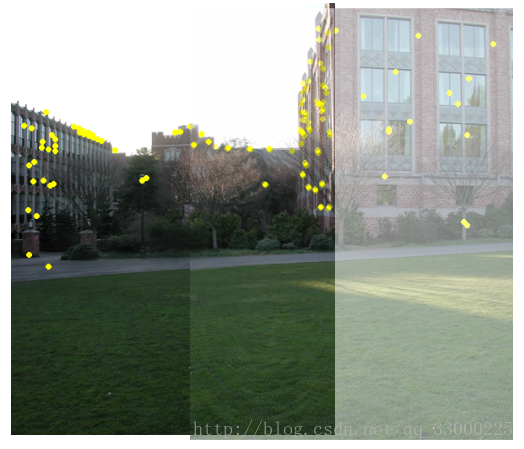
阶段结果:
4、最后再放上使用上面3个类的主函数的代码吧:
Main.cpp:
#include "stdafx.h"
#include "MyMatching.h"
#include "MyBlending.h"

int main() {
	char* inputAddr1 = "Input/1.bmp";
	char* inputAddr2 = "Input/2.bmp";

	MySift mySift1(inputAddr1, 1);
	mySift1.SiftMainProcess();
	mySift1.saveImgWithKeypoint("Output/1-2/1_kp.bmp");

	MySift mySift2(inputAddr2, 1);
	mySift2.SiftMainProcess();
	mySift2.saveImgWithKeypoint("Output/1-2/2_kp.bmp");

	MyMatching myMatching(mySift1.getKeyPointsCount(), mySift1.getFirstKeyDescriptors(),
		mySift2.getKeyPointsCount(), mySift2.getFirstKeyDescriptors());
	myMatching.featureMatchMainProcess();
	myMatching.drawOriKeypointOnImg(inputAddr1, inputAddr2, "Output/1-2/1_kp_real.bmp", "Output/1-2/2_kp_real.bmp");
	myMatching.mixImageAndDrawPairLine("Output/1-2/mixImg.bmp", "Output/1-2/mixImgWithLine.bmp");
	myMatching.myRANSACtoFindKpTransAndDrawOut("Output/1-2/mixImgWithLine_fixed.bmp");

	MyBlending myBlending(myMatching.getMatchVec().col, myMatching.getMatchVec().row);
	myBlending.blendingMainProcess(inputAddr1, inputAddr2);
	myBlending.saveBlendedImg("Output/1-2/blendedImg.bmp");

	int i;
	cin >> i;

	return 0;
}
好了,这就差不多了。(其实差很多_(:зゝ∠)_)
其实这份代码普适性不高_(:зゝ∠)_,比如图片是需要先人工排序再扔进去跑的,这个问题想了下应该可以根据转移向量V来进行一定的判别。另外上面也提到了,如果图片之间存在物体放缩,那就不能用上面的方法了(放缩的暂时还想不到解决方案……)。还有就是如果图片的横着的,比如数据集2,就也不能解决了。(想想就很难_(:зゝ∠)_)
如果有大佬能解决上面问题的可以跟我说说,也想了解一下_(:зゝ∠)_