Master主备切换
Spark原生的standalone模式是支持主备切换的,也就是说master可以配置两个,当Action Master因故障挂了的时候,系统会自动将Standby Master 切换成 Active Master。
Master的准备切换分为两种:
- 一种是基于文件系统的,spark提供目录保存spark Application和worker的注册信息,并将他们的恢复状态写入该目录,当spark的master节点宕掉的时候,重启master,就能获取application和worker的注册信息。需要手动进行切换
- 一种是基于zookeeper的,用于生产模式。其基本原理是通过zookeeper来选举一个Master,其他的Master处于Standby状态。将Standalone集群连接到同一个ZooKeeper实例并启动多个Master,利用zookeeper提供的选举和状态保存功能,可以使一个Master被选举,而其他Master处于Standby状态。如果现任Master死去,另一个Master会通过选举产生,并恢复到旧的Master状态,然后恢复调度。整个恢复过程可能要1-2分钟。
流程:
- 在active Master宕掉之后,内部持久化(FileSystemPersistenceEngine和ZookeeperPersistenceEngine)引擎首先会读取持久化的storedApps、storedDrivers、storedWorkers
- 判断,如果storedApps、storedDrivers、storedWorkers有任何一个是有内容的
- 将持久化的Application、Driver、Worker信息重新注册,注册到Master内部的内存缓存结构中
- 将Application和Worker的状态都修改为UNKNOWN,然后向Application所对应的Driver和Worker发送StandBy Master的地址
- 如果Driver和Wroker是正常运转的情况下,接收到Master发送过来的地址后,就会返回响应消息到新的Master
- Master陆续接收到Driver和Worker发送过来的消息后,会使用completeRecovery()方法对没有发送响应消息的Driver和Worker进行处理,过滤掉他们的信息。
- 调用Master的schedule()方法,对正在调度的Driver和Application进行调度。在worker上启动driver,或者是为Applicaiton在worker上启动executor
源码分析:
源码:org/apache/spark/deploy/master/Master.scala
override def receive: PartialFunction[Any, Unit] = {
    case ElectedLeader => {
      //读取持久化的storedApps、storedDrivers、storedWorkers
      val (storedApps, storedDrivers, storedWorkers) = persistenceEngine.readPersistedData(rpcEnv)
      //判断,如果storedApps、storedDrivers、storedWorkers有任何一个是有内容的
      state = if (storedApps.isEmpty && storedDrivers.isEmpty && storedWorkers.isEmpty) {
        RecoveryState.ALIVE
      } else {
        RecoveryState.RECOVERING
      }
      logInfo("I have been elected leader! New state: " + state)
      if (state == RecoveryState.RECOVERING) {
        //开始恢复master
        beginRecovery(storedApps, storedDrivers, storedWorkers)
        recoveryCompletionTask = forwardMessageThread.schedule(new Runnable {
          override def run(): Unit = Utils.tryLogNonFatalError {
            self.send(CompleteRecovery)
          }
        }, WORKER_TIMEOUT_MS, TimeUnit.MILLISECONDS)
      }
    }
    //完成master的主备切换
    case CompleteRecovery => completeRecovery()

......

}
第一步:开始恢复master
/**
   *  开始恢复master
   */
  private def beginRecovery(storedApps: Seq[ApplicationInfo], storedDrivers: Seq[DriverInfo],
    storedWorkers: Seq[WorkerInfo]) {
    for (app <- storedApps) {
      logInfo("Trying to recover app: " + app.id)
      try {
        // 注册application
        registerApplication(app)
        app.state = ApplicationState.UNKNOWN
        app.driver.send(MasterChanged(self, masterWebUiUrl))
      } catch {
        case e: Exception => logInfo("App " + app.id + " had exception on reconnect")
      }
    }

    for (driver <- storedDrivers) {
      // Here we just read in the list of drivers. Any drivers associated with now-lost workers
      // will be re-launched when we detect that the worker is missing.
      drivers += driver
    }

    for (worker <- storedWorkers) {
      logInfo("Trying to recover worker: " + worker.id)
      try {
        // 注册worker
        registerWorker(worker)
        worker.state = WorkerState.UNKNOWN
        worker.endpoint.send(MasterChanged(self, masterWebUiUrl))
      } catch {
        case e: Exception => logInfo("Worker " + worker.id + " had exception on reconnect")
      }
    }
  }
第二步:点击第一步中registerApplication
  private def registerApplication(app: ApplicationInfo): Unit = {
    //拿到driver的地址
    val appAddress = app.driver.address
    //如果driver的地址存在的情况下,就直接返回,就相当于对driver进行重复注册
    if (addressToApp.contains(appAddress)) {
      logInfo("Attempted to re-register application at same address: " + appAddress)
      return
    }

    applicationMetricsSystem.registerSource(app.appSource)

    //将Application的信息加入到内存缓存中
    apps += app
    idToApp(app.id) = app
    endpointToApp(app.driver) = app
    addressToApp(appAddress) = app

    //将Application的信息加入到等待调度的队列中,调度的算法为FIFO
    waitingApps += app
  }
第三步:点击第一步中registerWorker
  /**
   * 注册worker
   *
   * 遍历所有管理的Worker,若有与新注册的Worker相同的host,port且处于Dead(超时)状态的Worker则直接从workers中移除。
   * 若管理的addressToWorker已经存在新注册的Worker一样的workerAddress,则获取老Worker,若状态是UNKNOWN说明Master 处于recovery,
   * Worker正处于恢复中,则将老Worker移除,将新Worker直接加入并成功返回,若老Worker是其他状态则说明已经重复注册了,返回失败。
   *
   */
  private def registerWorker(worker: WorkerInfo): Boolean = {
    // There may be one or more refs to dead workers on this same node (w/ different ID's),
    // remove them.
    //过滤掉状态为DEAD的worker
    workers.filter { w =>
      (w.host == worker.host && w.port == worker.port) && (w.state == WorkerState.DEAD)
    }.foreach { w =>
      //  遍历workers HashSet,移除该worker
      workers -= w
    }

    //worker地址
    val workerAddress = worker.endpoint.address
    //如果已存在,该worker为oldWorker
    if (addressToWorker.contains(workerAddress)) {
      val oldWorker = addressToWorker(workerAddress)
      //  如果oldWorker的状态为UNKOWN,则移除该oldWorker
      if (oldWorker.state == WorkerState.UNKNOWN) {
        // A worker registering from UNKNOWN implies that the worker was restarted during recovery.
        // The old worker must thus be dead, so we will remove it and accept the new worker.
        //一个从UNKOWN状态中注册的worker,该worker在恢复过程被重启
        // old worker必须被杀死,移除old worker,接收新的worker
        removeWorker(oldWorker)
      } else {
        logInfo("Attempted to re-register worker at same address: " + workerAddress)
        return false
      }
    }
    //  将新的worker添加到HashSet中去
    workers += worker
    //  将worker id,address信息添加到对应的HashMap中
    idToWorker(worker.id) = worker
    addressToWorker(workerAddress) = worker
    //  返回True,worker注册成功
    true
  }
第四步:完成master的主备切换
/**
   * 完成master的主备切换,也就是完成master的主备切换
   */
  private def completeRecovery() {
    // Ensure "only-once" recovery semantics using a short synchronization period.
    if (state != RecoveryState.RECOVERING) { return }
    state = RecoveryState.COMPLETING_RECOVERY

    // Kill off any workers and apps that didn't respond to us.
    //将Applicaiton和Worker都过滤出来,目前状况还是UNKNOWN的
    //然后遍历,分别调用removeWorker和finishApplication方法,对可能已经出故障,或者已经死掉的Application和Worker进行清理
    /**
     * 清理三点:
     *   1、从内存缓存结构中移除
     *   2、从相关组件的内存缓存中移除(比如说worker所在的driver也要移除)
     *   3、从持久化存储中移除
     */
    workers.filter(_.state == WorkerState.UNKNOWN).foreach(removeWorker)
    apps.filter(_.state == ApplicationState.UNKNOWN).foreach(finishApplication)

    // Reschedule drivers which were not claimed by any workers
    drivers.filter(_.worker.isEmpty).foreach { d =>
      logWarning(s"Driver ${d.id} was not found after master recovery")
      // 重新启动driver,对于sparkstreaming程序而言
      if (d.desc.supervise) {
        logWarning(s"Re-launching ${d.id}")
        relaunchDriver(d)
      } else {
        removeDriver(d.id, DriverState.ERROR, None)
        logWarning(s"Did not re-launch ${d.id} because it was not supervised")
      }
    }

    state = RecoveryState.ALIVE
    //资源调度算法
    schedule()
    logInfo("Recovery complete - resuming operations!")
  }
第五步:点击第四步中的removeWorker
/**
   * 移除worker
   */
  private def removeWorker(worker: WorkerInfo) {
    logInfo("Removing worker " + worker.id + " on " + worker.host + ":" + worker.port)
    worker.setState(WorkerState.DEAD)
    //将内存缓存结构中移除(HashMap)
    idToWorker -= worker.id
    addressToWorker -= worker.endpoint.address
    for (exec <- worker.executors.values) {
      logInfo("Telling app of lost executor: " + exec.id)
      // 向driver发送exeutor丢失了
      exec.application.driver.send(ExecutorUpdated(
        exec.id, ExecutorState.LOST, Some("worker lost"), None))
      // 将worker上的所有executor给清楚掉
      exec.application.removeExecutor(exec)
    }
    for (driver <- worker.drivers.values) {
      //spark自动监视,driver所在的worker挂掉的时候,也会把这个driver移除掉,如果配置supervise这个属性的时候,driver也挂掉的时候master会重新启动driver
      if (driver.desc.supervise) {
        logInfo(s"Re-launching ${driver.id}")
        relaunchDriver(driver)
      } else {
        logInfo(s"Not re-launching ${driver.id} because it was not supervised")
        removeDriver(driver.id, DriverState.ERROR, None)
      }
    }
    // 持久化引擎会移除worker
    persistenceEngine.removeWorker(worker)
  }
第六步:点击finishApplication
private def finishApplication(app: ApplicationInfo) {
    removeApplication(app, ApplicationState.FINISHED)
  }

  def removeApplication(app: ApplicationInfo, state: ApplicationState.Value) {
    // 将数据从内存缓存结果中移除
    if (apps.contains(app)) {
      logInfo("Removing app " + app.id)
      apps -= app
      idToApp -= app.id
      endpointToApp -= app.driver
      addressToApp -= app.driver.address
      if (completedApps.size >= RETAINED_APPLICATIONS) {
        val toRemove = math.max(RETAINED_APPLICATIONS / 10, 1)
        completedApps.take(toRemove).foreach(a => {
          appIdToUI.remove(a.id).foreach { ui => webUi.detachSparkUI(ui) }
          applicationMetricsSystem.removeSource(a.appSource)
        })
        completedApps.trimStart(toRemove)
      }
      completedApps += app // Remember it in our history
      waitingApps -= app

      // If application events are logged, use them to rebuild the UI
      rebuildSparkUI(app)

      for (exec <- app.executors.values) {
        // 杀掉app对应的executor
        killExecutor(exec)
      }
      app.markFinished(state)
      if (state != ApplicationState.FINISHED) {
        app.driver.send(ApplicationRemoved(state.toString))
      }
      // 从持久化引擎中移除application
      persistenceEngine.removeApplication(app)
      schedule()

      // Tell all workers that the application has finished, so they can clean up any app state.
      workers.foreach { w =>
        w.endpoint.send(ApplicationFinished(app.id))
      }
    }
  }
第七步:点击relaunchDriver
  /**
   * 重新发布Driver
   */
  private def relaunchDriver(driver: DriverInfo) {
    driver.worker = None
    // 将driver的状态设置为relaunching
    driver.state = DriverState.RELAUNCHING
    // 将driver加入到等待的队列当中
    waitingDrivers += driver
    schedule()
  }
第八步:点击removeDriver
  /**
   * 移除driver
   */
  private def removeDriver(
    driverId: String,
    finalState: DriverState,
    exception: Option[Exception]) {
    drivers.find(d => d.id == driverId) match {
      case Some(driver) =>
        logInfo(s"Removing driver: $driverId")
        //内存缓存移除(HashSet)
        drivers -= driver
        if (completedDrivers.size >= RETAINED_DRIVERS) {
          val toRemove = math.max(RETAINED_DRIVERS / 10, 1)
          completedDrivers.trimStart(toRemove)
        }
        // 将driver加入到已经完成的driver中
        completedDrivers += driver
        // 将driver从持久化引擎中移除掉
        persistenceEngine.removeDriver(driver)
        // 将driver的状态设置为final
        driver.state = finalState
        driver.exception = exception
        // 将driver所在的worker中移除掉driver
        driver.worker.foreach(w => w.removeDriver(driver))
        schedule()
      case None =>
        logWarning(s"Asked to remove unknown driver: $driverId")
    }
  }
Master注册机制
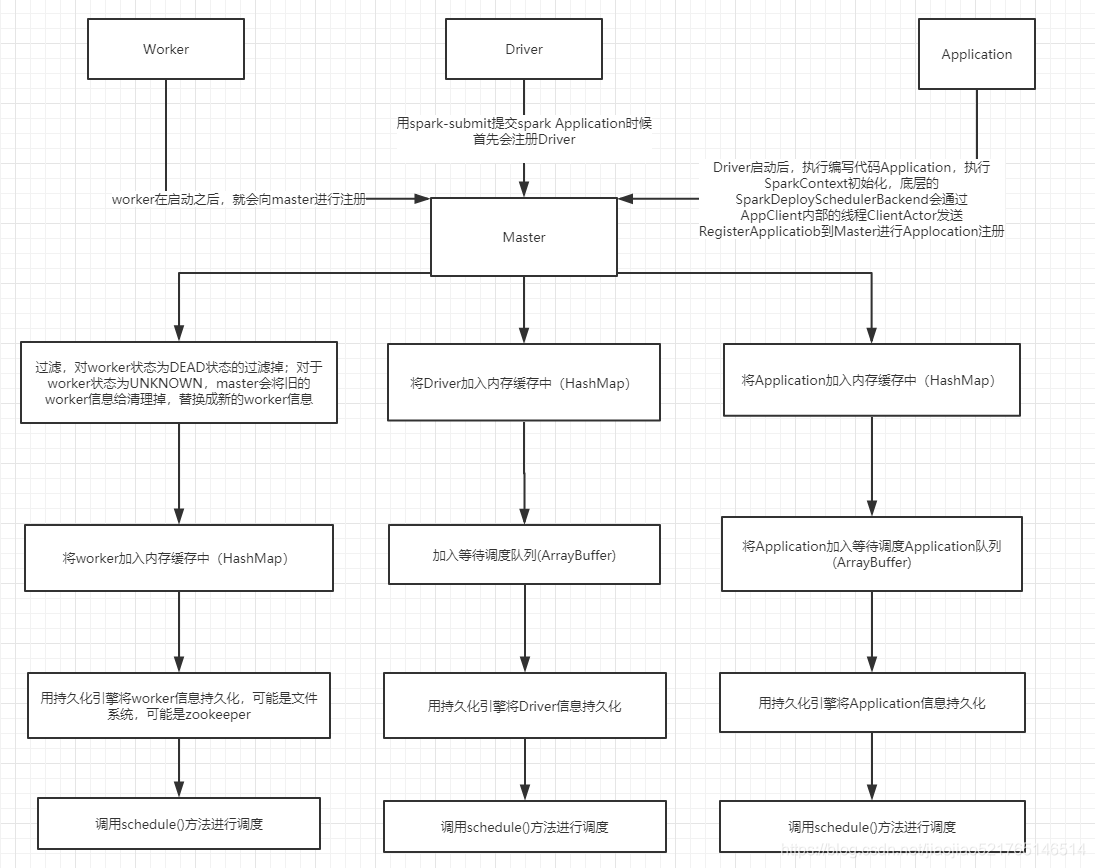
worker向master注册:
- worker在启动之后,就会向master进行注册
- 对于worker状态为dead的,过滤掉。比如说master在一定时间期限已经完成了恢复,但是发现其中的worker为unknown的情况下,对worker进行remove,将worker的状态设置为dead,如果过了很长时间worker又莫名其妙的向master进行注册的情况下,直接过滤掉;对于worker状态为unknown,master会将旧的worker信息给清理掉,替换成新的worker信息。比如说master刚启动的时候,会向worker发送新的地址的时候,master会将该worker状态设置为unknown,worker向master返回注册信息的时候,master会将旧的worker信息给清理掉,替换成新的worker信息
- 将worker加入内存缓存中(HashMap)
- 用持久化引擎将worker信息持久化,可能是文件系统,可能是zookeeper
- 调用schedule()方法进行调度
源码分析:
第一步:处理worker的注册请求
源码位置:org.apache.spark.deploy.master.Master
/**
  * 处理worker的注册请求
  * 注:
  * 这样设计Worker注册机制有一个很大的好处,在生产环境下,想要把新的Worker 加入到已经运行的Spark 集群上,
  * 不需要重新启动Spark 集群,就能够使用新加入的Worker 以提升处理性能
  *
*/
case RegisterWorker(
      id, workerHost, workerPort, workerRef, cores, memory, workerUiPort, publicAddress) => {
      logInfo("Registering worker %s:%d with %d cores, %s RAM".format(
        workerHost, workerPort, cores, Utils.megabytesToString(memory)))
      //判断Master的状态是否为StandBy
      if (state == RecoveryState.STANDBY) {
        // ignore, don't send response 忽略,不发送响应
      } else if (idToWorker.contains(id)) {
        //  如果WorkerId存在,则回复Worker注册失败"重复的worker id"
        workerRef.send(RegisterWorkerFailed("Duplicate worker ID"))
      } else {
        //  将worker的id,host,端口,cpu数,内存等信息封装成一个WorkerInfo
        val worker = new WorkerInfo(id, workerHost, workerPort, cores, memory,
          workerRef, workerUiPort, publicAddress)
        //  判断注册Worker注册是否成功
        if (registerWorker(worker)) {
          // 持久化引擎添加worker的信息
          persistenceEngine.addWorker(worker)
          workerRef.send(RegisteredWorker(self, masterWebUiUrl))
          // 资源调度算法
          schedule()
        } else {
          //worker注册失败
          val workerAddress = worker.endpoint.address
          logWarning("Worker registration failed. Attempted to re-register worker at same " +
            "address: " + workerAddress)
          workerRef.send(RegisterWorkerFailed("Attempted to re-register worker at same address: "
            + workerAddress))
        }
      }
}
第二步:点击第一步的registerWorke
  /**
   * 注册worker
   */
  private def registerWorker(worker: WorkerInfo): Boolean = {
    // There may be one or more refs to dead workers on this same node (w/ different ID's),
    // remove them.
    //过滤掉状态为DEAD的worker
    workers.filter { w =>
      (w.host == worker.host && w.port == worker.port) && (w.state == WorkerState.DEAD)
    }.foreach { w =>
      //  遍历workers HashSet,移除该worker
      workers -= w
    }

    //worker地址
    val workerAddress = worker.endpoint.address
    //如果已存在,该worker为oldWorker
    if (addressToWorker.contains(workerAddress)) {
      val oldWorker = addressToWorker(workerAddress)
      //  如果oldWorker的状态为UNKOWN,则移除该oldWorker
      if (oldWorker.state == WorkerState.UNKNOWN) {
        // A worker registering from UNKNOWN implies that the worker was restarted during recovery.
        // The old worker must thus be dead, so we will remove it and accept the new worker.
        //一个从UNKOWN状态中注册的worker,该worker在恢复过程被重启
        // old worker必须被杀死,移除old worker,接收新的worker
        removeWorker(oldWorker)
      } else {
        logInfo("Attempted to re-register worker at same address: " + workerAddress)
        return false
      }
    }
    //  将新的worker添加到HashSet中去
    workers += worker
    //  将worker id,address信息添加到对应的HashMap中
    idToWorker(worker.id) = worker
    addressToWorker(workerAddress) = worker
    //  返回True,worker注册成功
    true
  }
第三步:点击第二步中的removeWorker
/**
   * 移除worker
   */
  private def removeWorker(worker: WorkerInfo) {
    logInfo("Removing worker " + worker.id + " on " + worker.host + ":" + worker.port)
    worker.setState(WorkerState.DEAD)
    //将内存缓存结构中移除(HashMap)
    idToWorker -= worker.id
    addressToWorker -= worker.endpoint.address
    for (exec <- worker.executors.values) {
      logInfo("Telling app of lost executor: " + exec.id)
      // 向driver发送exeutor丢失了
      exec.application.driver.send(ExecutorUpdated(
        exec.id, ExecutorState.LOST, Some("worker lost"), None))
      // 将worker上的所有executor给清楚掉
      exec.application.removeExecutor(exec)
    }
    for (driver <- worker.drivers.values) {
      //spark自动监视,driver所在的worker挂掉的时候,也会把这个driver移除掉,如果配置supervise这个属性的时候,driver也挂掉的时候master会重新启动driver
      if (driver.desc.supervise) {
        logInfo(s"Re-launching ${driver.id}")
        relaunchDriver(driver)
      } else {
        logInfo(s"Not re-launching ${driver.id} because it was not supervised")
        removeDriver(driver.id, DriverState.ERROR, None)
      }
    }
    // 持久化引擎会移除worker
    persistenceEngine.removeWorker(worker)
  }
第四步:点击第三步中的removeExecutor
源码位置:org.apache.spark.deploy.master.ApplicationInfo
 /**
   * 将executor从内部的内存缓冲结构中移除
   */
 private[master] def removeExecutor(exec: ExecutorDesc) {
    if (executors.contains(exec.id)) {
      removedExecutors += executors(exec.id)
      executors -= exec.id
      coresGranted -= exec.cores
    }
  }
第五步:点击第三步中的relaunchDriver
 /**
   * 重新发布Driver
   */
  private def relaunchDriver(driver: DriverInfo) {
    driver.worker = None
    // 将driver的状态设置为relaunching
    driver.state = DriverState.RELAUNCHING
    // 将driver加入到等待的队列当中
    waitingDrivers += driver
    schedule()
  }
第六步:点击第三步中的removeDriver
  /**
   * 移除driver
   */
  private def removeDriver(
    driverId: String,
    finalState: DriverState,
    exception: Option[Exception]) {
    drivers.find(d => d.id == driverId) match {
      case Some(driver) =>
        logInfo(s"Removing driver: $driverId")
        //内存缓存移除(HashSet)
        drivers -= driver
        if (completedDrivers.size >= RETAINED_DRIVERS) {
          val toRemove = math.max(RETAINED_DRIVERS / 10, 1)
          completedDrivers.trimStart(toRemove)
        }
        // 将driver加入到已经完成的driver中
        completedDrivers += driver
        // 将driver从持久化引擎中移除掉
        persistenceEngine.removeDriver(driver)
        // 将driver的状态设置为final
        driver.state = finalState
        driver.exception = exception
        // 将driver所在的worker中移除掉driver
        driver.worker.foreach(w => w.removeDriver(driver))
        schedule()
      case None =>
        logWarning(s"Asked to remove unknown driver: $driverId")
    }
  }
driver向master注册
- 用spark-submit提交sparkApplication的时候,dirver首先就会向master进行注册,将driver信息放入到内存缓存中,也就是hashmap中
- 加入等待调度队列,也就是ArrayBuffer
- 用持久化引擎将driver信息持久化,可能是文件系统,可能是zookeeper
- 调用schedule()方法进行调度
源码分析:
第一步:请求提交Driver
override def receiveAndReply(context: RpcCallContext): PartialFunction[Any, Unit] = {
    /**
     * 请求提交Driver,参数 DriverDescription
     */
    case RequestSubmitDriver(description) => {
      // 判断Master状态是否为Alive
      if (state != RecoveryState.ALIVE) {
       //  如果不为Alive,则回应提交Driver失败,需要向Alive的Master提交
        val msg = s"${Utils.BACKUP_STANDALONE_MASTER_PREFIX}: $state. " +
          "Can only accept driver submissions in ALIVE state."
        context.reply(SubmitDriverResponse(self, false, None, msg))
      } else {
        logInfo("Driver submitted " + description.command.mainClass)
         //使用createDriver方法,创建driver
        val driver = createDriver(description)
         // 使用持久化引擎将driver的信息持久化
        persistenceEngine.addDriver(driver)
        // 将driver加入到等待调度的队列中(ArrayBuffer)
        waitingDrivers += driver
        // 在持久化内存中将driver加入到内部的内存缓冲结构中(HashSet)
        drivers.add(driver)
        //调度算法
        schedule()

        // TODO: It might be good to instead have the submission client poll the master to determine
        //       the current status of the driver. For now it's simply "fire and forget".
        //注册成功后,RpcCallContext回应Driver注册响应,已成功提交driver + id
        context.reply(SubmitDriverResponse(self, true, Some(driver.id),
          s"Driver successfully submitted as ${driver.id}"))
      }
    }

......

}
第二步:点击第一步中createDriver
  /**
   * 创建Driver,返回封装好的DriverInfo
   */
  private def createDriver(desc: DriverDescription): DriverInfo = {
    val now = System.currentTimeMillis()
    val date = new Date(now)
    //将时间,driver id,desc等信息封装成一个DriverInfo返回
    new DriverInfo(now, newDriverId(date), desc, date)
  }
application向master进行注册(registerApplication()方法)
- Driver启动好之后,会执行我们的application代码,执行sparkContext的初始化,底层的SparkDeploySchedulerBackend,会通过AppClient内部的线程,ClientActor发送RegisterAppliction,到master进行Application进行注册
- 将application信息放入到内存缓存中(HashmMap)
- 将application加入等待的调度队列(ArrayBuffer)
- 用持久化引擎将application信息持久化,可能是文件系统,可能是zookeeper
- 调用schedule()方法进行调度
源码分析:
第一步:底层的SparkDeploySchedulerBackend,会通过AppClient内部的线程,ClientActor发送Register Appliction,到master进行Application进行注册
源码位置:org.apache.spark.deploy.client.AppClient
/**
 *  Register with all masters asynchronously and returns an array `Future`s for cancellation.
 *  master支持两种主备切换机制,一种的hdfs的,另外一种是基于zookeeper的(动态ha,热切换的)
*/
 private def tryRegisterAllMasters(): Array[JFuture[_]] = {
      for (masterAddress <- masterRpcAddresses) yield {
        registerMasterThreadPool.submit(new Runnable {
          override def run(): Unit = try {
            if (registered) {
              return
            }
            logInfo("Connecting to master " + masterAddress.toSparkURL + "...")
            val masterRef =
              rpcEnv.setupEndpointRef(Master.SYSTEM_NAME, masterAddress, Master.ENDPOINT_NAME)
            //发送RegisterApplication这个case cass,把appDescription发送给master,进行向master注册
            masterRef.send(RegisterApplication(appDescription, self))
          } catch {
            case ie: InterruptedException => // Cancelled
            case NonFatal(e) => logWarning(s"Failed to connect to master $masterAddress", e)
          }
        })
      }
 }
第二步:处理Applicaton的注册的请求
源码位置:org.apache.spark.deploy.master.Master
 /**
  * 处理Applicaton的注册的请求
 */
case RegisterApplication(description, driver) => {
      // TODO Prevent repeated registrations from some driver
      // 如果master的状态为standby,也就是当前的这个master,不是active
      // 那么applicaiton来请求注册,什么都不会做
      if (state == RecoveryState.STANDBY) {
        // ignore, don't send response
      } else {
        logInfo("Registering app " + description.name)
        // 用ApplicationDescription信息,创建ApplicationInfo
        val app = createApplication(description, driver)
        // 注册Application ,将Application加入缓存,将Application加入等待调度的队列
        registerApplication(app)
        logInfo("Registered app " + description.name + " with ID " + app.id)
        // 用持久化引擎,将ApplicationInfo进行持久化
        persistenceEngine.addApplication(app)
        // 反向,向SparkDeploySchedulerBackend的AppClient的ClientActor发送消息,也就是registeredApplication,而不是registerApplication
        driver.send(RegisteredApplication(app.id, self))
        schedule()
      }
 }
第三步:点击第二步中的createApplication
private def createApplication(desc: ApplicationDescription, driver: RpcEndpointRef): ApplicationInfo = {
    val now = System.currentTimeMillis()
    val date = new Date(now)
    // 用当前时间戳给该application生成唯一的id
    new ApplicationInfo(now, newApplicationId(date), desc, date, driver, defaultCores)
 }
第四步:点击registerApplication
private def registerApplication(app: ApplicationInfo): Unit = {
    //拿到driver的地址
    val appAddress = app.driver.address
    //如果driver的地址存在的情况下,就直接返回,就相当于对driver进行重复注册
    if (addressToApp.contains(appAddress)) {
      logInfo("Attempted to re-register application at same address: " + appAddress)
      return
    }

    applicationMetricsSystem.registerSource(app.appSource)

    //将Application的信息加入到内存缓存中
    apps += app
    idToApp(app.id) = app
    endpointToApp(app.driver) = app
    addressToApp(appAddress) = app

    //将Application的信息加入到等待调度的队列中,调度的算法为FIFO
    waitingApps += app
 }
第五步:反向,向SparkDeploySchedulerBackend的AppClient的ClientActor发送消息,点击SparkDeploySchedulerBackend的RegisteredApplication
源码位置:org.apache.spark.deploy.client.AppClient
override def receive: PartialFunction[Any, Unit] = {
      case RegisteredApplication(appId_, masterRef) =>
        // FIXME How to handle the following cases?
        // 1. A master receives multiple registrations and sends back multiple
        // RegisteredApplications due to an unstable network.
        // 2. Receive multiple RegisteredApplication from different masters because the master is
        // changing.

        /**
         * 如何修复这个bug?
         * 1.由于不稳定的网络,一个主接收多个注册并返回多个注册应用程序
         * 2.在master的变化的过程中,如何从不同的registeredApplication从不同的master中
         */
        appId = appId_
        registered = true
        master = Some(masterRef)
        listener.connected(appId)

      case ApplicationRemoved(message) =>
        markDead("Master removed our application: %s".format(message))
        stop()

      case ExecutorAdded(id: Int, workerId: String, hostPort: String, cores: Int, memory: Int) =>
        val fullId = appId + "/" + id
        logInfo("Executor added: %s on %s (%s) with %d cores".format(fullId, workerId, hostPort,
          cores))
        // FIXME if changing master and `ExecutorAdded` happen at the same time (the order is not
        // guaranteed), `ExecutorStateChanged` may be sent to a dead master.
        sendToMaster(ExecutorStateChanged(appId, id, ExecutorState.RUNNING, None, None))
        listener.executorAdded(fullId, workerId, hostPort, cores, memory)

      case ExecutorUpdated(id, state, message, exitStatus) =>
        val fullId = appId + "/" + id
        val messageText = message.map(s => " (" + s + ")").getOrElse("")
        logInfo("Executor updated: %s is now %s%s".format(fullId, state, messageText))
        if (ExecutorState.isFinished(state)) {
          listener.executorRemoved(fullId, message.getOrElse(""), exitStatus)
        }

      case MasterChanged(masterRef, masterWebUiUrl) =>
        logInfo("Master has changed, new master is at " + masterRef.address.toSparkURL)
        master = Some(masterRef)
        alreadyDisconnected = false
        masterRef.send(MasterChangeAcknowledged(appId))
}
Master状态改变处理机制原理
Driver状态改变(DriverStateChanged)
- 如果driver的状态是错误的、完成的、被杀掉、失败,那么就移除driver
- 首先将driver加入到已经完成的driver中,然后将driver的状态设置为final,最后从driver所对应的worker中移除driver,释放资源
第一步:Driver状态改变
源码分析:
    /**
     * Driver状态改变
     */
    case DriverStateChanged(driverId, state, exception) => {
      state match {
        //如果Driver的状态是错误,完成,被杀掉,失败
        case DriverState.ERROR | DriverState.FINISHED | DriverState.KILLED | DriverState.FAILED =>
          //移除Driver
          removeDriver(driverId, state, exception)
        case _ =>
          throw new Exception(s"Received unexpected state update for driver $driverId: $state")
      }
    }
第二步:点击第一步中removeDriver
/**
 1. 移除driver
*/
 private def removeDriver(
    driverId: String,
    finalState: DriverState,
    exception: Option[Exception]) {
    //scala的find高阶函数,找到driverId对应的 driver
    drivers.find(d => d.id == driverId) match {
      //如果找到了,Some,样例类(Option)
      case Some(driver) =>
        logInfo(s"Removing driver: $driverId")
        //内存缓存移除(HashSet)
        drivers -= driver
        if (completedDrivers.size >= RETAINED_DRIVERS) {
          val toRemove = math.max(RETAINED_DRIVERS / 10, 1)
          completedDrivers.trimStart(toRemove)
        }
        // 将driver加入到已经完成的driver中
        completedDrivers += driver
        // 将driver从持久化引擎中移除掉
        persistenceEngine.removeDriver(driver)
        // 将driver的状态设置为final
        driver.state = finalState
        driver.exception = exception
        // 将driver所在的worker中移除掉driver
        driver.worker.foreach(w => w.removeDriver(driver))
        schedule()
      case None =>
        logWarning(s"Asked to remove unknown driver: $driverId")
    }
  }
Executor状态改变(ExecutorStateChanged)
- 找到executor对应的applicaiton,然后再反过来通过applicaiton内部的executors缓存获得executor信息
- 设置executor的当前状态为LAUNCHING状态,并向driver同步发送ExecutorUpdated消息
- 如果executor的状态已经发生变化,从application中移除executor,从运行中executor对应的worker中移除executor
- 判断如果executor的状态是异常的,进行applicatino重试操作,如果重试了10次,都是失败,那么就认为调度失败,移除application。如果在重试的10次之内恢复正常了,就进行重新调度
源码分析:
/**
  * Executor状态发生改变
  */
case ExecutorStateChanged(appId, execId, state, message, exitStatus) => {
      // 找到executor对应的App,然后再反过来通过App内部的executors缓存获得executor信息
      val execOption = idToApp.get(appId).flatMap(app => app.executors.get(execId))
      execOption match {
        // 如果有值
        case Some(exec) => {
          // 设置executor的当前状态为LAUNCHING状态
          val appInfo = idToApp(appId)
          exec.state = state
          if (state == ExecutorState.RUNNING) { appInfo.resetRetryCount() }

          // 向driver同步发送ExecutorUpdated消息
          exec.application.driver.send(ExecutorUpdated(execId, state, message, exitStatus))
          // 如果executor的状态已经发生变化
          if (ExecutorState.isFinished(state)) {
            // Remove this executor from the worker and app
            logInfo(s"Removing executor ${exec.fullId} because it is $state")
            // If an application has already finished, preserve its
            // state to display its information properly on the UI
            if (!appInfo.isFinished) {
              // 从app缓存中移除executor
              appInfo.removeExecutor(exec)
            }
            // 从运行executor的worker的缓存中移除executor
            exec.worker.removeExecutor(exec)
            // 判断,如果executor的状态是非正常的
            val normalExit = exitStatus == Some(0)
            // Only retry certain number of times so we don't go into an infinite loop.
            if (!normalExit) {
              // 判断applcation当前的重试次数,是否达到了最大值,最大值为10次
              if (appInfo.incrementRetryCount() < ApplicationState.MAX_NUM_RETRY) {
                //重新进行调度
                schedule()
              } else {
                // 否则就进行removeApplication操作
                // 也就是说,executor反复调度都是失败,那么就认为application失败了
                val execs = appInfo.executors.values
                if (!execs.exists(_.state == ExecutorState.RUNNING)) {
                  logError(s"Application ${appInfo.desc.name} with ID ${appInfo.id} failed " +
                    s"${appInfo.retryCount} times; removing it")
                  removeApplication(appInfo, ApplicationState.FAILED)
                }
              }
            }
          }
        }
        case None =>
          logWarning(s"Got status update for unknown executor $appId/$execId")
      }
}
第二步:点击第一步的removeExecutor
  /**
   * 将executor从内部的内存缓冲结构中移除
   */
  private[master] def removeExecutor(exec: ExecutorDesc) {
    if (executors.contains(exec.id)) {
      removedExecutors += executors(exec.id)
      executors -= exec.id
      coresGranted -= exec.cores
    }
  }
第三步:点击第一步的removeApplication
def removeApplication(app: ApplicationInfo, state: ApplicationState.Value) {
    // 将数据从内存缓存结果中移除
    if (apps.contains(app)) {
      logInfo("Removing app " + app.id)
      apps -= app
      idToApp -= app.id
      endpointToApp -= app.driver
      addressToApp -= app.driver.address
      if (completedApps.size >= RETAINED_APPLICATIONS) {
        val toRemove = math.max(RETAINED_APPLICATIONS / 10, 1)
        completedApps.take(toRemove).foreach(a => {
          appIdToUI.remove(a.id).foreach { ui => webUi.detachSparkUI(ui) }
          applicationMetricsSystem.removeSource(a.appSource)
        })
        completedApps.trimStart(toRemove)
      }
      completedApps += app // Remember it in our history
      waitingApps -= app

      // If application events are logged, use them to rebuild the UI
      rebuildSparkUI(app)

      for (exec <- app.executors.values) {
        // 杀掉app对应的executor
        killExecutor(exec)
      }
      app.markFinished(state)
      if (state != ApplicationState.FINISHED) {
        //driver发送消息
        app.driver.send(ApplicationRemoved(state.toString))
      }
      // 从持久化引擎中移除application
      persistenceEngine.removeApplication(app)
      schedule()

      // Tell all workers that the application has finished, so they can clean up any app state.
      workers.foreach { w =>
        w.endpoint.send(ApplicationFinished(app.id))
      }
    }
 }
Master资源调度算法
原理:
- 首先判断master的状态不是alive的话直接返回,也就是说,standby master是不会进行application等资源的调度的
- 取出workers中所有注册上来上的worker,进行过滤,必须是状态为alive的worker,调用rondom的shuffle方法进行随机的打乱(从第三个worker进行shuffle)
- 遍历活着的worker,启动driver,将driver加入都内存缓冲结构中,并将driver从等待的driver的队列中移除
- 在workers上启动executors,使用是默认SpreadOutApps算法
源码分析:
第一步:调用schedule()方法
源码位置:org.apache.spark.deploy.master.Master
  /**
   * Schedule the currently available resources among waiting apps. This method will be called
   * every time a new app joins or resource availability changes.
   *
   * 资源调度算法
   *
   */
  private def schedule(): Unit = {
    //先判断master的状态不是alive的话直接返回
    // 也就是说,standby master是不会进行application等资源的调度的
    if (state != RecoveryState.ALIVE) { return }
    // Drivers take strict precedence over executors

    /**
     * Random.shuffle的原理是对传入的集合的元素进行随机的打乱
     * 意思就是从ArrayBuffer的最后一个元素开始到第三个元素,对于每个元素,都会取出该范围内的随机数
     * 比如说buf.length为10,然后next会取0到10的一个随机数,然后就会把buf随机的一个位置和该数字进行交换
     */
    val shuffledWorkers = Random.shuffle(workers) // Randomization helps balance drivers

     /**
     * 这里是对取出workers中所有注册上来上的worker,进行过滤,必须是状态为alive的worker
     */
    for (worker <- shuffledWorkers if worker.state == WorkerState.ALIVE) {

      /**
       * 遍历等待的driver,只有yarn-cluster和standalone的cluster模式提交的时候,才会注册driver,其他方式都是在
       * 本地启动driver,而不是来注册driver,更不可能让master来调度driver
       */
      for (driver <- waitingDrivers) {
        //判断当前的worker的空闲内存量大于等于driver需要的内存量,并且判断worker的空闲cpu数大于等于driver需要的cpu数量
        if (worker.memoryFree >= driver.desc.mem && worker.coresFree >= driver.desc.cores) {
          // 启动driver
          launchDriver(worker, driver)
          //将driver从等待的driver的队列中删除
          waitingDrivers -= driver
        }
      }
    }
    //在workers上启动和调度executor
    startExecutorsOnWorkers()
  }
第二步:调用第一步的shuffle方法
源码位置:scala.util.Random
/** Returns a new collection of the same type in a randomly chosen order.
   *  对传入的集合的元素进行随机的打乱
   *  @return         the shuffled collection
   */
  def shuffle[T, CC[X] <: TraversableOnce[X]](xs: CC[T])(implicit bf: CanBuildFrom[CC[T], T, CC[T]]): CC[T] = {
    //传递的值赋值给ArrayBuffer
    val buf = new ArrayBuffer[T] ++= xs
    //位置替换
    def swap(i1: Int, i2: Int) {
      val tmp = buf(i1)
      buf(i1) = buf(i2)
      buf(i2) = tmp
    }
   //从ArrayBuffer的最后一个元素开始到第三个元素,对于每个元素,都会取出该范围内的随机数
   //比如说buf.length为10,然后next会取0到10的一个随机数,然后就会把buf随机的一个位置和该数字进行交换
    for (n <- buf.length to 2 by -1) {
      val k = nextInt(n)
      swap(n - 1, k)
    }

    (bf(xs) ++= buf).result
  }
第三步:调用第一步的launchDriver方法
/**
  * 在某一个worker上启动driver
  */
private def launchDriver(worker: WorkerInfo, driver: DriverInfo) {
    logInfo("Launching driver " + driver.id + " on worker " + worker.id)
    // 将driver加入到worker内部的缓冲结构中
    // 将worker中使用的内存和cpu的数量,都加上driver需要的内存和cpu的数量
    worker.addDriver(driver)
    // 将worker加入到driver的内存缓冲结构中
    driver.worker = Some(worker)
    // 调用worker的actor,给worker发送注册driver的信息,让worker启动driver
    worker.endpoint.send(LaunchDriver(driver.id, driver.desc))
    //将driver状态设置成运行中
    driver.state = DriverState.RUNNING
 }
第四步:调用第一步的startExecutorsOnWorkers方法
  /**
   * Schedule and launch executors on workers
   *
   * Application的调度机制(核心之核心)
   * ①spreadOutApps 将app要使用的资源分平均分配到workers上
   * ②非spreadOutApps 将app尽可能多的分配到一个或几个worker上,这样其他的worker就不用分配了,尽可能资源大的分配
   */
  private def startExecutorsOnWorkers(): Unit = {
    // Right now this is a very simple FIFO scheduler. We keep trying to fit in the first app
    // in the queue, then the second app, etc.
    // 首先遍历waitingApps中ApplicationInfo,并且还需要判断程序中定义的使用cpu的数量-启动执行application上
    // worker上的excutor所使用的的cpu的要大于0
    for (app <- waitingApps if app.coresLeft > 0) {
      val coresPerExecutor: Option[Int] = app.desc.coresPerExecutor
      // Filter out workers that don't have enough resources to launch an executor
      // 从workers中,过滤出worker的状态为alive的,按照cpu的数量进行倒序排序
      val usableWorkers = workers.toArray.filter(_.state == WorkerState.ALIVE)
        .filter(worker => worker.memoryFree >= app.desc.memoryPerExecutorMB &&
          worker.coresFree >= coresPerExecutor.getOrElse(1))
        .sortBy(_.coresFree).reverse
      val assignedCores = scheduleExecutorsOnWorkers(app, usableWorkers, spreadOutApps)

      // Now that we've decided how many cores to allocate on each worker, let's allocate them
      // 给每个worker分配完application要求的cpu core之后,遍历worker,只要判断之前给这个worker分配到了core
      for (pos <- 0 until usableWorkers.length if assignedCores(pos) > 0) {
        // 就在worker上启动executor
        allocateWorkerResourceToExecutors(
          app, assignedCores(pos), coresPerExecutor, usableWorkers(pos))
      }
    }
  }
在这个方法中会为每一个application启动一个executor,首先需要从workers中筛选出那些满足条件的worker用来启动executor,需要满足的条件如下:
- worker中的剩余的空闲的内存需要大于application中指定的每一个executor所需要的内存
- worker中的剩余的空闲的cpu的核数必须大于application中指定的每一个executor所需要的cpu的核数(如果启动的时候没有指定coresPerExecutor,那么就认为这个值是1)
第五步:调用第四步的scheduleExecutorsOnWorkers方法
/**
   * Schedule executors to be launched on the workers.
   * Returns an array containing number of cores assigned to each worker.
   *
   * There are two modes of launching executors. The first attempts to spread out an application's
   * executors on as many workers as possible, while the second does the opposite (i.e. launch them
   * on as few workers as possible). The former is usually better for data locality purposes and is
   * the default.
   *
   * The number of cores assigned to each executor is configurable. When this is explicitly set,
   * multiple executors from the same application may be launched on the same worker if the worker
   * has enough cores and memory. Otherwise, each executor grabs all the cores available on the
   * worker by default, in which case only one executor may be launched on each worker.
   *
   * It is important to allocate coresPerExecutor on each worker at a time (instead of 1 core
   * at a time). Consider the following example: cluster has 4 workers with 16 cores each.
   * User requests 3 executors (spark.cores.max = 48, spark.executor.cores = 16). If 1 core is
   * allocated at a time, 12 cores from each worker would be assigned to each executor.
   * Since 12 < 16, no executors would launch [SPARK-8881].
   *
   *  这里有一个bug问题,集群中有4个worker,每一个worker是16核,我们分配3个executor,要求每一个executor分配16核,总共分配48核
   *  实际情况下,我们每一个worker中分配了12核,12核小于16核,报错[SPARK-8881].
   *
   *  为Application分配要在Worker上启动的Executor返回一个数组,包括每个worker分配到的core数
   *
   */
  private def scheduleExecutorsOnWorkers(
    app: ApplicationInfo,
    usableWorkers: Array[WorkerInfo],
    spreadOutApps: Boolean): Array[Int] = {
    //每一个executor上的core的数量
    val coresPerExecutor = app.desc.coresPerExecutor
    //app中每个executor所需要的最小cpu核数,如果没有默认最小核数为1
    val minCoresPerExecutor = coresPerExecutor.getOrElse(1)
    //如果没有设置coresPerExecutor则代表对于当前的application只能在一个worker上启动该app的一个executor
    val oneExecutorPerWorker = coresPerExecutor.isEmpty
    //  每个Executor的内存
    val memoryPerExecutor = app.desc.memoryPerExecutorMB
    // 获取可用worker数量
    val numUsable = usableWorkers.length
    //构建一个可用worker长度的数组,用于存放每个worker节点可用于分配的cpu核数(16,16,16,16)
    val assignedCores = new Array[Int](numUsable) // Number of cores to give to each worker
    //构建一个可用worker长度的数组,用于存放每一个worker上新分配的executor数量(1,2,1,0)
    val assignedExecutors = new Array[Int](numUsable) // Number of new executors on each worker
    //app实际会分配的CPU的数量,取app剩余的还没有被分配的CPU的数量和可以使用的workers的cpu数量总和之间的最小值
   //防止超过当前可用的cpu核数
    var coresToAssign = math.min(app.coresLeft, usableWorkers.map(_.coresFree).sum)

    /** Return whether the specified worker can launch an executor for this app. */

    /**
     * 判断指定的worker是否可以为这个app启动一个executor
     * 1.主要判断是否还有core没有被分配
     * 2.判断worker上的core的数量是否充足
     * 3.if 新建一个executor 判断worker上的内存是否足够,判断executor的数量是否达到了上限
     * 4.不是 新建一个executor 那么就只需要判断1和2
     */
    def canLaunchExecutor(pos: Int): Boolean = {

      /**
      * 判断当前需要分配的cpu核数是否大于或者等于每个executor所需要的cpu核数,
      * 比如总共只能分配8核,但是每个executor所需要的cpu核数是12,那么就不能发起executor了,因为资源不够用
      */
      val keepScheduling = coresToAssign >= minCoresPerExecutor

      /**
       * 判断该worker上是否还有足够的cores,worker上剩余的cores减去已经被分配出去的cores
       *
       * 比如现在worker剩余核数16,然后又给application他分配了12核,即还剩4核可用
       * 但是启动一个executor需要12核,那么4 < 12 表示内核不足使用了
       */
      val enoughCores = usableWorkers(pos).coresFree - assignedCores(pos) >= minCoresPerExecutor

      // If we allow multiple executors per worker, then we can always launch new executors.
      // Otherwise, if there is already an executor on this worker, just give it more cores.

     /**
       * 如果我们允许每一个worker启动多个executor,然后我们就可以启动一个新的executor
       * 否则如果worker已经启动一个新executor,只需要将更多的内核分配给该executor即可
       */
      val launchingNewExecutor = !oneExecutorPerWorker || assignedExecutors(pos) == 0
      // 如果需要发起新的executor,既需要判断cpu核数是否足够,还需要判断 executor是否超过限制总数以及内存是否足够
      if (launchingNewExecutor) {
        //该worker上已经被分配的内存
        val assignedMemory = assignedExecutors(pos) * memoryPerExecutor
        //worker上剩余的内存减去被分配的内存需要大于将要被分配的内存
        val enoughMemory = usableWorkers(pos).memoryFree - assignedMemory >= memoryPerExecutor
        //判断 executor是否超过限制
        val underLimit = assignedExecutors.sum + app.executors.size < app.executorLimit
        keepScheduling && enoughCores && enoughMemory && underLimit
      } else {
        // We're adding cores to an existing executor, so no need
        // to check memory and executor limits
        // 否则只是对已经存在的executor添加cpu核数,没必要检查内存和executor限制
        keepScheduling && enoughCores
      }
    }

    // Keep launching executors until no more workers can accommodate any
    // more executors, or if we have reached this application's limits
    //canLaunchExecutor无非就是判断worker上的cores和memory的数量是否满足条件
    var freeWorkers = (0 until numUsable).filter(canLaunchExecutor)

    //不断的启动executor,直到不再有Worker可以容纳任何Executor,或者达到了这个Application的要求
    while (freeWorkers.nonEmpty) {
      freeWorkers.foreach { pos =>
        var keepScheduling = true
        //再次判断是否可以启动一个executor
        while (keepScheduling && canLaunchExecutor(pos)) {
          // 需要分配的核数减去每个executor所需要的最小核数
          coresToAssign -= minCoresPerExecutor
          // 对应的worker节点需要分配的cpu核数加上要启动该executor所需要的最小CPU核数
          assignedCores(pos) += minCoresPerExecutor

          // If we are launching one executor per worker, then every iteration assigns 1 core
          // to the executor. Otherwise, every iteration assigns cores to a new executor.
          /**
           * 假如我们只允许在一个worker上启动一个executor,那么设置该worker上被分配的executor的数量为1
           * 否则就是在原来的executors的数量上加上1
           */
          if (oneExecutorPerWorker) {
            assignedExecutors(pos) = 1
          } else {
            assignedExecutors(pos) += 1
          }

          // Spreading out an application means spreading out its executors across as
          // many workers as possible. If we are not spreading out, then we should keep
          // scheduling executors on this worker until we use all of its resources.
          // Otherwise, just move on to the next worker.
          /**
           * 如果我们采用的是spreadOutApps这个算法,就意味着我们需要尽可能的将executor分配到足够多的
           * worker上,此时就应该设置keepScheduling设置为false,结束在该executors上的分配
           *
           * 如果我们采用的不是spreadOutApps这个算法,就意味着我们需要一直在这个worker上分配这个executor
           * 这个时候我们就需要设置keepScheduling为true,让其一直循环,一直到该worker上的资源不满足再继续分配executor了
           */
          if (spreadOutApps) {
            keepScheduling = false
          }
        }
      }
      //因为最外层是一个while循环,所以这边在过滤一遍,如果分配结束了,那么canLaunchExecutor就会返回false
      //得到的freeworkers必然是一个空,最外层的循环就结束了
      freeWorkers = freeWorkers.filter(canLaunchExecutor)
    }
    assignedCores
  }
关于这两种资源调度的策略:
spreadOutApps其实就是在可用的Worker列表中,逐个遍历,在每个worker上面平均的启动相应的Executor, 比如,现在需要启动10个Executor,但是第一次判断有5个可用(有空闲的资源)的worker节点,那么第一趟遍历的时候,会在每个Worker节点上面都启动一个Executor,然后会进行第二次判断,因为可能在第一次分配之后某个节点就没有空闲的资源了,所以需要再次的判断,然后进行第二次的遍历分配,这里我们假设在第二趟遍历的时候,这5个worker依然有足够的空闲资源,那么在第二趟的遍历之后,每个Worker节点上面都为这个app启动了2个Executor(平均分配)
非 spreadOutApps其实有两重的含义,在之前的版本中,这种方式含义是,在第一判断之后,在有可用的Worker节点上面选取空闲资源最多的呢个节点,尽可能的在这个节点上面启动app所需的所有Executor,如果资源不够的话,会进行在一次的判断,选取空闲资源最多的Worker继续启动(不是太合理).现在是按照assignedExecutors变量,可以指定在可用的Worker节点上面分别启动相应个数的Executor,(按需分配).
至于这两种资源分配的方式是由 if (spreadOutApps) { keepScheduling = false } 这个判断条件来判断的
第六步:调用第四步的allocateWorkerResourceToExecutors方法
private def allocateWorkerResourceToExecutors(
    app: ApplicationInfo,
    //在这个worker上需要分配的cores
    assignedCores: Int,
    //每一个executor需要的cores
    coresPerExecutor: Option[Int],
    worker: WorkerInfo): Unit = {
    // If the number of cores per executor is specified, we divide the cores assigned
    // to this worker evenly among the executors with no remainder.
    // Otherwise, we launch a single executor that grabs all the assignedCores on this worker.
    // 获取该worker应该有多少个executor
    val numExecutors = coresPerExecutor.map { assignedCores / _ }.getOrElse(1)
   // 获取每一个executor应该分配的核数,如果没有指定则使用计算的应该分配的核数
    val coresToAssign = coresPerExecutor.getOrElse(assignedCores)
    for (i <- 1 to numExecutors) {
      // 向worker上添加executor,创建ExecutorDesc对象,更新application已经分配到的cpu核数
      val exec = app.addExecutor(worker, coresToAssign)
      // 启动executor
      launchExecutor(worker, exec)
      // 更新application的状态
      app.state = ApplicationState.RUNNING
    }
  }
第六步:调用第六步的launchExecutor方法
  private def launchExecutor(worker: WorkerInfo, exec: ExecutorDesc): Unit = {
    logInfo("Launching executor " + exec.fullId + " on worker " + worker.id)
   // worker启动executor,并且更新worker的cpu和内存信息
    worker.addExecutor(exec)
    worker.endpoint.send(LaunchExecutor(
      masterUrl,
      exec.application.id, exec.id, exec.application.desc, exec.cores, exec.memory))
    // 向application发送ExecutorAdded消息
    exec.application.driver.send(ExecutorAdded(
      exec.id, worker.id, worker.hostPort, exec.cores, exec.memory))
  }