深入分析SpringMVC请求处理过程
文章目录
在上一篇文章中我们讲到了SpringMVC的初始化,分别初始化两个ApplicationContext,并且初始化一些处理器,然后将url与Controller的method映射关系存放起来。在这篇文章中我们将深入源码分析SpringMVC是怎样处理一个请求的、Adapter是干什么用的、以及拦截器的原理。
1. DispatcherServlet处理请求
我们知道,在web.xml中配置的DispatcherServlet 映射的url是全部,也就是说,所有的请求都将由这个servlet去处理,所以,我们来关注一下DispatcherServlet的doGet与doPost方法(位于父类FrameworkServlet中实现):
@Override
protected final void doGet(HttpServletRequest request, HttpServletResponse response)
    throws ServletException, IOException {

    processRequest(request, response);
}

@Override
protected final void doPost(HttpServletRequest request, HttpServletResponse response)
    throws ServletException, IOException {

    processRequest(request, response);
}
由此看出,这两个方法都一致指向同一个方法processRequest:
protected final void processRequest(HttpServletRequest request, HttpServletResponse response)
    throws ServletException, IOException {

    long startTime = System.currentTimeMillis();
    Throwable failureCause = null;

    //将当前线程的LocaleContext对象提取出来
    LocaleContext previousLocaleContext = LocaleContextHolder.getLocaleContext();
    //根据request创建一个LocaleContext
    LocaleContext localeContext = buildLocaleContext(request);

    //将当前线程的RequestAttributes对象提取出来
    RequestAttributes previousAttributes = RequestContextHolder.getRequestAttributes();
    //根据request创建一个RequestAttributes
    ServletRequestAttributes requestAttributes = buildRequestAttributes(request, response, previousAttributes);

    WebAsyncManager asyncManager = WebAsyncUtils.getAsyncManager(request);
    asyncManager.registerCallableInterceptor(FrameworkServlet.class.getName(), new RequestBindingInterceptor());

    //将上述创建的两个对象绑定到当前线程
    initContextHolders(request, localeContext, requestAttributes);

    try {
        //处理请求
        doService(request, response);
    }
    catch (ServletException | IOException ex) {
        failureCause = ex;
        throw ex;
    }
    catch (Throwable ex) {
        failureCause = ex;
        throw new NestedServletException("Request processing failed", ex);
    }

    finally {
        //将之前提取出来的两个对象绑定到当前线程中
        resetContextHolders(request, previousLocaleContext, previousAttributes);
        if (requestAttributes != null) {
            requestAttributes.requestCompleted();
        }

        if (logger.isDebugEnabled()) {
            if (failureCause != null) {
                this.logger.debug("Could not complete request", failureCause);
            }
            else {
                if (asyncManager.isConcurrentHandlingStarted()) {
                    logger.debug("Leaving response open for concurrent processing");
                }
                else {
                    this.logger.debug("Successfully completed request");
                }
            }
        }

        //对ApplicationContext发布事件
        publishRequestHandledEvent(request, response, startTime, failureCause);
    }
}
这个方法还没有做正式的处理请求的逻辑,而是在做一些准备工作:
- 提取当前线程的LocaleContext、RequestAttributes对象
- 根据request创建RequestAttributes、LocaleContext对象,并将这两个对象绑定到当前线程
- 处理请求
- 将刚刚提取的两个对象绑定到当前线程
- 发布事件
这里我们需要关注的是doService方法(由DispatcherServlet实现):
@Override
protected void doService(HttpServletRequest request, HttpServletResponse response) throws Exception {
    if (logger.isDebugEnabled()) {
        String resumed = WebAsyncUtils.getAsyncManager(request).hasConcurrentResult() ? " resumed" : "";
        logger.debug("DispatcherServlet with name '" + getServletName() + "'" + resumed +
                     " processing " + request.getMethod() + " request for [" + getRequestUri(request) + "]");
    }

    // Keep a snapshot of the request attributes in case of an include,
    // to be able to restore the original attributes after the include.
    //判断是否是include请求,如果是,保存当前request属性的快照
    Map<String, Object> attributesSnapshot = null;
    if (WebUtils.isIncludeRequest(request)) {
        attributesSnapshot = new HashMap<String, Object>();
        Enumeration<?> attrNames = request.getAttributeNames();
        while (attrNames.hasMoreElements()) {
            String attrName = (String) attrNames.nextElement();
            if (this.cleanupAfterInclude || attrName.startsWith("org.springframework.web.servlet")) {
                attributesSnapshot.put(attrName, request.getAttribute(attrName));
            }
        }
    }

    // Make framework objects available to handlers and view objects.
    //将一些处理器属性赋值给request,在后面会用到
    request.setAttribute(WEB_APPLICATION_CONTEXT_ATTRIBUTE, getWebApplicationContext());
    request.setAttribute(LOCALE_RESOLVER_ATTRIBUTE, this.localeResolver);
    request.setAttribute(THEME_RESOLVER_ATTRIBUTE, this.themeResolver);
    request.setAttribute(THEME_SOURCE_ATTRIBUTE, getThemeSource());

    FlashMap inputFlashMap = this.flashMapManager.retrieveAndUpdate(request, response);
    if (inputFlashMap != null) {
        request.setAttribute(INPUT_FLASH_MAP_ATTRIBUTE, Collections.unmodifiableMap(inputFlashMap));
    }
    request.setAttribute(OUTPUT_FLASH_MAP_ATTRIBUTE, new FlashMap());
    request.setAttribute(FLASH_MAP_MANAGER_ATTRIBUTE, this.flashMapManager);

    try {
        //处理请求
        doDispatch(request, response);
    }
    finally {
        if (!WebAsyncUtils.getAsyncManager(request).isConcurrentHandlingStarted()) {
            // Restore the original attribute snapshot, in case of an include.
            if (attributesSnapshot != null) {
                //如果是include请求,根据快照属性进行恢复
                restoreAttributesAfterInclude(request, attributesSnapshot);
            }
        }
    }
}
这个方法中依然是在做一些准备工作,包括是否是include的判断和操作,设置一些处理器在request中,到最后才开始真正做请求的处理doDispatch:
protected void doDispatch(HttpServletRequest request, HttpServletResponse response) throws Exception {
    HttpServletRequest processedRequest = request;
    HandlerExecutionChain mappedHandler = null;
    boolean multipartRequestParsed = false;

    WebAsyncManager asyncManager = WebAsyncUtils.getAsyncManager(request);

    try {
        ModelAndView mv = null;
        Exception dispatchException = null;

        try {
            //检查是否是文件上传的请求
            processedRequest = checkMultipart(request);
            multipartRequestParsed = (processedRequest != request);

            // Determine handler for the current request.
            //取得处理当前请求的hanlder处理器
            //第一个步骤的意义就在这里体现了.这里并不是直接返回controller
            //而是返回的HandlerExecutionChain请求处理器链对象
            //该对象封装了handler和interceptors
            mappedHandler = getHandler(processedRequest);
            // 如果handler为空,则返回404
            if (mappedHandler == null) {
                noHandlerFound(processedRequest, response);
                return;
            }

            // Determine handler adapter for the current request.
            //获取处理request的处理器适配器handler adapter
            HandlerAdapter ha = getHandlerAdapter(mappedHandler.getHandler());

            // Process last-modified header, if supported by the handler.
            //处理 last-modified 请求头
            String method = request.getMethod();
            boolean isGet = "GET".equals(method);
            if (isGet || "HEAD".equals(method)) {
                long lastModified = ha.getLastModified(request, mappedHandler.getHandler());
                if (logger.isDebugEnabled()) {
                    logger.debug("Last-Modified value for [" + getRequestUri(request) + "] is: " + lastModified);
                }
                if (new ServletWebRequest(request, response).checkNotModified(lastModified) && isGet) {
                    return;
                }
            }

            //拦截器的前置处理
            if (!mappedHandler.applyPreHandle(processedRequest, response)) {
                return;
            }

            // Actually invoke the handler.
            //实际的处理器处理请求,返回结果视图对象
            mv = ha.handle(processedRequest, response, mappedHandler.getHandler());

            if (asyncManager.isConcurrentHandlingStarted()) {
                return;
            }

            //如果mv中没有设置视图并且mv为空,给一个默认的视图处理(如果有)
            applyDefaultViewName(processedRequest, mv);
            //拦截器的后处理
            mappedHandler.applyPostHandle(processedRequest, response, mv);
        }
        catch (Exception ex) {
            //如果发生异常,异常对象赋值给dispatchException
            dispatchException = ex;
        }
        catch (Throwable err) {
            // As of 4.3, we're processing Errors thrown from handler methods as well,
            // making them available for @ExceptionHandler methods and other scenarios.
            //如果发生异常,异常对象赋值给dispatchException
            dispatchException = new NestedServletException("Handler dispatch failed", err);
        }
        //如果参数dispatchException不为空,证明发生了异常,将进行异常的处理(视图)
        //之后会根据mv跳转视图
        processDispatchResult(processedRequest, response, mappedHandler, mv, dispatchException);
    }
    catch (Exception ex) {
        //触发完成之后的操作,回调拦截器的afterCompletion方法,不同的是,ex不为空
        //也就是说会传一个异常进去
        triggerAfterCompletion(processedRequest, response, mappedHandler, ex);
    }
    catch (Throwable err) {
        //触发完成之后的操作,回调拦截器的afterCompletion方法,不同的是,ex不为空
        //也就是说会传一个异常进去
        triggerAfterCompletion(processedRequest, response, mappedHandler,
                               new NestedServletException("Handler processing failed", err));
    }
    finally {
        if (asyncManager.isConcurrentHandlingStarted()) {
            // Instead of postHandle and afterCompletion
            if (mappedHandler != null) {
                //在最后,又提供了一个回调入口,如果拦截器有AsyncHandlerInterceptor类型的话
                //将执行AsyncHandlerInterceptor的afterConcurrentHandlingStarted回调
                mappedHandler.applyAfterConcurrentHandlingStarted(processedRequest, response);
            }
        }
        else {
            // Clean up any resources used by a multipart request.
            if (multipartRequestParsed) {
                cleanupMultipart(processedRequest);
            }
        }
    }
}
在这个方法中,我们罗列出主要的主线:
- 根据request信息寻找对应的handler
- 根据Handler寻找对应的HanldlerAdapter
- 过滤器的处理
- 异常视图的处理
- 根据视图跳转页面
1.1 寻找Handler
首先,根据request去调用了getHandler方法:
@Nullable
protected HandlerExecutionChain getHandler(HttpServletRequest request) throws Exception {
    //初始化的handlerMappings需不为空
    if (this.handlerMappings != null) {
		//遍历
        for (HandlerMapping hm : this.handlerMappings) {
            if (logger.isTraceEnabled()) {
                logger.trace(
                    "Testing handler map [" + hm + "] in DispatcherServlet with name '" + getServletName() + "'");
            }
            HandlerExecutionChain handler = hm.getHandler(request);
            //碰到返回值不为空的,证明找到了,直接返回
            if (handler != null) {
                return handler;
            }
        }
    }
    return null;
}
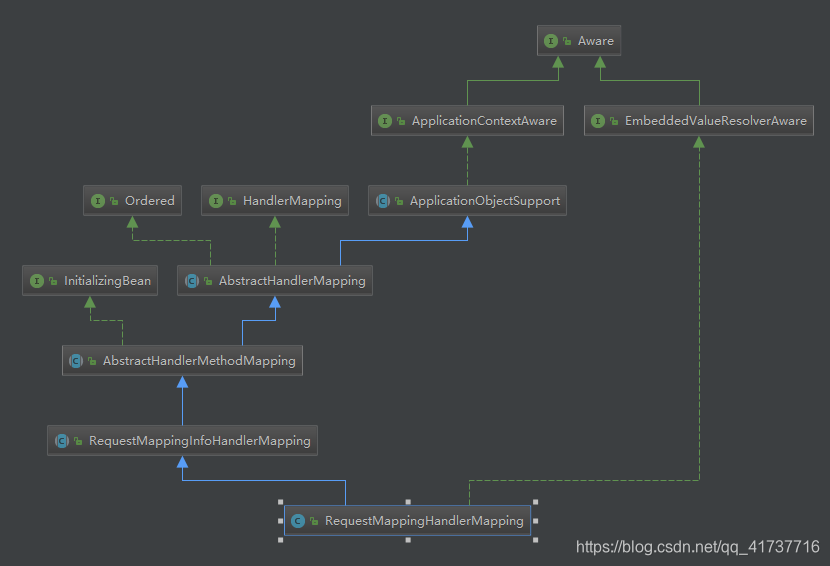
我们需要关注的是指定的HandlerMapping的getHandler是怎么找chain的,我们回忆一下上一篇文章中说到handlerMapping的初始化,其初始化了两个handlerMapping,而我们只需要关注一个Handler那就是RequestMappingHandlerMapping,回忆一下它的类结构图:
我们进入其抽象类的AbstractHandlerMapping的getHandler方法:
@Override
@Nullable
public final HandlerExecutionChain getHandler(HttpServletRequest request) throws Exception {
    //由子类实现,也就是AbstractHandlerMethodMapping
    Object handler = getHandlerInternal(request);
    if (handler == null) {
        //如果没获取到handler,获取一个默认的
        handler = getDefaultHandler();
    }
    //还没获取到,就返回null
    if (handler == null) {
        return null;
    }
    // Bean name or resolved handler?
    //此时的hanlder有可能是一个字符串,也就是beanName
    if (handler instanceof String) {
        String handlerName = (String) handler;
        //从IOC容器中获取
        handler = obtainApplicationContext().getBean(handlerName);
    }

    //封装为一个chain
    HandlerExecutionChain executionChain = getHandlerExecutionChain(handler, request);
    if (CorsUtils.isCorsRequest(request)) {
        CorsConfiguration globalConfig = this.globalCorsConfigSource.getCorsConfiguration(request);
        CorsConfiguration handlerConfig = getCorsConfiguration(handler, request);
        CorsConfiguration config = (globalConfig != null ? globalConfig.combine(handlerConfig) : handlerConfig);
        executionChain = getCorsHandlerExecutionChain(request, executionChain, config);
    }
    return executionChain;
}
这个方法大致是做一些包装工作,将得到的handler封装为chain并返回,主要的逻辑处理还是在getHandlerInternal方法中,在其子类AbstractHanlderMethodMapping实现:
@Override
protected HandlerMethod getHandlerInternal(HttpServletRequest request) throws Exception {
    //截取用于匹配的url有效路径
    String lookupPath = getUrlPathHelper().getLookupPathForRequest(request);
    if (logger.isDebugEnabled()) {
        logger.debug("Looking up handler method for path " + lookupPath);
    }
    this.mappingRegistry.acquireReadLock();
    try {
        //查找url对应的method
        HandlerMethod handlerMethod = lookupHandlerMethod(lookupPath, request);
        if (logger.isDebugEnabled()) {
            if (handlerMethod != null) {
                logger.debug("Returning handler method [" + handlerMethod + "]");
            }
            else {
                logger.debug("Did not find handler method for [" + lookupPath + "]");
            }
        }
        return (handlerMethod != null ? handlerMethod.createWithResolvedBean() : null);
    }
    finally {
        this.mappingRegistry.releaseReadLock();
    }
}
这里主要方法是lookupHandlerMethod,其主要用url去寻找对应的HandlerMethod,
this.mappingRegistry.getMappingsByUrl(lookupPath);

@Nullable
public List<T> getMappingsByUrl(String urlPath) {
    return this.urlLookup.get(urlPath);
}
还记得urlLookup这个Map吗,在DispatcherServlet中初始化所有的url与method的映射,其中信息就存放在4个Map中,urlLookup就是其中之一存放映射关系的Map,此处从Map中取出url对应的method,然后返回一个封装对象HandlerMethod。
回到主线getHandler方法中,我们知道,现在执行了getHandlerInternal方法返回了一个HandlerMethod对象,然后将对其进行封装:
HandlerExecutionChain executionChain = getHandlerExecutionChain(handler, request);
protected HandlerExecutionChain getHandlerExecutionChain(Object handler, HttpServletRequest request) {
    //如果不是chain类型,将handler作为构造函数创建一个chain实例
    HandlerExecutionChain chain = (handler instanceof HandlerExecutionChain ?
                                   (HandlerExecutionChain) handler : new HandlerExecutionChain(handler));

    //获得有效url路径,用于匹配拦截器规则
    String lookupPath = this.urlPathHelper.getLookupPathForRequest(request);
    //获取所有拦截器
    for (HandlerInterceptor interceptor : this.adaptedInterceptors) {
        //如果是MappedInterceptor类型的,按照规则看看当前拦截器是否需要加入拦截
        if (interceptor instanceof MappedInterceptor) {
            MappedInterceptor mappedInterceptor = (MappedInterceptor) interceptor;
            //如果拦截器规则设置/*,表示拦截所有,也就是说url是什么都会加入
            if (mappedInterceptor.matches(lookupPath, this.pathMatcher)) {
                chain.addInterceptor(mappedInterceptor.getInterceptor());
            }
        }
        else {
            //该拦截器直接加入拦截器链
            chain.addInterceptor(interceptor);
        }
    }
    return chain;
}
在封装chain的过程中主要做了两件事情:
- 创建一个chain实例,handler作为初始值存入实例中。
- 遍历拦截器,如匹配则将拦截器应用于该chain中,在后面会对匹配的这些拦截器进行拦截器的调用。
到此就结束了寻找Handler的过程,这里来总结一下,首先用RequestMappingHandlerMapping这个HandlerMapping去寻找handler,然后此类根据url去找Map中url对应的method,封装为HandlerMethod对象,然后再将HandlerMethod对象封装为chain对象,主要目的是加入拦截器链,然后返回这个chain就是我们最终需要寻找的hanlder了。
1.2 没有找到Handler的处理
如果找到的chain为空,则:
if (mappedHandler == null) {
    noHandlerFound(processedRequest, response);
    return;
}
protected void noHandlerFound(HttpServletRequest request, HttpServletResponse response) throws Exception {
    if (pageNotFoundLogger.isWarnEnabled()) {
        pageNotFoundLogger.warn("No mapping found for HTTP request with URI [" + getRequestUri(request) +
                                "] in DispatcherServlet with name '" + getServletName() + "'");
    }
    //如果允许抛出异常,当没有handler被找到
    if (this.throwExceptionIfNoHandlerFound) {
        //抛出没找到handler的异常
        throw new NoHandlerFoundException(request.getMethod(), getRequestUri(request),
                                          new ServletServerHttpRequest(request).getHeaders());
    }
    else {
        //直接跳转默认的NOT_FOUND页面
        response.sendError(HttpServletResponse.SC_NOT_FOUND);
    }
}
如果这里有设置throwExceptionIfNoHandlerFound为true的话,将会抛出异常,为什么这么做呢?读者需要看外部catch的逻辑,如果这里抛出异常则会被catch住,然后处理视图时exception参数是会有值的,将进行异常的处理,在后面会详细解释,这样做的目的就是为了可以自定义异常的视图。默认参数为false,则会跳转默认异常页面。
1.3 根据Handler寻找Adapter
回到主线doDispather,接下来会根据hanlder寻找adapter:
HandlerAdapter ha = getHandlerAdapter(mappedHandler.getHandler());
protected HandlerAdapter getHandlerAdapter(Object handler) throws ServletException {
    if (this.handlerAdapters != null) {
        //遍历Adapter
        for (HandlerAdapter ha : this.handlerAdapters) {
            if (logger.isTraceEnabled()) {
                logger.trace("Testing handler adapter [" + ha + "]");
            }
            //如果支持,直接返回
            if (ha.supports(handler)) {
                return ha;
            }
        }
    }
    throw new ServletException("No adapter for handler [" + handler +
                               "]: The DispatcherServlet configuration needs to include a HandlerAdapter that supports this handler");
}
这里回忆一下默认的Adapter实现有哪些:
org.springframework.web.servlet.HandlerAdapter=org.springframework.web.servlet.mvc.HttpRequestHandlerAdapter,\
	org.springframework.web.servlet.mvc.SimpleControllerHandlerAdapter,\
    org.springframework.web.servlet.mvc.method.annotation.RequestMappingHandlerAdapter
其中前两个Adapter都跟我们当前的例子没关系,怎么看出来的呢?回到getHandlerAdapter方法中,接下来会遍历Adapter列表,依此调用supports方法查询与当前handler是否支持。其上两个Adapter一个是处理HttpRequestHandler,一个是处理Controller类的,只有最后一个RequestMappingHandlerAdapter的supports方法才是我们要的:
@Override
public boolean supports(Object handler) {
    return HandlerMethod.class.equals(handler.getClass());
}
还记得handler的类型吗,在上面就已经被封装成HandlerMethod对象了,所以此时是RequestMappingHandlerAdapter这个适配器来处理请求。
1.4 拦截器的处理
在处理请求的过程中,涉及到许多拦截器的处理,其中主要的拦截器是HandlerInterceptor这个接口:
//前置处理
default boolean preHandle(HttpServletRequest request, HttpServletResponse response, Object handler)
      throws Exception {

   return true;
}

//后置处理
default void postHandle(HttpServletRequest request, HttpServletResponse response, Object handler,
      @Nullable ModelAndView modelAndView) throws Exception {
}

//完成时触发处理
default void afterCompletion(HttpServletRequest request, HttpServletResponse response, Object handler,
      @Nullable Exception ex) throws Exception {
}
这个拦截器拥有三个回调入口:
- 前置处理:还未执行对应method的时候进入回调方法,如果方法返回false,将不会继续往下执行了,直接return。
- 后置处理:在执行完method返回ModelAndView对象的时候,进入回调方法,注意这里还未进行视图的跳转,也就是说是在返回请求之前的时机,所以主要用途是可以修改ModelAndView,或是在request中赋值,这样,后面进行跳转的时候可以携带被自定义后处理修改后的ModelAndView跳转到页面去。
- 完成时触发:这个回调入口在全部完成后(处理完视图跳转之后)会执行的回调方法,注意此时参数ex有可能不为空,若ex不为空用户需要考虑是否进行异常的处理,因为ex如果不为空的话证明此时的处理模型和视图的跳转等一些流程出现了异常。若ex不为空,表示没有异常执行方法完成。
来看看具体的回调入口是在什么时机吧。我们回到主线,此时已经寻找到Adapter了,之后将执行这段代码(其中mappedHandler为之前我们获得的chain,其包含了拦截器):
if (!mappedHandler.applyPreHandle(processedRequest, response)) {
    return;
}
boolean applyPreHandle(HttpServletRequest request, HttpServletResponse response) throws Exception {
    //获取所有拦截器
    HandlerInterceptor[] interceptors = getInterceptors();
    if (!ObjectUtils.isEmpty(interceptors)) {
        for (int i = 0; i < interceptors.length; i++) {
            HandlerInterceptor interceptor = interceptors[i];
            //依次调用拦截器preHandle的方法,若返回false,则方法返回false
            //并执行triggerAfterCompletion完成触发回调,因为这里已经被拦截了,不会再执行下去了
            if (!interceptor.preHandle(request, response, this.handler)) {
                triggerAfterCompletion(request, response, null);
                return false;
            }
            this.interceptorIndex = i;
        }
    }
    return true;
}
可以看到,前置处理主要是用来判断该请求是否允许放行,若不允许,直接执行完成的触发回调(在后面详细解释),只有全部返回true,才会进行下面的逻辑,这里假设所有拦截器都放行,我们继续往下看:
//适配器执行HandlerMethod对应的方法,并返回一个ModelAndView
mv = ha.handle(processedRequest, response, mappedHandler.getHandler());

if (asyncManager.isConcurrentHandlingStarted()) {
    return;
}

//如果mv为空,视图为空,给一个默认的视图
applyDefaultViewName(processedRequest, mv);
//后处理
mappedHandler.applyPostHandle(processedRequest, response, mv);
从流程上可以看出,这里是先执行了url对应的那个method,返回了一个mv,注意此时页面都没有跳转,都没有进行处理的时候,就进入了后处理方法applyPostHandle:
void applyPostHandle(HttpServletRequest request, HttpServletResponse response, @Nullable ModelAndView mv)
    throws Exception {

    //获得所有的拦截器
    HandlerInterceptor[] interceptors = getInterceptors();
    if (!ObjectUtils.isEmpty(interceptors)) {
        for (int i = interceptors.length - 1; i >= 0; i--) {
            HandlerInterceptor interceptor = interceptors[i];
            //执行拦截器的postHandle后处理方法
            interceptor.postHandle(request, response, this.handler, mv);
        }
    }
}
从这里可以看出,后处理的时机是在页面得到mv之前的,所以在后处理的时候最适合来处理ModelAndView的值,或是修改request中的属性,在后面页面处理的时候会拿到后处理修改之后的ModelAndView,起到了后处理ModelAndView的效果。
回到主线,继续走:
catch (Exception ex) {
    dispatchException = ex;
}
catch (Throwable err) {
    // As of 4.3, we're processing Errors thrown from handler methods as well,
    // making them available for @ExceptionHandler methods and other scenarios.
    dispatchException = new NestedServletException("Handler dispatch failed", err);
}
//处理MV,并且进行页面的跳转
processDispatchResult(processedRequest, response, mappedHandler, mv, dispatchException);
这里注意两个catch方法,若发生异常将执行完成触发回调方法,将异常对象作为参数传入此回调,来看看此完成回调方法做了什么:
private void triggerAfterCompletion(HttpServletRequest request, HttpServletResponse response,
                                    @Nullable HandlerExecutionChain mappedHandler, Exception ex) throws Exception {

    if (mappedHandler != null) {
        //调用chain的triggerAfterCompletion方法
        mappedHandler.triggerAfterCompletion(request, response, ex);
    }
    throw ex;
}
这里做回调,都是调用chain的方法,因为先前chain已经保存了需要执行的拦截器变量。这里进入triggerAfterCompletion方法:
void triggerAfterCompletion(HttpServletRequest request, HttpServletResponse response, @Nullable Exception ex)
    throws Exception {

    HandlerInterceptor[] interceptors = getInterceptors();
    if (!ObjectUtils.isEmpty(interceptors)) {
        for (int i = this.interceptorIndex; i >= 0; i--) {
            HandlerInterceptor interceptor = interceptors[i];
            try {
                //回调入口
                interceptor.afterCompletion(request, response, this.handler, ex);
            }
            catch (Throwable ex2) {
                logger.error("HandlerInterceptor.afterCompletion threw exception", ex2);
            }
        }
    }
}
没有什么特别的,只是遍历每个拦截器,执行拦截器的afterCompletion方法而已,值得一提的是,此时ex参数是不为空的,这里再举一个例子,在doDspatcher方法中的处理分发结果processDispatchResult方法中,最后会执行这样一段代码:
if (mappedHandler != null) {
    mappedHandler.triggerAfterCompletion(request, response, null);
}
在处理完页面跳转之后,也是会执行triggerAfterCompletion完成时回调的,此时的ex是为null的,而回顾一下我们开头说的前置处理,若返回false,直接执行完成触发并直接中止请求的执行:
if (!interceptor.preHandle(request, response, this.handler)) {
    triggerAfterCompletion(request, response, null);
    return false;
}
可以看到,这里的ex参数也是null。也就是说,完成时触发分别在以下场景会进行触发:
- 前置处理器不放行,返回false时执行完成回调:ex=null
- 执行完页面的跳转之后,执行完成回调:ex=null
- 执行页面跳转的过程中若出现异常,执行完成回调:ex=当前出现的异常
所以,从以上情况可以看出此回调方法都是在被认为操作已经结束的时候执行的,其中的ex是有可能有值的,有没有异常都会执行完成回调,所以在写完成回调的时候建议考虑异常情况的逻辑处理,也就是ex != null的处理。
回到主线,最后,不管怎样,都会进入一个finally语句块:
finally {
    if (asyncManager.isConcurrentHandlingStarted()) {
        // Instead of postHandle and afterCompletion
        if (mappedHandler != null) {
            //另外一种拦截器的回调入口
            mappedHandler.applyAfterConcurrentHandlingStarted(processedRequest, response);
        }
    }
    else {
        // Clean up any resources used by a multipart request.
        if (multipartRequestParsed) {
            cleanupMultipart(processedRequest);
        }
    }
}
这里介绍另一种拦截器,其是刚刚介绍的HandlerInterceptor拦截器的子类AsyncHandlerInterceptor,其又定义了一个方法,是在finally语句块中会执行的一个回调入口,这里先看看AsyncHandlerInterceptor:
public interface AsyncHandlerInterceptor extends HandlerInterceptor {

	default void afterConcurrentHandlingStarted(HttpServletRequest request, HttpServletResponse response,
			Object handler) throws Exception {
	}

}
接口只定义了一个方法,回到finally语句块中,看看applyAfterConcurrentHandlingStarted方法做了什么:
void applyAfterConcurrentHandlingStarted(HttpServletRequest request, HttpServletResponse response) {
    //获取chain中的拦截器
    HandlerInterceptor[] interceptors = getInterceptors();
    if (!ObjectUtils.isEmpty(interceptors)) {
        for (int i = interceptors.length - 1; i >= 0; i--) {
            //若此拦截器是AsyncHandlerInterceptor类型的
            if (interceptors[i] instanceof AsyncHandlerInterceptor) {
                try {
                    AsyncHandlerInterceptor asyncInterceptor = (AsyncHandlerInterceptor) interceptors[i];
                    //执行回调
                    asyncInterceptor.afterConcurrentHandlingStarted(request, response, this.handler);
                }
                catch (Throwable ex) {
                    logger.error("Interceptor [" + interceptors[i] + "] failed in afterConcurrentHandlingStarted", ex);
                }
            }
        }
    }
}
这段代码很简单,也就是说,如果我们的拦截器还额外实现了AsyncHandlerInterceptor接口,意味着其也实现了afterConcurrentHandlingStarted回调方法,在最后收尾时执行该回调。
1.5 Adapter处理请求
回到主线中去,接下来会使用得到的Adapter去执行handler方法(注意这里是执行的RequestMappingHandlerAdapter的handle方法,而RequestMappingHandlerAdapter不是webFlux包下的,webFlux里涉及到reactive,这里仅讨论返回ModelAndView的情况)这里是RequestMappingHandlerAdapter的父类AbstractHandlerMethodAdapter实现了handle方法:
mv = ha.handle(processedRequest, response, mappedHandler.getHandler());
@Override
@Nullable
public final ModelAndView handle(HttpServletRequest request, HttpServletResponse response, Object handler)
    throws Exception {

    return handleInternal(request, response, (HandlerMethod) handler);
}
而handleInternal方法是由RequestMappingHandlerAdapter实现的:
@Override
protected ModelAndView handleInternal(HttpServletRequest request,
                                      HttpServletResponse response, HandlerMethod handlerMethod) throws Exception {

    ModelAndView mav;
    checkRequest(request);

    // Execute invokeHandlerMethod in synchronized block if required.
    if (this.synchronizeOnSession) {
        HttpSession session = request.getSession(false);
        if (session != null) {
            Object mutex = WebUtils.getSessionMutex(session);
            synchronized (mutex) {
                mav = invokeHandlerMethod(request, response, handlerMethod);
            }
        }
        else {
            // No HttpSession available -> no mutex necessary
            mav = invokeHandlerMethod(request, response, handlerMethod);
        }
    }
    else {
        // No synchronization on session demanded at all...
        mav = invokeHandlerMethod(request, response, handlerMethod);
    }

    if (!response.containsHeader(HEADER_CACHE_CONTROL)) {
        if (getSessionAttributesHandler(handlerMethod).hasSessionAttributes()) {
            applyCacheSeconds(response, this.cacheSecondsForSessionAttributeHandlers);
        }
        else {
            prepareResponse(response);
        }
    }

    return mav;
}
到这里我并没有去深究,因为其封装了许多对象来处理,大致逻辑就是利用反射去执行对应的方法,值得一提的是参数的绑定,有两种方式:
- 通过@RequestParam注解绑定
- 通过参数名称绑定
第一种只需要在方法参数前面声明注解@RequestParam(“paramName”),就可以将请求request传来的参数名为"paramName"的参数绑定到方法的参数上。
第二种是可以不用写注解,就可以将参数根据名称绑定,SpringMVC底层用到了asm框架读取字节码文件来获取参数的名称,对方法参数进行绑定。
所以这里有一个可有可无的小建议,将参数都使用@RequestParam,这样就省去了asm框架读取字节码的操作,也更能省点时间,不过这里参数的绑定上可能是有缓存的,所以这里留给读者去探究。
1.6 异常视图的处理
当处理请求时发生异常,Spring提供了一些方式来对异常的处理。这里回到主线doDispatcher,在processDispatchResult方法之前若出现任何异常,都会被catch捕捉,并对dispatchException进行赋值,并且正常执行processDispatchResult方法。在processDispatchResult方法中有这样一段代码:
//当发生异常,exception!=null
if (exception != null) {
    if (exception instanceof ModelAndViewDefiningException) {
        logger.debug("ModelAndViewDefiningException encountered", exception);
        mv = ((ModelAndViewDefiningException) exception).getModelAndView();
    }
    else {
        Object handler = (mappedHandler != null ? mappedHandler.getHandler() : null);
        //进行异常的处理,将mv重新赋值,变为异常的mv视图
        mv = processHandlerException(request, response, handler, exception);
        errorView = (mv != null);
    }
}
这里进入processHandlerException方法处理异常:
@Nullable
protected ModelAndView processHandlerException(HttpServletRequest request, HttpServletResponse response,
                                               @Nullable Object handler, Exception ex) throws Exception {

    // Check registered HandlerExceptionResolvers...
    ModelAndView exMv = null;
    if (this.handlerExceptionResolvers != null) {
        for (HandlerExceptionResolver handlerExceptionResolver : this.handlerExceptionResolvers) {
            //使用handlerExceptionResolver处理异常
            exMv = handlerExceptionResolver.resolveException(request, response, handler, ex);
            //返回值不为空,证明已经处理好,可以跳出循环往下执行了
            if (exMv != null) {
                break;
            }
        }
    }
    if (exMv != null) {
        if (exMv.isEmpty()) {
            request.setAttribute(EXCEPTION_ATTRIBUTE, ex);
            return null;
        }
        // We might still need view name translation for a plain error model...
        if (!exMv.hasView()) {
            String defaultViewName = getDefaultViewName(request);
            if (defaultViewName != null) {
                exMv.setViewName(defaultViewName);
            }
        }
        if (logger.isDebugEnabled()) {
            logger.debug("Handler execution resulted in exception - forwarding to resolved error view: " + exMv, ex);
        }
        WebUtils.exposeErrorRequestAttributes(request, ex, getServletName());
        return exMv;
    }

    throw ex;
}
这里主要是handlerExceptionResolver处理的异常,handlerExceptionResolver也是一个DispatherServlet初始化的处理器,它与初始化HandlerMapping的过程一样,如果没有配置是会从配置文件中读取默认配置的,让我们来看看配置文件DispatcherServlet.properties:
org.springframework.web.servlet.HandlerExceptionResolver=org.springframework.web.servlet.mvc.method.annotation.ExceptionHandlerExceptionResolver,\
org.springframework.web.servlet.mvc.annotation.ResponseStatusExceptionResolver,\
org.springframework.web.servlet.mvc.support.DefaultHandlerExceptionResolver
而这三个Resolver都实现了AbstractHandlerExceptionResolver这个抽象类,所以不论是哪个resolver,都会进入此抽象类的resolveException方法:
@Override
@Nullable
public ModelAndView resolveException(HttpServletRequest request, HttpServletResponse response,
                                     @Nullable Object handler, Exception ex) {

    if (shouldApplyTo(request, handler)) {
        if (this.logger.isDebugEnabled()) {
            this.logger.debug("Resolving exception from handler [" + handler + "]: " + ex);
        }
        prepareResponse(ex, response);
        //由子类实现
        ModelAndView result = doResolveException(request, response, handler, ex);
        if (result != null) {
            logException(ex, request);
        }
        return result;
    }
    else {
        return null;
    }
}
而这里不同的方法是doResolveException,该方法返回一个ModelAndView对象,在方法内部对异常类型进行判断,然后尝试生成对应的ModelAndView对象,如果该方法返回了null,则Spring会继续寻找其他的ExceptionResolver。这里doResolveException方法将会对ModelAndView设置一个异常视图和一些属性,并返回出去,从processDispatchResult可以看出,若是有异常,mv对象将会被异常处理返回的mv对象替换,并执行异常的mv的视图的跳转,从而优雅的解决异常问题。
1.7 页面的跳转
做了前面这么多的处理,现在来到最后也是最关键的一步,根据ModelAndView对象对页面进行跳转处理。
来到doDispatcher方法中的processDispatchResult方法,有这样一段代码:
//如果mv对象不为空
if (mv != null && !mv.wasCleared()) {
    //跳转
    render(mv, request, response);
    if (errorView) {
        WebUtils.clearErrorRequestAttributes(request);
    }
}
protected void render(ModelAndView mv, HttpServletRequest request, HttpServletResponse response) throws Exception {
    // Determine locale for request and apply it to the response.
    Locale locale =
        (this.localeResolver != null ? this.localeResolver.resolveLocale(request) : request.getLocale());
    response.setLocale(locale);

    //视图对象
    View view;
    //从mv直接尝试拿视图名称
    String viewName = mv.getViewName();
    //如果视图名称不为空,证明需要寻找视图对象
    if (viewName != null) {
        // We need to resolve the view name.
        //根据视图名称,寻找视图对象
        view = resolveViewName(viewName, mv.getModelInternal(), locale, request);
        if (view == null) {
            throw new ServletException("Could not resolve view with name '" + mv.getViewName() +
                                       "' in servlet with name '" + getServletName() + "'");
        }
    }
    else {
        // No need to lookup: the ModelAndView object contains the actual View object.
        //名称为空,那么mv就已经定义好了视图对象
        view = mv.getView();
        //如果没有,抛出异常
        if (view == null) {
            throw new ServletException("ModelAndView [" + mv + "] neither contains a view name nor a " +
                                       "View object in servlet with name '" + getServletName() + "'");
        }
    }

    // Delegate to the View object for rendering.
    if (logger.isDebugEnabled()) {
        logger.debug("Rendering view [" + view + "] in DispatcherServlet with name '" + getServletName() + "'");
    }
    try {
        if (mv.getStatus() != null) {
            response.setStatus(mv.getStatus().value());
        }
        //使用视图对象进行页面跳转
        view.render(mv.getModelInternal(), request, response);
    }
    catch (Exception ex) {
        if (logger.isDebugEnabled()) {
            logger.debug("Error rendering view [" + view + "] in DispatcherServlet with name '" +
                         getServletName() + "'", ex);
        }
        throw ex;
    }
}
这里主要会对视图名称选择合适的视图对象进行渲染,然后进行页面的跳转,这里主要看resolveViewName方法:
@Nullable
protected View resolveViewName(String viewName, @Nullable Map<String, Object> model,
                               Locale locale, HttpServletRequest request) throws Exception {

    if (this.viewResolvers != null) {
        //使用视图解析器去尝试解析视图
        for (ViewResolver viewResolver : this.viewResolvers) {
            View view = viewResolver.resolveViewName(viewName, locale);
            //如果返回值不为空,证明解析完成,直接返回视图对象
            if (view != null) {
                return view;
            }
        }
    }
    return null;
}
其中,viewResolver也是在上一篇讲DispatherServlet的初始化时进行初始化的,同样,其也是默认配置配置文件中的Resolver:
org.springframework.web.servlet.ViewResolver=org.springframework.web.servlet.view.InternalResourceViewResolver
默认只有一个resolver,所以这里对InternalResourceViewResolver进行分析,其中resolveViewName方法在这个类的父类AbstractCachingViewResolver中定义:
@Override
public View resolveViewName(String viewName, Locale locale) throws Exception {
    if (!isCache()) {
        //判断是否缓存,如果不缓存,直接创建一个视图对象
        return createView(viewName, locale);
    }
    //如果可以缓存
    else {
        //获取缓存的key
        Object cacheKey = getCacheKey(viewName, locale);
        //根据key寻找对应视图对象
        View view = this.viewAccessCache.get(cacheKey);
        //若没找到
        if (view == null) {
            synchronized (this.viewCreationCache) {
                //从第二层缓存取
                view = this.viewCreationCache.get(cacheKey);
                //还是没找到
                if (view == null) {
                    // Ask the subclass to create the View object.
                    //创建视图对象
                    view = createView(viewName, locale);
                    if (view == null && this.cacheUnresolved) {
                        //默认不解决的视图对象,空实现
                        view = UNRESOLVED_VIEW;
                    }
                    if (view != null) {
                        //放入两个缓存中
                        this.viewAccessCache.put(cacheKey, view);
                        this.viewCreationCache.put(cacheKey, view);
                        if (logger.isTraceEnabled()) {
                            logger.trace("Cached view [" + cacheKey + "]");
                        }
                    }
                }
            }
        }
        //若是空实现,返回null
        return (view != UNRESOLVED_VIEW ? view : null);
    }
}
这里关注创建视图的方法createView,在子类UrlBasedViewResolver中定义:
@Override
protected View createView(String viewName, Locale locale) throws Exception {
    // If this resolver is not supposed to handle the given view,
    // return null to pass on to the next resolver in the chain.
    if (!canHandle(viewName, locale)) {
        return null;
    }
    // Check for special "redirect:" prefix.
    //处理前缀为"redirect:"的情况
    if (viewName.startsWith(REDIRECT_URL_PREFIX)) {
        String redirectUrl = viewName.substring(REDIRECT_URL_PREFIX.length());
        RedirectView view = new RedirectView(redirectUrl, isRedirectContextRelative(), isRedirectHttp10Compatible());
        String[] hosts = getRedirectHosts();
        if (hosts != null) {
            view.setHosts(hosts);
        }
        return applyLifecycleMethods(viewName, view);
    }
    // Check for special "forward:" prefix.
    //处理前缀为"forward:"的情况
    if (viewName.startsWith(FORWARD_URL_PREFIX)) {
        String forwardUrl = viewName.substring(FORWARD_URL_PREFIX.length());
        return new InternalResourceView(forwardUrl);
    }
    // Else fall back to superclass implementation: calling loadView.
    return super.createView(viewName, locale);
}
在创建视图时分别考虑了几种情况:
-
如果是redirect前缀:返回RedirectView类型的视图对象
-
如果是forward前缀:返回InternalResourceView类型的视图对象
-
如果不是上述的,调用父类创建视图方法:
@Nullable protected View createView(String viewName, Locale locale) throws Exception { return loadView(viewName, locale); }其中loadView又回到其子类
UrlBasedViewResolver中:@Override protected View loadView(String viewName, Locale locale) throws Exception { AbstractUrlBasedView view = buildView(viewName); View result = applyLifecycleMethods(viewName, view); return (view.checkResource(locale) ? result : null); }进入buildView方法:
protected AbstractUrlBasedView buildView(String viewName) throws Exception { Class<?> viewClass = getViewClass(); Assert.state(viewClass != null, "No view class"); AbstractUrlBasedView view = (AbstractUrlBasedView) BeanUtils.instantiateClass(viewClass); //添加前缀与后缀 view.setUrl(getPrefix() + viewName + getSuffix()); String contentType = getContentType(); if (contentType != null) { //设置ContentType view.setContentType(contentType); } view.setRequestContextAttribute(getRequestContextAttribute()); view.setAttributesMap(getAttributesMap()); Boolean exposePathVariables = getExposePathVariables(); if (exposePathVariables != null) { view.setExposePathVariables(exposePathVariables); } Boolean exposeContextBeansAsAttributes = getExposeContextBeansAsAttributes(); if (exposeContextBeansAsAttributes != null) { view.setExposeContextBeansAsAttributes(exposeContextBeansAsAttributes); } String[] exposedContextBeanNames = getExposedContextBeanNames(); if (exposedContextBeanNames != null) { view.setExposedContextBeanNames(exposedContextBeanNames); } return view; }这里,前缀后缀是自己设置的,回忆一下xml配置,我们需要这样配置一个视图解析器:
<bean class="org.springframework.web.servlet.view.InternalResourceViewResolver">
    <property name="viewClass" value="org.springframework.web.servlet.view.JstlView" />
    <property name="prefix" value="/WEB-INF/jsp/" />
    <property name="suffix" value=".jsp"/>
</bean>
配置其前缀后缀,就在这里用到。
回到render方法,在获取视图对象之后,将调用此视图对象的render方法,进行页面的跳转:
view.render(mv.getModelInternal(), request, response);
@Override
public void render(@Nullable Map<String, ?> model, HttpServletRequest request,
                   HttpServletResponse response) throws Exception {

    if (logger.isTraceEnabled()) {
        logger.trace("Rendering view with name '" + this.beanName + "' with model " + model +
                     " and static attributes " + this.staticAttributes);
    }

    //解析属性
    Map<String, Object> mergedModel = createMergedOutputModel(model, request, response);
    prepareResponse(request, response);
    //处理页面跳转
    renderMergedOutputModel(mergedModel, getRequestToExpose(request), response);
}
这里进入的是抽象类AbstractView的render方法,首先回忆一下ModelAndView的使用,我们将属性放入mv中,然后在JSP上可以使用JSTL语法或者request中获取我们之前放入的属性,以便在JSP中可以调用,而解析这些属性的工作就是在createMergedOutputModel方法中完成:
protected Map<String, Object> createMergedOutputModel(@Nullable Map<String, ?> model,
                                                      HttpServletRequest request, HttpServletResponse response) {

    @SuppressWarnings("unchecked")
    Map<String, Object> pathVars = (this.exposePathVariables ?
                                    (Map<String, Object>) request.getAttribute(View.PATH_VARIABLES) : null);

    // Consolidate static and dynamic model attributes.
    int size = this.staticAttributes.size();
    size += (model != null ? model.size() : 0);
    size += (pathVars != null ? pathVars.size() : 0);

    Map<String, Object> mergedModel = new LinkedHashMap<>(size);
    mergedModel.putAll(this.staticAttributes);
    if (pathVars != null) {
        mergedModel.putAll(pathVars);
    }
    if (model != null) {
        mergedModel.putAll(model);
    }

    // Expose RequestContext?
    if (this.requestContextAttribute != null) {
        mergedModel.put(this.requestContextAttribute, createRequestContext(request, response, mergedModel));
    }

    return mergedModel;
}
接着就是处理页面的跳转了,不同的视图对象跳转的方式都不一样,具体逻辑在renderMergedOutputModel方法中定义,这里举一个比较常用的RedirectView这个视图对象:
@Override
protected void renderMergedOutputModel(Map<String, Object> model, HttpServletRequest request,
                                       HttpServletResponse response) throws IOException {

    String targetUrl = createTargetUrl(model, request);
    targetUrl = updateTargetUrl(targetUrl, model, request, response);

    // Save flash attributes
    RequestContextUtils.saveOutputFlashMap(targetUrl, request, response);

    // Redirect
    sendRedirect(request, response, targetUrl, this.http10Compatible);
}
无非就是使用Redirect重定向的方式去进行页面的跳转,当然每个不同的视图对象都有不同的跳转逻辑。
2.总结
本篇文章是继上一篇分析SpringMVC的文章写的,在上篇文章中讲到了Loader与DispatcherServlet的一系列初始化工作,例如处理器的初始化,在本篇文章中大部分都有用到,所以上一篇文章初始化也是很重要的。
在本篇文章中,分析当一个请求request来了,交由DispathcerServlet处理,DispathcerServlet会先做一些准备工作,然后再寻找对应的Handler,去根据url寻找method对象,然后寻找此请求url对应的拦截器,将信息都封装成一个chain,然后就去寻找handler对应的Adapter,因为处理的时候需要Adapter对象调用handler方法才可以对方法进行执行,就像一个电源适配器,需要转换一下才可以用。然后还讲到了拦截器的使用,以及拦截器的几个方法的回调时机,回调入口分别在DisapathcerServlet中的哪些执行流程中。然后讲到了异常视图的处理,如何处理全局异常,并且跳转到异常的视图。最后也是最重要的,将根据ModelAndView对象去寻找视图对象,然后视图对象进行跳转操作,完成整个MVC请求流程。