初识SpringMVC与其初始化
文章目录
1. 初探SpringMVC基本流程
先来看一张图(引用自《Spring实战》第四版 ):
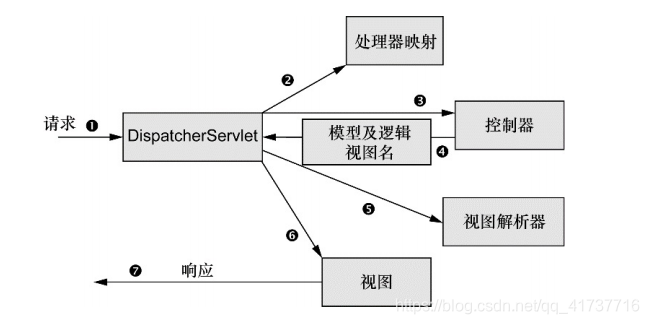
这张图大致描述了SpringMVC从接收请求到响应请求的流程。
- 首先从浏览器发出一个url网络请求,然后WEB容器就接收到一个请求,每一个请求都会经过前端控制器Servlet,在SpringMVC中,此前端控制器即为
DispatcherServlet,在下面我们会分析这个Servlet究竟干了什么。 - 前端控制器接收到请求之后,将会把请求委派给
Handler,处理器Handler此时会接收到这个请求,此时处理器会找到url对应的控制器。 - 执行控制器中url所对应的方法。
- 执行url对应的方法之后,将会返回一个模型和视图(
ModelAndView)给前端控制器。 - 前端控制器将委派一个视图解析器去完成对刚刚返回的视图的解析(包括模型的传递)。
- 视图解析完成,视图解析器返回给前端控制器一个视图,前端控制器会将得到的视图响应出去。
- 将视图响应给浏览器,浏览器渲染视图呈现给用户。
到这里我们可以知道,一个请求要经过很多步骤,最后才能响应出去。其中我们可以看到,主要的工作都是由一个实现Servlet接口的DispatcherServlet来实现的,它像一个中央处理器,负责分发所有的工作(Manager)。
我在阅读源码的过程中,这种架构思想几乎在每个框架都有出现,例如Shiro的
SecurityManager,MyBatis的SqlSession,Spring的ApplicationContext等等,它们都充当了一个管理者的角色,负责所有工作,但具体做事的其实不是它们,作为管理者只需要调配分发工作给下级,而干活的实际上是下级来做,这样能清晰整个架构,使功能与功能之间产生解耦,“专人干专事”,并且符合面向对象设计的原则。如果功能耦合在一起,一个类包办所有功能,那么复杂性会极高,难维护难修改,并且容易让人看不懂,面向对象退化为面向过程。
看完了基本流程,我们来粗略的讲讲如何使用,首先你需要在web.xml配置如下:
<!-- 用来告诉ContextLoaderListener配置文件的位置 -->
<context-param>
    <param-name>contextConfigLocation</param-name>
    <param-value>
        classpath*:applicationContext.xml
    </param-value>
</context-param>

<!-- WEB容器启动此类也将启动,载入上下文 -->
<listener>
    <listener-class>org.springframework.web.context.ContextLoaderListener</listener-class>
</listener>

<!-- 前端控制器DispatcherServlet -->
<servlet>
    <servlet-name>springmvc</servlet-name>
    <servlet-class>org.springframework.web.servlet.DispatcherServlet</servlet-class>
    <load-on-startup>1</load-on-startup>
</servlet>
<servlet-mapping>
    <servlet-name>springmvc</servlet-name>
    <url-pattern>/*</url-pattern>
</servlet-mapping>
2. ContextLoaderListener
在上面的web.xml配置中,我们发现需要配置这样一个Listener,那么它是做什么用的呢?我们知道,在ServletContext启动之后,会调用Listener的contextInitialized方法,那么我们就从它的这个方法开始分析:
@Override
public void contextInitialized(ServletContextEvent event) {
    //委托给了父类ConetxtLoader去做
    initWebApplicationContext(event.getServletContext());
}
public WebApplicationContext initWebApplicationContext(ServletContext servletContext) {
    //如果已经存在Root上下文对象,抛出异常
    if (servletContext.getAttribute(WebApplicationContext.ROOT_WEB_APPLICATION_CONTEXT_ATTRIBUTE) != null) {
        throw new IllegalStateException(
            "Cannot initialize context because there is already a root application context present - " +
            "check whether you have multiple ContextLoader* definitions in your web.xml!");
    }

    Log logger = LogFactory.getLog(ContextLoader.class);
    servletContext.log("Initializing Spring root WebApplicationContext");
    if (logger.isInfoEnabled()) {
        logger.info("Root WebApplicationContext: initialization started");
    }
    long startTime = System.currentTimeMillis();

    try {
        // Store context in local instance variable, to guarantee that
        // it is available on ServletContext shutdown.
        if (this.context == null) {
            //创建Context
            this.context = createWebApplicationContext(servletContext);
        }
        if (this.context instanceof ConfigurableWebApplicationContext) {
            ConfigurableWebApplicationContext cwac = (ConfigurableWebApplicationContext) this.context;
            if (!cwac.isActive()) {
                // The context has not yet been refreshed -> provide services such as
                // setting the parent context, setting the application context id, etc
                if (cwac.getParent() == null) {
                    // The context instance was injected without an explicit parent ->
                    // determine parent for root web application context, if any.
                    ApplicationContext parent = loadParentContext(servletContext);
                    cwac.setParent(parent);
                }
                //对创建出来的Context进行初始化refresh
                configureAndRefreshWebApplicationContext(cwac, servletContext);
            }
        }
        //将初始化好的上下文对象存放在servletContext中
        servletContext.setAttribute(WebApplicationContext.ROOT_WEB_APPLICATION_CONTEXT_ATTRIBUTE, this.context);

        ClassLoader ccl = Thread.currentThread().getContextClassLoader();
        if (ccl == ContextLoader.class.getClassLoader()) {
            currentContext = this.context;
        }
        else if (ccl != null) {
            currentContextPerThread.put(ccl, this.context);
        }

        if (logger.isDebugEnabled()) {
            logger.debug("Published root WebApplicationContext as ServletContext attribute with name [" +
                         WebApplicationContext.ROOT_WEB_APPLICATION_CONTEXT_ATTRIBUTE + "]");
        }
        if (logger.isInfoEnabled()) {
            long elapsedTime = System.currentTimeMillis() - startTime;
            logger.info("Root WebApplicationContext: initialization completed in " + elapsedTime + " ms");
        }

        return this.context;
    }
    //catch 略..
}
此方法委托给了父类ContextLoader去做。在这个方法中,主要做了两件事:
-
存在性验证:首先会判断servletContext中是否已经有一个
RootContext了,如果有将抛出异常,没有才继续初始化。 -
创建Context上下文对象:createWebApplicationContext方法创建一个
WebApplicationContext。protected WebApplicationContext createWebApplicationContext(ServletContext sc) { //获取Context的Class类类型 Class<?> contextClass = determineContextClass(sc); if (!ConfigurableWebApplicationContext.class.isAssignableFrom(contextClass)) { throw new ApplicationContextException("Custom context class [" + contextClass.getName() + "] is not of type [" + ConfigurableWebApplicationContext.class.getName() + "]"); } //根据得到的Class使用反射实例化上下文对象 return (ConfigurableWebApplicationContext) BeanUtils.instantiateClass(contextClass); }需要关注的是determineContextClass方法,看看是怎么拿到上下文Class对象的:
protected Class<?> determineContextClass(ServletContext servletContext) {
    //CONTEXT_CLASS_PARAM="contextClass"
    String contextClassName = servletContext.getInitParameter(CONTEXT_CLASS_PARAM);
    if (contextClassName != null) {
        try {
            //如果有,直接forName得到Class
            return ClassUtils.forName(contextClassName, ClassUtils.getDefaultClassLoader());
        }
        catch (ClassNotFoundException ex) {
            throw new ApplicationContextException(
                "Failed to load custom context class [" + contextClassName + "]", ex);
        }
    }
    else {
        //从defaultStrategies中获取WebApplicationContext全类名对应的Property
        contextClassName = defaultStrategies.getProperty(WebApplicationContext.class.getName());
        try {
            //根据ClassName得到Class
            return ClassUtils.forName(contextClassName, ContextLoader.class.getClassLoader());
        }
        catch (ClassNotFoundException ex) {
            throw new ApplicationContextException(
                "Failed to load default context class [" + contextClassName + "]", ex);
        }
    }
}
那么
defaultStrategies是什么呢?为什么可以从中获得一个ClassName,其中ContextLoader中有这样一段静态代码块:private static final String DEFAULT_STRATEGIES_PATH = "ContextLoader.properties"; private static final Properties defaultStrategies; static { // Load default strategy implementations from properties file. // This is currently strictly internal and not meant to be customized // by application developers. try { //读取名为ContextLoader.properties的属性文件 ClassPathResource resource = new ClassPathResource(DEFAULT_STRATEGIES_PATH, ContextLoader.class); //载入此资源,放入defaultStrategies中 defaultStrategies = PropertiesLoaderUtils.loadProperties(resource); } catch (IOException ex) { throw new IllegalStateException("Could not load 'ContextLoader.properties': " + ex.getMessage()); } }由此可知,
defaultStrategies是存放配置文件的变量,那么配置文件中配置了什么呢?org.springframework.web.context.WebApplicationContext=org.springframework.web.context.support.XmlWebApplicationContext到这里可以得出结论,用
WebApplicationContext全类名得到的ClassName就是以上的XmlWebApplicationContext,然后根据此全类名,利用反射实例化上下文对象,然后将其记录在ServletContext中。创建Context对象之后,将会执行configureAndRefreshWebApplicationContext方法,对上下文对象进行初始化处理:
protected void configureAndRefreshWebApplicationContext(ConfigurableWebApplicationContext wac, ServletContext sc) {

    //配置wac的各项属性,这里略过

    customizeContext(sc, wac);
    //在反射实例化之后,将调用ApplicationContext的refresh方法对上下文对象进行初始化
    wac.refresh();
}
到这里就结束了对
RootContext的初始化,主要就是调用配置文件定义的Context,反射实例化出来然后refresh进行初始化,然后将其存在ServletContext中。
3.DispatcherServlet
上面,我们完成了对ContextLoaderListener的初始化,其在ServletContext中记录了一个上下文对象,当然也在ContextLoader中存放了上下文对象。
然后就要开始初始化DispatcherServlet了,我们知道,在servlet初始化阶段会调用其init方法,而DispatcherServlet实现了servlet接口,所以我们先来看看DispatcherServlet的init方法(在父类HttpServletBean中实现):
@Override
public final void init() throws ServletException {
    if (logger.isDebugEnabled()) {
        logger.debug("Initializing servlet '" + getServletName() + "'");
    }

    // Set bean properties from init parameters.
    //将配置的属性值封装成PropertyValues对象,以便于Spring将其注入
    PropertyValues pvs = new ServletConfigPropertyValues(getServletConfig(), this.requiredProperties);
    if (!pvs.isEmpty()) {
        try {
            //将对象转换封装成BeanWrapper,以便于Spring对其注入属性
            BeanWrapper bw = PropertyAccessorFactory.forBeanPropertyAccess(this);
            ResourceLoader resourceLoader = new ServletContextResourceLoader(getServletContext());
            bw.registerCustomEditor(Resource.class, new ResourceEditor(resourceLoader, getEnvironment()));
            initBeanWrapper(bw);
            //注入属性
            bw.setPropertyValues(pvs, true);
        }
        catch (BeansException ex) {
            if (logger.isErrorEnabled()) {
                logger.error("Failed to set bean properties on servlet '" + getServletName() + "'", ex);
            }
            throw ex;
        }
    }

    // Let subclasses do whatever initialization they like.
    initServletBean();

    if (logger.isDebugEnabled()) {
        logger.debug("Servlet '" + getServletName() + "' configured successfully");
    }
}
在这个方法中我们可以知道,其主要是讲当前Servlet封装为BeanWrapper,在分析SpringIOC的时候有讲到此对象是Spring的封装对象,是Spring可以操作的对象,这里封装成BeanWrapper是为了下面对其进行属性的依赖注入,Spring会将init-param设置的属性值例如我们上面设置的contextConfigLocation设置到Servlet的属性中去,然后就是初始化ServletBean(在子类FrameworkServlet中实现):
@Override
protected final void initServletBean() throws ServletException {
    // log 略..

    try {
        //主要初始化的方法
        this.webApplicationContext = initWebApplicationContext();
        initFrameworkServlet();
    }
    // catche log 略..
}
这里,initWebApplicationContext方法完成了对Context的初始化逻辑:
protected WebApplicationContext initWebApplicationContext() {
    //getWebApplicationContext方法是从ServletConetxt对象获取RootContext
    //也就是我们之前存放的属性名为ROOT_WEB_APPLICATION_CONTEXT_ATTRIBUTE的对象
    WebApplicationContext rootContext =
        WebApplicationContextUtils.getWebApplicationContext(getServletContext());
    WebApplicationContext wac = null;

    //webApplicationContext属性在构造函数中被设置
    //如果此时不为空,证明在构造函数中就已经设置了webApplicationContext
    if (this.webApplicationContext != null) {
        // A context instance was injected at construction time -> use it
        //直接将其赋值给wac
        wac = this.webApplicationContext;
        if (wac instanceof ConfigurableWebApplicationContext) {
            ConfigurableWebApplicationContext cwac = (ConfigurableWebApplicationContext) wac;
            if (!cwac.isActive()) {
                // The context has not yet been refreshed -> provide services such as
                // setting the parent context, setting the application context id, etc
                if (cwac.getParent() == null) {
                    // The context instance was injected without an explicit parent -> set
                    // the root application context (if any; may be null) as the parent
                    //将RootContext设置为其的父容器
                    cwac.setParent(rootContext);
                }
                //初始化Conetxt,设置属性并调用refresh方法
                configureAndRefreshWebApplicationContext(cwac);
            }
        }
    }
    //如果到了这里,说明构造函数中并没有初始化Context
    if (wac == null) {
        // No context instance was injected at construction time -> see if one
        // has been registered in the servlet context. If one exists, it is assumed
        // that the parent context (if any) has already been set and that the
        // user has performed any initialization such as setting the context id
        //通过contextAttribute尝试获取一个Context对象
        wac = findWebApplicationContext();
    }
    //如果还是没有找到对应的Context对象
    if (wac == null) {
        // No context instance is defined for this servlet -> create a local one
        //直接创建一个
        wac = createWebApplicationContext(rootContext);
    }

    if (!this.refreshEventReceived) {
        // Either the context is not a ConfigurableApplicationContext with refresh
        // support or the context injected at construction time had already been
        // refreshed -> trigger initial onRefresh manually here.
        //由子类DispatcherServlet实现,初始化一系列处理器
        onRefresh(wac);
    }

    if (this.publishContext) {
        // Publish the context as a servlet context attribute.
        String attrName = getServletContextAttributeName();
        getServletContext().setAttribute(attrName, wac);
        if (this.logger.isDebugEnabled()) {
            this.logger.debug("Published WebApplicationContext of servlet '" + getServletName() +
                              "' as ServletContext attribute with name [" + attrName + "]");
        }
    }

    return wac;
}
3.1 初始化WebApplicationContext
由上面这段代码可以知道,这里由三种方式去寻找或是创建Context对象:
-
通过构造函数的注入进行初始化:首先会判断是否构造函数已经注入了一个Context对象,如果已经注入,则只需要设置其父容器为RootContext,再对其设置对应属性以及初始化refresh即可。
-
通过contextAttribute初始化:通过在web.xml文件中配置servlet参数contextAttribute中使用自己创建的
WebApplicationContext。 -
创建WebApplicationContext实例:以上两个方法都没有找到Context对象的话,将在这里重新创建一个Context对象,调用createWebApplicationContext方法:
protected WebApplicationContext createWebApplicationContext(@Nullable WebApplicationContext parent) {
    return createWebApplicationContext((ApplicationContext) parent);
}
protected WebApplicationContext createWebApplicationContext(@Nullable ApplicationContext parent) { //获取Servlet的初始化参数contextClass,如果没有配置默认使用XmlWebApplicationContext Class<?> contextClass = getContextClass(); if (this.logger.isDebugEnabled()) { this.logger.debug("Servlet with name '" + getServletName() + "' will try to create custom WebApplicationContext context of class '" + contextClass.getName() + "'" + ", using parent context [" + parent + "]"); } //contextClass必须是ConfigurableWebApplicationContext的子类 if (!ConfigurableWebApplicationContext.class.isAssignableFrom(contextClass)) { throw new ApplicationContextException( "Fatal initialization error in servlet with name '" + getServletName() + "': custom WebApplicationContext class [" + contextClass.getName() + "] is not of type ConfigurableWebApplicationContext"); } //实例化一个Context对象 ConfigurableWebApplicationContext wac = (ConfigurableWebApplicationContext) BeanUtils.instantiateClass(contextClass); wac.setEnvironment(getEnvironment()); //设置父容器为RootContext wac.setParent(parent); //获取配置文件的location String configLocation = getContextConfigLocation(); if (configLocation != null) { //将配置文件的location设置到Context中 wac.setConfigLocation(configLocation); } //调用refresh方法初始化Context configureAndRefreshWebApplicationContext(wac); return wac; }以上就是创建Context对象的过程了,首先是会获取contextClass的值,如果没有设置采用默认值:
public static final Class<?> DEFAULT_CONTEXT_CLASS = XmlWebApplicationContext.class; /** WebApplicationContext implementation class to create */ private Class<?> contextClass = DEFAULT_CONTEXT_CLASS;获得一个Class对象,然后利用反射实例化出一个Context对象,对其设置一些必要的属性,然后调用refresh方法初始化Context。至于configureAndRefreshWebApplicationContext方法在上面也有提到过,其是设置一些必要属性然后调用refresh方法。
3.2 刷新
接下来就是调用onRefresh方法,该方法是在其子类DispatcherServlet中实现,主要目的是初始化一些处理器:
@Override
protected void onRefresh(ApplicationContext context) {
    initStrategies(context);
}
protected void initStrategies(ApplicationContext context) {
    //初始化文件上传处理器
    initMultipartResolver(context);
    //初始化国际化配置
    initLocaleResolver(context);
    //初始化主题处理器
    initThemeResolver(context);
    //初始化HanlderMapping
    initHandlerMappings(context);
    //初始化HandlerAdapter
    initHandlerAdapters(context);
    //初始化异常处理器
    initHandlerExceptionResolvers(context);
    initRequestToViewNameTranslator(context);
    //初始化视图处理器
    initViewResolvers(context);
    initFlashMapManager(context);
}
这里初始化的处理器大部分在开头的基本流程图中都有用到,DispatcherServlet接收到一个请求之后,将会调用这些处理器来做对应的事情。这里主要分析HandlerMappings和MultipartResolver文件上传处理器,其他的处理器初始化都与上述两个大致相同(部分处理器例如LocaleResolver还是不同的)。
-
HandlerMappings:当客户端发起一个Request请求时,DispatcherServlet会将Request交给HandlerMapping处理,然后该HandlerMapping将会找到url对应的Controller去处理对应方法。初始化HandlerMapping的过程在initHandlerMappings方法中体现:private void initHandlerMappings(ApplicationContext context) { this.handlerMappings = null; //此属性在xml中可以配置,默认为true if (this.detectAllHandlerMappings) { // Find all HandlerMappings in the ApplicationContext, including ancestor contexts. //寻找IOC容器中HandlerMapping类型的Bean Map<String, HandlerMapping> matchingBeans = BeanFactoryUtils.beansOfTypeIncludingAncestors(context, HandlerMapping.class, true, false); //如果找到 if (!matchingBeans.isEmpty()) { //将其赋值给handlerMappings完成HandlerMapping的初始化 this.handlerMappings = new ArrayList<>(matchingBeans.values()); // We keep HandlerMappings in sorted order. AnnotationAwareOrderComparator.sort(this.handlerMappings); } } //如果用户自定义detectAllHandlerMappings为false else { try { //从IOC容器中取出名为HANDLER_MAPPING_BEAN_NAME的Bean HandlerMapping hm = context.getBean(HANDLER_MAPPING_BEAN_NAME, HandlerMapping.class); //赋值给handlerMappings this.handlerMappings = Collections.singletonList(hm); } catch (NoSuchBeanDefinitionException ex) { // Ignore, we'll add a default HandlerMapping later. } } // Ensure we have at least one HandlerMapping, by registering // a default HandlerMapping if no other mappings are found. //如果以上过程都没有找到handlerMapping if (this.handlerMappings == null) { //将赋值handlerMappings为默认的HandlerMapping this.handlerMappings = getDefaultStrategies(context, HandlerMapping.class); if (logger.isDebugEnabled()) { logger.debug("No HandlerMappings found in servlet '" + getServletName() + "': using default"); } } }那么默认的HandlerMapping是怎样的呢?进入getDefaultStrategies方法看看:
protected <T> List<T> getDefaultStrategies(ApplicationContext context, Class<T> strategyInterface) {
    //HandlerMapping全类名
    String key = strategyInterface.getName();
    //从defaultStrategies获取HandlerMapping全类名对应的字符串
    String value = defaultStrategies.getProperty(key);
    if (value != null) {
        //将获得的字符串以,分割为字符串数组
        String[] classNames = StringUtils.commaDelimitedListToStringArray(value);
        List<T> strategies = new ArrayList<>(classNames.length);
        //遍历此字符串数组
        for (String className : classNames) {
            try {
                //反射获得Class对象
                Class<?> clazz = ClassUtils.forName(className, DispatcherServlet.class.getClassLoader());
                //用context对象利用Class对象创建此Bean
                Object strategy = createDefaultStrategy(context, clazz);
                //将创建好的Bean放入数组中
                strategies.add((T) strategy);
            }
            //catch 略...
        }
        //返回此数组
        return strategies;
    }
    else {
        return new LinkedList<>();
    }
}
这里主要是从defaultStrategies属性中获得HandlerMapping全类名对应的一些字符串,然后利用字符串获得Class对象,再用IOC容器获得Class对象的Bean,加入到HandlerMapping数组中返回出去。这里我们需要关心的是defaultStrategies属性到底是什么,获得的字符串又是什么呢?
DispatcherServlet中有这样一段静态代码块:private static final String DEFAULT_STRATEGIES_PATH = "DispatcherServlet.properties"; private static final Properties defaultStrategies; static { // Load default strategy implementations from properties file. // This is currently strictly internal and not meant to be customized // by application developers. try { ClassPathResource resource = new ClassPathResource(DEFAULT_STRATEGIES_PATH, DispatcherServlet.class); defaultStrategies = PropertiesLoaderUtils.loadProperties(resource); } catch (IOException ex) { throw new IllegalStateException("Could not load '" + DEFAULT_STRATEGIES_PATH + "': " + ex.getMessage()); } }从这段代码可以看出,其加载了名为DispatcherServlet.properties的配置文件,全局搜索DispatcherServlet.properties这个配置文件:
# 略过所有处理器,这里只关注HandlerMapping

org.springframework.web.servlet.HandlerMapping=org.springframework.web.servlet.handler.BeanNameUrlHandlerMapping,\
	org.springframework.web.servlet.mvc.method.annotation.RequestMappingHandlerMapping
可以得知,这里默认会加载两个HandlerMapping,分别是
BeanNameUrlHandlerMapping与RequestMappingHandlerMapping。其中BeanNameUrlHandlerMapping主要是取BeanName为/开头的类作为Controller,不是我们主要研究对象,RequestMappingHandlerMapping是我们需要研究的HandlerMapping,这个类将url与Controller映射关系初始化,保存起来。还记得getDefaultStrategies方法中使用context对象去创建HandlerMapping吗:
Object strategy = createDefaultStrategy(context, clazz);这个方法将调用beanFactory中的createBean方法去创建该对象,这也就意味着该对象会像一个Bean一样被Spring创建,也就是说它会执行一些Aware接口的方法,一些InitializingBean接口的初始化方法,于是我们来看一下RequestMappingHandlerMapping这个HandlerMapping的类结构:

果然,其实现了Aware接口与InitializingBean,我们需要关注的是InitializingBean的afterPropertiesSet方法:@Override public void afterPropertiesSet() { this.config = new RequestMappingInfo.BuilderConfiguration(); this.config.setPatternParser(getPathPatternParser()); this.config.setContentTypeResolver(getContentTypeResolver()); //调用父类AbstractHandlerMethodMapping的afterPropertiesSet方法 super.afterPropertiesSet(); }这里先初始化了一些属性,然后调用父类的afterPropertiesSet方法:
@Override
public void afterPropertiesSet() {
    initHandlerMethods();
}
protected void initHandlerMethods() { if (logger.isDebugEnabled()) { logger.debug("Looking for request mappings in application context: " + getApplicationContext()); } //从IOC容器中获取所有的BeanName String[] beanNames = obtainApplicationContext().getBeanNamesForType(Object.class); for (String beanName : beanNames) { if (!beanName.startsWith(SCOPED_TARGET_NAME_PREFIX)) { Class<?> beanType = null; try { //获取Bean的Class类型 beanType = obtainApplicationContext().getType(beanName); } catch (Throwable ex) { // An unresolvable bean type, probably from a lazy bean - let's ignore it. if (logger.isDebugEnabled()) { logger.debug("Could not resolve target class for bean with name '" + beanName + "'", ex); } } //判断Class上是否有Controller注解或是RequestMapping注解 if (beanType != null && isHandler(beanType)) { //提取其url与controller映射关系 detectHandlerMethods(beanName); } } } handlerMethodsInitialized(getHandlerMethods()); }这里主要是对IOC容器中所有的Bean依次做一些判断,如果有**@Controller或是@RequestMapping注解的都会进入detectHandlerMethods**方法:
protected void detectHandlerMethods(final Object handler) { //如果handler是字符串,证明是一个beanName,则从IOC容器中获取其Class对象 Class<?> handlerType = (handler instanceof String ? obtainApplicationContext().getType((String) handler) : handler.getClass()); if (handlerType != null) { final Class<?> userType = ClassUtils.getUserClass(handlerType); //寻找方法上有@RequestMapping注解的Method对象 Map<Method, T> methods = MethodIntrospector.selectMethods(userType, (MethodIntrospector.MetadataLookup<T>) method -> getMappingForMethod(method, userType)); if (logger.isDebugEnabled()) { logger.debug(methods.size() + " request handler methods found on " + userType + ": " + methods); } //将获得到的Method对象依此注册到HandlerMapping中去 methods.forEach((key, mapping) -> { Method invocableMethod = AopUtils.selectInvocableMethod(key, userType); registerHandlerMethod(handler, invocableMethod, mapping); }); } }我们需要关注的是registerHandlerMethod这个注册方法:
protected void registerHandlerMethod(Object handler, Method method, T mapping) {
    this.mappingRegistry.register(mapping, handler, method);
}
public void register(T mapping, Object handler, Method method) { this.readWriteLock.writeLock().lock(); try { HandlerMethod handlerMethod = createHandlerMethod(handler, method); assertUniqueMethodMapping(handlerMethod, mapping); if (logger.isInfoEnabled()) { logger.info("Mapped \"" + mapping + "\" onto " + handlerMethod); } this.mappingLookup.put(mapping, handlerMethod); CorsConfiguration corsConfig = initCorsConfiguration(handler, method, mapping); if (corsConfig != null) { this.corsLookup.put(handlerMethod, corsConfig); } this.registry.put(mapping, new MappingRegistration<>(mapping, handlerMethod)); } finally { this.readWriteLock.writeLock().unlock(); } }这里就是大致注册url与Controller的地方了,主要流程就是获取@RequestMapping注解的方法,然后获取其url,将url与方法对象Method存入Map中,在处理请求时就可以根据url来执行对应的method。这里我DEBUG了部分Map,大家可以自己动手DEBUG一下,就可以清楚这里注册的Map到底是什么了:
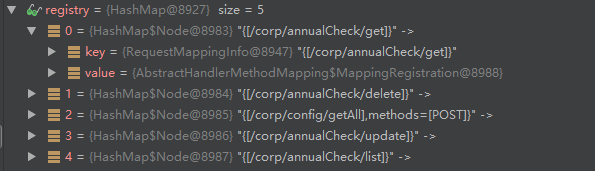

其中,Spring将url与method都各封装成了一个对象,感兴趣的可以深究封装了哪些属性。到这里就完成了该HandlerMapping的创建,之后,将其放入DispatcherServlet作为一个属性存放。
-
MultipartResolver:这个处理器主要用于处理文件上传,主要初始化逻辑如下:private void initMultipartResolver(ApplicationContext context) { try { //从IOC容器获取名为MULTIPART_RESOLVER_BEAN_NAME的Bean this.multipartResolver = context.getBean(MULTIPART_RESOLVER_BEAN_NAME, MultipartResolver.class); if (logger.isDebugEnabled()) { logger.debug("Using MultipartResolver [" + this.multipartResolver + "]"); } } catch (NoSuchBeanDefinitionException ex) { // Default is no multipart resolver. this.multipartResolver = null; if (logger.isDebugEnabled()) { logger.debug("Unable to locate MultipartResolver with name '" + MULTIPART_RESOLVER_BEAN_NAME + "': no multipart request handling provided"); } } }很简单的初始化,仅仅是获取一个名为MULTIPART_RESOLVER_BEAN_NAME的Bean,由此可以得出结论,我们如果需要使用文件上传功能,需要配置一个Bean如下:
<!-- beanName必须固定,才能被DispatcherServlet配置 -->
<bean id="multipartResolver" class="org.Springframework.web.multipart.commons.CommonsMultipartResolver">
    <!-- 该属性用于配置可上传文件的最大byte数 -->
	<property name="maximumFileSize"><value>100000</value></property>
</bean>
从以上两种处理器的初始化方式来看,可以知道,我们如果需要配置处理器,需要在配置文件中做一个Bean,并且按照指定的BeanName,有些例如HandlerMapping的配置如果需要自定义你还需要配置以下属性:
<init-param>
	<param-name>detactAllHandlerMappings</param-name>
    <param-value>false</param-value>
</init-param>
如果是默认的,大部分处理器的方式都是从配置文件中取,有些处理器默认就是不进行配置。
4. 小结
到这里,一些重要的初始化就基本结束了,我们来回顾一下初始化都做了什么:
- ContextLoaderListener:首先初始化一个Context对象,并存入ServletContext中,作为RootContext。
- DispatcherServlet:也初始化一个Context对象,并将RootContext设为其父容器。
- DispatcherServlet:初始化一系列处理器,特别是默认的一个HanlderMapping,在初始化过程中将Spring中带有@Controller注解的类统一处理,将url与method作为映射保存下来。