直接上代码进行分析:
""" Convolutional Neural Network.

Build and train a convolutional neural network with TensorFlow.
This example is using the MNIST database of handwritten digits
(http://yann.lecun.com/exdb/mnist/)

Author: Aymeric Damien
Project: https://github.com/aymericdamien/TensorFlow-Examples/
"""

from __future__ import division, print_function, absolute_import

import tensorflow as tf

# Import MNIST data
from tensorflow.examples.tutorials.mnist import input_data
mnist = input_data.read_data_sets("tmp/data/", one_hot=True)

# Training Parameters
learning_rate = 0.001
num_steps = 200
batch_size = 128
display_step = 10

# Network Parameters
num_input = 784 # MNIST data input (img shape: 28*28)
num_classes = 10 # MNIST total classes (0-9 digits)
dropout = 0.75 # Dropout, probability to keep units

# tf Graph input
X = tf.placeholder(tf.float32, [None, num_input])
Y = tf.placeholder(tf.float32, [None, num_classes])
keep_prob = tf.placeholder(tf.float32) # dropout (keep probability)


# Create some wrappers for simplicity
def conv2d(x, W, b, strides=1):
    # Conv2D wrapper, with bias and relu activation
    x = tf.nn.conv2d(x, W, strides=[1, strides, strides, 1], padding='SAME')
    x = tf.nn.bias_add(x, b)
    return tf.nn.relu(x)


def maxpool2d(x, k=2):
    # MaxPool2D wrapper
    return tf.nn.max_pool(x, ksize=[1, k, k, 1], strides=[1, k, k, 1],
                          padding='SAME')


# Create model
def conv_net(x, weights, biases, dropout):
    # MNIST data input is a 1-D vector of 784 features (28*28 pixels)
    # Reshape to match picture format [Height x Width x Channel]
    # Tensor input become 4-D: [Batch Size, Height, Width, Channel]
    x = tf.reshape(x, shape=[-1, 28, 28, 1])

    # Convolution Layer
    conv1 = conv2d(x, weights['wc1'], biases['bc1'])
    # Max Pooling (down-sampling)
    conv1 = maxpool2d(conv1, k=2)

    # Convolution Layer
    conv2 = conv2d(conv1, weights['wc2'], biases['bc2'])
    # Max Pooling (down-sampling)
    conv2 = maxpool2d(conv2, k=2)

    # Fully connected layer
    # Reshape conv2 output to fit fully connected layer input
    fc1 = tf.reshape(conv2, [-1, weights['wd1'].get_shape().as_list()[0]])
    fc1 = tf.add(tf.matmul(fc1, weights['wd1']), biases['bd1'])
    fc1 = tf.nn.relu(fc1)
    # Apply Dropout
    fc1 = tf.nn.dropout(fc1, dropout)

    # Output, class prediction
    out = tf.add(tf.matmul(fc1, weights['out']), biases['out'])
    return out

# Store layers weight & bias
weights = {
    # 5x5 conv, 1 input, 32 outputs
    'wc1': tf.Variable(tf.random_normal([5, 5, 1, 32])),
    # 5x5 conv, 32 inputs, 64 outputs
    'wc2': tf.Variable(tf.random_normal([5, 5, 32, 64])),
    # fully connected, 7*7*64 inputs, 1024 outputs
    'wd1': tf.Variable(tf.random_normal([7*7*64, 1024])),
    # 1024 inputs, 10 outputs (class prediction)
    'out': tf.Variable(tf.random_normal([1024, num_classes]))
}

biases = {
    'bc1': tf.Variable(tf.random_normal([32])),
    'bc2': tf.Variable(tf.random_normal([64])),
    'bd1': tf.Variable(tf.random_normal([1024])),
    'out': tf.Variable(tf.random_normal([num_classes]))
}

# Construct model
logits = conv_net(X, weights, biases, keep_prob)
prediction = tf.nn.softmax(logits)

# Define loss and optimizer
loss_op = tf.reduce_mean(tf.nn.softmax_cross_entropy_with_logits(
    logits=logits, labels=Y))
optimizer = tf.train.AdamOptimizer(learning_rate=learning_rate)
train_op = optimizer.minimize(loss_op)


# Evaluate model
correct_pred = tf.equal(tf.argmax(prediction, 1), tf.argmax(Y, 1))
accuracy = tf.reduce_mean(tf.cast(correct_pred, tf.float32))

# Initialize the variables (i.e. assign their default value)
init = tf.global_variables_initializer()

# Start training
with tf.Session() as sess:

    # Run the initializer
    sess.run(init)

    for step in range(1, num_steps+1):
        batch_x, batch_y = mnist.train.next_batch(batch_size)
        # Run optimization op (backprop)
        sess.run(train_op, feed_dict={X: batch_x, Y: batch_y, keep_prob: 0.8})
        if step % display_step == 0 or step == 1:
            # Calculate batch loss and accuracy
            loss, acc = sess.run([loss_op, accuracy], feed_dict={X: batch_x,
                                                                 Y: batch_y,
                                                                 keep_prob: 1.0})
            print("Step " + str(step) + ", Minibatch Loss= " + \
                  "{:.4f}".format(loss) + ", Training Accuracy= " + \
                  "{:.3f}".format(acc))

    print("Optimization Finished!")

    # Calculate accuracy for 256 MNIST test images
    print("Testing Accuracy:", \
        sess.run(accuracy, feed_dict={X: mnist.test.images[:256],
                                      Y: mnist.test.labels[:256],
                                      keep_prob: 1.0}))
tf.nn.conv2d(input, filter, strides, padding, use_cudnn_on_gpu=None, name=None)
第一个参数input:指需要做卷积的输入图像,它要求是一个Tensor,具有[batch, in_height, in_width, in_channels]这样的shape,具体含义是[训练时一个batch的图片数量, 图片高度, 图片宽度, 图像通道数],注意这是一个4维的Tensor,要求类型为float32和float64其中之一,其中图像通道数:比如rgb24图像,通道数为3
第二个参数filter:相当于CNN中的卷积核,它要求是一个Tensor,具有[filter_height, filter_width, in_channels, out_channels]这样的shape,具体含义是[卷积核的高度,卷积核的宽度,图像通道数,输出通道in_channels
第三个参数strides:卷积时在图像每一维的步长,这是一个一维的向量,长度4
第四个参数padding:string类型的量,只能是"SAME","VALID"其中之一,这个值决定了不同的卷积方式(后面会介绍)
第五个参数:use_cudnn_on_gpu:bool类型,是否使用cudnn加速,默认为true
结果返回一个Tensor,这个输出,就是我们常说的feature map,shape仍然是[batch, height, width, channels]这种形式。
卷积的结果可以查看上一篇的卷积。这里就举个例子吧:
input = tf.Variable(tf.random_normal([1,5,5,5])) =》数量1 图像高度5 宽度5 通道数5
filter = tf.Variable(tf.random_normal([3,3,5,1]))==》卷积核高3 卷积核宽5 通道5 输出通道1
=》输出结果数量1 高3 宽3 通道数1

x = tf.nn.bias_add(x, b)

举个例子好理解一点:
a=tf.constant([[1,1],[2,2],[3,3]],dtype=tf.float32)
b=tf.constant([1,-1],dtype=tf.float32)
c=tf.constant([1],dtype=tf.float32)

with tf.Session() as sess:
    print('bias_add:')
    print(sess.run(tf.nn.bias_add(a, b)))
    #执行下面语句错误
    #print(sess.run(tf.nn.bias_add(a, c)))

    print('add:')
    print(sess.run(tf.add(a, c)))
输出如下:

tf.nn.relu(x)
tf.nn.relu(features, name = None)
将大于0的数保持不变,小于0的数置为0。
举个例子:
a = tf.constant([-1.0, 2.0])
with tf.Session() as sess:
    b = tf.nn.relu(a)
    print (sess.run(b))
输出:

tf.nn.max_pool(x, ksize=[1, k, k, 1], strides=[1, k, k, 1],
padding='SAME')
tf.nn.max_pool(value, ksize, strides, padding, name=None)
参数是四个,和卷积很类似:
第一个参数value:需要池化的输入,一般池化层接在卷积层后面,所以输入通常是feature map,依然是[batch, height, width, channels]这样的shape
第二个参数ksize:池化窗口的大小,取一个四维向量,一般是[1, height, width, 1],因为我们不想在batch和channels上做池化,所以这两个维度设为了1
第三个参数strides:和卷积类似,窗口在每一个维度上滑动的步长,一般也是[1, stride,stride, 1]
第四个参数padding:和卷积类似,可以取'VALID' 或者'SAME'
返回一个Tensor,类型不变,shape仍然是[batch, height, width, channels]这种形式
举个例子:
示例源码:
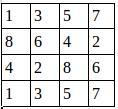
假设有这样一张图,双通道
第一个通道:
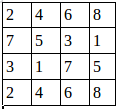
第二个通道:
用程序去做最大值池化:
a=tf.constant([
        [[1.0,2.0,3.0,4.0],
        [5.0,6.0,7.0,8.0],
        [8.0,7.0,6.0,5.0],
        [4.0,3.0,2.0,1.0]],
        [[4.0,3.0,2.0,1.0],
         [8.0,7.0,6.0,5.0],
         [1.0,2.0,3.0,4.0],
         [5.0,6.0,7.0,8.0]]
    ])

a=tf.reshape(a,[1,4,4,2])

pooling=tf.nn.max_pool(a,[1,2,2,1],[1,1,1,1],padding='VALID')
with tf.Session() as sess:
    print("image:")
    image=sess.run(a)
    print (image)
    print("reslut:")
    result=sess.run(pooling)
    print (result)
输出为:
池化后的图就是:

