本文是《图解Spark核心技术与案例实战》一书的读书笔记,将简单介绍一下几种Spark运行架构。
总体介绍
三种角色
Spark有本地运行模式,stand alone模式,集群模式,yarn模式,mesos模式等多种模式。这些模式的主要组成部分都可以看成SparkContext,Cluster Manager,Executor三个部分,其中SparkContext负责管理Application的执行,与ClusterManager通信,进行资源的申请,任务的调度,监控。Cluster Manager负责管理集群资源,Executor负责执行task。
在不同的模式下,ClusterManager由不同的组件担任,在本地,stand alone和集群模式下,cluster manager是master,在Yarn 模式中由Resource Manager担任,在Mesos模式中由Application Master担任。
重要的类
TaskScheduler.
taskScheduler负责将DAGScheduler解析出来的stage转换成task set,然后通过submitTasks()提交给SchedulerBackend,SchedulerBackend收到任务之后使用reviveOffers()方法分配运行资源并启动任务。TaskScheduler负责沟通DAGScheduler和SchedulerBackend,由于DAGScheduler抽象层次较高,而SchedulerBackend负责与底层接口交互,因此TaskScheduler可以起到屏蔽底层不同的资源分配方式的作用。TaskScheduler的主要实现类是TaskSchedulerImpl,Yarn模式下提供了两个类继承TaskSchedulerImpl,分别是YarnScheduler和YarnCluseterScheduler.
SchedulerBackend
SchedulerBackend根据不同的运行模式分为本地的LocalBackend,粗粒度模式下的CoarseGrainedSchedulerBackend,细粒度模式下的MesosSchedulerBackend,粗粒度模式下又分为stand alone模式下的SparkDeploySchedulerBackend,Yarn运行模式下的YarnSchedulerBackend,mesos粗粒度模式的CoarseMesosShedulerBackend.其中Yarn又根据client模式和cluster模式分为了YarnClientSchedulerBackend,YarnClusterSchedulerBackend.

本地模式
本地模式一般用于测试,在这种模式下所有的Spark进程都运行在同一个JVM里面,比如在IDEA里面直接启动一个程序,那么这种情况下就是在本地模式。在运行中,默认不加配置的情况下使用的是本地模式,还可以在参数里或者程序中显式指定使用本地模式:
参数:--master local[4]
代码:SparkConf conf = new SparkConf().setAppName("Simple Application").setMaster("local[*]");
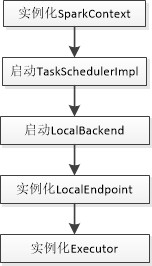
local模式首先启动了SparkContext,在启动SparkContext的过程中会初始化DAGScheduler,启动TaskSchedulerImpl,初始化TaskSchedulerImpl的时候会启动LocalBackend。启动LocalBackend的时候会实例化LocalEndpoint,实例化LocalEndpoint的时候会实例化Executor。
本地模式的job执行调用图:

上面省略了一些细节,只突出了在调用过程中比较重要的一些组件,大体流程如下:
main方法执行,创建了SparkContext,DAGScheduler,TaskSchedulerImpl等组件,程序执行到Action操作,开始执行job
- SparkContext 中的runJob方法层层调用最终通过messageLoop的方法提交给了DAGScheduler
- DAGScheduler对RDD进行解析,通过宽依赖划分为不同的stage,然后通过submitStage方法提交调度阶段,注意在这之后还是DAGScheduler做了将stage解析为task的任务,最后是在DAGScheduler的submitMissingTasks()方法里面调用了taskSchedulerImpl的submitTasks方法
- taskSchedulerImpl的submitTasks方法里面调用了LocalBackend的reviveOffers方法,开始分配资源。
- LocalBackend的reviveOffers使用locaEndpoint发送了消息,注意这里的localEndpoint虽然是一个RpcEndpointRef的类,但是底层操作的是LocalEndpoint,所以发送的reviveOffer消息被LocalEndpoint收到,然后调用LocalEndpoint的reviveOffers,在里面调用Executor的launchTasks开始执行任务,首先是使用Runnable的实现类TaskRunner包装了task.runTask,然后通过线程池调度运行任务。
独立运行模式(Standalone)
独立运行模式是使用Spark自己实现的资源管理组件,而没有使用Yarn或者Mesos的运行模式。独立运行模式由客户端,Master节点,Worker节点组成,而SparkContext可能运行在本地客户端,也可能运行在Master节点,当使用run-example来运行spark程序的时候,SparkContext运行在Master节点上,如果使用spark submit工具运行作业时,spark context 运行在提交作业的客户端上。
在worker节点上通过ExecutorRunner运行了若干个CoarseGrainedExecutorBackend进程,每个进程包含一个executor,executor里面包含了一个线程池,用来调度执行任务。

- 启动过程中会实例化DriverEndpint,这个实际上是在SparkDeploySchedulerBackend里面调用了CoarseGrainedSchedulerBackend的start,然后SparkDeploySchedulerBackend自身的start方法实例化了一个AppClient
override def start() {
    super.start()
    ……
    client = new AppClient(sc.env.actorSystem, masters, appDesc, this, conf)
    client.start()
    waitForRegistration()
  }
  // CoarseGrainedExecutorBackend的start
  override def start() {
    val properties = new ArrayBuffer[(String, String)]
    for ((key, value) <- scheduler.sc.conf.getAll) {
      if (key.startsWith("spark.")) {
        properties += ((key, value))
      }
    }

    // TODO (prashant) send conf instead of properties
    // 创建driverEndpoint
    driverEndpoint = rpcEnv.setupEndpoint(
      CoarseGrainedSchedulerBackend.ENDPOINT_NAME, new DriverEndpoint(rpcEnv, properties))
  }
在AppClient里面有个内部类,ClientActor,在AppClient的start方法里面初始化了这个ClientActor,触发了它的生命周期方法,registerWithMaster,然后就向Master发送了注册请求。
def tryRegisterAllMasters() {
      for (masterAkkaUrl <- masterAkkaUrls) {
        logInfo("Connecting to master " + masterAkkaUrl + "...")
        val actor = context.actorSelection(masterAkkaUrl)
        // !是运算符重载,发送了RegisterApplication消息
        actor ! RegisterApplication(appDescription)
      }
    }
- master 收到信息之后回复了RegisterApplication消息,并调用了schedule启动Executor
override def receiveWithLogging: PartialFunction[Any, Unit] = {

    case RegisterApplication(description) => {
      if (state == RecoveryState.STANDBY) {
        // ignore, don't send response
      } else {
        logInfo("Registering app " + description.name)
        // 创建App
        val app = createApplication(description, sender)
        // 注册App
        registerApplication(app)
        logInfo("Registered app " + description.name + " with ID " + app.id)
        persistenceEngine.addApplication(app)
        // 回复消息
        sender ! RegisteredApplication(app.id, masterUrl)
        // 启动Executor
        schedule()
      }
    }
      /**
   * Schedule the currently available resources among waiting apps. This method will be called
   * every time a new app joins or resource availability changes.
   */
  private def schedule(): Unit = {
    if (state != RecoveryState.ALIVE) { return }
    // Drivers take strict precedence over executors
    val shuffledWorkers = Random.shuffle(workers) // Randomization helps balance drivers
    // 遍历所有活着的worker
    for (worker <- shuffledWorkers if worker.state == WorkerState.ALIVE) {
    // 遍历所有等待的driver
      for (driver <- waitingDrivers) {
      // 如果worker的空闲资源可以满足driver的需求
        if (worker.memoryFree >= driver.desc.mem && worker.coresFree >= driver.desc.cores) {
        // 在worker上面启动driver程序
          launchDriver(worker, driver)
          waitingDrivers -= driver
        }
      }
    }
    // 在worker 上启动executor
    startExecutorsOnWorkers()
  }
上面给的launchDriver给worker发送了launchDriver的消息,worker收到了消息之后会尝试启动driver,而startExecutorOnWorkers会向选中的worker发送launchExecutor的消息,worker收到消息之后会启动Executor。
  override def receiveWithLogging: PartialFunction[Any, Unit] = {
    // 启动executor
    case LaunchExecutor(masterUrl, appId, execId, appDesc, cores_, memory_) =>
      if (masterUrl != activeMasterUrl) {
        logWarning("Invalid Master (" + masterUrl + ") attempted to launch executor.")
      } else {
        try {
          logInfo("Asked to launch executor %s/%d for %s".format(appId, execId, appDesc.name))

          // Create the executor's working directory
          val executorDir = new File(workDir, appId + "/" + execId)
          if (!executorDir.mkdirs()) {
            throw new IOException("Failed to create directory " + executorDir)
          }

          // Create local dirs for the executor. These are passed to the executor via the
          // SPARK_EXECUTOR_DIRS environment variable, and deleted by the Worker when the
          // application finishes.
          val appLocalDirs = appDirectories.get(appId).getOrElse {
            Utils.getOrCreateLocalRootDirs(conf).map { dir =>
              Utils.createDirectory(dir, namePrefix = "executor").getAbsolutePath()
            }.toSeq
          }
          appDirectories(appId) = appLocalDirs
          // 创建executor runner
          val manager = new ExecutorRunner(
            appId,
            execId,
            appDesc.copy(command = Worker.maybeUpdateSSLSettings(appDesc.command, conf)),
            cores_,
            memory_,
            self,
            workerId,
            host,
            webUi.boundPort,
            publicAddress,
            sparkHome,
            executorDir,
            akkaUrl,
            conf,
            appLocalDirs, ExecutorState.LOADING)
          executors(appId + "/" + execId) = manager
          manager.start()
          coresUsed += cores_
          memoryUsed += memory_
          master ! ExecutorStateChanged(appId, execId, manager.state, None, None)
        } catch {
          ……
      }

    // 启动driver
    case LaunchDriver(driverId, driverDesc) => {
      logInfo(s"Asked to launch driver $driverId")
      val driver = new DriverRunner(
        conf,
        driverId,
        workDir,
        sparkHome,
        driverDesc.copy(command = Worker.maybeUpdateSSLSettings(driverDesc.command, conf)),
        self,
        akkaUrl,
        securityMgr)
      drivers(driverId) = driver
      driver.start()

      coresUsed += driverDesc.cores
      memoryUsed += driverDesc.mem
    }
    case ReregisterWithMaster =>
      reregisterWithMaster()

    case ApplicationFinished(id) =>
      finishedApps += id
      maybeCleanupApplication(id)
  }
上面没有涉及到的还有在worker在preStart的时候会调用registerWithMaster向master注册worker。
Yarn 运行模式
首先介绍一下Yarn的运行架构。

ResourceManager负责资源的分配,资源分配的基本单位是container,内存、磁盘,cpu等资源都会被封装到container里面,任务只能在container里面运行。NodeManager负责启动Application需要的container,监控节点的资源使用情况并与ResourceManager通信。ApplicationMaster与具体的Application相关,ApplicationMaster和ResourceManager协商,以获取合适的container,监控这些container的状态。
Yarn Client模式
注意这一部分的代码在spark-yarn里面。
程序启动的顺序还是和之前类似,这里是使用了YarnClientSchedulerBackend作为schedulerBackend,然后在YarnClientSchedulerBackend里面开始注册Application
  /**
   * Submit an application running our ApplicationMaster to the ResourceManager.
   *向ResourceManager提交Application,启动ApplicationMaster
   * The stable Yarn API provides a convenience method (YarnClient#createApplication) for
   * creating applications and setting up the application submission context. This was not
   * available in the alpha API.
   */
  def submitApplication(): ApplicationId = {
    var appId: ApplicationId = null
    try {
      launcherBackend.connect()
      // Setup the credentials before doing anything else,
      // so we have don't have issues at any point.
      setupCredentials()
      // 初始化yarnClient以和yarn 集群通信
      yarnClient.init(yarnConf)
      yarnClient.start()

      logInfo("Requesting a new application from cluster with %d NodeManagers"
        .format(yarnClient.getYarnClusterMetrics.getNumNodeManagers))

      // Get a new application from our RM
      // 向resource manager 申请应用程序编号
      val newApp = yarnClient.createApplication()
      val newAppResponse = newApp.getNewApplicationResponse()
      appId = newAppResponse.getApplicationId()
      reportLauncherState(SparkAppHandle.State.SUBMITTED)
      launcherBackend.setAppId(appId.toString)

      // Verify whether the cluster has enough resources for our AM
      // 确认集群中有足够的资源来启动Application Master
      verifyClusterResources(newAppResponse)

      // Set up the appropriate contexts to launch our AM
      val containerContext = createContainerLaunchContext(newAppResponse)
      val appContext = createApplicationSubmissionContext(newApp, containerContext)

      // Finally, submit and monitor the application
      // 向集群提交Application
      logInfo(s"Submitting application $appId to ResourceManager")
      yarnClient.submitApplication(appContext)
      appId
    } catch {
      case e: Throwable =>
        if (appId != null) {
          cleanupStagingDir(appId)
        }
        throw e
    }
  }
// val containerContext = createContainerLaunchContext(newAppResponse)的调用
val amClass =
      if (isClusterMode) {
        Utils.classForName("org.apache.spark.deploy.yarn.ApplicationMaster").getName
      } else {
        Utils.classForName("org.apache.spark.deploy.yarn.ExecutorLauncher").getName
      }
ResourceManager的代码在Yarn里面,没有包含在这里,ResourceManager收到消息之后会选择一个合适的NodeManager并启动ExecutorLauncher,ExecutorLauncher的main里面会启动ApplicationMaster
ApplicationMaster启动之后会通过registerAM方法向DriverEndpoint发送消息,进行注册,然后调用YarnAllocator的allocateResources方法申请资源:
private def registerAM(
      _rpcEnv: RpcEnv,
      driverRef: RpcEndpointRef,
      uiAddress: String,
      securityMgr: SecurityManager) = {
    val sc = sparkContextRef.get()

    val appId = client.getAttemptId().getApplicationId().toString()
    val attemptId = client.getAttemptId().getAttemptId().toString()
    val historyAddress =
      sparkConf.get(HISTORY_SERVER_ADDRESS)
        .map { text => SparkHadoopUtil.get.substituteHadoopVariables(text, yarnConf) }
        .map { address => s"${address}${HistoryServer.UI_PATH_PREFIX}/${appId}/${attemptId}" }
        .getOrElse("")

    val _sparkConf = if (sc != null) sc.getConf else sparkConf
    val driverUrl = RpcEndpointAddress(
      _sparkConf.get("spark.driver.host"),
      _sparkConf.get("spark.driver.port").toInt,
      CoarseGrainedSchedulerBackend.ENDPOINT_NAME).toString
    // 向driver 发送消息,通知driver ApplicationMaster已经启动
    allocator = client.register(driverUrl,
      driverRef,
      yarnConf,
      _sparkConf,
      uiAddress,
      historyAddress,
      securityMgr,
      localResources)

    // 分配资源
    allocator.allocateResources()
    reporterThread = launchReporterThread()
  }
其中有register的调用完成了对AM的注册,allocator.allocateResources()完成了资源分配。
  /**
   * Request resources such that, if YARN gives us all we ask for, we'll have a number of containers
   * equal to maxExecutors.
   *
   * Deal with any containers YARN has granted to us by possibly launching executors in them.
   *
   * This must be synchronized because variables read in this method are mutated by other methods.
   */
  def allocateResources(): Unit = synchronized {
    updateResourceRequests()

    val progressIndicator = 0.1f
    // Poll the ResourceManager. This doubles as a heartbeat if there are no pending container
    // requests.
    val allocateResponse = amClient.allocate(progressIndicator)

    val allocatedContainers = allocateResponse.getAllocatedContainers()

    if (allocatedContainers.size > 0) {
      logDebug("Allocated containers: %d. Current executor count: %d. Cluster resources: %s."
        .format(
          allocatedContainers.size,
          numExecutorsRunning,
          allocateResponse.getAvailableResources))

      // 处理分配到的container ,调用函数启动executor
      handleAllocatedContainers(allocatedContainers.asScala)
    }

    val completedContainers = allocateResponse.getCompletedContainersStatuses()
    if (completedContainers.size > 0) {
      logDebug("Completed %d containers".format(completedContainers.size))
      processCompletedContainers(completedContainers.asScala)
      logDebug("Finished processing %d completed containers. Current running executor count: %d."
        .format(completedContainers.size, numExecutorsRunning))
    }
  }
上面的handleAllocatedContainers里面调用了runAllocatedContainers(),这个方法将启动Executor:
  /**
   * Launches executors in the allocated containers.
   */
  private def runAllocatedContainers(containersToUse: ArrayBuffer[Container]): Unit = {
    for (container <- containersToUse) {
      executorIdCounter += 1
      val executorHostname = container.getNodeId.getHost
      val containerId = container.getId
      val executorId = executorIdCounter.toString
      assert(container.getResource.getMemory >= resource.getMemory)
      logInfo("Launching container %s for on host %s".format(containerId, executorHostname))

      def updateInternalState(): Unit = synchronized {
        numExecutorsRunning += 1
        assert(numExecutorsRunning <= targetNumExecutors)
        executorIdToContainer(executorId) = container
        containerIdToExecutorId(container.getId) = executorId

        // 记录当前分配到的Container信息
        val containerSet = allocatedHostToContainersMap.getOrElseUpdate(executorHostname,
          new HashSet[ContainerId])
        containerSet += containerId
        allocatedContainerToHostMap.put(containerId, executorHostname)
      }

      if (launchContainers) {
        logInfo("Launching ExecutorRunnable. driverUrl: %s,  executorHostname: %s".format(
          driverUrl, executorHostname))

        //启动executor
        launcherPool.execute(new Runnable {
          override def run(): Unit = {
            try {
              new ExecutorRunnable(
                container,
                conf,
                sparkConf,
                driverUrl,
                executorId,
                executorHostname,
                executorMemory,
                executorCores,
                appAttemptId.getApplicationId.toString,
                securityMgr,
                localResources
              ).run()
              updateInternalState()
            } catch {
              case NonFatal(e) =>
                logError(s"Failed to launch executor $executorId on container $containerId", e)
                // Assigned container should be released immediately to avoid unnecessary resource
                // occupation.
                amClient.releaseAssignedContainer(containerId)
            }
          }
        })
      } else {
        // For test only
        updateInternalState()
      }
    }
  }
ExecutorRunnable是如何启动Executor的呢?看下ExecutorRunnable的代码就可以知道了:
val commands = prefixEnv ++ Seq(
      YarnSparkHadoopUtil.expandEnvironment(Environment.JAVA_HOME) + "/bin/java",
      "-server") ++
      javaOpts ++
      Seq("org.apache.spark.executor.CoarseGrainedExecutorBackend",
        "--driver-url", masterAddress.toString,
        "--executor-id", slaveId.toString,
        "--hostname", hostname.toString,
        "--cores", executorCores.toString,
        "--app-id", appId) ++
      userClassPath ++
      Seq(
        "1>", ApplicationConstants.LOG_DIR_EXPANSION_VAR + "/stdout",
        "2>", ApplicationConstants.LOG_DIR_EXPANSION_VAR + "/stderr")
可以看到,是使用了bin/java 这个命令执行的

Yarn cluster模式

在Yarn cluster模式中,客户端提交Application的时候会一并提交启动ApplicationMaster的命令,ResourceManager收到Application之后会先选择一个NodeManager启动一个ApplicationMaster,ApplicationMaster进行之后的SparkContext的初始化。
YarnCluster模式中,首先在SparkContext的createTaskScheduler中匹配使用YarnClusterScheduler作为TaskScheduler,使用YarnClusterSchedulerBackend作为SchedulerBackend。
case "yarn-standalone" | "yarn-cluster" =>
        if (master == "yarn-standalone") {
          logWarning(
            "\"yarn-standalone\" is deprecated as of Spark 1.0. Use \"yarn-cluster\" instead.")
        }
        val scheduler = try {
          val clazz = Class.forName("org.apache.spark.scheduler.cluster.YarnClusterScheduler")
          val cons = clazz.getConstructor(classOf[SparkContext])
          cons.newInstance(sc).asInstanceOf[TaskSchedulerImpl]
        } catch {
          ……
        }
        val backend = try {
          val clazz =
            Class.forName("org.apache.spark.scheduler.cluster.YarnClusterSchedulerBackend")
          val cons = clazz.getConstructor(classOf[TaskSchedulerImpl], classOf[SparkContext])
          cons.newInstance(scheduler, sc).asInstanceOf[CoarseGrainedSchedulerBackend]
        } catch {
          ……
        }
        scheduler.initialize(backend)
        (backend, scheduler)
通过Spark submit提交的程序会使用SparkSubmit的runMain执行,
这个runMain()方法是通过反射调用用户提交的程序里面的main方法,但是如果是yarn cluster模式,这个mainClass会被修改:
// In yarn-cluster mode, use yarn.Client as a wrapper around the user class
    if (isYarnCluster) {
      childMainClass = "org.apache.spark.deploy.yarn.Client"
那么这里实际上运行的是
def main(argStrings: Array[String]) {
    if (!sys.props.contains("SPARK_SUBMIT")) {
      logWarning("WARNING: This client is deprecated and will be removed in a " +
        "future version of Spark. Use ./bin/spark-submit with \"--master yarn\"")
    }

    // Set an env variable indicating we are running in YARN mode.
    // Note that any env variable with the SPARK_ prefix gets propagated to all (remote) processes
    System.setProperty("SPARK_YARN_MODE", "true")
    val sparkConf = new SparkConf

    val args = new ClientArguments(argStrings)
    new Client(args, sparkConf).run()
  }
在这里可以看到首先是创建了Client对象,然后调用了其run方法,run方法里面调用了之前client模式的submitApplication,那么之后的流程就是向ResourceManager申请启动ApplicationManager,最后到了val newApp = yarnClient.createApplication(),通过RPC调用使ResourceManager启动ApplicationMaster,接下来执行的函数是ExecutorLauncher的main方法,这里调用了ApplicationMaster的main方法:
/**
 * This object does not provide any special functionality. It exists so that it's easy to tell
 * apart the client-mode AM from the cluster-mode AM when using tools such as ps or jps.
 */
object ExecutorLauncher {
  def main(args: Array[String]): Unit = {
    ApplicationMaster.main(args)
  }
}
ApplicationMaster.main方法里面调用了ApplicationMaster.run
def main(args: Array[String]): Unit = {
    SignalUtils.registerLogger(log)
    val amArgs = new ApplicationMasterArguments(args)

    // Load the properties file with the Spark configuration and set entries as system properties,
    // so that user code run inside the AM also has access to them.
    // Note: we must do this before SparkHadoopUtil instantiated
    if (amArgs.propertiesFile != null) {
      Utils.getPropertiesFromFile(amArgs.propertiesFile).foreach { case (k, v) =>
        sys.props(k) = v
      }
    }
    SparkHadoopUtil.get.runAsSparkUser { () =>
      master = new ApplicationMaster(amArgs, new YarnRMClient)
      // 调用run 方法
      System.exit(master.run())
    }
  }
最终会通过ApplicationMaster的run方法执行,在这个方法中会判断是否是集群模式,然后选择启动Driver或者启动ExecutorLauncher:
if (isClusterMode) {
        runDriver(securityMgr)
      } else {
        runExecutorLauncher(securityMgr)
      }
而上面的runDriver会调用startUserApplication()方法,开始执行用户提交的程序。
  private def runDriver(securityMgr: SecurityManager): Unit = {
    addAmIpFilter()
    // 开始执行用户程序
    userClassThread = startUserApplication()

    // This a bit hacky, but we need to wait until the spark.driver.port property has
    // been set by the Thread executing the user class.
    val sc = waitForSparkContextInitialized()

    // If there is no SparkContext at this point, just fail the app.
    if (sc == null) {
      finish(FinalApplicationStatus.FAILED,
        ApplicationMaster.EXIT_SC_NOT_INITED,
        "Timed out waiting for SparkContext.")
    } else {
      rpcEnv = sc.env.rpcEnv
      val driverRef = runAMEndpoint(
        sc.getConf.get("spark.driver.host"),
        sc.getConf.get("spark.driver.port"),
        isClusterMode = true)
        // 通知driver ApplicationMaster启动成功,
        //接下来分配container并启动executor,和client模式相同
      registerAM(rpcEnv, driverRef, sc.ui.map(_.appUIAddress).getOrElse(""), securityMgr)
      userClassThread.join()
    }
  }
那么在实例化SparkContext的过程中调用的就是YarnClusterScheduler.start(),不过这个类没有复写start函数,所以还是TashSchedulerImpl的start,然后调用YarnClusterSchedulerBackend.start(),这个方法相比Client版本的要简单很多:
  override def start() {
    val attemptId = ApplicationMaster.getAttemptId
    bindToYarn(attemptId.getApplicationId(), Some(attemptId))
    super.start()
    totalExpectedExecutors = YarnSparkHadoopUtil.getInitialTargetExecutorNumber(sc.conf)
  }
Yarn client和Yarn cluster区别
Yarn client和Yarn cluster的区别就是两种模式的Application Master的区别:
Yarn client模式Application Master只用负责和ResourceManager申请container,client需要和container通信,调度job的执行,yarn client模式下client不能离开。
Yarn cluster模式Driver 是运行在Application Master里面的,用户提交了作业之后就不用继续在线了。
Mesos运行模式
Mesos 运行模式分为Meson粗粒度模式和Mesos细粒度模式。Mesos使用zookeeper来解决单点故障问题。Mesos由4个组件构成,分别是Mesos master,Mesos slave,框架和执行容器。其架构如图所示:

Mesos Slave 负责对每个节点上的资源进行管理,Mesos Master 负责对接Mesos Slave和注册的应用程序框架,将Slave上的资源按照一定的策略分配给执行框架。
框架指的是Hadoop,Spark这类的分布式计算框架,为了给不同的计算框架提供统一的接入方式,Mesos提供了MesosSchedulerDriver,计算框架的Scheduler通过使用MesosSchedulerDriver的接口实现和MesosMaster通信,申请计算资源。这里的MesosSchedulerDriver的包名是org.apache.mesos,可以看出这个类是属于mesos提供的实现类,可以直接用,不用继承,也不会被框架回调。
执行容器的作用是执行计算任务,Mesos提供了MesosExecutorDriver来兼容不同框架启动任务的不同方式,框架如果想接入mesos,需要继承mesos的Executor类,复写其中的任务控制方法,这里使用的是策略模式。
Mesos 粗粒度模式
Mesos粗粒度模式使用的SchedulerBackend是CoarseMesosSchedulerBackend,CoarseMesosBackend不仅继承了CoarseGrainedSchedulerBackend而且实现了MScheduler,MScheduler是一个回调接口,CoarseMesosSchedulerBackend在start里面实例化了一个MesosSchedulerDriver,这个类类似于上面yarn里面的client,但是里面有很多native方法,这个类有一个构造函数接受MScheduler参数,然后在各种事件发生的时候通过回调MScheduler的方法来做相应的操作。
- sparkcontext启动,选择CoarseMesosSchedulerBackend作为schedulerBackend
case mesosUrl @ MESOS_REGEX(_) =>
        MesosNativeLibrary.load()
        val scheduler = new TaskSchedulerImpl(sc)
        val coarseGrained = sc.conf.getBoolean("spark.mesos.coarse", false)
        val url = mesosUrl.stripPrefix("mesos://") // strip scheme from raw Mesos URLs
        val backend = if (coarseGrained) {
          new CoarseMesosSchedulerBackend(scheduler, sc, url)
        } else {
          new MesosSchedulerBackend(scheduler, sc, url)
        }
        scheduler.initialize(backend)
        (backend, scheduler)
- CoarseMesosSchedulerBackend.start启动MesosSchedulerDriver
  override def start() {
    super.start()
    val fwInfo = FrameworkInfo.newBuilder().setUser(sc.sparkUser).setName(sc.appName).build()
    startScheduler(master, CoarseMesosSchedulerBackend.this, fwInfo)
  }
    /**
   * Starts the MesosSchedulerDriver with the provided information. This method returns
   * only after the scheduler has registered with Mesos.
   * @param masterUrl Mesos master connection URL
   * @param scheduler Scheduler object
   * @param fwInfo FrameworkInfo to pass to the Mesos master
   */
  def startScheduler(masterUrl: String, scheduler: Scheduler, fwInfo: FrameworkInfo): Unit = {
    synchronized {
      if (mesosDriver != null) {
        registerLatch.await()
        return
      }

      new Thread(Utils.getFormattedClassName(this) + "-mesos-driver") {
        setDaemon(true)

        override def run() {
          mesosDriver = new MesosSchedulerDriver(scheduler, fwInfo, masterUrl)
          try {
            val ret = mesosDriver.run()
            logInfo("driver.run() returned with code " + ret)
            if (ret.equals(Status.DRIVER_ABORTED)) {
              System.exit(1)
            }
          } catch {
            case e: Exception => {
              logError("driver.run() failed", e)
              System.exit(1)
            }
          }
        }
      }.start()

      registerLatch.await()
    }
  }
- 完成注册之后回调了CoarseMesosSchedulerBackend.registered()方法通知完成注册,MesosMaster会和集群通信,让集群创建容器,然后回调CoarseMesosSchedulerBackend.resourceOffers()
  override def registered(d: SchedulerDriver, frameworkId: FrameworkID, masterInfo: MasterInfo) {
    appId = frameworkId.getValue
    logInfo("Registered as framework ID " + appId)
    markRegistered()
  }
MesosMaster在完成注册之后会调用reviveOffers方法,这个方法会调用Spark里面的CoarseMesosSchedulerBackend.resourceOffers和CoarseGrainedExecutorBackend的onStart。
先看下resourceOffers方法:
  override def resourceOffers(d: SchedulerDriver, offers: JList[Offer]) {
    synchronized {
      val filters = Filters.newBuilder().setRefuseSeconds(5).build()

		// 遍历所有的资源
      for (offer <- offers) {
      // 获取slave id
        val slaveId = offer.getSlaveId.toString
        // 获取内存大小
        val mem = getResource(offer.getResourcesList, "mem")
        // 获取cpu数量
        val cpus = getResource(offer.getResourcesList, "cpus").toInt
        // 如果资源狗荣
        if (totalCoresAcquired < maxCores &&
            mem >= MemoryUtils.calculateTotalMemory(sc) &&
            cpus >= 1 &&
            failuresBySlaveId.getOrElse(slaveId, 0) < MAX_SLAVE_FAILURES &&
            !slaveIdsWithExecutors.contains(slaveId)) {
          // Launch an executor on the slave
          // 在slave上面启动executor
          val cpusToUse = math.min(cpus, maxCores - totalCoresAcquired)
          totalCoresAcquired += cpusToUse
          val taskId = newMesosTaskId()
          taskIdToSlaveId(taskId) = slaveId
          slaveIdsWithExecutors += slaveId
          coresByTaskId(taskId) = cpusToUse
          val task = MesosTaskInfo.newBuilder()
            .setTaskId(TaskID.newBuilder().setValue(taskId.toString).build())
            .setSlaveId(offer.getSlaveId)
            .setCommand(createCommand(offer, cpusToUse + extraCoresPerSlave))
            .setName("Task " + taskId)
            .addResources(createResource("cpus", cpusToUse))
            .addResources(createResource("mem",
              MemoryUtils.calculateTotalMemory(sc)))

          sc.conf.getOption("spark.mesos.executor.docker.image").foreach { image =>
            MesosSchedulerBackendUtil
              .setupContainerBuilderDockerInfo(image, sc.conf, task.getContainerBuilder())
          }

          d.launchTasks(
            Collections.singleton(offer.getId), Collections.singletonList(task.build()), filters)
        } else {
          // Filter it out
          d.launchTasks(
            Collections.singleton(offer.getId), Collections.emptyList[MesosTaskInfo](), filters)
        }
      }
    }
  }
启动CoarseGrainedExecutorBackend的方法是通过外部命令来实现的,具体的代码在createCommand里面
if (uri.isEmpty) {
      val runScript = new File(executorSparkHome, "./bin/spark-class").getCanonicalPath
      command.setValue(
        "%s \"%s\" org.apache.spark.executor.CoarseGrainedExecutorBackend"
          .format(prefixEnv, runScript) +
        s" --driver-url $driverUrl" +
        s" --executor-id ${offer.getSlaveId.getValue}" +
        s" --hostname ${offer.getHostname}" +
        s" --cores $numCores" +
        s" --app-id $appId")
    } else {
      // Grab everything to the first '.'. We'll use that and '*' to
      // glob the directory "correctly".
      val basename = uri.get.split('/').last.split('.').head
      command.setValue(
        s"cd $basename*; $prefixEnv " +
         "./bin/spark-class org.apache.spark.executor.CoarseGrainedExecutorBackend" +
        s" --driver-url $driverUrl" +
        s" --executor-id ${offer.getSlaveId.getValue}" +
        s" --hostname ${offer.getHostname}" +
        s" --cores $numCores" +
        s" --app-id $appId")
      command.addUris(CommandInfo.URI.newBuilder().setValue(uri.get))
    }
这里的调用就通知了CoarseGrainedExecutorBackend driverUrl,接下来直接运行的是CoarseGrainedExecutorBackend的main方法,CoarseGrainedExecutorBackend启动之后会先和Driver通信,完成通信之后启动Executor。
Mesos细粒度模式
Mesos细粒度模式的细主要体现在在Mesos将会参与到Task执行的过程中去,不再是按照每个Application的粒度来管理,而是按照task的粒度来管理,在粗粒度模式中,Driver与MesosMaster通信获得了Container之后将直接和Executor通信,由spark在mesos分配的container里面管理具体的task的执行,而在细粒度模式下,spark 通过ExecutorBackend将task发送到MesosMaster里面去,MesosMaster再调度MesosSlave来执行任务,完成任务之后slave会将任务执行情况反馈给MesosMaster,MesosMaster再将任务执行情况返回个Driver。
Mesos细粒度模式与粗粒度模式实现的主要区别是SchedulerBackend的实现不同,Mesos细粒度模式使用了MesosSchedulerBackend,在MesosSchedulerBackend中, 启动和申请资源的流程类似,主要的变动是resourceOffers。接下来看详细步骤:
- 启动MesosSchedulerDriver,具体实现和粗粒度一样,不再深入
  override def start() {
    val fwInfo = FrameworkInfo.newBuilder().setUser(sc.sparkUser).setName(sc.appName).build()
    classLoader = Thread.currentThread.getContextClassLoader
    // 启动schedulerDriver
    startScheduler(master, MesosSchedulerBackend.this, fwInfo)
  }
- 回调resourceOffers,调用createExecutorInfo在对应的slave上启动ExecutorBackend
  def createExecutorInfo(execId: String): MesosExecutorInfo = {
    val executorSparkHome = sc.conf.getOption("spark.mesos.executor.home")
      .orElse(sc.getSparkHome()) // Fall back to driver Spark home for backward compatibility
      .getOrElse {
        throw new SparkException("Executor Spark home `spark.mesos.executor.home` is not set!")
      }
    val environment = Environment.newBuilder()
    sc.conf.getOption("spark.executor.extraClassPath").foreach { cp =>
      environment.addVariables(
        Environment.Variable.newBuilder().setName("SPARK_CLASSPATH").setValue(cp).build())
    }
    val extraJavaOpts = sc.conf.getOption("spark.executor.extraJavaOptions").getOrElse("")

    val prefixEnv = sc.conf.getOption("spark.executor.extraLibraryPath").map { p =>
      Utils.libraryPathEnvPrefix(Seq(p))
    }.getOrElse("")

    environment.addVariables(
      Environment.Variable.newBuilder()
        .setName("SPARK_EXECUTOR_OPTS")
        .setValue(extraJavaOpts)
        .build())
    sc.executorEnvs.foreach { case (key, value) =>
      environment.addVariables(Environment.Variable.newBuilder()
        .setName(key)
        .setValue(value)
        .build())
    }
    val command = CommandInfo.newBuilder()
      .setEnvironment(environment)
    val uri = sc.conf.getOption("spark.executor.uri")
      .orElse(Option(System.getenv("SPARK_EXECUTOR_URI")))

    val executorBackendName = classOf[MesosExecutorBackend].getName
    if (uri.isEmpty) {
      val executorPath = new File(executorSparkHome, "/bin/spark-class").getCanonicalPath
      command.setValue(s"$prefixEnv $executorPath $executorBackendName")
    } else {
      // Grab everything to the first '.'. We'll use that and '*' to
      // glob the directory "correctly".
      val basename = uri.get.split('/').last.split('.').head
      command.setValue(s"cd ${basename}*; $prefixEnv ./bin/spark-class $executorBackendName")
      command.addUris(CommandInfo.URI.newBuilder().setValue(uri.get))
    }
    val cpus = Resource.newBuilder()
      .setName("cpus")
      .setType(Value.Type.SCALAR)
      .setScalar(Value.Scalar.newBuilder()
        .setValue(mesosExecutorCores).build())
      .build()
    val memory = Resource.newBuilder()
      .setName("mem")
      .setType(Value.Type.SCALAR)
      .setScalar(
        Value.Scalar.newBuilder()
          .setValue(MemoryUtils.calculateTotalMemory(sc)).build())
      .build()
    val executorInfo = MesosExecutorInfo.newBuilder()
      .setExecutorId(ExecutorID.newBuilder().setValue(execId).build())
      .setCommand(command)
      .setData(ByteString.copyFrom(createExecArg()))
      .addResources(cpus)
      .addResources(memory)

    sc.conf.getOption("spark.mesos.executor.docker.image").foreach { image =>
      MesosSchedulerBackendUtil
        .setupContainerBuilderDockerInfo(image, sc.conf, executorInfo.getContainerBuilder())
    }

    executorInfo.build()
  }
MesosExecutorBackend实现了MesosExecutor接口和ExecutorBackend,实例化的过程中将会创建Executor
// MesosExecutorBackend.scala
  override def registered(
      driver: ExecutorDriver,
      executorInfo: ExecutorInfo,
      frameworkInfo: FrameworkInfo,
      slaveInfo: SlaveInfo) {
      ……

    executor = new Executor(
      executorId,
      slaveInfo.getHostname,
      env)
  }
- mesos使用SchedulerDriver将tasks发送到MesosMaster执行
// MesosSchedulerBackend.scala片段
mesosTasks.foreach { case (slaveId, tasks) =>
        slaveIdToWorkerOffer.get(slaveId).foreach(o =>
          listenerBus.post(SparkListenerExecutorAdded(System.currentTimeMillis(), slaveId,
            // TODO: Add support for log urls for Mesos
            new ExecutorInfo(o.host, o.cores, Map.empty)))
        )
        // 发送tasks 到MesosMaster
        d.launchTasks(Collections.singleton(slaveIdToOffer(slaveId).getId), tasks, filters)
      }
Mesos粗粒度和细粒度对比
Mesos粗粒度的实现方式和之前的各种框架类似,MesosMaster负责在Slave上面启动资源容器,将资源打包成对象返回给Driver,Driver在资源上调度Task的执行,这样的模式资源一旦分配就不能更改,资源的分配是以Application作为单位的。
Mesos细粒度模式将任务上传到MesosMaster,Driver只和MesosMaster交互,而tasks由MesosMaster调度执行,MesosMaster按照每task的粒度来请求资源和调度执行。
Mesos细粒度模式以task的粒度调度运行任务,优化了任务的使用,但是增加了调度任务的计算开销,也增加了MesosMaster的计算压力。