版权声明:本文为博主原创文章,转载请标明出处,蟹蟹 https://blog.csdn.net/fly_wt/article/details/84719596
第一种方法:subplot2grid
定义一个3*3的矩阵位置,利用subplot2grid分别框选出想要的区域大小,进而在区域中plot出想绘制的函数即可,colspan与rowspan分别表示行数和列数,用来界定大小
说明:
通过这种方法设置title和label需要在前面加上set_
import matplotlib.pyplot as plt
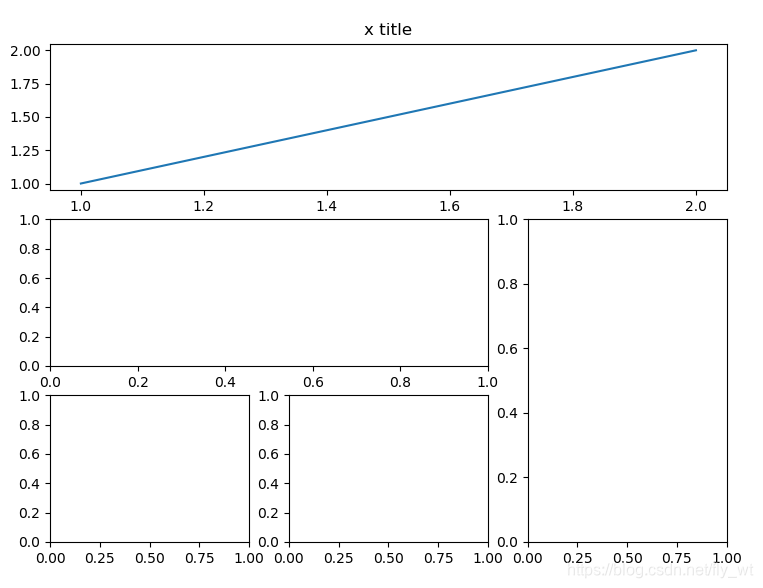
# 第一种方法
plt.figure()
ax1 = plt.subplot2grid((3, 3), (0, 0), colspan=3, rowspan=1)
ax1.plot([1, 2], [1, 2])
ax1.set_title('x title')
ax2 = plt.subplot2grid((3, 3), (1, 0), colspan=2,)
ax3 = plt.subplot2grid((3, 3), (1, 2), rowspan=2)
ax4 = plt.subplot2grid((3, 3), (2, 0))
ax5 = plt.subplot2grid((3, 3), (2, 1))
plt.show()
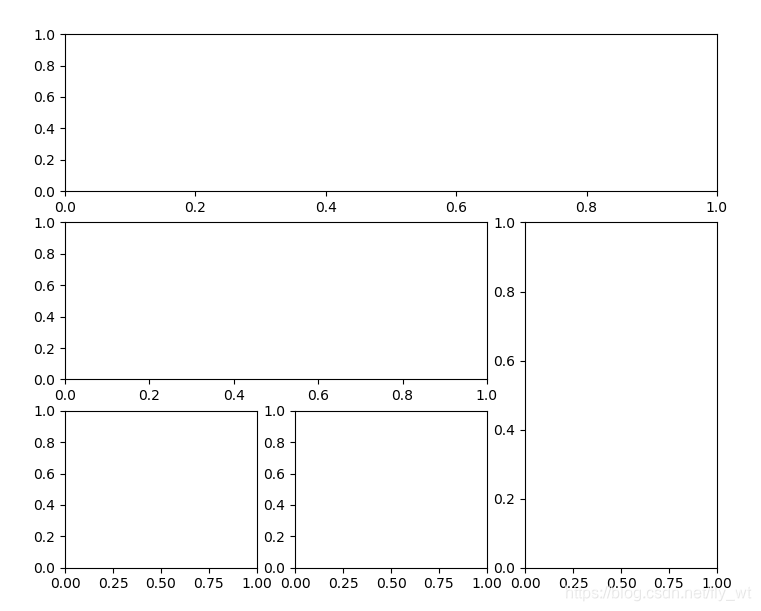
第二种方法:subplot2grid
借助matplotlib中的gridspec方法进行划分区域
import matplotlib.pyplot as plt
import matplotlib.gridspec as gridspec

# 第二种方法
plt.figure()
gs = gridspec.GridSpec(3, 3)
ax1 = plt.subplot(gs[0, :]) # 第一行的全部位置
ax2 = plt.subplot(gs[1, :2])# 第二行前两个位置
ax3 = plt.subplot(gs[1:, 2])# 第三行到最后一行,第三个位置
ax4 = plt.subplot(gs[-1, 0])# 最后一行第一个位置
ax5 = plt.subplot(gs[-1, -2])# 最后一行倒数第二个位置

plt.show()
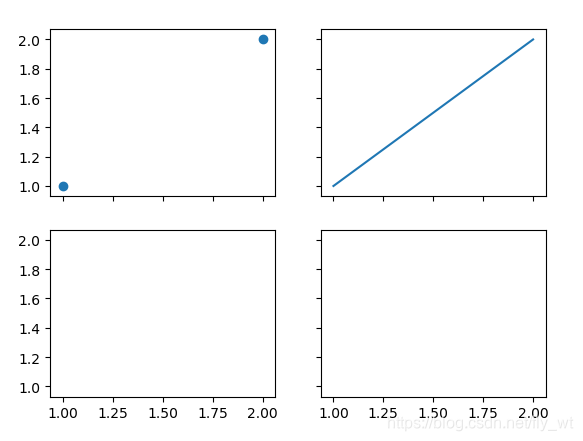
第二种方法:subplots
借助subplots返回两个对象,一个是figure的信息,一个是位置信息。
import matplotlib.pyplot as plt


# 第三种方法
f, ((ax11, ax12), (ax21, ax22))= plt.subplots(2, 2, sharex=True, sharey=True)
ax11.scatter([1, 2], [1, 2])
ax12.plot([1, 2], [1, 2])
plt.show()
大家选一个去绘制即可,最后的结果是一样的