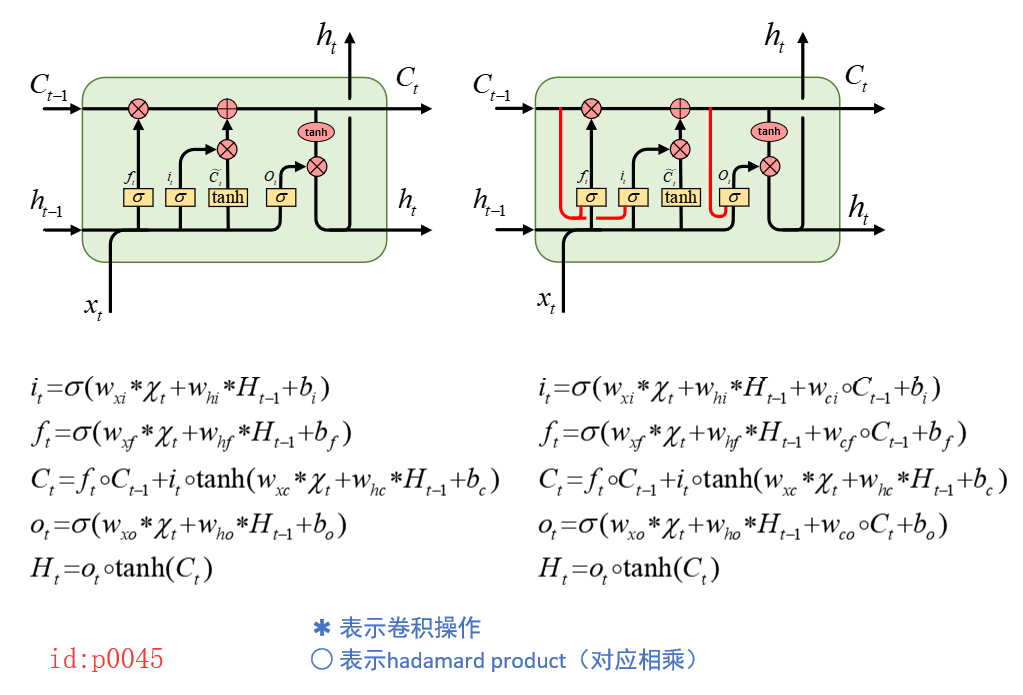
前面一文我们简单得介绍了ConvLSTM得原理和应用场景,现在来看看在Tensorflow它具体是如何实现得。 值得一说得是Tensorflow在实现这个算法得时候并没有使用peepholes,即下面的红色部分,而是基于原始的LSTM网络结构改变的。不过在最后,我也会给出一个仿照Tensorflow实现的基于peepholes的ConvLSTM版本。
1.用法
在接受具体用法前,先来大致解释一下参数。由于该算法是CNN与LSTM的一个结合,所以在说到对其中各个参数理解的时候,我会将其类比于CNN和LSTM中对应的参数。
def __init__(self,
               conv_ndims,
               input_shape,
               output_channels,
               kernel_shape,
               use_bias=True,
               skip_connection=False,
               forget_bias=1.0,
               initializers=None,
               name="conv_lstm_cell"):
参数:
conv_ndims:卷积维度,对于平面卷积来说都为2,例如图片的卷积处理;
input_shape:输入维度(除去batch_size),例如当conv_ndims=2时,输入维度就应该为[weight,high,channel],最简单的就是将它想象成一个图片;
output_channels:最终输出时的深度;就像是在conv2d中卷积核的深度一样,它决定了最终提取特征后的图像的深度
kernel_shape:卷积核的平面大小例如[3,3];熟悉conv2d的都知道卷积核的维度应该是4,这儿怎么才2,原因就是剩下的两个维度直接通过计算就可以得到,这部分在ConvLSTM的内部实现中完成
use_bias:这个很好理解,是否要使用偏置
剩下的参数保持默认就好。
1.1 单个单元cell.call()
import tensorflow.contrib as contrib
import tensorflow as tf

inputs = tf.placeholder(dtype=tf.float32, shape=[64, 10, 10, 28])  # [batch_size,width,high,channeals]
cell = contrib.rnn.ConvLSTMCell(conv_ndims=2, input_shape=[10, 10, 28], output_channels=6, kernel_shape=[3, 3])
initial_state = cell.zero_state(batch_size=64, dtype=tf.float32)
output, final_state=cell.call(inputs=inputs,state=initial_state)
print(output)
print(final_state)

>>
Tensor("mul_2:0", shape=(64, 10, 10, 6), dtype=float32)
LSTMStateTuple(c=<tf.Tensor 'add_2:0' shape=(64, 10, 10, 6) dtype=float32>, h=<tf.Tensor 'mul_2:0' shape=(64, 10, 10, 6) dtype=float32>)
从图中我们可以看到每个输出结果的维度是由哪些参数所确定的。
1.2 按时间维度展开dynamic_rnn()
inputs = tf.placeholder(dtype=tf.float32, shape=[64, 100, 10, 10, 28])  # [batch_size,time_setp,width,high,channeals] 5D
cell = contrib.rnn.ConvLSTMCell(conv_ndims=2, input_shape=[10, 10, 28], output_channels=6, kernel_shape=[3, 3])
initial_state = cell.zero_state(batch_size=64, dtype=tf.float32)
output, final_state = tf.nn.dynamic_rnn(cell, inputs, dtype=tf.float32, time_major=False, initial_state=initial_state)
print(output)
print(final_state)

>>
Tensor("rnn/transpose_1:0", shape=(64, 100, 10, 10, 6), dtype=float32)
LSTMStateTuple(c=<tf.Tensor 'rnn/while/Exit_3:0' shape=(64, 10, 10, 6) dtype=float32>, h=<tf.Tensor 'rnn/while/Exit_4:0' shape=(64, 10, 10, 6) dtype=float32>)
同其它RNN一样,在使用dynamic_rnn时inputs接受两种形式的输入,并且通过参数time_major来控制。如果inputs的shape=[time_setp,batch_size,width,high,channeals],则必须有time_major=True。同时,从上面的代码可知,在时间轴上的展开有100个,所以最后输出shape=(64, 100, 10, 10, 6)表示的含义是100个单元,每个单元对应输出部分的大小为[64,10,10,6]。
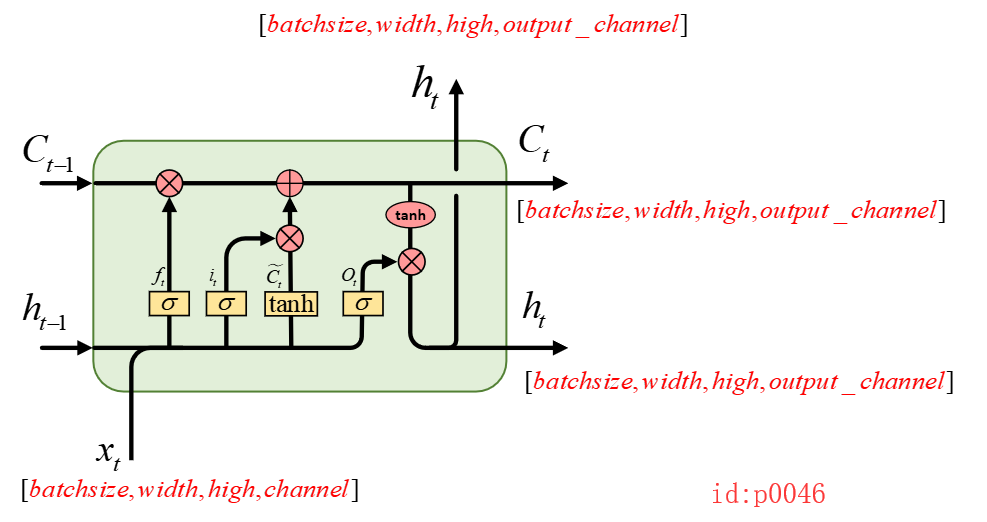
2.Tensorflow中的实现细节
接下来,我们就来大致看看ConvLSTM的内部实现部分。同RNN、LSTM一样,其核心部分都是在于实现call()这个类方法,然后通过调用call()来完成一次前向传播的任务。而对应call()这个方法来说,其核心部分就是里面的卷积操作(由_conv()这个函数来实现),当计算得到卷积后的结果后,剩下的就是各种激活函数的线性组合了,如下:
  def call(self, inputs, state, scope=None):
    cell, hidden = state
    new_hidden = _conv([inputs, hidden],
                       self._kernel_shape,
                       4*self._output_channels,
                       self._use_bias)
    input_gate, new_input, forget_gate, output_gate = gates
    new_cell = math_ops.sigmoid(forget_gate + self._forget_bias) * cell
    new_cell += math_ops.sigmoid(input_gate) * math_ops.tanh(new_input)
    output = math_ops.tanh(new_cell) * math_ops.sigmoid(output_gate)
    new_state = rnn_cell_impl.LSTMStateTuple(new_cell, output)

    return output, new_state
所以此时的关注的重点就转移到了_conv()这个函数上来了。同时我们知道,在写卷积网络的时候,我们需要指定每一个卷积核的shape,可是在ConvLSTM中似乎并没有完全指定,这到底怎么回事呢?
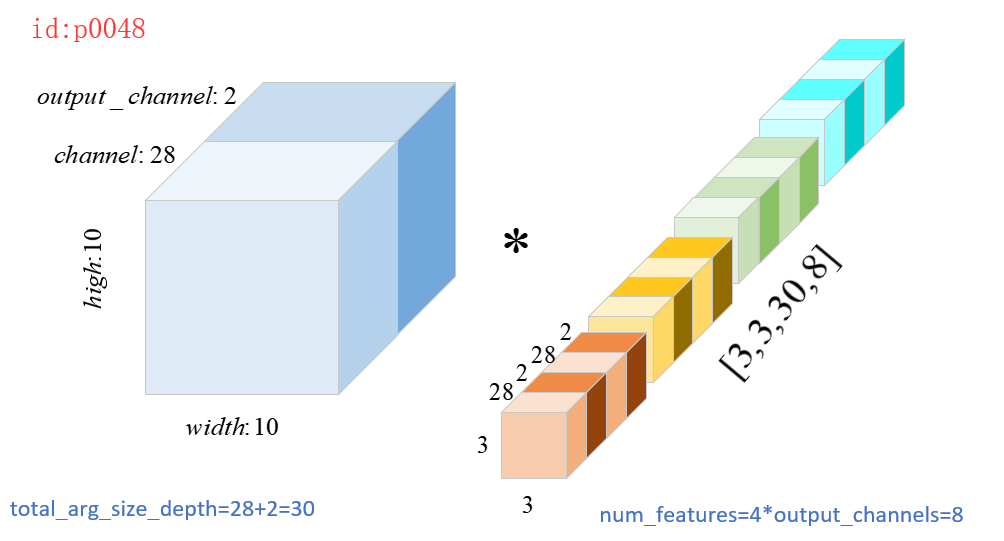
由前面的的计算公式可知一共应该有8个卷积核,分别是
。假设我们现在输入的形状input:[1,10,10,28],output_channels=2,kernel_size=[3,3],则按照一般思路我们应该是进行如下计算(进行8次卷积操作)。
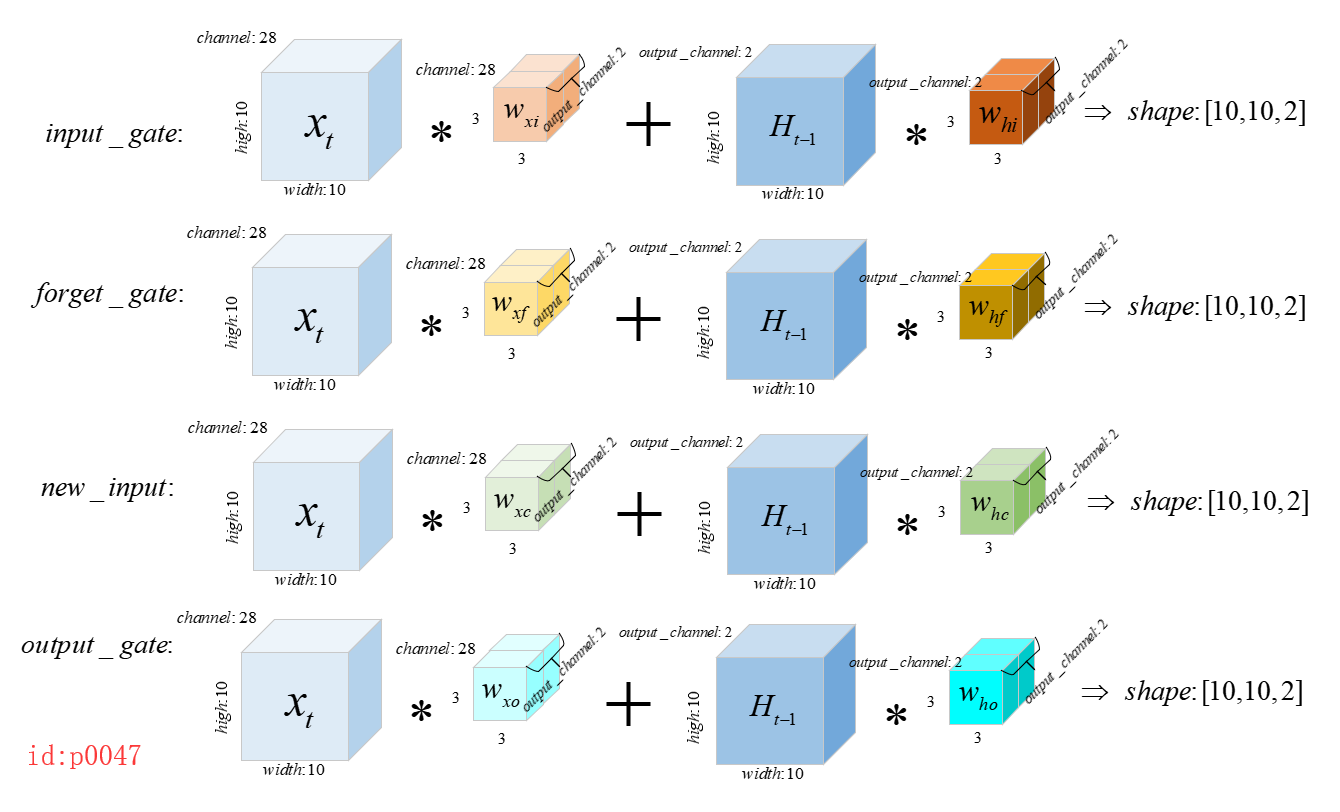
有没有发现这样计算太麻烦了,我在画图的时候都觉得麻烦。不过Tensorflow的实现从来没让我们失望过,其在实现的时候同样采用了先叠加,然后进行卷积的原则,大大减少了计算复杂程度:
new_hidden = _conv([inputs, hidden],
                   self._kernel_shape,
                   4*self._output_channels,
                   self._use_bias)
---------------------------------------------------------------------------

def _conv(args, filter_size, num_features, bias, bias_start=0.0):
    total_arg_size_depth = 0
    shapes = [a.get_shape().as_list() for a in args]
    shape_length = len(shapes[0])# 得到args[0],也就是inputs的维度
    total_arg_size_depth += shape[-1]
    kernel = vs.get_variable(
      "kernel",
      filter_size + [total_arg_size_depth, num_features],
      dtype=dtype)

    res = conv_op(array_ops.concat(axis=shape_length-1, values=args),
              kernel,
              strides,
              padding='SAME')
如上代码所示:
第3行对应的即使计算图p0048中的8;
第11行对应的就是计算图p0048中的30;
第17行中的concat对应的就是将图p0048中的
堆叠起来;
从以上代码我们也确实可以发现,Tensorflow在实现ConvLSTM时,确实基于的是原始的LSTM。
3.Tensorflow实现基于’peepholes LSTM’的ConvLSTM
由于contrib.rnn.ConvLSTMCell中对于ConvLSTMCell的实现本没有基于原作者的所引用的带有 "peepholes connection"的LSTM。因此,这里就照着葫芦画瓢,直接在原来的contrib.rnn.ConvLSTMCell的call()实现中上添加了peepholes这一步。
添加的代码为:
        w_ci = vs.get_variable(
            "w_ci", cell.shape, inputs.dtype)
        w_cf = vs.get_variable(
            "w_cf", cell.shape, inputs.dtype)
        w_co = vs.get_variable(
            "w_co", cell.shape, inputs.dtype)

        new_cell = math_ops.sigmoid(forget_gate + self._forget_bias + w_cf * cell) * cell
        new_cell += math_ops.sigmoid(input_gate + w_ci * cell) * math_ops.tanh(new_input)
        output = math_ops.tanh(new_cell) * math_ops.sigmoid(output_gate + w_co * new_cell)
引用时,将 ConvLSTM中的BasicConvLSTM导入即可:
from ConvLSTM import BasicConvLSTM
用法同ConvLSTMCell一模一样!