版权声明:本文为博主原创文章,未经博主允许不得转载。 https://blog.csdn.net/akof1314/article/details/23261651
在上一篇《Unity 4.3 制作一个2D横版射击游戏》时,已经完成一个基本的射击游戏了。在这一篇将继续完善。
1.视差卷轴效果
为了达到这种视差卷轴的效果,可以让背景层以不同的速度进行移动,越远的层,移动地越慢。如果操作得当,这可以造成深度的错觉,这将很酷,又是可以容易做到的效果。在这里存在两个滚动:
- 主角随着摄像机向前推进
- 背景元素除了摄像机的移动外,又以不同的速度移动
一个循环的背景将在水平滚动的时候,一遍又一遍的重复进行显示。现在添加一个新的层到场景中,来显示背景元素。现有的层如下:
如下图所示:

接下来,先实现下不带背景循环的滚动。创建一个脚本,命名为" ScrollingScript",代码如下:
| Layer | Loop | Position |
| Background with the sky | Yes | (0, 0, 10) |
| Background (1st row of flying platforms) | No | (0, 0, 9) |
| Middleground (2nd row of flying platforms) | No | (0, 0, 5) |
| Foreground with players and enemies | No | (0, 0, 0) |
接下来,先实现下不带背景循环的滚动。创建一个脚本,命名为" ScrollingScript",代码如下:
|
1
2 3 4 5 6 7 8 9 10 11 12 13 14 15 16 17 18 19 20 21 22 23 24 25 26 27 28 29 30 31 32 33 34 35 36 37 38 39 40 |
using UnityEngine;
/// <summary> /// Parallax scrolling script that should be assigned to a layer /// </summary> public class ScrollingScript : MonoBehaviour { /// <summary> /// Scrolling speed /// </summary> public Vector2 speed = new Vector2( 2, 2); /// <summary> /// Moving direction /// </summary> public Vector2 direction = new Vector2(- 1, 0); /// <summary> /// Movement should be applied to camera /// </summary> public bool isLinkedToCamera = false; void Update() { // Movement Vector3 movement = new Vector3( speed.x * direction.x, speed.y * direction.y, 0); movement *= Time.deltaTime; transform.Translate(movement); // Move the camera if (isLinkedToCamera) { Camera.main.transform.Translate(movement); } } } |
将这个脚本附加到以下对象上,并且设置好其属性值,如下:
| Layer | Speed | Direction | Linked to Camera |
| 0 - Background | (1, 1) | (-1, 0, 0) | No |
| 1 - Background elements | (1.5, 1.5) | (-1, 0, 0) | No |
| 2 - Middleground | (2.5, 2.5) | (-1, 0, 0) | No |
| 3 - Foreground | (1, 1) | (1, 0, 0) | Yes |
现在添加更多的元素到场景上:
- 添加两个天空背景到0 - Background
- 添加一些小的平台到1 - Background elements
- 添加一些平台到2 - Middleground
- 添加更多的敌人到3 - Foreground,放置在摄像机的右边
接下来,实现无限背景。当左侧的背景对象远离了摄像机的左边缘,那么就将它移到右侧去,一直这样无限循环,如下图所示:

要做到检查的对象渲染器是否在摄像机的可见范围内,需要一个类扩展。创建一个C#文件,命名为"
RendererExtensions.cs",代码如下:
|
1
2 3 4 5 6 7 8 9 10 |
using UnityEngine;
public static class RendererExtensions { public static bool IsVisibleFrom( this Renderer renderer, Camera camera) { Plane[] planes = GeometryUtility.CalculateFrustumPlanes(camera); return GeometryUtility.TestPlanesAABB(planes, renderer.bounds); } } |
修改"
ScrollingScript"脚本文件,为如下:
|
1
2 3 4 5 6 7 8 9 10 11 12 13 14 15 16 17 18 19 20 21 22 23 24 25 26 27 28 29 30 31 32 33 34 35 36 37 38 39 40 41 42 43 44 45 46 47 48 49 50 51 52 53 54 55 56 57 58 59 60 61 62 63 64 65 66 67 68 69 70 71 72 73 74 75 76 77 78 79 80 81 82 83 84 85 86 87 88 89 90 91 92 93 94 95 96 97 98 99 100 101 102 103 104 105 106 107 108 109 110 111 112 113 114 115 116 117 118 119 120 |
using System.Collections.Generic;
using System.Linq; using UnityEngine; /// <summary> /// Parallax scrolling script that should be assigned to a layer /// </summary> public class ScrollingScript : MonoBehaviour { /// <summary> /// Scrolling speed /// </summary> public Vector2 speed = new Vector2( 10, 10); /// <summary> /// Moving direction /// </summary> public Vector2 direction = new Vector2(- 1, 0); /// <summary> /// Movement should be applied to camera /// </summary> public bool isLinkedToCamera = false; /// <summary> /// 1 - Background is infinite /// </summary> public bool isLooping = false; /// <summary> /// 2 - List of children with a renderer. /// </summary> private List<Transform> backgroundPart; // 3 - Get all the children void Start() { // For infinite background only if (isLooping) { // Get all the children of the layer with a renderer backgroundPart = new List<Transform>(); for ( int i = 0; i < transform.childCount; i++) { Transform child = transform.GetChild(i); // Add only the visible children if (child.renderer != null) { backgroundPart.Add(child); } } // Sort by position. // Note: Get the children from left to right. // We would need to add a few conditions to handle // all the possible scrolling directions. backgroundPart = backgroundPart.OrderBy( t => t.position.x ).ToList(); } } void Update() { // Movement Vector3 movement = new Vector3( speed.x * direction.x, speed.y * direction.y, 0); movement *= Time.deltaTime; transform.Translate(movement); // Move the camera if (isLinkedToCamera) { Camera.main.transform.Translate(movement); } // 4 - Loop if (isLooping) { // Get the first object. // The list is ordered from left (x position) to right. Transform firstChild = backgroundPart.FirstOrDefault(); if (firstChild != null) { // Check if the child is already (partly) before the camera. // We test the position first because the IsVisibleFrom // method is a bit heavier to execute. if (firstChild.position.x < Camera.main.transform.position.x) { // If the child is already on the left of the camera, // we test if it's completely outside and needs to be // recycled. if (firstChild.renderer.IsVisibleFrom(Camera.main) == false) { // Get the last child position. Transform lastChild = backgroundPart.LastOrDefault(); Vector3 lastPosition = lastChild.transform.position; Vector3 lastSize = (lastChild.renderer.bounds.max - lastChild.renderer.bounds.min); // Set the position of the recyled one to be AFTER // the last child. // Note: Only work for horizontal scrolling currently. firstChild.position = new Vector3(lastPosition.x + lastSize.x, firstChild.position.y, firstChild.position.z); // Set the recycled child to the last position // of the backgroundPart list. backgroundPart.Remove(firstChild); backgroundPart.Add(firstChild); } } } } } } |
在
Start方法里,使用了LINQ将它们按X轴进行排序。将"
0 - Background"对象里的"
ScrollingScript"组件的"
Is Looping"属性勾选,现在运行,就可以看到视差卷轴的效果,如下图所示:

接下来,修改敌人脚本,让敌人静止不动,且无敌,直到摄像机看到它们。另外,当它们移出屏幕时,则立刻移除它们。修改"
EnemyScript"脚本,代码为如下:
|
1
2 3 4 5 6 7 8 9 10 11 12 13 14 15 16 17 18 19 20 21 22 23 24 25 26 27 28 29 30 31 32 33 34 35 36 37 38 39 40 41 42 43 44 45 46 47 48 49 50 51 52 53 54 55 56 57 58 59 60 61 62 63 64 65 66 67 68 69 70 71 72 73 74 75 76 77 78 79 80 81 82 83 |
using UnityEngine;
/// <summary> /// Enemy generic behavior /// </summary> public class EnemyScript : MonoBehaviour { private bool hasSpawn; private MoveScript moveScript; private WeaponScript[] weapons; void Awake() { // Retrieve the weapon only once weapons = GetComponentsInChildren<WeaponScript>(); // Retrieve scripts to disable when not spawn moveScript = GetComponent<MoveScript>(); } // 1 - Disable everything void Start() { hasSpawn = false; // Disable everything // -- collider collider2D.enabled = false; // -- Moving moveScript.enabled = false; // -- Shooting foreach (WeaponScript weapon in weapons) { weapon.enabled = false; } } void Update() { // 2 - Check if the enemy has spawned. if (hasSpawn == false) { if (renderer.IsVisibleFrom(Camera.main)) { Spawn(); } } else { // Auto-fire foreach (WeaponScript weapon in weapons) { if (weapon != null && weapon.enabled && weapon.CanAttack) { weapon.Attack( true); } } // 4 - Out of the camera ? Destroy the game object. if (renderer.IsVisibleFrom(Camera.main) == false) { Destroy(gameObject); } } } // 3 - Activate itself. private void Spawn() { hasSpawn = true; // Enable everything // -- Collider collider2D.enabled = true; // -- Moving moveScript.enabled = true; // -- Shooting foreach (WeaponScript weapon in weapons) { weapon.enabled = true; } } } |
现在运行的话,会发现主角永远看不到敌人,因为敌人也跟随者层移动了。解决方法,只需将"
3 - Foreground"层上的"
ScrollingScript"脚本移除掉即可。在游戏过程中,可以发现主角并不是限制在摄像机区域内的,可以随意离开摄像机,现在来修复这个问题。打开"
PlayerScript"脚本,在
Update方法里面添加如下代码:
|
1
2 3 4 5 6 7 8 9 10 11 12 13 14 15 16 17 18 19 20 21 22 23 24 25 26 27 28 29 30 31 |
void Update()
{ // ... // 6 - Make sure we are not outside the camera bounds var dist = (transform.position - Camera.main.transform.position).z; var leftBorder = Camera.main.ViewportToWorldPoint( new Vector3( 0, 0, dist) ).x; var rightBorder = Camera.main.ViewportToWorldPoint( new Vector3( 1, 0, dist) ).x; var topBorder = Camera.main.ViewportToWorldPoint( new Vector3( 0, 0, dist) ).y; var bottomBorder = Camera.main.ViewportToWorldPoint( new Vector3( 0, 1, dist) ).y; transform.position = new Vector3( Mathf.Clamp(transform.position.x, leftBorder, rightBorder), Mathf.Clamp(transform.position.y, topBorder, bottomBorder), transform.position.z ); // End of the update method } |
2.粒子效果
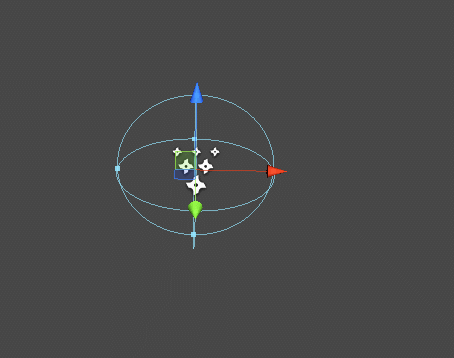
制作一个爆炸的粒子,用于敌人或者主角被摧毁时进行显示。创建一个"
Particle System",导入烟图片到
"
Textures
"文件夹,改变其"
Texture Type"为"
Texture",并且勾选"
Alpha Is Transparent"属性,附加这个纹理到粒子上,将其拖动到粒子对象上,更改其Shader为"
Particles
"→"
Alpha Blended",接着更改一些属性,如下所示:
| Category | Parameter name | Value |
| General | Duration | 1 |
| General | Max Particles | 15 |
| General | Start Lifetime | 1 |
| General | Start Color | Gray |
| General | Start Speed | 3 |
| General | Start Size | 2 |
| Emission | Bursts | 0 : 15 |
| Shape | Shape | Sphere |
| Color Over Lifetime | Color | See below (N°1) |
| Size Over Lifetime | Size | See below (N°2) |
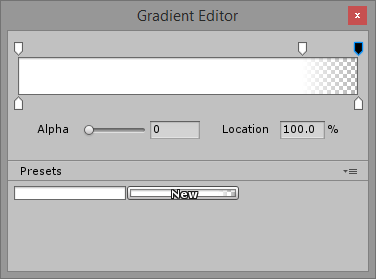
其中
Color Over Lifetime要设置成在结束时,有个淡出的效果,如下图所示:
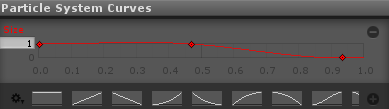
Size Over Lifetime选择一个递减曲线,如下图所示:
当调整完成后,取消勾选"
Looping",现在粒子效果为如下:
保存成预制,命名为"
SmokeEffect",放在"
Prefabs/Particles"文件夹下。现在创建另一个粒子,火焰效果,使用默认材质即可。其他设置如下:
| Category | Parameter name | Value |
| General | Looping | false |
| General | Duration | 1 |
| General | Max Particles | 10 |
| General | Start Lifetime | 1 |
| General | Start Speed | 0.5 |
| General | Start Size | 2 |
| Emission | Bursts | 0 : 10 |
| Shape | Shape | Box |
| Color Over Lifetime | Color | See below (N°1) |
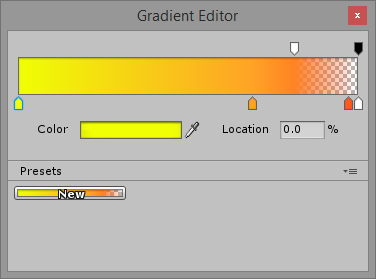
其中
Color Over Lifetime要设置成有一个黄色到橙色的渐变,最后淡出,如下图所示:
粒子效果为:
这里创建了一个单例,可以让任何地方都可以产生烟和火焰的粒子。将这个脚本附加到"
Scripts"对象,设置其属性"Smoke Effect"和"Fire Effect"为对应的预制体。现在是时候调用这个脚本了,打开"
HealthScript"脚本文件,在
OnTriggerEnter方法里面,更新成如下代码:
保存成预制,命名为"
FireEffect"。创建一个脚本,命名为"
SpecialEffectsHelper",代码如下:
|
1
2 3 4 5 6 7 8 9 10 11 12 13 14 15 16 17 18 19 20 21 22 23 24 25 26 27 28 29 30 31 32 33 34 35 36 37 38 39 40 41 42 43 44 45 46 47 48 49 50 51 52 53 54 55 56 57 58 59 60 61 62 63 |
using UnityEngine;
/// <summary> /// Creating instance of particles from code with no effort /// </summary> public class SpecialEffectsHelper : MonoBehaviour { /// <summary> /// Singleton /// </summary> public static SpecialEffectsHelper Instance; public ParticleSystem smokeEffect; public ParticleSystem fireEffect; void Awake() { // Register the singleton if (Instance != null) { Debug.LogError( "Multiple instances of SpecialEffectsHelper!"); } Instance = this; } /// <summary> /// Create an explosion at the given location /// </summary> /// <param name="position"></param> public void Explosion(Vector3 position) { // Smoke on the water instantiate(smokeEffect, position); // Tu tu tu, tu tu tudu // Fire in the sky instantiate(fireEffect, position); } /// <summary> /// Instantiate a Particle system from prefab /// </summary> /// <param name="prefab"></param> /// <returns></returns> private ParticleSystem instantiate(ParticleSystem prefab, Vector3 position) { ParticleSystem newParticleSystem = Instantiate( prefab, position, Quaternion.identity ) as ParticleSystem; // Make sure it will be destroyed Destroy( newParticleSystem.gameObject, newParticleSystem.startLifetime ); return newParticleSystem; } } |
|
1
2 3 4 5 6 7 8 9 10 11 12 13 14 15 |
public Damage(
int damageCount)
{ // ... if (hp <= 0) { // 'Splosion! SpecialEffectsHelper.Instance.Explosion(transform.position); // Dead! Destroy(gameObject); } // ... } |
现在运行,射击敌人,可以看到如下效果:

3.音乐和音效
现在来添加一些声音。将声音资源放入"
Sounds"文件夹,取消勾选每一个声音的"
3D sound"属性,因为这是2D游戏。准备播放背景音乐,创建一个游戏对象,命名为"
Music",其
Position为(0, 0, 0),将背景音乐拖到这个对象上,然后勾选"
Mute"属性。因为音效总是在一定的时机进行播放,所以创建一个脚本文件,命名为"
SoundEffectsHelper",代码如下:
|
1
2 3 4 5 6 7 8 9 10 11 12 13 14 15 16 17 18 19 20 21 22 23 24 25 26 27 28 29 30 31 32 33 34 35 36 37 38 39 40 41 42 43 44 45 46 47 48 49 50 51 52 53 |
using UnityEngine;
using System.Collections; /// <summary> /// Creating instance of sounds from code with no effort /// </summary> public class SoundEffectsHelper : MonoBehaviour { /// <summary> /// Singleton /// </summary> public static SoundEffectsHelper Instance; public AudioClip explosionSound; public AudioClip playerShotSound; public AudioClip enemyShotSound; void Awake() { // Register the singleton if (Instance != null) { Debug.LogError( "Multiple instances of SoundEffectsHelper!"); } Instance = this; } public void MakeExplosionSound() { MakeSound(explosionSound); } public void MakePlayerShotSound() { MakeSound(playerShotSound); } public void MakeEnemyShotSound() { MakeSound(enemyShotSound); } /// <summary> /// Play a given sound /// </summary> /// <param name="originalClip"></param> private void MakeSound(AudioClip originalClip) { // As it is not 3D audio clip, position doesn't matter. AudioSource.PlayClipAtPoint(originalClip, transform.position); } } |
将此脚本附加到"
Scripts"对象上,然后设置其属性值,如下图所示:

接着,在"
HealthScript"脚本文件里,播放粒子效果后面,添加代码:
|
1
|
SoundEffectsHelper.Instance.MakeExplosionSound();
|
在"
PlayerScript"脚本文件里,代码
weapon.Attack(false);后面,添加代码:
|
1
|
SoundEffectsHelper.Instance.MakePlayerShotSound();
|
在"
EnemyScript"脚本文件里,代码
weapon.Attack(false);后面,添加代码:
|
1
|
SoundEffectsHelper.Instance.MakeEnemyShotSound();
|
现在运行,就可以听到声音了。
4.菜单
创建简单的菜单,以便游戏可以重新开始。导入背景图片和LOGO图片到
"
Textures
"文件夹的子文件夹"
Menu"。创建一个新的场景,命名为"Menu"。添加背景
Sprite对象,其Position为
(0, 0, 1),Size为
(2, 2, 1)。添加LOGO的Sprite对象,其Position为
(0, 2, 0),Size为
(0.75, 0.75, 1)。添加一个空对象,命名为"Scripts",用来加载脚本。现在为这个启动画面,添加一个开始按钮。创建一个脚本文件,命名为"
MenuScript",代码如下:
|
1
2 3 4 5 6 7 8 9 10 11 12 13 14 15 16 17 18 19 20 21 22 23 24 25 26 27 28 29 30 31 32 |
using UnityEngine;
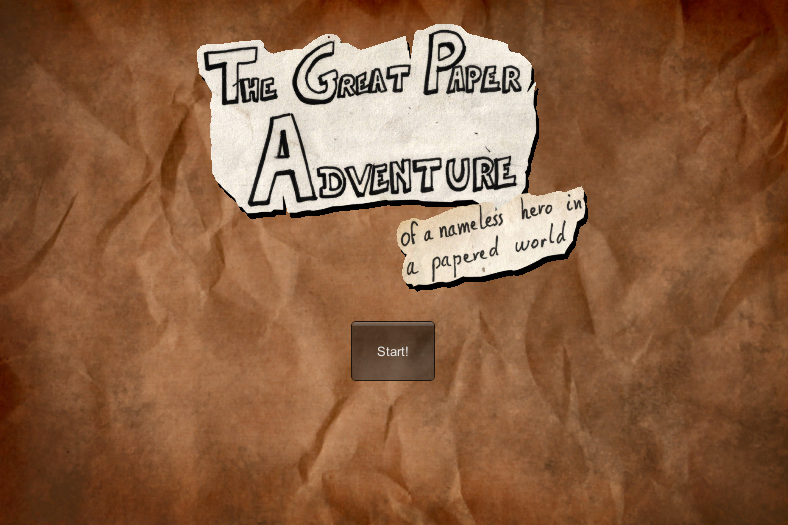
/// <summary> /// Title screen script /// </summary> public class MenuScript : MonoBehaviour { void OnGUI() { const int buttonWidth = 84; const int buttonHeight = 60; // Draw a button to start the game if ( GUI.Button( // Center in X, 2/3 of the height in Y new Rect( Screen.width / 2 - (buttonWidth / 2), ( 2 * Screen.height / 3) - (buttonHeight / 2), buttonWidth, buttonHeight ), "Start!" ) ) { // On Click, load the first level. // "Stage1" is the name of the first scene we created. Application.LoadLevel( "Stage1"); } } } |
将此脚本附加到"
Scripts"对象上。现在运行,可以
看到如下效果:
但是,点击按钮会崩溃,因为没有将
Stage1场景添加进来。打开"
File"→"
Build Settings",将场景"
Menu"和"
Stage1"拖动到上面的"
Scenes In Build"里面。再次运行,就可以看到按钮正常切换场景了。当主角被摧毁时,需要可以重新开始游戏。创建一个脚本文件,命名为"
GameOverScript",代码如下:
|
1
2 3 4 5 6 7 8 9 10 11 12 13 14 15 16 17 18 19 20 21 22 23 24 25 26 27 28 29 30 31 32 33 34 35 36 37 38 39 40 41 42 43 44 45 46 47 |
using UnityEngine;
/// <summary> /// Start or quit the game /// </summary> public class GameOverScript : MonoBehaviour { void OnGUI() { const int buttonWidth = 120; const int buttonHeight = 60; if ( GUI.Button( // Center in X, 1/3 of the height in Y new Rect( Screen.width / 2 - (buttonWidth / 2), ( 1 * Screen.height / 3) - (buttonHeight / 2), buttonWidth, buttonHeight ), "Retry!" ) ) { // Reload the level Application.LoadLevel( "Stage1"); } if ( GUI.Button( // Center in X, 2/3 of the height in Y new Rect( Screen.width / 2 - (buttonWidth / 2), ( 2 * Screen.height / 3) - (buttonHeight / 2), buttonWidth, buttonHeight ), "Back to menu" ) ) { // Reload the level Application.LoadLevel( "Menu"); } } } |
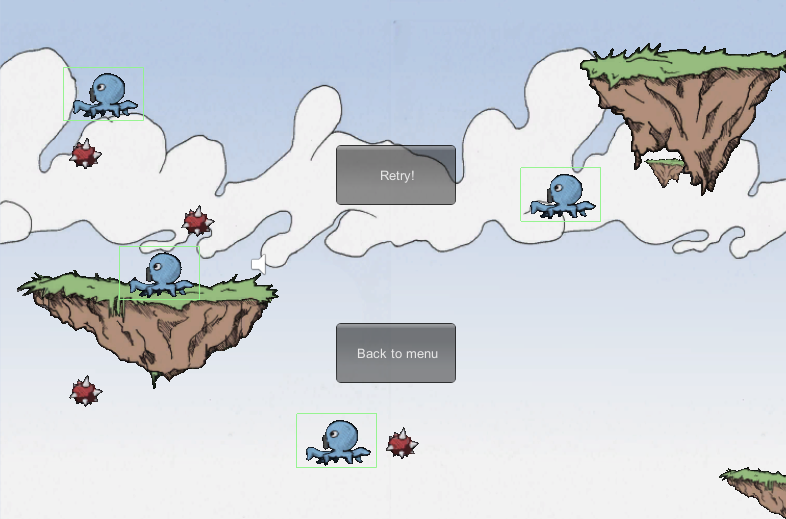
在主角死亡的时候,调用这个脚本。打开"
PlayerScript"文件,添加如下代码:
现在运行,当死亡时,就会出现按钮,如下图所示:
|
1
2 3 4 5 6 7 |
void OnDestroy()
{ // Game Over. // Add the script to the parent because the current game // object is likely going to be destroyed immediately. transform.parent.gameObject.AddComponent<GameOverScript>(); } |