这是一个横版射击游戏。
教程来自:
http://pixelnest.io/tutorials/2d-game-unity/
中文版教程:
http://www.litpo.com/category/易学的教程/
教程文章已经详细地介绍实现过程,这里就不再复述,只做一些简单的笔记记录,以供备忘。
1.创建第一个场景
新建工程。接着在"
Project"面板上创建如下文件夹:

接着在" Hierarchy"面板上创建多个空对象,形成以下结构:
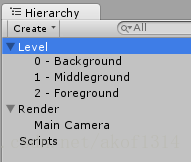
接着在" Hierarchy"面板上创建多个空对象,形成以下结构:
这些空对象的
Position保持为(0, 0, 0)即可。保存场景,名称为"
Stage1"。
2.添加显示背景
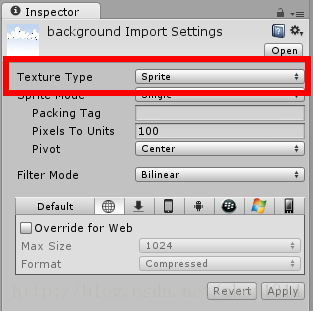
将背景图片放入"
Textures"文件夹,确认这张图片的纹理类型,即"
Texture Type"属性为"
Sprite",如下图所示:
在场景中添加一个Sprite游戏对象,设置其" Sprite"属性为刚才导入的背景图片。重命名这个对象为" Background1",将其移动到" Level -> 0 - Background"里面,设置其" Position"为 (0, 0, 0)。接着添加背景元素。导入平台图片到 "Textures"文件夹,选中" platforms"图片,设置其" Sprite Mode"为" Multiple",然后点击" Sprite Editor",如下图所示:

在场景中添加一个Sprite游戏对象,设置其" Sprite"属性为刚才导入的背景图片。重命名这个对象为" Background1",将其移动到" Level -> 0 - Background"里面,设置其" Position"为 (0, 0, 0)。接着添加背景元素。导入平台图片到 "Textures"文件夹,选中" platforms"图片,设置其" Sprite Mode"为" Multiple",然后点击" Sprite Editor",如下图所示:
在弹出的"
Sprite Editor"窗口中,进行绘制每个平台的包围矩形,以便将纹理分割成更小的部分。然后分别命名为"
platform1"和"
platform2",如下图所示:

创建一个新的 Sprite游戏对象,设置其"Sprite"属性为" platform1"。再在创建新 Sprite对象, 设置其"Sprite"属性为" platform2"。将它们放置到" 1 - Middleground"对象里,并且确认它们的Z坐标为0。将这两个对象从" Hierarchy"面板拖动到" Project"面板下的" Prefabs"文件夹,保存成预制对象。接着,为了避免显示顺序问题,修改下游戏对象的Z坐标,如下所示:
创建一个新的 Sprite游戏对象,设置其"Sprite"属性为" platform1"。再在创建新 Sprite对象, 设置其"Sprite"属性为" platform2"。将它们放置到" 1 - Middleground"对象里,并且确认它们的Z坐标为0。将这两个对象从" Hierarchy"面板拖动到" Project"面板下的" Prefabs"文件夹,保存成预制对象。接着,为了避免显示顺序问题,修改下游戏对象的Z坐标,如下所示:
| Layer | Z Position |
| 0 - Background | 10 |
| 1 - Middleground | 5 |
| 2 - Foreground | 0 |
此时,点击"
Scene"面板上的2D到3D视图切换,可以清楚看到层次:
3.创建主角和敌人
导入主角图片
到
"Textures"文件夹,创建一个Sprite游戏对象,命名为"Player",
设置其"Sprite"属性为刚才导入的主角图片。将此对象放入"
2 - Foreground"层里,设置其Scale为
(0.2, 0.2, 1)。接着,为主角添加盒碰撞体组件,点击"
Add Component"按钮,选择"
Box Collider 2D",设置其Size为
(10, 10),虽然这还是大于实际的区域,但已比图片小多了,如下图所示:

(可以通过按住Shift键,来调整绿色碰撞范围)
接着,再为主角对象添加"
Rigidbody 2D"刚体组件,现在运行可以看到如下结果:
可以看到主角往下落了,这是因为刚体带有重力,但在这个游戏不需要用到,将" Gravity Scale"属性设为0即可。另外,不想因为物理而引起的主角旋转,则将" Fixed Angles"属性勾选上。完整的设置如下图所示:
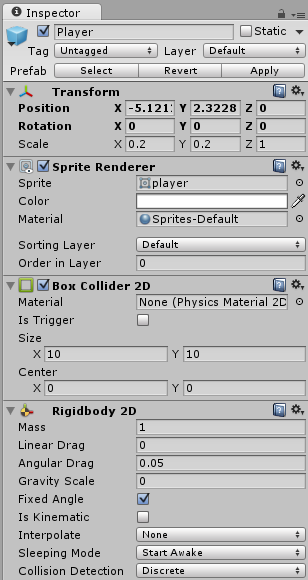
开始准备让主角移动。在" Scripts"文件夹里,创建一个C#脚本,名称为" PlayerScript",实现让方向键移动主角,代码如下:
这里以改变刚体的速率来达到主角的移动,而不是通过直接改变"transform.Translate",因为那样的话,可能会不产生碰撞。将此脚本附加到主角对象上,现在运行,方向键来控制移动,如下图所示:
接下来,添加第一个敌人。导入章鱼敌人图片到 "Textures"文件夹,创建一个Sprite游戏对象,命名为" Poulpi ", 设置其"Sprite"属性为刚才导入的图片,设置" Scale"属性为(0.4, 0.4, 1),添加" Box Collider 2D"组件,其 Size为(4, 4),添加" Rigidbody 2D"组件,其" Gravity Scale"属性为0,并且勾选" Fixed Angles"属性框。将对象保存为预制。在这里只让章鱼简单地往前行,创建一个脚本,命名为" MoveScript",代码如下:
可以看到主角往下落了,这是因为刚体带有重力,但在这个游戏不需要用到,将" Gravity Scale"属性设为0即可。另外,不想因为物理而引起的主角旋转,则将" Fixed Angles"属性勾选上。完整的设置如下图所示:
开始准备让主角移动。在" Scripts"文件夹里,创建一个C#脚本,名称为" PlayerScript",实现让方向键移动主角,代码如下:
|
1
2 3 4 5 6 7 8 9 10 11 12 13 14 15 16 17 18 19 20 21 22 23 24 25 26 27 28 29 30 31 32 33 34 |
using UnityEngine;
/// <summary> /// Player controller and behavior /// </summary> public class PlayerScript : MonoBehaviour { /// <summary> /// 1 - The speed of the ship /// </summary> public Vector2 speed = new Vector2( 50, 50); // 2 - Store the movement private Vector2 movement; void Update() { // 3 - Retrieve axis information float inputX = Input.GetAxis( "Horizontal"); float inputY = Input.GetAxis( "Vertical"); // 4 - Movement per direction movement = new Vector2( speed.x * inputX, speed.y * inputY); } void FixedUpdate() { // 5 - Move the game object rigidbody2D.velocity = movement; } } |
接下来,添加第一个敌人。导入章鱼敌人图片到 "Textures"文件夹,创建一个Sprite游戏对象,命名为" Poulpi ", 设置其"Sprite"属性为刚才导入的图片,设置" Scale"属性为(0.4, 0.4, 1),添加" Box Collider 2D"组件,其 Size为(4, 4),添加" Rigidbody 2D"组件,其" Gravity Scale"属性为0,并且勾选" Fixed Angles"属性框。将对象保存为预制。在这里只让章鱼简单地往前行,创建一个脚本,命名为" MoveScript",代码如下:
|
1
2 3 4 5 6 7 8 9 10 11 12 13 14 15 16 17 18 19 20 21 22 23 24 25 26 27 28 29 30 31 32 33 34 35 |
using UnityEngine;
/// <summary> /// Simply moves the current game object /// </summary> public class MoveScript : MonoBehaviour { // 1 - Designer variables /// <summary> /// Object speed /// </summary> public Vector2 speed = new Vector2( 10, 10); /// <summary> /// Moving direction /// </summary> public Vector2 direction = new Vector2(- 1, 0); private Vector2 movement; void Update() { // 2 - Movement movement = new Vector2( speed.x * direction.x, speed.y * direction.y); } void FixedUpdate() { // Apply movement to the rigidbody rigidbody2D.velocity = movement; } } |
将此脚本附加到章鱼对象上,现在运行,可以看到章鱼往前移动,如下图所示:
此时如果将主角放在章鱼前面,两个对象将会产生碰撞,互相阻塞对方的移动。
此时如果将主角放在章鱼前面,两个对象将会产生碰撞,互相阻塞对方的移动。
4.射击
导入子弹图片
到
"Textures"文件夹,创建一个Sprite游戏对象,命名为"
PlayerShot
",
设置其"Sprite"属性为刚才导入的图片
,设置"
Scale"属性为(0.75, 0.75, 1)
,添加"Rigidbody 2D"组件,其"Gravity Scale"属性为0,并且勾选"Fixed Angles"属性框
,添加"Box Collider 2D"组件,其Size为(1, 1),并且勾选"
IsTrigger"属性
。勾选"
IsTrigger"属性表示该碰撞体用于触发事件,并将被物理引擎所忽略。意味着,子弹将穿过触碰到的对象,而不会阻碍对象的移动,触碰的时候将会引发"
OnTriggerEnter2D"事件。创建一个脚本,命名为"
ShotScript",代码如下:
|
1
2 3 4 5 6 7 8 9 10 11 12 13 14 15 16 17 18 19 20 21 22 23 24 25 |
using UnityEngine;
/// <summary> /// Projectile behavior /// </summary> public class ShotScript : MonoBehaviour { // 1 - Designer variables /// <summary> /// Damage inflicted /// </summary> public int damage = 1; /// <summary> /// Projectile damage player or enemies? /// </summary> public bool isEnemyShot = false; void Start() { // 2 - Limited time to live to avoid any leak Destroy(gameObject, 20); // 20sec } } |
将此脚本附加到子弹对象上,然后将"
MoveScript"脚本也附加到子弹对象上以便可以移动。保存此对象为预制。接着,让碰撞产生伤害效果。创建一个脚本,命名为"
HealthScript",代码如下:
|
1
2 3 4 5 6 7 8 9 10 11 12 13 14 15 16 17 18 19 20 21 22 23 24 25 26 27 28 29 30 31 32 33 34 35 36 37 38 39 40 41 42 43 44 45 46 47 48 49 |
using UnityEngine;
/// <summary> /// Handle hitpoints and damages /// </summary> public class HealthScript : MonoBehaviour { /// <summary> /// Total hitpoints /// </summary> public int hp = 1; /// <summary> /// Enemy or player? /// </summary> public bool isEnemy = true; /// <summary> /// Inflicts damage and check if the object should be destroyed /// </summary> /// <param name="damageCount"></param> public void Damage( int damageCount) { hp -= damageCount; if (hp <= 0) { // Dead! Destroy(gameObject); } } void OnTriggerEnter2D(Collider2D otherCollider) { // Is this a shot? ShotScript shot = otherCollider.gameObject.GetComponent<ShotScript>(); if (shot != null) { // Avoid friendly fire if (shot.isEnemyShot != isEnemy) { Damage(shot.damage); // Destroy the shot Destroy(shot.gameObject); // Remember to always target the game object, otherwise you will just remove the script } } } } |
将此脚本附加到
Poulpi预制体上。现在运行,让子弹和章鱼碰撞,可以看到如下结果:
如果章鱼的生命值大于子弹的伤害值,那么章鱼就不会被消灭,可以试着通过改变章鱼对象的" HealthScript"的hp值。接着,准备可以射击。创建一个脚本,命名为" WeaponScript",代码如下:
如果章鱼的生命值大于子弹的伤害值,那么章鱼就不会被消灭,可以试着通过改变章鱼对象的" HealthScript"的hp值。接着,准备可以射击。创建一个脚本,命名为" WeaponScript",代码如下:
|
1
2 3 4 5 6 7 8 9 10 11 12 13 14 15 16 17 18 19 20 21 22 23 24 25 26 27 28 29 30 31 32 33 34 35 36 37 38 39 40 41 42 43 44 45 46 47 48 49 50 51 52 53 54 55 56 57 58 59 60 61 62 63 64 65 66 67 68 69 70 71 72 73 74 75 76 77 78 79 80 81 82 83 84 85 86 |
using UnityEngine;
/// <summary> /// Launch projectile /// </summary> public class WeaponScript : MonoBehaviour { //-------------------------------- // 1 - Designer variables //-------------------------------- /// <summary> /// Projectile prefab for shooting /// </summary> public Transform shotPrefab; /// <summary> /// Cooldown in seconds between two shots /// </summary> public float shootingRate = 0.25f; //-------------------------------- // 2 - Cooldown //-------------------------------- private float shootCooldown; void Start() { shootCooldown = 0f; } void Update() { if (shootCooldown > 0) { shootCooldown -= Time.deltaTime; } } //-------------------------------- // 3 - Shooting from another script //-------------------------------- /// <summary> /// Create a new projectile if possible /// </summary> public void Attack( bool isEnemy) { if (CanAttack) { shootCooldown = shootingRate; // Create a new shot var shotTransform = Instantiate(shotPrefab) as Transform; // Assign position shotTransform.position = transform.position; // The is enemy property ShotScript shot = shotTransform.gameObject.GetComponent<ShotScript>(); if (shot != null) { shot.isEnemyShot = isEnemy; } // Make the weapon shot always towards it MoveScript move = shotTransform.gameObject.GetComponent<MoveScript>(); if (move != null) { move.direction = this.transform.right; // towards in 2D space is the right of the sprite } } } /// <summary> /// Is the weapon ready to create a new projectile? /// </summary> public bool CanAttack { get { return shootCooldown <= 0f; } } } |
将这个脚本附加到主角对象上,设置其"
Shot Prefab"属性为"
PlayerShot"预制体。打开"
PlayerScript"脚本,在
Update()方法里面,加入以下片段:
|
1
2 3 4 5 6 7 8 9 10 11 12 13 14 15 16 17 18 19 20 21 |
void Update()
{ // ... // 5 - Shooting bool shoot = Input.GetButtonDown( "Fire1"); shoot |= Input.GetButtonDown( "Fire2"); // Careful: For Mac users, ctrl + arrow is a bad idea if (shoot) { WeaponScript weapon = GetComponent<WeaponScript>(); if (weapon != null) { // false because the player is not an enemy weapon.Attack( false); } } // ... } |
当收到射击的按钮状态,调用
Attack(false)方法。现在运行,可以看到如下结果:

接下来,准备创建敌人的子弹。 导入敌人子弹图片 到 "Textures"文件夹, 选中"PlayerShot"预制体,按下Ctrl+D进行复制,命名为"EnemyShot1",然后改变其Sprite为刚才导入的图片,设置其Scale为 (0.35, 0.35, 1)。接着,让章鱼可以射击。将" WeaponScript"脚本附加到章鱼对象上,拖动" EnemyShot1"预制体到其" Shot Prefab"属性,创建一个脚本,命名为" EnemyScript",用来简单地每一帧进行自动射击,代码如下:
|
1
2 3 4 5 6 7 8 9 10 11 12 13 14 15 16 17 18 19 20 21 22 23 24 |
using UnityEngine;
/// <summary> /// Enemy generic behavior /// </summary> public class EnemyScript : MonoBehaviour { private WeaponScript weapon; void Awake() { // Retrieve the weapon only once weapon = GetComponent<WeaponScript>(); } void Update() { // Auto-fire if (weapon != null && weapon.CanAttack) { weapon.Attack( true); } } } |
将此脚本附加到章鱼对象上,如下图所示:
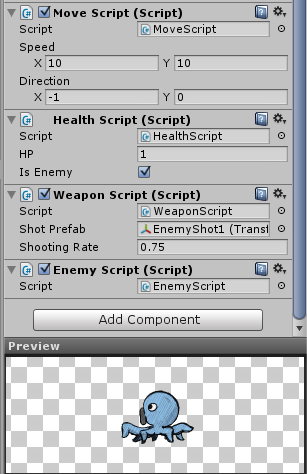
现在运行,可以看到如下结果:
可以看到章鱼向右射击了子弹,这是因为代码就是让它那么做的。实际上,应该做到可以朝向任何方向射击子弹。在这里,创建一个空对象,命名为" WeaponObject",删除章鱼预制体身上的" WeaponScript"脚本,将" WeaponScript"脚本附加到" WeaponObject"对象上,并且 拖动" EnemyShot1"预制体到其" Shot Prefab"属性,设置" WeaponObject"对象的" Rotation"属性为(0, 0, 180),然后保存为预制,如下所示:
接着,修改"
EnemyScript",代码为如下:
|
1
2 3 4 5 6 7 8 9 10 11 12 13 14 15 16 17 18 19 20 21 22 23 24 25 26 27 28 |
using System.Collections.Generic;
using UnityEngine; /// <summary> /// Enemy generic behavior /// </summary> public class EnemyScript : MonoBehaviour { private WeaponScript[] weapons; void Awake() { // Retrieve the weapon only once weapons = GetComponentsInChildren<WeaponScript>(); } void Update() { foreach (WeaponScript weapon in weapons) { // Auto-fire if (weapon != null && weapon.CanAttack) { weapon.Attack( true); } } } } |
可以适当调整子弹的移动速度,它应该快于章鱼的移动速度。现在运行,如下图所示:
按这种方式,可以轻易实现多个方向的射击。复制添加一个" WeaponObject"对象,让这两个" WeaponObject"对象的旋转不同即可。现在主角被章鱼攻击到,但是没有任何伤害。将" HealthScript"脚本附加到主角对象上,确保" Is Enemy"属性不被勾选。现在运行,可以看到如下结果:
目前,当主角和章鱼碰撞时,仅仅只是阻碍对方的移动而已,在这里改成互相受到伤害。打开" PlayerScript"文件,添加如下代码:
按这种方式,可以轻易实现多个方向的射击。复制添加一个" WeaponObject"对象,让这两个" WeaponObject"对象的旋转不同即可。现在主角被章鱼攻击到,但是没有任何伤害。将" HealthScript"脚本附加到主角对象上,确保" Is Enemy"属性不被勾选。现在运行,可以看到如下结果:
目前,当主角和章鱼碰撞时,仅仅只是阻碍对方的移动而已,在这里改成互相受到伤害。打开" PlayerScript"文件,添加如下代码:
|
1
2 3 4 5 6 7 8 9 10 11 12 13 14 15 16 17 18 19 20 21 22 23 24 25 |
//PlayerScript.cs //.... void OnCollisionEnter2D(Collision2D collision) { bool damagePlayer = false; // Collision with enemy EnemyScript enemy = collision.gameObject.GetComponent<EnemyScript>(); if (enemy != null) { // Kill the enemy HealthScript enemyHealth = enemy.GetComponent<HealthScript>(); if (enemyHealth != null) enemyHealth.Damage(enemyHealth.hp); damagePlayer = true; } // Damage the player if (damagePlayer) { HealthScript playerHealth = this.GetComponent<HealthScript>(); if (playerHealth != null) playerHealth.Damage( 1); } } |
至此,一个基本的射击游戏完成。
下一篇,将进行增强表现,完善游戏。
再分享一下我老师大神的人工智能教程吧。零基础!通俗易懂!风趣幽默!还带黄段子!希望你也加入到我们人工智能的队伍中来!https://www.cnblogs.com/captainbed