版权声明:本文为博主原创文章,未经博主允许不得转载。 https://blog.csdn.net/v2sking/article/details/79048380
在spring官方cache starter基础上,通过简单的yml或properties配置,而无需配置ehcache.xml即可开启ehcache配置
同时支持rmi自动配置(组播)和手工配置(点对点)两种集群配置方式。
项目地址:https://gitee.com/luanhaoyu/ehcache-spring-boot/
# ehcache-spring-boot
### springboot ehcache自动配置 starter
## 在spring官方cache starter基础上,通过简单的yml或properties配置,而无需配置ehcache.xml即可开启ehcache配置
同时支持rmi自动配置(组播)和手工配置(点对点)两种集群配置方式。
## 使用方法
**1. 执行 _mvn install_ 安装至仓库**
**2. springboot应用引入maven依赖**
<dependency>
	<groupId>com.lhy</groupId>
	<artifactId>ehcache-spring-boot-starter</artifactId>
	<version>1.0.0</version>
</dependency>
**3. 无集群application.yml文件配置如下**
ehcache:
  caches:
    - name: userCache #缓存名称
      eternal: false #是否永不过期 默认false 如果为false那么还要根据timeToIdleSeconds,timeToLiveSeconds判断。
      max-elements-in-memory: 100 #cache 中最多可以存放的元素的数量 默认值100
      time-to-idle-seconds: 0 #对象空闲时间,指对象在多长时间没有被访问就会失效。只对eternal为false的有效。默认值0,表示一直可以访问。以秒为单位。
      time-to-live-seconds: 0 #对象存活时间,指对象从创建到失效所需要的时间。只对eternal为false的有效。默认值0,表示一直可以访问。以秒为单位。
      overflow-to-disk: true #如果内存中数据超过内存限制,是否要缓存到磁盘上。默认false
      disk-persistent: false #否在磁盘上持久化。指重启jvm后,数据是否有效。默认为false。
      max-elements-on-disk: 100 #在磁盘上缓存的element的最大数目,默认值为0,表示不限制。
      disk-spool-buffer-size-mB: 30 #DiskStore使用的磁盘大小,默认值30MB。每个cache使用各自的DiskStore。
      disk-expiry-thread-interval-seconds: 120 #对象检测线程运行时间间隔。标识对象状态的线程多长时间运行一次。以秒为单位。默认120 秒
    - name: roleCache #缓存名称
      eternal: false #是否永不过期 默认false 如果为false那么还要根据timeToIdleSeconds,timeToLiveSeconds判断。
      max-elements-in-memory: 100 #cache 中最多可以存放的元素的数量 默认值100
      time-to-idle-seconds: 0 #对象空闲时间,指对象在多长时间没有被访问就会失效。只对eternal为false的有效。默认值0,表示一直可以访问。以秒为单位。
      time-to-live-seconds: 0 #对象存活时间,指对象从创建到失效所需要的时间。只对eternal为false的有效。默认值0,表示一直可以访问。以秒为单位。
      overflow-to-disk: true #如果内存中数据超过内存限制,是否要缓存到磁盘上。默认false
      disk-persistent: false #否在磁盘上持久化。指重启jvm后,数据是否有效。默认为false。
      max-elements-on-disk: 100 #在磁盘上缓存的element的最大数目,默认值为0,表示不限制。
      disk-spool-buffer-size-mB: 30 #DiskStore使用的磁盘大小,默认值30MB。每个cache使用各自的DiskStore。
      disk-expiry-thread-interval-seconds: 120 #对象检测线程运行时间间隔。标识对象状态的线程多长时间运行一次。以秒为单位。默认120 秒
**4. 自动配置方式application.yml文件配置如下(组播)**
ehcache:
  caches:
    - name: userCache
      eternal: false
      max-elements-in-memory: 1000
      time-to-idle-seconds: 1800
      time-to-live-seconds: 1800
      overflow-to-disk: true
      disk-persistent: false
      max-elements-on-disk: 100
      disk-spool-buffer-size-mB: 30
      disk-expiry-thread-interval-seconds: 1

  cluster-enabled: true #是否启用集群
  cluster:
    provider:
      peer-discovery: automatic
      automatic:
        multicast-group-address:  224.1.1.1 #组播缓存提供者广播组地址 默认:224.1.1.1
        multicast-group-port: 41000 #组播缓存提供者广播组端口 默认:41000
        #time-to-live: 32 #存活时间 默认32
    listener:
      #host-name: 127.0.0.1  #缓存监听者端口地址 默认:127.0.0.1
      #port: 40002 #缓存监听者默认端口 默认:127.0.0.1 仅当random-port-enabled为false是生效
      #random-port-enabled: true #开启随机监听端口
      #max-random-port: 43000 #随机端口范围上限 默认 40999
      #min-random-port: 42000 #随机端口范围下限 默认 40000
      #socket-timeout-millis: 2000 #监听socket连接超时时间 默认2000毫秒
**5. 手工配置application.yml文件配置如下(点对点)**
ehcache:
  caches:
    - name: userCache
      eternal: false
      max-elements-in-memory: 1000
      time-to-idle-seconds: 1800
      time-to-live-seconds: 1800
      overflow-to-disk: true
      disk-persistent: false
      max-elements-on-disk: 100
      disk-spool-buffer-size-mB: 30
      disk-expiry-thread-interval-seconds: 1
  cluster-enabled: true
  cluster:
    provider:
      peer-discovery: manual
      manual:
        rmi-urls: 127.0.0.1:40002|127.0.0.0:40001  #缓存提供者需要通知的rmi地址 多个 | 分隔
    listener:
      #host-name: 127.0.0.1  #缓存监听者端口地址 默认:127.0.0.1
      port: 40001
      #socket-timeout-millis: 2000 #监听socket连接超时时间 默认2000毫秒
**6.自定义ehcache CacheConfiguration合并规则**
如果不满足yml或properties属性配置,可以添加ehcache.xml文件,自动配置将合并ehcache.xml上配置的属性到application.xml,默认的规则是无则新增,有则覆盖。
如果默认规则不满足要求,可以自定义配置合并类:
@Bean
public EhCacheConfigurationMarger ehCacheConfigurationMarger() {
	return new CustomEhCacheConfigurationMarger(ehCacheProperties);//CustomEhCacheConfigurationMarger为自定义配置合并类,需要实现EhCacheConfigurationMarger 接口
}
**7.进行测试 以手工方式为例**
启动两个springboot应用ehcache-app1(端口8080),ehcache-app2(端口8081)需要提前加入上述缓存相关配置
通过spirngmvc restful接口测试缓存
##### 核心代码如下:
 package com.lhy.boot;


import org.springframework.beans.factory.annotation.Autowired;
import org.springframework.boot.SpringApplication;
import org.springframework.boot.autoconfigure.SpringBootApplication;
import org.springframework.cache.annotation.EnableCaching;
import org.springframework.web.bind.annotation.PathVariable;
import org.springframework.web.bind.annotation.RequestMapping;
import org.springframework.web.bind.annotation.RestController;


import net.sf.ehcache.Cache;
import net.sf.ehcache.CacheManager;
import net.sf.ehcache.Element;


@SpringBootApplication
@RestController
@EnableCaching
public class Application{


    public static void main(String[] args) {
        SpringApplication.run(Application.class, args);
    }

    @Autowired
    CacheManager cacheManager;

    @RequestMapping("add/{name}")
    public String add(@PathVariable String name){
    	Cache cache = cacheManager.getCache("user");
    	cache.put(new Element("name", name));
    	return "success add:"+name;
    }

    @RequestMapping("get")
    public String get(){
    	Cache cache = cacheManager.getCache("user");
    	Element element = cache.get("name");
    	if (element == null) {
    	return "no cache: name";
	}
    	return (String)element.getObjectValue();
    }
}
##### 访问http://127.0.0.1:8080/add/1 节点1 添加一个缓存:

##### 访问http://127.0.0.1:8081/get 节点2 查看添加的缓存 :
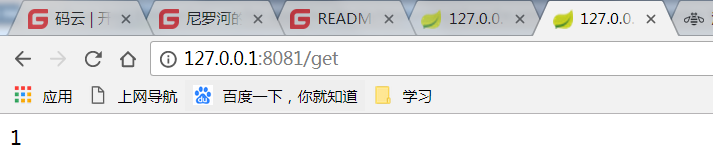
可见缓存同步完成!
**8. demo**
见 https://gitee.com/luanhaoyu/ehcache-app1-test
automatic-application.yml为自动发现方式
## 说明
自动发现配置更为简单 但要注意
> 在多网卡的主机,或同一网卡多IP的主机上,尽管地址可能是一个网段内的,但其实地址间已经存在跳数了(hop),其实就是从一个地址向另一个地址跳. 这时广播/组播就容易被阻断.
谨慎使用
其他集群配置方式参考: https://www.cnblogs.com/duwanjiang/p/6230113.html