SpringBoot 缓存(EhCache 使用)
源文链接:http://blog.csdn.net/u011244202/article/details/55667868
SpringBoot 缓存
在 Spring Boot中,通过@EnableCaching注解自动化配置合适的缓存管理器(CacheManager),Spring Boot根据下面的顺序去侦测缓存提供者:
* Generic
* JCache (JSR-107)
* EhCache 2.x
* Hazelcast
* Infinispan
* Redis
* Guava
* Simple
关于 Spring Boot 的缓存机制:
高速缓存抽象不提供实际存储,并且依赖于由org.springframework.cache.Cache和org.springframework.cache.CacheManager接口实现的抽象。 Spring Boot根据实现自动配置合适的CacheManager,只要缓存支持通过@EnableCaching注释启用即可。
Spring Boot 配置 EhCache 2.x
官方文档上对于注解缓存的介绍资料非常之少,往往需要我们自己去了解相应的缓存提供者。我这里主要介绍的是 EhCache .
引入依赖
在pom.xml文件中引入以下依赖
      <!--开启 cache 缓存-->
      <dependency>
          <groupId>org.springframework.boot</groupId>
          <artifactId>spring-boot-starter-cache</artifactId>
      </dependency>
      <!-- ehcache 缓存 -->
      <dependency>
          <groupId>net.sf.ehcache</groupId>
          <artifactId>ehcache</artifactId>
</dependency>- 1
- 2
- 3
- 4
- 5
- 6
- 7
- 8
- 9
- 10
引入配置文件 ehcache.xml
在resource文件夹下创建文件ehcache.xml,并进行配置:
<?xml version="1.0" encoding="UTF-8"?>
<ehcache xmlns:xsi="http://www.w3.org/2001/XMLSchema-instance"
         xsi:noNamespaceSchemaLocation="http://ehcache.org/ehcache.xsd"
         updateCheck="false">
    <defaultCache
            eternal="false"
            maxElementsInMemory="1000"
            overflowToDisk="false"
            diskPersistent="false"
            timeToIdleSeconds="0"
            timeToLiveSeconds="600"
            memoryStoreEvictionPolicy="LRU" />

    <!-- 这里的 users 缓存空间是为了下面的 demo 做准备 -->
    <cache
            name="users"
            eternal="false"
            maxElementsInMemory="100"
            overflowToDisk="false"
            diskPersistent="false"
            timeToIdleSeconds="0"
            timeToLiveSeconds="300"
            memoryStoreEvictionPolicy="LRU" />
</ehcache>- 1
- 2
- 3
- 4
- 5
- 6
- 7
- 8
- 9
- 10
- 11
- 12
- 13
- 14
- 15
- 16
- 17
- 18
- 19
- 20
- 21
- 22
- 23
- 24
ehcache.xml 文件配置详解
部分资料来源于网络
- diskStore:为缓存路径,ehcache分为内存和磁盘两级,此属性定义磁盘的缓存位置。
- defaultCache:默认缓存策略,当ehcache找不到定义的缓存时,则使用这个缓存策略。只能定义一个。
- name:缓存名称。
- maxElementsInMemory:缓存最大数目
- maxElementsOnDisk:硬盘最大缓存个数。
- eternal:对象是否永久有效,一但设置了,timeout将不起作用。
- overflowToDisk:是否保存到磁盘,当系统当机时
- timeToIdleSeconds:设置对象在失效前的允许闲置时间(单位:秒)。仅当eternal=false对象不是永久有效时使用,可选属性,默认值是0,也就是可闲置时间无穷大。
- timeToLiveSeconds:设置对象在失效前允许存活时间(单位:秒)。最大时间介于创建时间和失效时间之间。仅当eternal=false对象不是永久有效时使用,默认是0.,也就是对象存活时间无穷大。
- diskPersistent:是否缓存虚拟机重启期数据 Whether the disk store persists between restarts of the Virtual Machine. The default value is false.diskSpoolBufferSizeMB:这个参数设置DiskStore(磁盘缓存)的缓存区大小。默认是30MB。每个Cache都应该有自己的一个缓冲区。
- diskExpiryThreadIntervalSeconds:磁盘失效线程运行时间间隔,默认是120秒。
- memoryStoreEvictionPolicy:当达到maxElementsInMemory限制时,Ehcache将会根据指定的策略去清理内存。默认策略是LRU(最近最少使用)。你可以设置为FIFO(先进先出)或是LFU(较少使用)。
- clearOnFlush:内存数量最大时是否清除。
- memoryStoreEvictionPolicy:可选策略有:LRU(最近最少使用,默认策略)、FIFO(先进先出)、LFU(最少访问次数)。
FIFO,first in first out,先进先出。
LFU, Less Frequently Used,一直以来最少被使用的。如上面所讲,缓存的元素有一个hit属性,hit值最小的将会被清出缓存。
LRU,Least Recently Used,最近最少使用的,缓存的元素有一个时间戳,当缓存容量满了,而又需要腾出地方来缓存新的元素的时候,那么现有缓存元素中时间戳离当前时间最远的元素将被清出缓存。
在主类加上启动注解
在 Spring Boot 主类加上开启缓存的注解@EnableCaching。
demo : SpringBoot + EhCache
搭建 Spring Boot 工程
我搭建了一个普通的 SpringBoot 工程,配置了 Druid+MySQL。
并在数据库中创建了 users 表,各字段如下:
| 字段名 | 属性 |
|---|---|
| id | bigint |
| uuid | varchar |
| name | varchar |
| age | int |
用户实体类
User.java
public class User {

    private long id;
    private String uuid;
    private String name;
    private Integer age;

    //省略 get、set 及 toString 方法
}- 1
- 2
- 3
- 4
- 5
- 6
- 7
- 8
- 9
用户数据库操作接口
UserDao.java
@Mapper
public interface UserDao{

    void delete(String uuid);

    User update(User user);

    User findByUuid(String uuid);

    int save(@Param("user") User user);
}
- 1
- 2
- 3
- 4
- 5
- 6
- 7
- 8
- 9
- 10
- 11
- 12
用户操作Mapper文件
UserMapper.xml
<?xml version="1.0" encoding="UTF-8" ?>
<!DOCTYPE mapper
        PUBLIC "-//mybatis.org//DTD Mapper 3.0//EN"
        "http://mybatis.org/dtd/mybatis-3-mapper.dtd">
<mapper namespace="qg.fangrui.boot.dao.UserDao">
    <!--目的:为Dao接口方法提供SQL语句-->

    <!--映射实体对象-->
    <resultMap id="UserResultMap" type="qg.fangrui.boot.model.User">
        <id property="id" column="id" />
        <result property="uuid" column="uuid" />
        <result property="name" column="name" />
        <result property="age" column="age" />
    </resultMap>


    <insert id="save">
        INSERT INTO users(name, age, uuid)
        VALUES (#{user.name}, #{user.age}, #{user.uuid})
    </insert>

    <select id="findByUuid" resultType="User">
        SELECT * FROM users WHERE uuid = #{uuid}
    </select>

    <delete id="delete">
        DELETE FROM users WHERE uuid = #{uuid}
    </delete>

</mapper>- 1
- 2
- 3
- 4
- 5
- 6
- 7
- 8
- 9
- 10
- 11
- 12
- 13
- 14
- 15
- 16
- 17
- 18
- 19
- 20
- 21
- 22
- 23
- 24
- 25
- 26
- 27
- 28
- 29
- 30
用户操作 service 层
一般情况下,我们在Sercive层进行对缓存的操作。先介绍 Ehcache 在 Spring 中的注解:在支持 Spring Cache 的环境下,
* @Cacheable : Spring在每次执行前都会检查Cache中是否存在相同key的缓存元素,如果存在就不再执行该方法,而是直接从缓存中获取结果进行返回,否则才会执行并将返回结果存入指定的缓存中。
* @CacheEvict : 清除缓存。
* @CachePut : @CachePut也可以声明一个方法支持缓存功能。使用@CachePut标注的方法在执行前不会去检查缓存中是否存在之前执行过的结果,而是每次都会执行该方法,并将执行结果以键值对的形式存入指定的缓存中。
* 这三个方法中都有两个主要的属性:value 指的是 ehcache.xml 中的缓存策略空间;key 指的是缓存的标识,同时可以用 # 来引用参数。
UserService.java
@Service
public class UserService {

    //这里的单引号不能少,否则会报错,被识别是一个对象
    private static final String CACHE_KEY = "'user'";
    private static final String DEMO_CACHE_NAME = "users";

    @Autowired
    private UserDao userDao;

    //删除用户数据
    @CacheEvict(value = DEMO_CACHE_NAME,key = "'user_'+#uuid")//这是清除缓存
    public void delete(String uuid){
        userDao.delete(uuid);
    }

    //更新用户数据
    @CachePut(value = DEMO_CACHE_NAME,key = "'user_'+#user.getUuid()")
    public User update(User user) throws CacheException{
        User user1 = userDao.findByUuid(user.getUuid());
        if (null == user1){
            throw new  CacheException("Not Find");
        }
        user1.setAge(user.getAge());
        user1.setName(user.getName());
        return user1;
    }

    //查找用户数据
    @Cacheable(value=DEMO_CACHE_NAME,key="'user_'+#uuid")
    public User findByUuid(String uuid){
        //若找不到缓存将打印出提示语句
        System.err.println("没有走缓存!"+uuid);
        return userDao.findByUuid(uuid);
    }

    //保存用户数据
    @CacheEvict(value=DEMO_CACHE_NAME,key=CACHE_KEY)
    public int save(User user){
        return userDao.save(user);
    }
}- 1
- 2
- 3
- 4
- 5
- 6
- 7
- 8
- 9
- 10
- 11
- 12
- 13
- 14
- 15
- 16
- 17
- 18
- 19
- 20
- 21
- 22
- 23
- 24
- 25
- 26
- 27
- 28
- 29
- 30
- 31
- 32
- 33
- 34
- 35
- 36
- 37
- 38
- 39
- 40
- 41
- 42
Controller 类
最后我们创建一个 Controller 来访问我们的缓存。因为我的 SpringBoot 处于 Debug 模式,会将所有的数据库操作打印出来,这样子缓存作用就可一目了然了。
EhcacheController.java
@RestController
public class EhcacheController {

    private static final Logger logger = LoggerFactory.getLogger(EhcacheController.class);

    @Autowired
    private UserService userService;

    @RequestMapping("/encache")
    public String EhcacheTest(){
        logger.debug("进行Encache缓存测试");
        System.out.println("====生成第一个用户====");
        User user1 = new User();
        //生成第一个用户的唯一标识符 UUID
        String u1_uuid = UUID.randomUUID().toString();
        //去掉 UUID 的 - 符号
        String uuid1 = u1_uuid.substring(0,8)+u1_uuid.substring(9,13)+u1_uuid.substring(14,18)+u1_uuid.substring(19,23)+u1_uuid.substring(24);
        user1.setName("张三");
        user1.setAge(18);
        user1.setUuid(uuid1);
        if (userService.save(user1) == 0){
            throw new JdbcException("用户对象插入数据库失败");
        }

        //第一次查询
        System.out.println(userService.findByUuid(user1.getUuid()));
        //通过缓存查询
        System.out.println(userService.findByUuid(user1.getUuid()));

        System.out.println("====修改数据====");
        User user2 = new User();
        user2.setName("李四-update");
        user2.setAge(22);
        user2.setId(user1.getId());
        user2.setUuid(user1.getUuid());
        try {
            System.out.println(userService.update(user2));
        } catch (CacheException e){
            e.printStackTrace();
        }

        System.out.println(userService.findByUuid(user2.getUuid()));
        return "success";
    }
}- 1
- 2
- 3
- 4
- 5
- 6
- 7
- 8
- 9
- 10
- 11
- 12
- 13
- 14
- 15
- 16
- 17
- 18
- 19
- 20
- 21
- 22
- 23
- 24
- 25
- 26
- 27
- 28
- 29
- 30
- 31
- 32
- 33
- 34
- 35
- 36
- 37
- 38
- 39
- 40
- 41
- 42
- 43
- 44
- 45
测试
启动 SpringBoot 工程,访问 http://localhost:8080/encache ,并查看控制台打印信息: 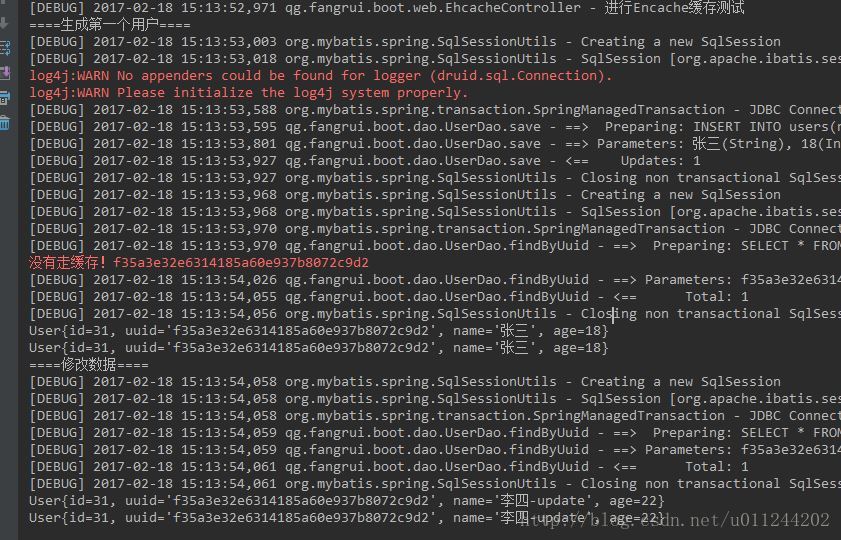
由控制台,我们可以清楚到看到,第一次查询用户信息时,工程将用户信息存入缓存中;在第二次查询时,无需访问数据库直接从缓存中获取用户信息。
另外需要学习的同学可以看看我的git项目 https://github.com/passliang/monkey spring cloud 分布式项目