文章目录
使用springboot搭建api项目,使用swagger生成api文档信息
创建 springboot
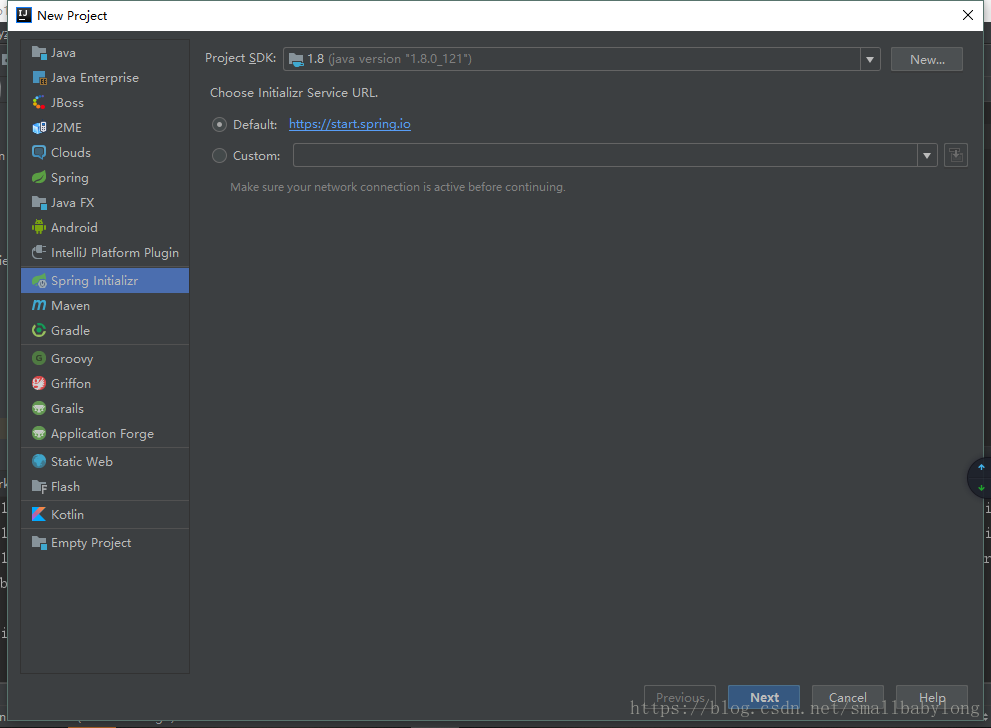
使用IntelliJ IDEA创建springboot
1.创建项目File->New Project
选择 Spring Initializr
两种方式,一般默认选择第一个,需要联网下载一下东西
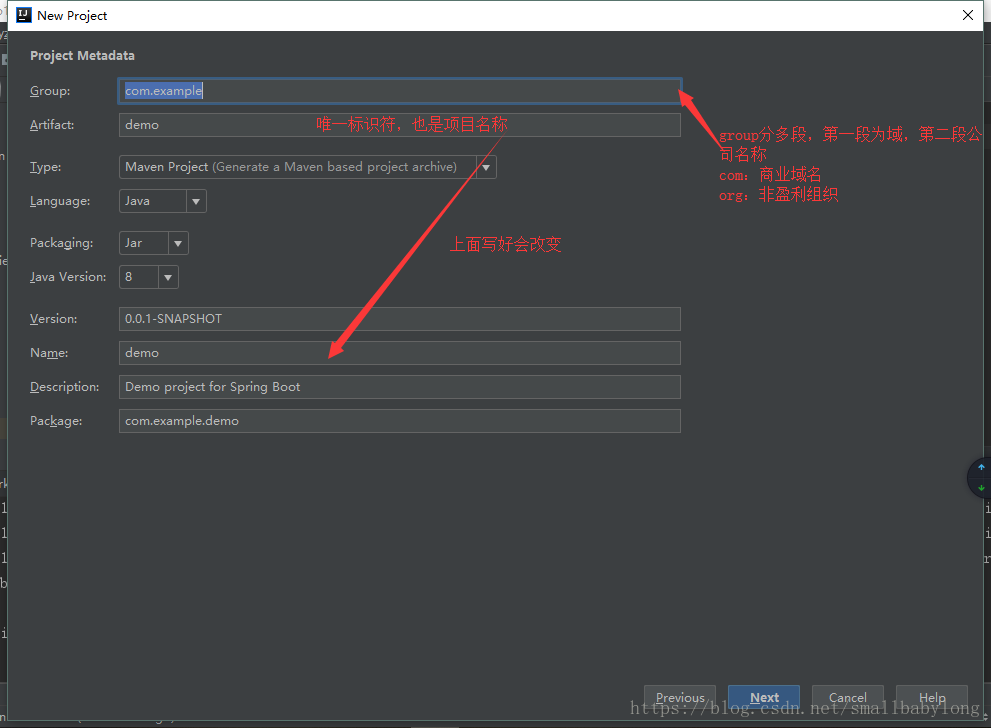
然后填写信息
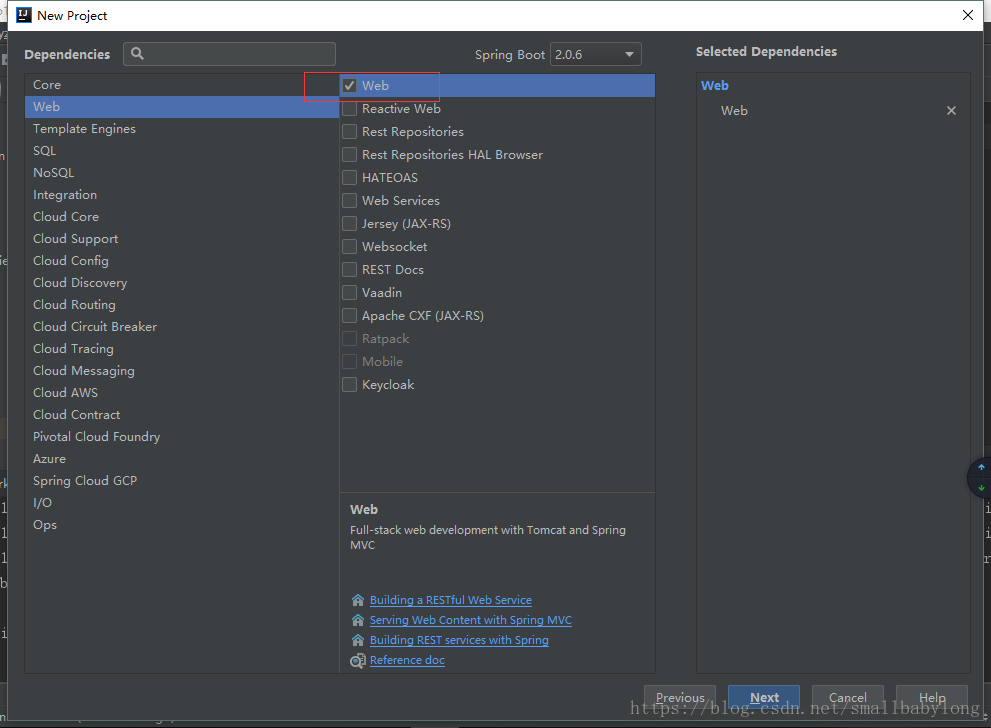
选择web支持
Spring Initializr 提供了很多的选项,不同的选项有不同的作用,这里我们只需要依赖 Web->Web就可以了,选择好依赖包之后点击 Next -> Finish。
到此一个简单的springboot项目就初始化完成了,来看一下完成项目结构
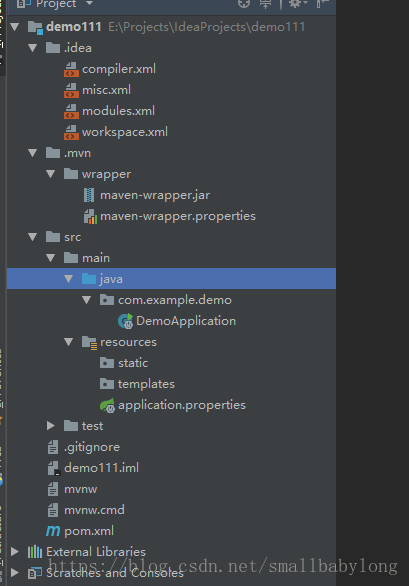
src
   -main
       -java
           -package
               #主函数,启动类,运行它如果运行了 Tomcat、Jetty、Undertow 等容器
               -SpringbootApplication
       -resouces
           #存放静态资源 js/css/images 等
           - statics
           #存放 html 模板文件
           - templates
           #主要的配置文件,SpringBoot启动时候会自动加载application.yml/application.properties
           - application.yml
   #测试文件存放目录
   -test
# pom.xml 文件是Maven构建的基础,里面包含了我们所依赖JAR和Plugin的信息
- pom
2.添加配置pom.xml
由于自动创建已经为我们完成了许多配置,这里只是添加支持jsp页面的依赖,让其支持jsp
- 1.添加 jsp页面依赖
  <!--jsp页面使用jstl标签-->
        <dependency>
            <groupId>javax.servlet</groupId>
            <artifactId>jstl</artifactId>
        </dependency>

        <!--用于编译jsp-->
        <dependency>
            <groupId>org.apache.tomcat.embed</groupId>
            <artifactId>tomcat-embed-jasper</artifactId>
            <scope>provided</scope>
        </dependency>
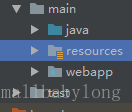
3.添加root文件夹webapp及以下目录或者自定义其他名称
注意webapp路径级别
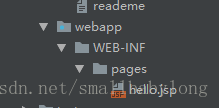
创建hello.jsp文件
<%--
  Created by IntelliJ IDEA.
  User: Long
  Date: 2018/10/18
  Time: 20:18
  To change this template use File | Settings | File Templates.
--%>
<%@ page contentType="text/html;charset=UTF-8" language="java" %>
<html>
<head>
    <title>Title</title>
</head>
<body>
hello world!

</body>
</html>
4.配置resources目录下application.properties
添加spring.mvc.view.prefix = /WEB-INF/pages/ spring.mvc.view.suffix = .jsp
页面默认前缀目录
spring.mvc.view.prefix=/WEB-INF/jsp/
响应页面默认后缀
spring.mvc.view.suffix=.jsp
默认的 8080 我们可以将它改成 9090
server.port=9090
5.编写Controller文件
@Controller和@RestController的区别?
/*
  Created by IntelliJ IDEA.
  User: Long
  Date: 2018/10/18
  Time: 20:21
  To change this template use File | Settings | File Templates.
*/
package org.mml.demo.controller;


import org.springframework.stereotype.Controller;
import org.springframework.web.bind.annotation.RequestMapping;
import org.springframework.web.bind.annotation.RestController;

@Controller
//此处用这个不能用RestController
@RequestMapping(value = "/hello")
//RequestMapping是一个用来处理请求地址映射的注解,可用于类或方法上。用于类上,表示类中的所有响应请求的方法都是以该地址作为父路径
public class HelloController {
    @RequestMapping(value = "/hello")
    public String hello(){
        return "hello";
        //此处返回值需要跟jsp页面文件名一致
    }
}
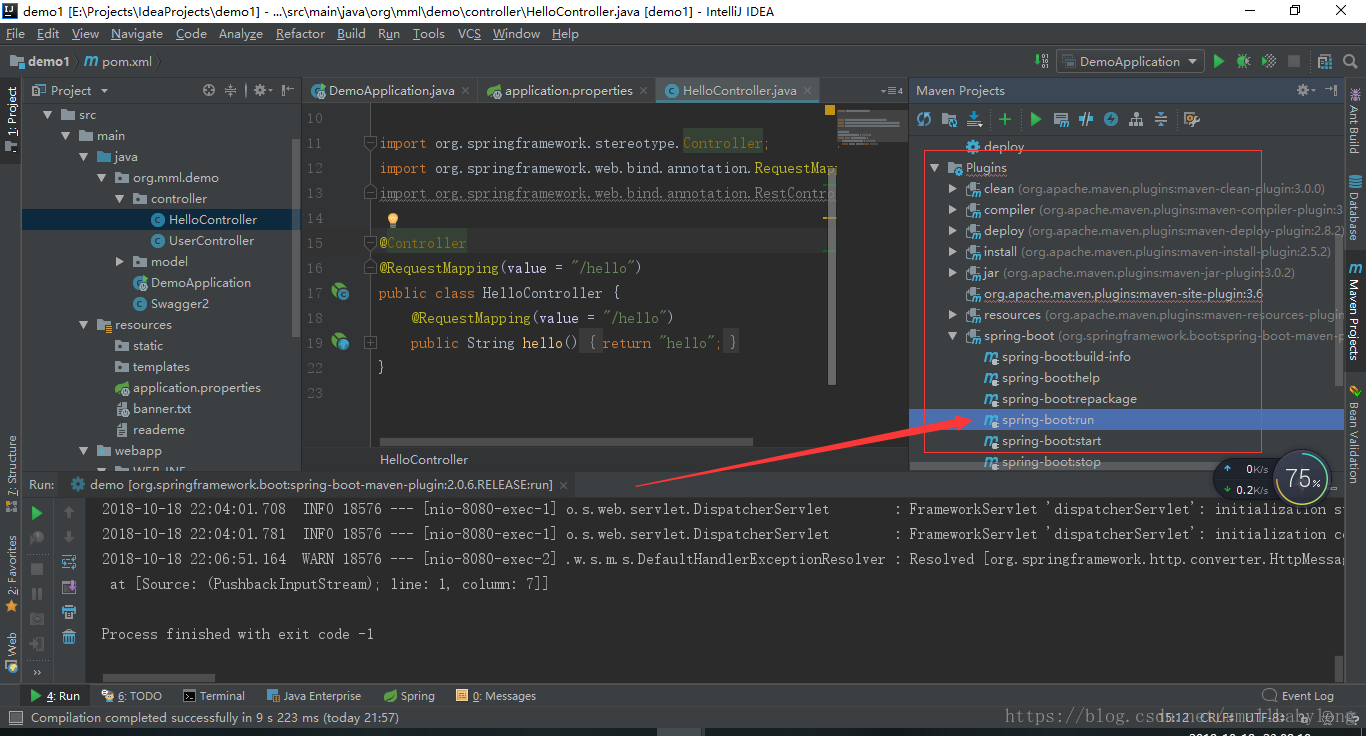
6.测试 :使用maven ->springboot-run启动
启动完成后浏览器地址栏输入 (http://localhost:8080/hello/hello)查看结果有没有跳转jsp页面

添加Swagger 自动生成Controller文档
pom.xml添加配置文件
  <!--Swagger2的依赖-->
        <dependency>
            <groupId>io.springfox</groupId>
            <artifactId>springfox-swagger2</artifactId>
            <version>2.7.0</version>
        </dependency>
        <dependency>
            <groupId>io.springfox</groupId>
            <artifactId>springfox-swagger-ui</artifactId>
            <version>2.7.0</version>
        </dependency>
创建Swagger类文件,目录结构跟APP同级
/*
  Created by IntelliJ IDEA.
  User: Long
  Date: 2018/10/18
  Time: 21:28
  To change this template use File | Settings | File Templates.
*/
package org.mml.demo;

import org.springframework.context.annotation.Bean;
import org.springframework.context.annotation.Configuration;
import springfox.documentation.builders.ApiInfoBuilder;
import springfox.documentation.builders.PathSelectors;
import springfox.documentation.builders.RequestHandlerSelectors;
import springfox.documentation.service.ApiInfo;
import springfox.documentation.spi.DocumentationType;
import springfox.documentation.spring.web.plugins.Docket;
import springfox.documentation.swagger2.annotations.EnableSwagger2;
//api显示注解官网http://docs.swagger.io/swagger-core/apidocs/com/wordnik/swagger/annotations/package-summary.html
@Configuration//必须存在
@EnableSwagger2//必须存在
public class Swagger {

    @Bean
    public Docket createRestApi() {
        return new Docket(DocumentationType.SWAGGER_2)
                .apiInfo(apiInfo())
                .select()
                //// 指定controller存放的目录路径
                .apis(RequestHandlerSelectors.basePackage("org.mml.demo.controller"))
                .paths(PathSelectors.any())
                .build();
    }

    private ApiInfo apiInfo() {
        return new ApiInfoBuilder()
                .title("Spring Boot中使用Swagger2构建RESTful APIs")
                .description("更多请查看:https://blog.csdn.net/smallbabylong/article/details/83155091")
                .termsOfServiceUrl("https://blog.csdn.net/smallbabylong/article/details/83155091")
                .contact("menglong")
                .version("1.0")
                .build();
    }

}
这个Swagger 类有四个注解,看名称就可以明白是什么意思。其中,@Configuration,@EnableWebMvc和@ComponentScan是Spring的注解,而@EnableSwagger2则是用来启动Swagger支持,表示这是一个Spring Swagger的配置文件。之后,定义了一个Bean方法createRestApi()方法指定扫描的包会生成文档,默认是显示所有接口,可以用@ApiIgnore注解标识该接口不显示。 apiInfo() 方法配置一些基本的信息。(Spring中名字并不重要,重要的是它返回一个Docket类,DocumentationType.SWAGGER_2作为Docket构造方法的参数,指定了所用的swagger版本2.0)
创建一个Controller类测试
/*
  Created by IntelliJ IDEA.
  User: Long
  Date: 2018/10/18
  Time: 21:37
  To change this template use File | Settings | File Templates.
*/
package org.mml.demo.controller;
import org.mml.demo.model.User;
import org.springframework.web.bind.annotation.*;
import io.swagger.annotations.*;

import java.util.*;

@RestController
@RequestMapping(value="/users")     // 通过这里配置使下面的映射都在/users下,可去除
public class UserController {

    static Map<Long, User> users = Collections.synchronizedMap(new HashMap<Long, User>());

    @ApiOperation(value="获取用户列表", notes="")
    @RequestMapping(value={""}, method=RequestMethod.GET)
    public List<User> getUserList() {
        List<User> r = new ArrayList<User>(users.values());
        return r;
    }

    @ApiOperation(value="创建用户", notes="根据User对象创建用户")
    @ApiImplicitParam(name = "user", value = "用户详细实体user", required = true, dataType = "User")
    @RequestMapping(value="", method=RequestMethod.POST)
    public String postUser(@RequestBody User user) {
        users.put(user.getId(), user);
        return "success";
    }

    @ApiOperation(value="获取用户详细信息", notes="根据url的id来获取用户详细信息")
    @ApiImplicitParam(name = "id", value = "用户ID", required = true, dataType = "Long")
    @RequestMapping(value="/{id}", method=RequestMethod.GET)
    public User getUser(@PathVariable Long id) {
        return users.get(id);
    }
}
Swagger2提供了一些注解来丰富接口的信息,常用的有:
@ApiOperation:用在方法上,说明方法的作用
- value: 表示接口名称
- notes: 表示接口详细描述
@ApiImplicitParams:用在方法上包含一组参数说明
@ApiImplicitParam:用在@ApiImplicitParams注解中,指定一个请求参数的各个方面
- paramType:参数位置
- header 对应注解:@RequestHeader
- query 对应注解:@RequestParam
- path 对应注解: @PathVariable
- body 对应注解: @requestbody
- name:参数名
- dataType:参数类型
- required:参数是否必须传
- value:参数的描述
- defaultValue:参数的默认值
@ApiResponses:用于表示一组响应
@ApiResponse:用在@ApiResponses中,一般用于表达一个错误的响应信息
- code:状态码
- message:返回自定义信息
- response:抛出异常的类
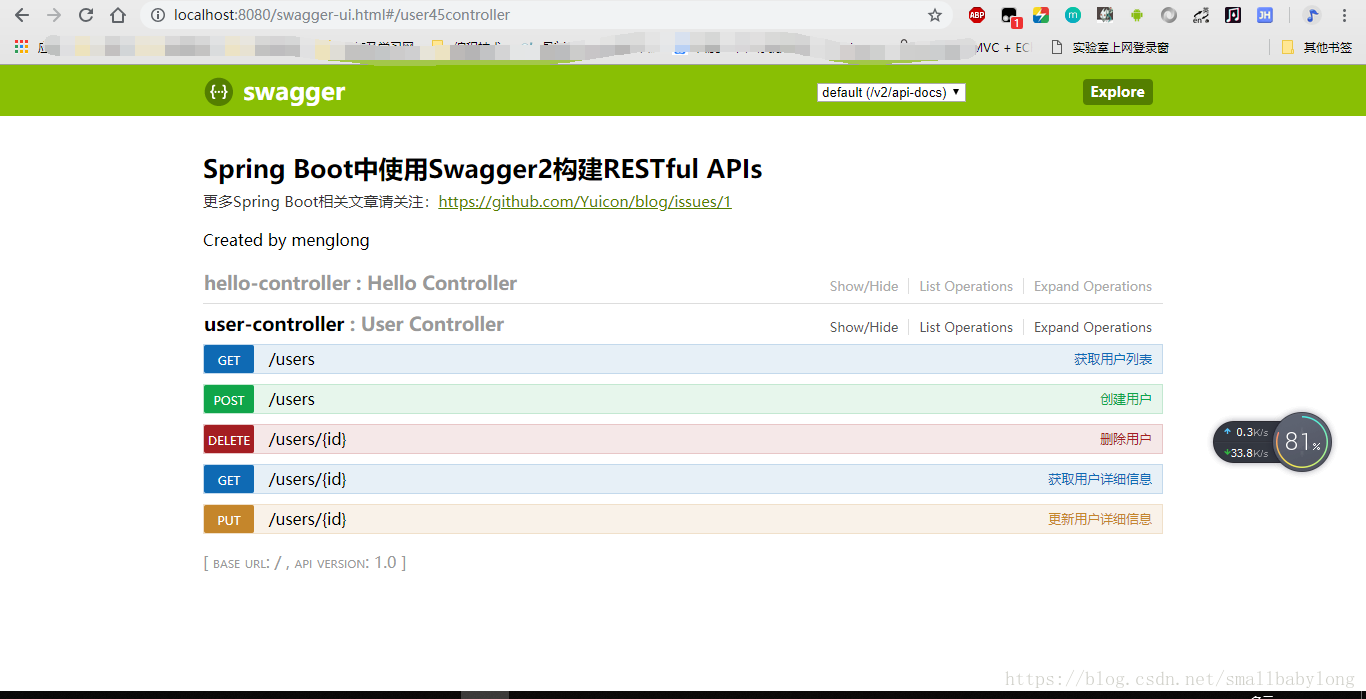
观察api接口文档界面:
输入网站:[http://localhost:8080/swagger-ui.html]即可看到图示界面
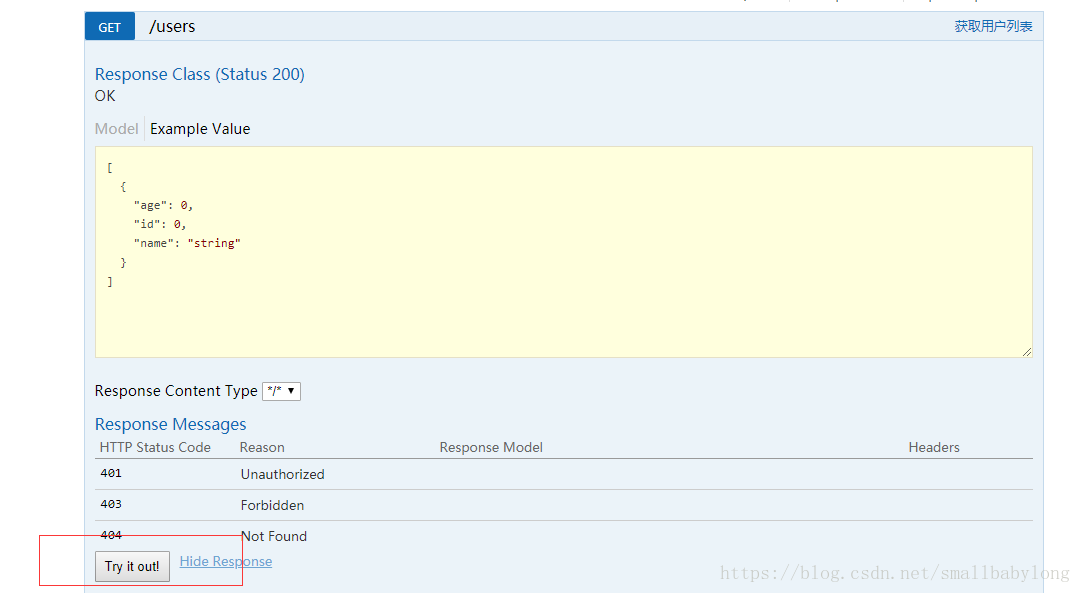
点击查看详细内容
点击Try it out!可进行测试