开门见山:应用到的技术有spring-boot,mybatis,springmvc,mysql,thymeleaf。
首先给自己的eclipse安装sts,传送门:https://blog.csdn.net/zhen_6137/article/details/79383941
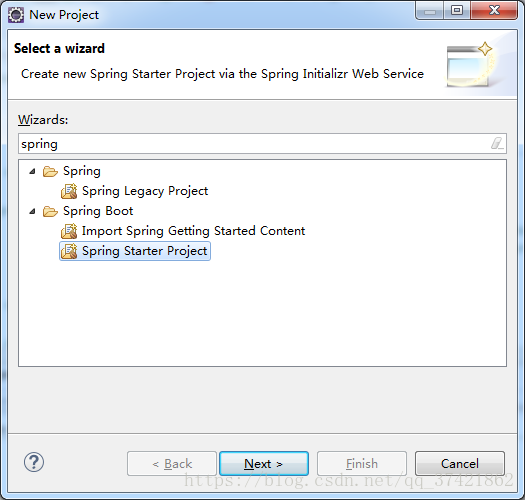
1.创建spring-boot项目
new project找到Spring Starter Project
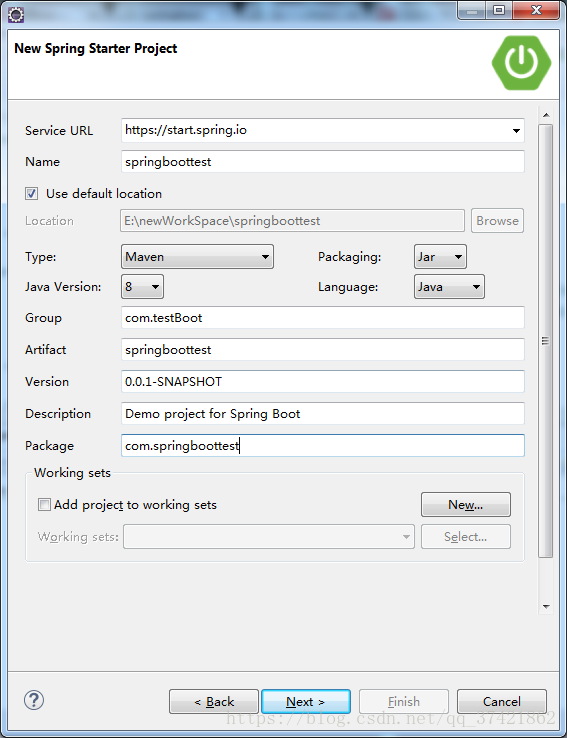
点击next之后 填写参数
下图可选择依赖,可以跳过

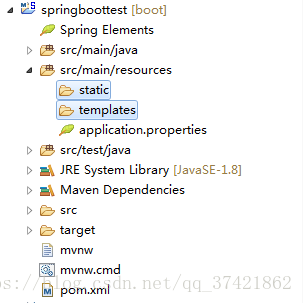
2.创建必要文件及文件夹
finish之后可以看到我们创建的项目,在src/main/resources源代码文件夹上右键,选择new->folder。新建以下几个文件夹,static(用于存放静态资源,如js、css或img)和templates(用于存放html)。
添加依赖,pom.xml文件:
<?xml version="1.0" encoding="UTF-8"?>
<project xmlns="http://maven.apache.org/POM/4.0.0" xmlns:xsi="http://www.w3.org/2001/XMLSchema-instance"
  xsi:schemaLocation="http://maven.apache.org/POM/4.0.0 http://maven.apache.org/xsd/maven-4.0.0.xsd">
  <modelVersion>4.0.0</modelVersion>

  <groupId>com.testBoot</groupId>
  <artifactId>springboottest</artifactId>
  <version>0.0.1-SNAPSHOT</version>
  <packaging>jar</packaging>

  <name>springboottest</name>
  <description>Demo project for Spring Boot</description>

  <parent>
    <groupId>org.springframework.boot</groupId>
    <artifactId>spring-boot-starter-parent</artifactId>
    <version>2.0.2.RELEASE</version>
    <relativePath/> <!-- lookup parent from repository -->
  </parent>

  <properties>
    <project.build.sourceEncoding>UTF-8</project.build.sourceEncoding>
    <project.reporting.outputEncoding>UTF-8</project.reporting.outputEncoding>
    <java.version>1.8</java.version>
  </properties>

  <dependencies>
    <dependency>
      <groupId>org.springframework.boot</groupId>
      <artifactId>spring-boot-starter</artifactId>
    </dependency>
    <dependency>
      <groupId>org.springframework.boot</groupId>
      <artifactId>spring-boot-starter-test</artifactId>
      <scope>test</scope>
    </dependency>
    <!-- web 模块 -->
    <dependency>
      <groupId>org.springframework.boot</groupId>
      <artifactId>spring-boot-starter-web</artifactId>
    </dependency>
    <!-- webservice 模块 -->
    <dependency>
      <groupId>org.springframework.boot</groupId>
      <artifactId>spring-boot-starter-web-services</artifactId>
    </dependency>
    <!-- websocket 模块 -->
    <dependency>
      <groupId>org.springframework.boot</groupId>
      <artifactId>spring-boot-starter-websocket</artifactId>
    </dependency>
    <!-- thymeleaf 模板引擎 -->
    <dependency>
      <groupId>org.springframework.boot</groupId>
      <artifactId>spring-boot-starter-thymeleaf</artifactId>
    </dependency>
    <!-- mail 模块 -->
    <dependency>
      <groupId>org.springframework.boot</groupId>
      <artifactId>spring-boot-starter-mail</artifactId>
    </dependency>
    <!-- mysql 模块 -->
    <dependency>
      <groupId>mysql</groupId>
      <artifactId>mysql-connector-java</artifactId>
      <scope>runtime</scope>
    </dependency>
    <!-- mybatis 模块 -->
    <dependency>
      <groupId>org.mybatis.spring.boot</groupId>
      <artifactId>mybatis-spring-boot-starter</artifactId>
      <version>1.3.2</version>
    </dependency>
    <!-- restdocs 模块 -->
    <dependency>
      <groupId>org.springframework.restdocs</groupId>
      <artifactId>spring-restdocs-mockmvc</artifactId>
      <scope>test</scope>
    </dependency>
    <!-- httpclient -->
    <!-- <dependency>
      <groupId>org.apache.httpcomponents</groupId>
      <artifactId>httpclient</artifactId>
      <version>${httpclient.version}</version>
    </dependency> -->
    <!-- gson -->
    <!-- <dependency>
      <groupId>com.google.code.gson</groupId>
      <artifactId>gson</artifactId>
      <version>2.8.2</version>
    </dependency> -->
    <!-- Swagger2 模块 -->
    <dependency>
      <groupId>io.springfox</groupId>
      <artifactId>springfox-swagger2</artifactId>
      <version>2.8.0</version>
    </dependency>
    <dependency>
      <groupId>io.springfox</groupId>
      <artifactId>springfox-swagger-ui</artifactId>
      <version>2.8.0</version>
    </dependency>
    <!-- test 模块 -->
    <dependency>
      <groupId>org.springframework.boot</groupId>
      <artifactId>spring-boot-starter-test</artifactId>
      <scope>test</scope>
    </dependency>
    <!-- 热部署模块 -->
    <dependency>
      <groupId>org.springframework.boot</groupId>
      <artifactId>spring-boot-devtools</artifactId>
      <optional>true</optional> <!-- 这个需要为 true 热部署才有效 -->
    </dependency>
  </dependencies>

  <build>
        <finalName>springboottest</finalName>
        <plugins>
            <plugin>
                <groupId>org.springframework.boot</groupId>
                <artifactId>spring-boot-maven-plugin</artifactId>
            </plugin>
        </plugins>
    </build>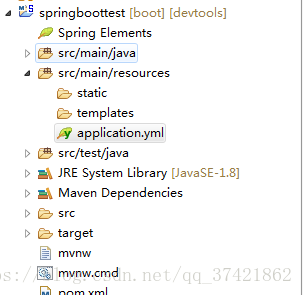
</project>使用application.yml代替application.properties
配置文件为:
server:
  port: 8080
  servlet:
    context-path: /boot

# =====================数据源配置===========================
spring:
  datasource:
     url: jdbc:mysql://127.0.0.1:3306/boottest?characterEncoding=utf8
     username: root
     password: root
     driver-class-name: com.mysql.jdbc.Driver
# =====================Thymeleaf 配置===========================
  thymeleaf:
    enabled: true  # 是否启用thymeleaf模板解析
    cache: false   # 是否开启模板缓存(建议:开发环境下设置为false,生产环境设置为true)
    check-template-location: true # Check that the templates location exists.
    servlet:
      content-type: text/html  # 模板的媒体类型设置,默认为text/html
    encoding: UTF-8  # 模板的编码设置,默认UTF-8
    characterEncoding: UTF-8
    #view-names:  # 设置可以被解析的视图,以逗号,分隔
    #excluded-view-names: # 排除不需要被解析视图,以逗号,分隔
    #mode:HTML5 # 模板模式设置,默认为HTML5
    prefix: classpath:/templates/  # 前缀设置,SpringBoot默认模板放置在classpath:/template/目录下
    suffix: .html  # 后缀设置,默认为.html
    #template-resolver-order: # 模板在模板链中被解析的顺序
  jmx:
#    enabled: false
    default-domain: springboottest
logging:
  path: D:\JavaFiles\logs\spring boot\logs
  level:
        com.springboottest.dao: DEBUG
图示:
3.测试项目是否可运行
接下来创建controller和html测试项目是否可运行:
图示:
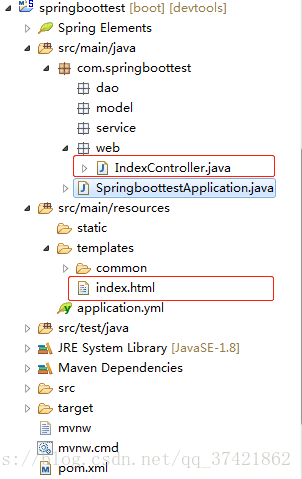
IndexController.java代码:
package com.springboottest.web;

import org.springframework.stereotype.Controller;
import org.springframework.web.bind.annotation.RequestMapping;

@Controller
@RequestMapping("/")
public class IndexController {

  @RequestMapping("/")
  public String indexPage(){

    return "index";
  }
}
index.html代码:
<!DOCTYPE html>
<html>
<head>
<meta charset="UTF-8">
<title>Insert title here</title>
</head>
<body>
<h1>welcome to spring-boot</h1>
</body>
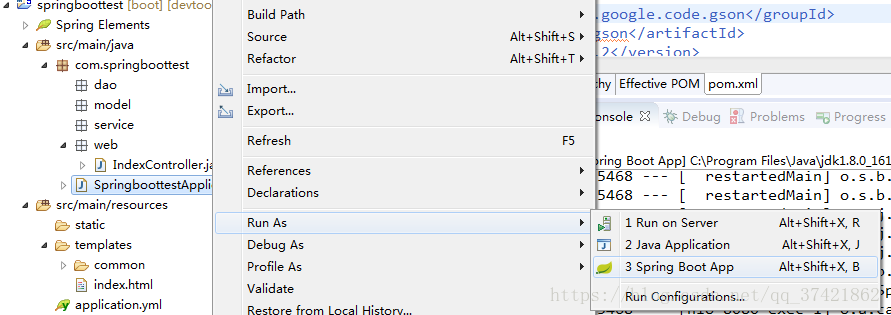
</html>由于我们安装了sts插件,eclipse可以很方便的启动项目,如图示操作即可:
待启动完毕之后,在浏览器输入http://localhost:8080/boot/地址之后效果:
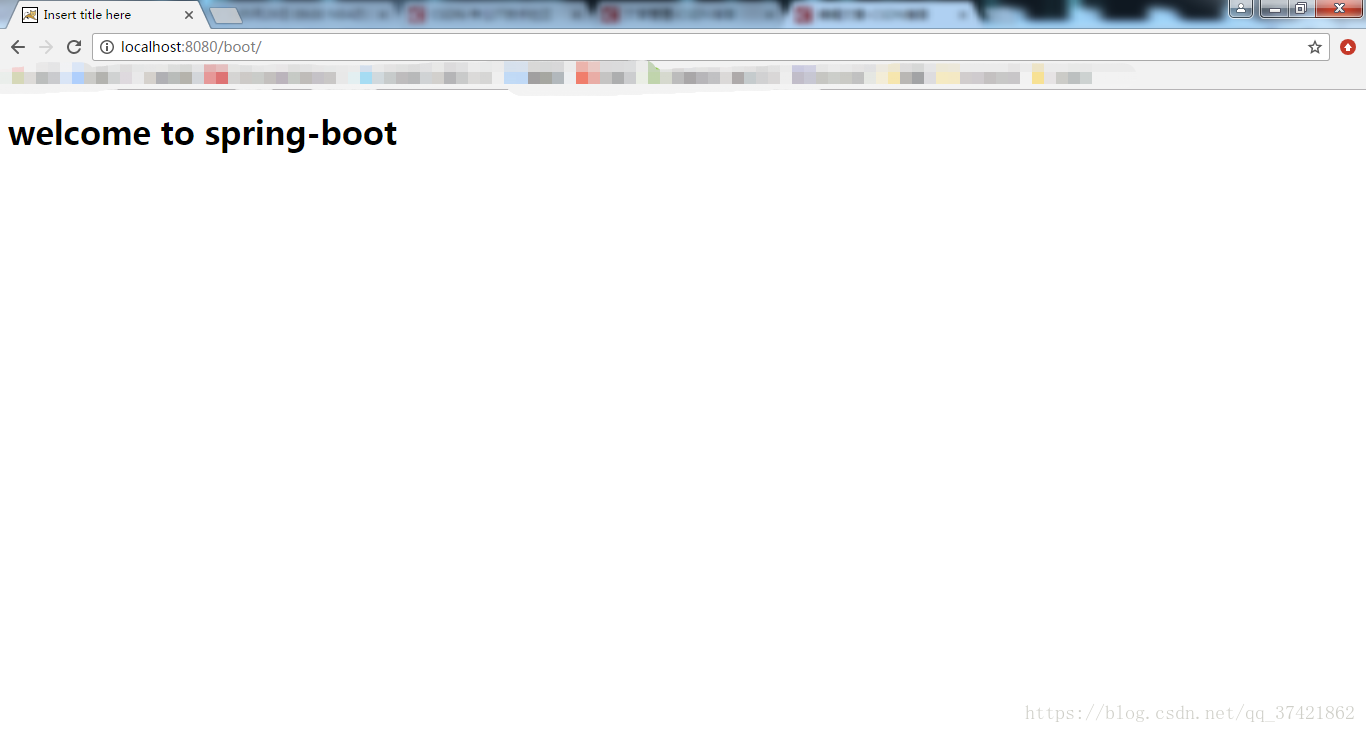
至此eclipse搭建springboot项目完毕。
在下篇博客将使用thymeleaf、bootstrap实现注册登录。《Spring-boot使用eclipse搭建项目(二)》