Swagger 是一款RESTFUL接口的文档在线自动生成+功能测试功能软件。
Swagger 是一个规范和完整的框架,用于生成、描述、调用和可视化 RESTful 风格的 Web 服务。总体目标是使客户端和文件系统作为服务器以同样的速度来更新。文件的方法,参数和模型紧密集成到服务器端的代码,允许API来始终保持同步。Swagger 让部署管理和使用功能强大的API从未如此简单。
GitHub地址:
Swagger2引入的好处,同样也是手写Api文档的几个痛点:
文档需要更新的时候,需要再次发送一份给前端,也就是文档更新交流不及时。
接口返回结果不明确
不能直接在线测试接口,通常需要使用工具,比如postman
接口文档太多,不好管理
三、使用Swagger2
3.1、添加Swagger2依赖:
<dependency>
    <groupId>io.springfox</groupId>
    <artifactId>springfox-swagger2</artifactId>
    <version>2.2.2</version>
</dependency>
<dependency>
    <groupId>io.springfox</groupId>
    <artifactId>springfox-swagger-ui</artifactId>
    <version>2.2.2</version>
</dependency>
使用@Configuration来表示该类是个配置类
使用@EnableSwagger2来启用Swagger2
@Configuration
@EnableSwagger2//启用Swagger2
public class Swagger2Config {
//从配置文件中获取属性值
@Value("${swagger2.basepackage}")
private String basepackage;
/**
* buildDocket()用于创建Docket的Bean,
* buildApiInfo()创建Api的基本信息,用于显示在文档页面上。
* select()函数返回一个ApiSelectorBuilder实例,用来控制哪些接口暴露给Swagger2来展现。
* 一般采用指定扫描的包路径来定义,本例中Swagger会扫描controller包下所有定义的API,并产生文档内容(除了被@ApiIgnore指定的请求)。
*
* @return
*/
@Bean
public Docket buildDocket(){
return new Docket(DocumentationType.SWAGGER_2)
.apiInfo(buildApiInfo())
.select()
.apis(RequestHandlerSelectors.basePackage(basepackage))
.paths(PathSelectors.any())
.build();
}
private ApiInfo buildApiInfo(){
return new ApiInfoBuilder()
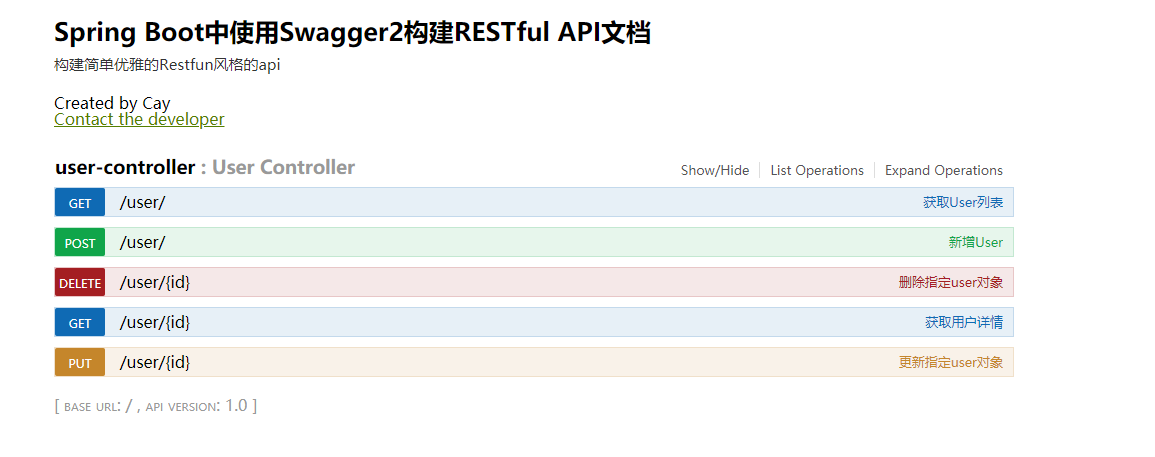
.title("Spring Boot中使用Swagger2构建RESTful API文档")
.description("构建简单优雅的Restfun风格的api")
.termsOfServiceUrl("https://github.com/caychen")
.contact(new Contact("Cay", "", "[email protected]"))
.version("1.0")
.build();
}
}
:用于controller请求类上,说明该类的说明
@Api(value = "用户Controller")
public class UserController {}
@ApiOperation:用在controller类的具体请求方法上,说明方法的作用和用途
notes:备注说明
@ApiOperation(value = "获取User列表", notes = "获取所有User对象")
public List<User> getUserList() {}
@ApiModel(value = "用户对象User")
public class User implements Serializable {
    @ApiModelProperty(value = "用户id", name = "uid")
    private Integer uid;
    @ApiModelProperty(value = "用户名", name = "uname")
    private String uname;
    @ApiModelProperty(value = "用户年龄", name = "uage")
    private Integer uage;
}
required:参数是否必须传参,必须指定
paramType:参数放在哪个地方,必须指定
header --> 请求参数从header请求头中获取,需要使用@RequestHeader
query --> 请求参数从url的请求中获取,@RequestParam。例如 ?query=q ,jquery ajax中data设置的值也可以,例如 data:{query:”q”},在Controller中不需要添加注解就可以直接接收。
path(用于restful接口)--> 请求参数从path中获取:需要使用@PathVariable
body --> 需要使用@RequestBody接收数据,POST有效
form --> 表单提交,必须使用post提交
dataType:参数类型,默认String,如果类型名称相同,请指定全路径,例如 dataType = “java.util.Date”,springfox会自动根据类型生成模型
defaultValue:参数的默认值
@PutMapping("/{id}")
@ApiOperation(value = "更新指定user对象", notes = "根据url的id来指定更新对象,并根据传过来的user信息来更新用户详细信息")
@ApiImplicitParams({
    @ApiImplicitParam(name = "id", value = "需要更新的用户id", required = true, dataType = "Integer", paramType = "path"),
    @ApiImplicitParam(name = "user", value = "用户详细实体user", required = true, dataType = "User", paramType = "body")
})
public String updateUser(@PathVariable Integer id, @RequestBody User user) {}
@RestController
@RequestMapping("/user")
@Api(value = "用户Controller")
public class UserController {

	private static final Logger logger = LoggerFactory.getLogger(UserController.class);

	@Autowired
	private IUserService userService;

	//@RequestMapping("/")
	@GetMapping("/")
	@ApiOperation(value = "获取User列表", notes = "获取所有User对象")
	public List<User> getUserList() {
		logger.info("获取User列表...");
		return userService.getUserList();
	}

	@GetMapping("/{id}")
	@ApiOperation(value = "获取用户详情", notes = "根据url中用户id来获取该用户的详情")
	@ApiImplicitParam(name = "id", value = "用户id", required = true, dataType = "Integer", paramType = "path")
	public User getById(@PathVariable Integer id) {
		logger.info("获取id为{}的User...", id);
		return userService.getById(id);
	}

	@PostMapping("/")
	@ApiOperation(value = "新增User", notes = "根据User对象创建用户")
	@ApiImplicitParam(name = "user", value = "用户详细实体user", required = true, dataType = "User", paramType = "body")
	public String addUser(@RequestBody User user) {
		logger.info("新增User对象...");
		int result = userService.addUser(user);
		if (result == 1) {
			return "success";
		} else {
			return "error";
		}
	}

	@PutMapping("/{id}")
	@ApiOperation(value = "更新指定user对象", notes = "根据url的id来指定更新对象,并根据传过来的user信息来更新用户详细信息")
	@ApiImplicitParams({
			@ApiImplicitParam(name = "id", value = "需要更新的用户id", required = true, dataType = "Integer", paramType = "path"),
			@ApiImplicitParam(name = "user", value = "用户详细实体user", required = true, dataType = "User", paramType = "body")
	})
	public String updateUser(@PathVariable Integer id, @RequestBody User user) {
		logger.info("更新id为{}的User对象...", id);
		user.setUid(id);
		int result = userService.updateUser(id, user);
		if (result == 1) {
			return "success";
		} else {
			return "error";
		}
	}

	@DeleteMapping("/{id}")
	@ApiOperation(value = "删除指定user对象", notes = "根据url中的id来删除user对象")
	@ApiImplicitParam(name = "id", value = "需要删除user对象的id", required = true, dataType = "Integer", paramType = "path")
	public String deleteUser(@PathVariable Integer id) {
		logger.info("删除id为{}的User对象...", id);
		int result = userService.deleteUser(id);
		if (result == 1) {
			return "success";
		} else {
			return "error";
		}
	}
}
http://ip:port/swagger-ui.html
依次点开每个url,即可在线调试。
====================打个广告,欢迎关注====================
| QQ: |
412425870 |
| 微信公众号:Cay课堂 |
 |
| csdn博客: |
http://blog.csdn.net/caychen |
| 码云: |
https://gitee.com/caychen/ |
| github: |
https://github.com/caychen |
点击群号或者扫描二维码即可加入QQ群: |
 |
|
|
 |