译自:Implementing YOLO v3 in Tensorflow (TF-Slim)
最近我一直在使用Tensorflow中的YOLO v3。我在GitHub上找不到任何适合我需要的实现,因此我决定将这个用PyTorch编写的代码转换为Tensorflow。与论文一起发布的YOLO v3的原始配置可以在Darknet GitHub repo中找到。
我想分享我的代码,以及我在实现它时遇到的一些问题的解决方案。
我不会过分关注与实施无关的方面。我假设您熟悉CNN,目标检测,YOLO v3架构等以及Tensorflow和TF-Slim框架。如果没有,最好从相应的论文/教程开始。我不会解释每一行的作用,而是提供工作代码,并解释我偶然发现的一些问题。
我的GitHub repo中提供了运行此探测器和一些演示所需的所有代码。
我的测试环境:Ubuntu 16.04,Tensorflow 1.8.0和CUDA 9.0。
查看tensorflow版本:

这篇文章的组织结构如下:
1. 配置
2. Darknet-53层的实现
3. 实施YOLO v3检测层
4. 转换预先训练的COCO权重
5. 后处理算法的实现
6. 总结
1. setup
我想以类似于Tensorflow模型库中的组织方式来组织代码。 我使用TF-Slim,因为它让我们将诸如激活函数,批量标准化参数等常见参数定义为全局变量,从而使得定义神经网络的速度更快。
我们从yolo_v3.py文件开始,文件中含有初始化网络的函数以及加载预先训练的权重的函数。
在文件顶部的某处添加必要的常量:
_BATCH_NORM_DECAY = 0.9
_BATCH_NORM_EPSILON = 1e-05
_LEAKY_RELU = 0.1
YOLO v3将输入归一化为0-1。 检测器中的大多数层在卷积后立即进行batch normalization,使用Leaky ReLU激活,没有偏置(biases)。 用slim 定义参数(arg)范围来处理这种情况是很方便的。 在不使用BN和LReLU的层中,我们需要隐式定义它。
# transpose the inputs to NCHW
if data_format == 'NCHW':
    inputs = tf.transpose(inputs, [0, 3, 1, 2])

# normalize values to range [0..1]
inputs = inputs / 255

# set batch norm params
batch_norm_params = {
    'decay': _BATCH_NORM_DECAY,
    'epsilon': _BATCH_NORM_EPSILON,
    'scale': True,
    'is_training': is_training,
    'fused': None,  # Use fused batch norm if possible.
}

# Set activation_fn and parameters for conv2d, batch_norm.
with slim.arg_scope([slim.conv2d, slim.batch_norm, _fixed_padding], data_format=data_format, reuse=reuse):
    with slim.arg_scope([slim.conv2d], normalizer_fn=slim.batch_norm, normalizer_params=batch_norm_params,
                        biases_initializer=None, activation_fn=lambda x: tf.nn.leaky_relu(x, alpha=_LEAKY_RELU)):
        with tf.variable_scope('darknet-53'):
            inputs = darknet53(inputs)
2. Darknet-53的实现
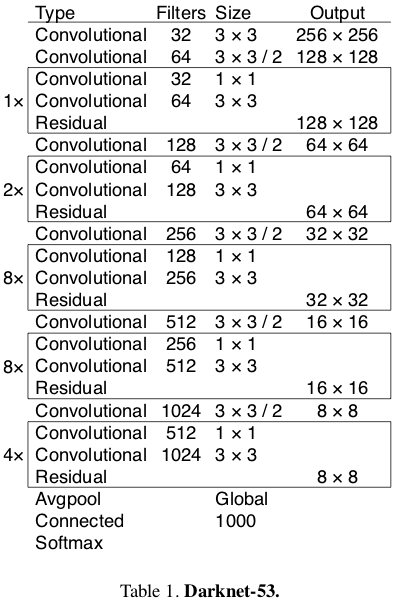
在YOLO v3论文中,作者提出了一种名为Darknet-53的更深层次的特征提取器架构。 顾名思义,它包含53个卷积层,每个卷后面都有BN层和Leaky ReLU激活层。 下采样由带有stride = 2的conv层完成。
Source: YOLO v3 paper
在定义卷积层之前,我们必须认识到作者是使用固定填充(fixed padding)而不依赖于输入大小来实现的。 为了实现相同的效果,我们可以使用下面的函数(我稍微修改了这里的代码)。
@tf.contrib.framework.add_arg_scope
def _fixed_padding(inputs, kernel_size, *args, mode='CONSTANT', **kwargs):
    """
    Pads the input along the spatial dimensions independently of input size.

    Args:
      inputs: A tensor of size [batch, channels, height_in, width_in] or
        [batch, height_in, width_in, channels] depending on data_format.
      kernel_size: The kernel to be used in the conv2d or max_pool2d operation.
                   Should be a positive integer.
      data_format: The input format ('NHWC' or 'NCHW').
      mode: The mode for tf.pad.

    Returns:
      A tensor with the same format as the input with the data either intact
      (if kernel_size == 1) or padded (if kernel_size > 1).
    """
    pad_total = kernel_size - 1
    pad_beg = pad_total // 2
    pad_end = pad_total - pad_beg

    if kwargs['data_format'] == 'NCHW':
        padded_inputs = tf.pad(inputs, [[0, 0], [0, 0],
                                        [pad_beg, pad_end], [pad_beg, pad_end]], mode=mode)
    else:
        padded_inputs = tf.pad(inputs, [[0, 0], [pad_beg, pad_end],
                                        [pad_beg, pad_end], [0, 0]], mode=mode)
    return padded_inputs
_fixed_padding pad沿高度和宽度尺寸输入适当数量的0元素(当mode ='CONSTANT'时)。 我们稍后也会使用mode ='SYMMETRIC'。
现在我们可以定义_conv2d_fixed_padding函数:
def _conv2d_fixed_padding(inputs, filters, kernel_size, strides=1):
    if strides > 1:
        inputs = _fixed_padding(inputs, kernel_size)
    inputs = slim.conv2d(inputs, filters, kernel_size, stride=strides, padding=('SAME' if strides == 1 else 'VALID'))
    return inputs
Darknet-53模型由一些块构建,具有2个卷积层和shortcut connection,然后是下采样层。 为避免样板代码,我们定义了_darknet_block函数:
def _darknet53_block(inputs, filters):
    shortcut = inputs
    inputs = _conv2d_fixed_padding(inputs, filters, 1)
    inputs = _conv2d_fixed_padding(inputs, filters * 2, 3)

    inputs = inputs + shortcut
    return inputs
最后,我们为Darknet-53模型提供了所有必需的构建块:
def darknet53(inputs):
    """
    Builds Darknet-53 model.
    """
    inputs = _conv2d_fixed_padding(inputs, 32, 3)
    inputs = _conv2d_fixed_padding(inputs, 64, 3, strides=2)
    inputs = _darknet53_block(inputs, 32)
    inputs = _conv2d_fixed_padding(inputs, 128, 3, strides=2)

    for i in range(2):
        inputs = _darknet53_block(inputs, 64)

    inputs = _conv2d_fixed_padding(inputs, 256, 3, strides=2)

    for i in range(8):
        inputs = _darknet53_block(inputs, 128)

    inputs = _conv2d_fixed_padding(inputs, 512, 3, strides=2)

    for i in range(8):
        inputs = _darknet53_block(inputs, 256)

    inputs = _conv2d_fixed_padding(inputs, 1024, 3, strides=2)

    for i in range(4):
        inputs = _darknet53_block(inputs, 512)

    return inputs
最初,在最后一个块之后有全局平均池化层和softmax层,但YOLO v3均未使用(所以实际上我们有52层而不是53层;))
3. YOLO v3检测层的实现
直接将Darknet-53提取的特征输入到检测层中。 检测模块由若干块构成,每一块都含有上采样层、3个具有线性激活功能的卷积层,从而在3种不同的尺度上进行检测。 让我们从编写辅助函数_yolo_block开始:
def _yolo_block(inputs, filters):
    inputs = _conv2d_fixed_padding(inputs, filters, 1)
    inputs = _conv2d_fixed_padding(inputs, filters * 2, 3)
    inputs = _conv2d_fixed_padding(inputs, filters, 1)
    inputs = _conv2d_fixed_padding(inputs, filters * 2, 3)
    inputs = _conv2d_fixed_padding(inputs, filters, 1)
    route = inputs
    inputs = _conv2d_fixed_padding(inputs, filters * 2, 3)
    return route, inputs
然后,来自块中第5层的激活被转到另一个卷积层,并进行上采样,而来自第6层的激活转到_detection_layer,(这是我们接下来定义的):
def _detection_layer(inputs, num_classes, anchors, img_size, data_format):
    num_anchors = len(anchors)
    predictions = slim.conv2d(inputs, num_anchors * (5 + num_classes), 1, stride=1, normalizer_fn=None,
                              activation_fn=None, biases_initializer=tf.zeros_initializer())

    shape = predictions.get_shape().as_list()
    grid_size = _get_size(shape, data_format)
    dim = grid_size[0] * grid_size[1]
    bbox_attrs = 5 + num_classes

    if data_format == 'NCHW':
        predictions = tf.reshape(predictions, [-1, num_anchors * bbox_attrs, dim])
        predictions = tf.transpose(predictions, [0, 2, 1])

    predictions = tf.reshape(predictions, [-1, num_anchors * dim, bbox_attrs])

    stride = (img_size[0] // grid_size[0], img_size[1] // grid_size[1])

    anchors = [(a[0] / stride[0], a[1] / stride[1]) for a in anchors]

    box_centers, box_sizes, confidence, classes = tf.split(predictions, [2, 2, 1, num_classes], axis=-1)

    box_centers = tf.nn.sigmoid(box_centers)
    confidence = tf.nn.sigmoid(confidence)

    grid_x = tf.range(grid_size[0], dtype=tf.float32)
    grid_y = tf.range(grid_size[1], dtype=tf.float32)
    a, b = tf.meshgrid(grid_x, grid_y)

    x_offset = tf.reshape(a, (-1, 1))
    y_offset = tf.reshape(b, (-1, 1))

    x_y_offset = tf.concat([x_offset, y_offset], axis=-1)
    x_y_offset = tf.reshape(tf.tile(x_y_offset, [1, num_anchors]), [1, -1, 2])

    box_centers = box_centers + x_y_offset
    box_centers = box_centers * stride

    anchors = tf.tile(anchors, [dim, 1])
    box_sizes = tf.exp(box_sizes) * anchors
    box_sizes = box_sizes * stride

    detections = tf.concat([box_centers, box_sizes, confidence], axis=-1)

    classes = tf.nn.sigmoid(classes)
    predictions = tf.concat([detections, classes], axis=-1)
    return predictions
该层根据以下等式完成原始预测。 因为不同尺度上的YOLO v3会检测到不同大小和宽高比的对象,所以需要anchors参数,这是每个尺度的3个元组(高度,宽度)的列表。 需要为数据集定制anchors(在本教程中,我们将使用COCO数据集的anchors)。 只需在yolo_v3.py文件的顶部添加此常量即可。
_ANCHORS = [(10, 13), (16, 30), (33, 23), (30, 61), (62, 45), (59, 119), (116, 90), (156, 198), (373, 326)]
Source: YOLO v3 paper
我们需要一个辅助函数_get_size,它返回输入的高度和宽度:
def _get_size(shape, data_format):
    if len(shape) == 4:
        shape = shape[1:]
    return shape[1:3] if data_format == 'NCHW' else shape[0:2]
如前所述,我们需要实现的YOLO v3最后一个构建块是上采样层。 YOLO探测器采用双线性上采样方法。 为什么我们不能只使用Tensorflow API中的标准tf.image.resize_bilinear方法? 原因是,就今天(TF版本1.8.0)而言,所有上采样方法都使用 constant填充模式。 YOLO作者repo和PyTorch中的标准pad方法是edge (可以在这里找到填充模式的良好比较)。 这个微小的差异对检测产生了重大影响(并且花了我几个小时的调试时间)。
为了解决这个问题,我们将手动填充1个像素的输入,设置mode ='SYMMETRIC',这相当于edge模式。
# we just need to pad with one pixel, so we set kernel_size = 3
inputs = _fixed_padding(inputs, 3, 'NHWC', mode='SYMMETRIC')
整个_upsample函数代码如下所示:
def _upsample(inputs, out_shape, data_format='NCHW'):
    # we need to pad with one pixel, so we set kernel_size = 3
    inputs = _fixed_padding(inputs, 3, mode='SYMMETRIC')

    # tf.image.resize_bilinear accepts input in format NHWC
    if data_format == 'NCHW':
        inputs = tf.transpose(inputs, [0, 2, 3, 1])

    if data_format == 'NCHW':
        height = out_shape[3]
        width = out_shape[2]
    else:
        height = out_shape[2]
        width = out_shape[1]

    # we padded with 1 pixel from each side and upsample by factor of 2, so new dimensions will be
    # greater by 4 pixels after interpolation
    new_height = height + 4
    new_width = width + 4

    inputs = tf.image.resize_bilinear(inputs, (new_height, new_width))

    # trim back to desired size
    inputs = inputs[:, 2:-2, 2:-2, :]

    # back to NCHW if needed
    if data_format == 'NCHW':
        inputs = tf.transpose(inputs, [0, 3, 1, 2])

    inputs = tf.identity(inputs, name='upsampled')
return inputs更新:感谢Srikanth Vidapanakal,我检查了darknet的源代码,发现上采样方法是最近邻,而不是双线性。 我们不再需要填充图像了。 已更新的代码已在我的repo中。
修改以后的_upsample函数代码如下所示:
def _upsample(inputs, out_shape, data_format='NCHW'):
    # tf.image.resize_nearest_neighbor accepts input in format NHWC
    if data_format == 'NCHW':
        inputs = tf.transpose(inputs, [0, 2, 3, 1])

    if data_format == 'NCHW':
        new_height = out_shape[3]
        new_width = out_shape[2]
    else:
        new_height = out_shape[2]
        new_width = out_shape[1]

    inputs = tf.image.resize_nearest_neighbor(inputs, (new_height, new_width))

    # back to NCHW if needed
    if data_format == 'NCHW':
        inputs = tf.transpose(inputs, [0, 3, 1, 2])

    inputs = tf.identity(inputs, name='upsampled')
    return inputs
上采样激活按通道轴连接来自Darknet-53的激活。 这就是为什么我们需要回到darknet53函数并在第4和第5个下采样层之前,从conv层返回激活。
def darknet53(inputs):
    """
    Builds Darknet-53 model.
    """
    inputs = _conv2d_fixed_padding(inputs, 32, 3)
    inputs = _conv2d_fixed_padding(inputs, 64, 3, strides=2)
    inputs = _darknet53_block(inputs, 32)
    inputs = _conv2d_fixed_padding(inputs, 128, 3, strides=2)

    for i in range(2):
        inputs = _darknet53_block(inputs, 64)

    inputs = _conv2d_fixed_padding(inputs, 256, 3, strides=2)

    for i in range(8):
        inputs = _darknet53_block(inputs, 128)

    route1 = inputs
    inputs = _conv2d_fixed_padding(inputs, 512, 3, strides=2)

    for i in range(8):
        inputs = _darknet53_block(inputs, 256)

    route2 = inputs
    inputs = _conv2d_fixed_padding(inputs, 1024, 3, strides=2)

    for i in range(4):
        inputs = _darknet53_block(inputs, 512)

    return route1, route2, inputs
现在我们准备定义检测模块。 让我们回到yolo_v3函数并在slim的arg范围中添加以下行:
with tf.variable_scope('darknet-53'):
    route_1, route_2, inputs = darknet53(inputs)

with tf.variable_scope('yolo-v3'):
    route, inputs = _yolo_block(inputs, 512)
    detect_1 = _detection_layer(inputs, num_classes, _ANCHORS[6:9], img_size, data_format)
    detect_1 = tf.identity(detect_1, name='detect_1')

    inputs = _conv2d_fixed_padding(route, 256, 1)
    upsample_size = route_2.get_shape().as_list()
    inputs = _upsample(inputs, upsample_size, data_format)
    inputs = tf.concat([inputs, route_2], axis=1 if data_format == 'NCHW' else 3)

    route, inputs = _yolo_block(inputs, 256)

    detect_2 = _detection_layer(inputs, num_classes, _ANCHORS[3:6], img_size, data_format)
    detect_2 = tf.identity(detect_2, name='detect_2')

    inputs = _conv2d_fixed_padding(route, 128, 1)
    upsample_size = route_1.get_shape().as_list()
    inputs = _upsample(inputs, upsample_size, data_format)
    inputs = tf.concat([inputs, route_1], axis=1 if data_format == 'NCHW' else 3)

    _, inputs = _yolo_block(inputs, 128)

    detect_3 = _detection_layer(inputs, num_classes, _ANCHORS[0:3], img_size, data_format)
    detect_3 = tf.identity(detect_3, name='detect_3')

    detections = tf.concat([detect_1, detect_2, detect_3], axis=1)
    return detections
4.转换预训练的权重(COCO)
我们定义了检测器的架构。 要使用它,我们必须在自己的数据集上训练或使用预训练的权重。 在COCO数据集上预先训练的权重可供公众使用。 我们可以使用以下命令下载它:
wget https://pjreddie.com/media/files/yolov3.weights这个二进制文件的结构如下:
前5个int32值是头(header)信息:主要版本号,次要版本号,字版本号和网络在训练期间看到的图像。在它们之后,有62 001 757个float32值,它们是每个卷积和BN层的权重。重要的是要记住它们按以行主(row-major )的格式进行存储,这与Tensorflow以列为主(column-major)的格式相反。
那么,我们应该如何从这个文件中读取权重?
我们从第一个卷积层开始。大多数卷积层紧接着是BN层。在这种情况下,我们首先需要读取4 *num_filters个BN层的权重:gamma,beta,moving mean和moving variance,然后读取kernel_size [0] * kernel_size [1] * num_filters * input_channels个conv层的权重。
在相反的情况下,当卷积层后面没有BN层时,我们需要读取num_filters个偏差权重,而不是读取BN参数。
让我们开始编写load_weights函数的代码。它需要2个参数:图表中的变量列表和二进制文件的名称。
我们首先打开文件,跳过前5个int32值并以列表的形式读取其他内容:
def load_weights(var_list, weights_file):
    with open(weights_file, "rb") as fp:
        _ = np.fromfile(fp, dtype=np.int32, count=5)

        weights = np.fromfile(fp, dtype=np.float32)
然后我们将使用两个指针,第一个 var_list 遍历迭代变量列表,第二个 weights 遍历加载的变量权重列表。 我们需要检查当前处理的层之后的层类型,并读取适当数量的值。 在代码中,i 将迭代var_list,ptr 将迭代weights 。 我们将返回一份tf.assign操作列表。 我只是通过比较它的名称来检查层的类型。 (我同意它有点难看,但我不知道有什么更好的方法。这种方法似乎对我有用。)
ptr = 0
i = 0
assign_ops = []
while i < len(var_list) - 1:
    var1 = var_list[i]
    var2 = var_list[i + 1]
    # do something only if we process conv layer
    if 'Conv' in var1.name.split('/')[-2]:
        # check type of next layer
        if 'BatchNorm' in var2.name.split('/')[-2]:
            # load batch norm params
            gamma, beta, mean, var = var_list[i + 1:i + 5]
            batch_norm_vars = [beta, gamma, mean, var]
            for var in batch_norm_vars:
                shape = var.shape.as_list()
                num_params = np.prod(shape)
                var_weights = weights[ptr:ptr + num_params].reshape(shape)
                ptr += num_params
                assign_ops.append(tf.assign(var, var_weights, validate_shape=True))

            # we move the pointer by 4, because we loaded 4 variables
            i += 4
        elif 'Conv' in var2.name.split('/')[-2]:
            # load biases
            bias = var2
            bias_shape = bias.shape.as_list()
            bias_params = np.prod(bias_shape)
            bias_weights = weights[ptr:ptr + bias_params].reshape(bias_shape)
            ptr += bias_params
            assign_ops.append(tf.assign(bias, bias_weights, validate_shape=True))

            # we loaded 2 variables
            i += 1
        # we can load weights of conv layer
        shape = var1.shape.as_list()
        num_params = np.prod(shape)

        var_weights = weights[ptr:ptr + num_params].reshape((shape[3], shape[2], shape[0], shape[1]))
        # remember to transpose to column-major
        var_weights = np.transpose(var_weights, (2, 3, 1, 0))
        ptr += num_params
        assign_ops.append(tf.assign(var1, var_weights, validate_shape=True))
        i += 1
return assign_ops
就是这样! 现在我们可以通过执行以下代码来恢复模型的权重::
with tf.variable_scope('model'):
    model = yolo_v3(inputs, 80)
model_vars = tf.global_variables(scope='model')
assign_ops = load_variables(model_vars, 'yolov3.weights')
sess = tf.Session()
sess.run(assign_ops)
为了将来的使用,使用 tf.train.Saver 导出权重并从检查点加载可能要容易得多。
5.后处理算法的实现
我们的模型返回一个下列形状的张量:
batch_size x 10647 x (num_classes + 5 bounding box attrs)数字10647等于507 +2028 + 8112的和,它们是在每个刻度上检测到的可能的对象数量。 描述边界框属性的5个值代表center_x,center_y,width,height。 在大多数情况下,更容易处理两点的坐标:左上角和右下角。 让我们将检测器的输出转换为这种格式。
这样做的函数如下:
def detections_boxes(detections):
    center_x, center_y, width, height, attrs = tf.split(detections, [1, 1, 1, 1, -1], axis=-1)
    w2 = width / 2
    h2 = height / 2
    x0 = center_x - w2
    y0 = center_y - h2
    x1 = center_x + w2
    y1 = center_y + h2

    boxes = tf.concat([x0, y0, x1, y1], axis=-1)
    detections = tf.concat([boxes, attrs], axis=-1)
    return detections
通常我们的检测器会多次检测到同一物体(中心和大小略有不同)。 在大多数情况下,我们不希望保留所有这些仅仅由少量像素区分的检测。 该问题的标准解决方案是非极大值抑制。 这里可以很好地描述这种方法。
为什么我们不使用Tensorflow API中的 tf.image.non_max_suppression 函数? 主要有两个原因。 首先,在我看来,每个类执行NMS 要好得多,因为我们可能会遇到来自2个不同类的对象高度重叠,全局NMS将抑制其中一个框的情况。 其次,有些人抱怨这个功能很慢,因为它尚未优化。
让我们实现NMS算法。 首先,我们需要一个函数来计算两个边界框的IoU(Intersection over Union):
def _iou(box1, box2):
    b1_x0, b1_y0, b1_x1, b1_y1 = box1
    b2_x0, b2_y0, b2_x1, b2_y1 = box2

    int_x0 = max(b1_x0, b2_x0)
    int_y0 = max(b1_y0, b2_y0)
    int_x1 = min(b1_x1, b2_x1)
    int_y1 = min(b1_y1, b2_y1)

    int_area = (int_x1 - int_x0) * (int_y1 - int_y0)

    b1_area = (b1_x1 - b1_x0) * (b1_y1 - b1_y0)
    b2_area = (b2_x1 - b2_x0) * (b2_y1 - b2_y0)

    iou = int_area / (b1_area + b2_area - int_area + 1e-05)
    return iou
现在我们可以编写non_max_suppression函数的代码。 我使用NumPy库进行快速矢量操作。
def non_max_suppression(predictions_with_boxes, confidence_threshold, iou_threshold=0.4):
    """
    Applies Non-max suppression to prediction boxes.

    :param predictions_with_boxes: 3D numpy array, first 4 values in 3rd dimension are bbox attrs, 5th is confidence
    :param confidence_threshold: the threshold for deciding if prediction is valid
    :param iou_threshold: the threshold for deciding if two boxes overlap
    :return: dict: class -> [(box, score)]
    """
它需要3个参数:来自我们的YOLO v3检测器的输出,置信度阈值和IoU阈值。 这个函数的主体如下:
conf_mask = np.expand_dims((predictions_with_boxes[:, :, 4] > confidence_threshold), -1)
predictions = predictions_with_boxes * conf_mask

result = {}
for i, image_pred in enumerate(predictions):
    shape = image_pred.shape
    non_zero_idxs = np.nonzero(image_pred)
    image_pred = image_pred[non_zero_idxs]
    image_pred = image_pred.reshape(-1, shape[-1])

    bbox_attrs = image_pred[:, :5]
    classes = image_pred[:, 5:]
    classes = np.argmax(classes, axis=-1)

    unique_classes = list(set(classes.reshape(-1)))

    for cls in unique_classes:
        cls_mask = classes == cls
        cls_boxes = bbox_attrs[np.nonzero(cls_mask)]
        cls_boxes = cls_boxes[cls_boxes[:, -1].argsort()[::-1]]
        cls_scores = cls_boxes[:, -1]
        cls_boxes = cls_boxes[:, :-1]

        while len(cls_boxes) > 0:
            box = cls_boxes[0]
            score = cls_scores[0]
            if not cls in result:
                result[cls] = []
            result[cls].append((box, score))
            cls_boxes = cls_boxes[1:]
            ious = np.array([_iou(box, x) for x in cls_boxes])
            iou_mask = ious < iou_threshold
            cls_boxes = cls_boxes[np.nonzero(iou_mask)]
            cls_scores = cls_scores[np.nonzero(iou_mask)]

return result
至此,我们实现了YOLO v3所需的所有功能。
6.总结
在教程repo中,您可以找到用于运行检测的代码和一些演示脚本。 检测器可以使用NHWC和NCHW数据格式,因此您可以轻松在您的机器上选择能更快运行的格式。
如果您有任何疑问,请随时与我联系。
我打算编写本教程的下一部分,其中我将展示如何在自定义数据集上训练(fine-tune,微调)YOLO v3。
谢谢阅读。 如果你喜欢它,请通过鼓掌和/或分享来告诉我!:)
如果有什么疑问,请到作者的github主页下查看已有问题的解答,或重新提问。