Spring-Security框架学习总结
前提:在做演示之前,我们先创建项目,并将项目导入IDE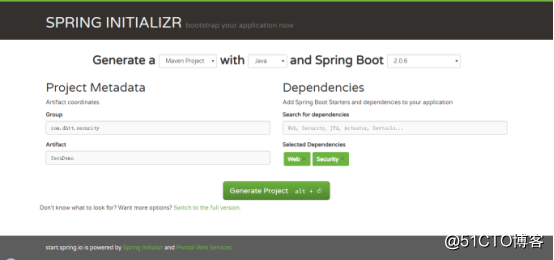
测试项目是否运行成功,成功后进行正式开始学习
一.Case1:只要能登录即可
目标:我们在访问项目是访问index可以直接进入,不需要拦截,访问其他路径是需要进行登录验证,并且允许登录用户注销和使用表单进行登录,不拦截前台js,css,image等文件,我们在内存中设置了一个admin用户,可以进行登录
直接上代码(代码中会有注释):
SecuDemoApplication:
package com.dhtt.security.SecuDemo;

import org.springframework.boot.SpringApplication;
import org.springframework.boot.autoconfigure.EnableAutoConfiguration;
import org.springframework.boot.autoconfigure.SpringBootApplication;
import org.springframework.web.bind.annotation.RequestMapping;
import org.springframework.web.bind.annotation.RestController;

@SpringBootApplication
@RestController
@EnableAutoConfiguration
public class SecuDemoApplication {

    public static void main(String[] args) {
        SpringApplication.run(SecuDemoApplication.class, args);
    }

    @RequestMapping("/index")
    public String hello() {
        return "hello Spring boot....";

    }

    @RequestMapping("/home")
    public String home() {
        return "this my home....";

    }
}
SpringSecruityConfig:
package com.dhtt.security.SecuDemo;

import org.springframework.context.annotation.Configuration;
import org.springframework.security.config.annotation.authentication.builders.AuthenticationManagerBuilder;
import org.springframework.security.config.annotation.web.builders.HttpSecurity;
import org.springframework.security.config.annotation.web.builders.WebSecurity;
import org.springframework.security.config.annotation.web.configuration.EnableWebSecurity;
import org.springframework.security.config.annotation.web.configuration.WebSecurityConfigurerAdapter;

@Configuration
@EnableWebSecurity
public class SpringSecruityConfig extends WebSecurityConfigurerAdapter{

    /**
     * HTTP请求拦截处理
     */
    @Override
    protected void configure(HttpSecurity http) throws Exception {
        http.authorizeRequests()
        .antMatchers("/index").permitAll()  //主路径直接请求
        .anyRequest().authenticated()    //请他请求都要验证
        .and()
        .logout().permitAll()   //允许注销
        .and()
        .formLogin();  //允许表单登录
        http.csrf().disable();  //关闭csrf的认证
    }

    /**
     * 处理前端文件,拦截忽略
     */
    @Override
    public void configure(WebSecurity web) throws Exception {
        web.ignoring().antMatchers("/js/**","/css/**","/image/**");
    }

    /**
     * 设置内存中的用户admin
     */
    @Override
    protected void configure(AuthenticationManagerBuilder auth) throws Exception {
        auth.inMemoryAuthentication().withUser("admin").password("123456").roles("ADMIN");
    }
}
然后我们启动项目,在前台访问路径
(1)访问http://localhost:8080/index成功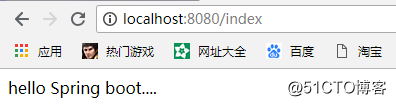
(2)访问http://localhost:8080/home:
我们发现前台会为我们跳转到登录界面,接下来我们进行登录验证,我们发现登录界面没有跳转,证明登录失败,此时我们观察后台
发现后台报错
(3)报错问题解决:原因是spring boot的版本和Spring Security的版本问题,我们需要提供一个PasswordEncorder实例
MyPasswordEncoder:
package com.dhtt.security.SecuDemo;

import org.springframework.security.crypto.password.PasswordEncoder;

public class MyPasswordEncoder implements PasswordEncoder{

    @Override
    public String encode(CharSequence rawPassword) {
        return rawPassword.toString();
    }

    @Override
    public boolean matches(CharSequence rawPassword, String encodedPassword) {
        return encodedPassword.equals(rawPassword);
    }

}
SpringSecruityConfig中修改部分:
/**
     * 设置内存中的用户admin
     */
    @Override
    protected void configure(AuthenticationManagerBuilder auth) throws Exception {
        auth.inMemoryAuthentication().passwordEncoder(new MyPasswordEncoder())
        .withUser("admin").password("123456").roles("ADMIN");
    }
现在再次运行项目访问/home,我们发现登录成功,页面成功访问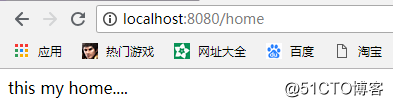
Case2:有指定的角色,每个角色都有指定的权限
(1)目标:我们新增一个USER,对于ADMIN权限可以访问所有地址,但是user的权限规定其不能访问/roleAuth,代码:
SpringSecruityConfig中修改部分:
/**
     * 设置内存中的用户admin
     */
    @Override
    protected void configure(AuthenticationManagerBuilder auth) throws Exception {
        auth.inMemoryAuthentication().passwordEncoder(new MyPasswordEncoder())
        .withUser("admin").password("haha1996").roles("ADMIN");
        auth.inMemoryAuthentication().passwordEncoder(new MyPasswordEncoder())
        .withUser("zhangsan").password("123456").roles("ADMIN");
        auth.inMemoryAuthentication().passwordEncoder(new MyPasswordEncoder())
        .withUser("username1").password("password").roles("USER");
    }
SecuDemoApplication:这里我们添加了新的注解
package com.dhtt.security.SecuDemo;

import org.springframework.boot.SpringApplication;
import org.springframework.boot.autoconfigure.EnableAutoConfiguration;
import org.springframework.boot.autoconfigure.SpringBootApplication;
import org.springframework.security.access.prepost.PreAuthorize;
import org.springframework.security.config.annotation.method.configuration.EnableGlobalMethodSecurity;
import org.springframework.web.bind.annotation.RequestMapping;
import org.springframework.web.bind.annotation.RestController;

@SpringBootApplication
@RestController
@EnableAutoConfiguration
@EnableGlobalMethodSecurity(prePostEnabled=true)
public class SecuDemoApplication {

    public static void main(String[] args) {
        SpringApplication.run(SecuDemoApplication.class, args);
    }

    @RequestMapping("/index")
    public String hello() {
        return "hello Spring boot....";

    }

    @RequestMapping("/home")
    public String home() {
        return "this my home....";

    }

    @RequestMapping("/roleAuth")
    @PreAuthorize("hasRole('ROLE_ADMIN')")
    public String role() {
        return "HELLO SPRING SECURITY....";

    }
}
经测试运行结果与我们的预期相同,我们使用admin进行登录,地址均可访问,当我们使用user进行登录时,我们发现/roleAuth路径访问失败,没有权限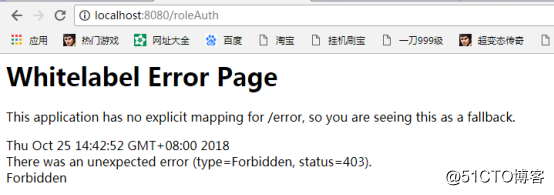
待续。。。