版权声明:本文为博主原创文章,未经博主允许不得转载。 https://blog.csdn.net/dtttyc/article/details/89205702
这里写自定义目录标题
前言
在读这篇文章之前请先读
https://blog.csdn.net/dtttyc/article/details/88950201
自定义登陆配置
上一篇文章讲解的Security是如何使用的,但是写的比较死,这次通过配置我们可以实现登陆可以利用表单也可以利用我们自己写的页面
- WebSecurityConfigurerAdapter中方法void configure(HttpSecurity http),登陆的时候不要把地址写 http.httpBasic()或者表单
   http.formLogin()
                .loginPage("/authentication/require")


    @RequestMapping("/authentication/require")
    @ResponseStatus(code = HttpStatus.UNAUTHORIZED)
    public SimpleSupport requireAuthentication(HttpServletRequest request, HttpServletResponse response) throws IOException {

        //得到访问的url
        SavedRequest savedRequest=requestCache.getRequest(request,response);
        if (savedRequest != null) {
            String redirectUrl = savedRequest.getRedirectUrl();
            //截取字符串后面为HTML
            if (StringUtils.endsWithIgnoreCase(redirectUrl,"html")){
                redirectStrategy.sendRedirect(request,response,securityProperties.getBrowser().getLoginPage());
            }
        }
        return new SimpleSupport("访问服务需要身份验证");
    }
- 在application.properties
imooc.security.browser.loginPage = /demo-signIn.html
- 读取配置信息
/**
 * @Author: judy
 * @Description: 读取配置信息
 * @Date: Created in 10:58 2019/4/10
 */
@ConfigurationProperties(prefix = "imooc.security")
public class SecurityProperties {
    BrowserProperties browser= new BrowserProperties();

    public BrowserProperties getBrowser() {
        return browser;
    }

    public void setBrowser(BrowserProperties browser) {
        this.browser = browser;
    }
}
- 配置地址和设置默认的地址
/**
 * @Author: judy
 * @Description: 配置地址和设置默认的地址
 * @Date: Created in 10:59 2019/4/10
 */
public class BrowserProperties {
    private String loginPage="/imooc-signIn.html";

    public String getLoginPage() {
        return loginPage;
    }

    public void setLoginPage(String loginPage) {
        this.loginPage = loginPage;
    }
}
其实没有太多的含金量, 主要就是抽象能力, 利用读取配置和必要的条件做一些判断和逻辑就可以
Security流程
下发的图是关于Security的一个基本流程, 我设置了几个断点,走进去看看
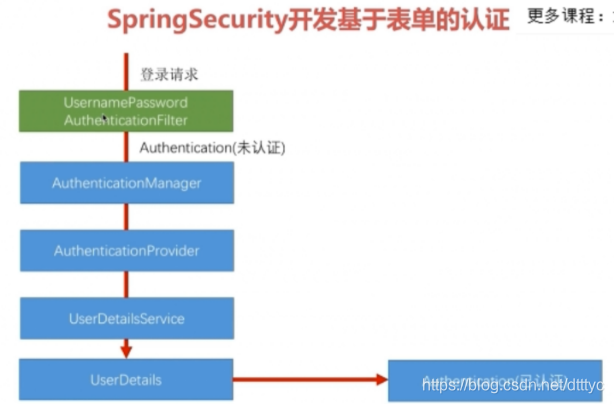
UsernamePasswordAuthenticationFilter
登陆之后首先进入UsernamePasswordAuthenticationFilter,
核心代码块
            username = username.trim();
            UsernamePasswordAuthenticationToken authRequest = new UsernamePasswordAuthenticationToken(username, password);
            this.setDetails(request, authRequest);
            return this.getAuthenticationManager().authenticate(authRequest);
划重点
UsernamePasswordAuthenticationToken authRequest = new UsernamePasswordAuthenticationToken(username, password);
首先传入我们的用户名和密码,然后设置权限为false
 public UsernamePasswordAuthenticationToken(Object principal, Object credentials) {
        super((Collection)null);
        this.principal = principal;
        this.credentials = credentials;
        this.setAuthenticated(false);
    }
划重点
//把用户的权限信息set
 this.setDetails(request, authRequest);
AuthenticationManager和AuthenticationProvider
AuthenticationManager的作用是用来管理authenticationProvider,因为Security为我们了提供了很多方法, 假如我们是利用第三方登陆,根本不需要用户名和秘密, 那么这个时候authenticationProvider会遍历它,也就是我们复合那种情况
public class ProviderManager implements AuthenticationManager, MessageSourceAware, InitializingBean {
     public Authentication authenticate(Authentication authentication) throws AuthenticationException {
        Class<? extends Authentication> toTest = authentication.getClass();
        AuthenticationException lastException = null;
        Authentication result = null;
        boolean debug = logger.isDebugEnabled();
        Iterator var6 = this.getProviders().iterator();

        while(var6.hasNext()) {
            AuthenticationProvider provider = (AuthenticationProvider)var6.next();
            //匹配使用的那种方法
            if (provider.supports(toTest)) {
                if (debug) {
                    logger.debug("Authentication attempt using " + provider.getClass().getName());
                }

                try {
                    result = provider.authenticate(authentication);
                    if (result != null) {
                        this.copyDetails(authentication, result);
                        break;
                    }
                } catch (AccountStatusException var11) {
                    this.prepareException(var11, authentication);
                    throw var11;
                } catch (InternalAuthenticationServiceException var12) {
                    this.prepareException(var12, authentication);
                    throw var12;
                } catch (AuthenticationException var13) {
                    lastException = var13;
                }
            }
        }

        if (result == null && this.parent != null) {
            try {
                result = this.parent.authenticate(authentication);
            } catch (ProviderNotFoundException var9) {
                ;
            } catch (AuthenticationException var10) {
                lastException = var10;
            }
        }

        if (result != null) {
            if (this.eraseCredentialsAfterAuthentication && result instanceof CredentialsContainer) {
                ((CredentialsContainer)result).eraseCredentials();
            }

            this.eventPublisher.publishAuthenticationSuccess(result);
            return result;
        } else {
            if (lastException == null) {
                lastException = new ProviderNotFoundException(this.messages.getMessage("ProviderManager.providerNotFound", new Object[]{toTest.getName()}, "No AuthenticationProvider found for {0}"));
            }

            this.prepareException((AuthenticationException)lastException, authentication);
            throw lastException;
        }
    }
public abstract class AbstractUserDetailsAuthenticationProvider implements AuthenticationProvider, InitializingBean, MessageSourceAware {

 public Authentication authenticate(Authentication authentication) throws AuthenticationException {
        Assert.isInstanceOf(UsernamePasswordAuthenticationToken.class, authentication, this.messages.getMessage("AbstractUserDetailsAuthenticationProvider.onlySupports", "Only UsernamePasswordAuthenticationToken is supported"));
        String username = authentication.getPrincipal() == null ? "NONE_PROVIDED" : authentication.getName();
        boolean cacheWasUsed = true;
        UserDetails user = this.userCache.getUserFromCache(username);
        if (user == null) {
            cacheWasUsed = false;

            try {
                user = this.retrieveUser(username, (UsernamePasswordAuthenticationToken)authentication);
            } catch (UsernameNotFoundException var6) {
                this.logger.debug("User '" + username + "' not found");
                if (this.hideUserNotFoundExceptions) {
                    throw new BadCredentialsException(this.messages.getMessage("AbstractUserDetailsAuthenticationProvider.badCredentials", "Bad credentials"));
                }

                throw var6;
            }

            Assert.notNull(user, "retrieveUser returned null - a violation of the interface contract");
        }
         //check检查
        try {
            this.preAuthenticationChecks.check(user);
            this.additionalAuthenticationChecks(user, (UsernamePasswordAuthenticationToken)authentication);
        } catch (AuthenticationException var7) {
            if (!cacheWasUsed) {
                throw var7;
            }

            cacheWasUsed = false;
            user = this.retrieveUser(username, (UsernamePasswordAuthenticationToken)authentication);
            this.preAuthenticationChecks.check(user);
            this.additionalAuthenticationChecks(user, (UsernamePasswordAuthenticationToken)authentication);
        }
      //check检查
        this.postAuthenticationChecks.check(user);
        if (!cacheWasUsed) {
            this.userCache.putUserInCache(user);
        }

        Object principalToReturn = user;
        if (this.forcePrincipalAsString) {
            principalToReturn = user.getUsername();
        }

        return this.createSuccessAuthentication(principalToReturn, authentication, user);
    }

}
UserDetailsService
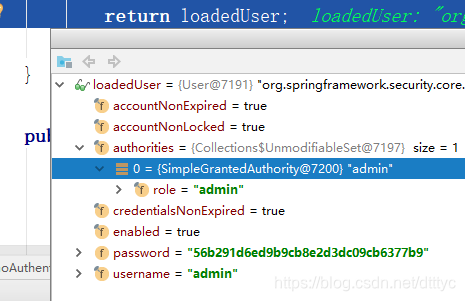
我们在实习Security的时候需要写一个类来实现UserDetailsService,用来实现我们的业务逻辑,简单来说可以实现用户名和密码
@Component
public class MyUserDetailsSservice implements UserDetailsService{
//    private Logger logger= (Logger) LoggerFactory.getLogger(getClass());
    @Autowired
    private pass passwordEncoder;
    @Override
    public UserDetails loadUserByUsername(String username) throws UsernameNotFoundException {

//        logger.info("登陆用户名:"+ username);
        System.out.println("登陆用户名:"+ username);
        //这里的true就是上面check用到的
        return new User(username,passwordEncoder.encode("123456"),
                true,true,true,true
                ,AuthorityUtils.commaSeparatedStringToAuthorityList("admin"));
    }
}
    protected final UserDetails retrieveUser(String username, UsernamePasswordAuthenticationToken authentication) throws AuthenticationException {
        UserDetails loadedUser;
       loadedUser = this.getUserDetailsService().loadUserByUsername(username);
       }
成功
等到都成功执行之后,会发现权限设置为了true
   public UsernamePasswordAuthenticationToken(Object principal, Object credentials, Collection<? extends GrantedAuthority> authorities) {
        super(authorities);
        this.principal = principal;
        this.credentials = credentials;
        super.setAuthenticated(true);
    }
总结
O(∩_∩)O,