基于角色或权限访问控制
- hasAuthority方法
如果当前主体具有指定的权限,则返回true,否则返回false- 在配置类设置当前访问地址有哪些权限
//当前登录用户,只要具有admin权限才可以访问这个路径 .antMatchers("/test/index").hasAuthority("admin")- 在UserDetailsService,把返回User对象设置权限
List<GrantedAuthority> role = AuthorityUtils.commaSeparatedStringToAuthorityList("admin");- type=Forbidden,status=403表示没有访问权限
- hasAnyAuthority方法
如果当前主体有任何一个提供的角色的话,返回true
.antMatchers("/test/index").hasAnyAuthority("admin,manager")

List<GrantedAuthority> role = AuthorityUtils.commaSeparatedStringToAuthorityList("admin");
- hasRole方法
- 赋予角色的时候需加上前缀"ROLE_"
.antMatchers("/test/index").hasRole("sale")
List<GrantedAuthority> role = AuthorityUtils.commaSeparatedStringToAuthorityList("admin,ROLE_sale");
private static String hasRole(String role) {


    Assert.notNull(role, "role cannot be null");
    Assert.isTrue(!role.startsWith("ROLE_"), () -> {


        return "role should not start with 'ROLE_' since it is automatically inserted. Got '" + role + "'";
    });
    return "hasRole('ROLE_" + role + "')";
}
- hasAnyRole方法
用户具备任何一个都可以访问
自定义403页面
http.exceptionHandling().accessDeniedPage("/unauth.html");
认证授权注解使用
- @Secured注解,用户具有某个角色,可以访问方法
- 启动类(配置类)开启注解
@EnableGlobalMethodSecurity(securedEnabled = true)- 在Controller的方法上面使用注解,设置角色
@GetMapping("/secured") @Secured({ "ROLE_sale","ROLE_manager"}) public String secured(){ return "hello secured"; }- userDetailsService设置用户角色
List<GrantedAuthority> role = AuthorityUtils.commaSeparatedStringToAuthorityList("admin,ROLE_sale"); - @PreAuthorize:在方法执行之前检验
- 开启注解
@EnableGlobalMethodSecurity(prePostEnabled = true)- 在controller的方法上面使用注解
@GetMapping("/preAuthorize") @PreAuthorize("hasAnyAuthority('admin,manager')") public String preAuthorize(){ return "hello PreAuthorize"; } - @PostAuthorize:在方法执行之后校验
- @PostFilter:对方法返回的数据进行过滤
@GetMapping("/testFilter")
@PreAuthorize("hasAnyAuthority('admin,manager')")
@PostFilter("filterObject.username == 'admin11'")
public List<User> testFilter(){


    ArrayList<User> list = new ArrayList<>();
    list.add(new User(11,"admin11","111"));
    list.add(new User(22,"admin22","222"));
    System.out.println(list);
    return list;
}
控制台输出
[User(id=11, username=admin11, password=111), User(id=22, username=admin22, password=222)]
前端输出
[
    {
        id: 11,
        username: "admin11",
        password: "111"
    }
]
- @PreFilter:进入控制器之前对数据进行过滤
用户注销
- 在配置类添加退出的配置
http.logout().logoutUrl("/logout")
                .logoutSuccessUrl("/test/hello").permitAll();
- 测试
- 修改配置类,登录成功后跳转到成功页面
- 在成功页面添加超链接,写退出路径
- 登录成功之后,在成功页面点击退出,再去访问其他controller不能进行访问
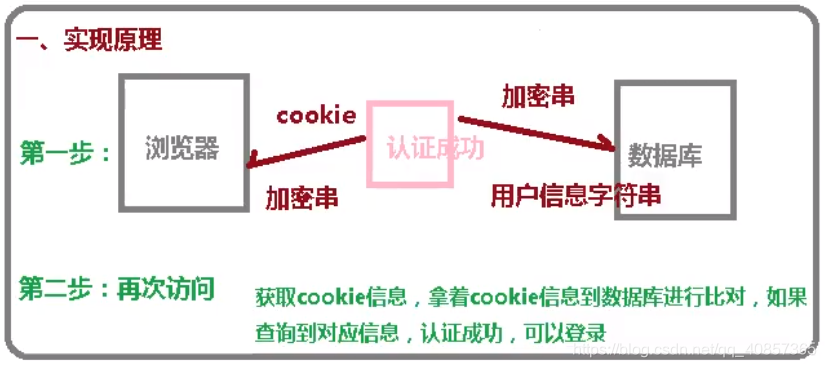
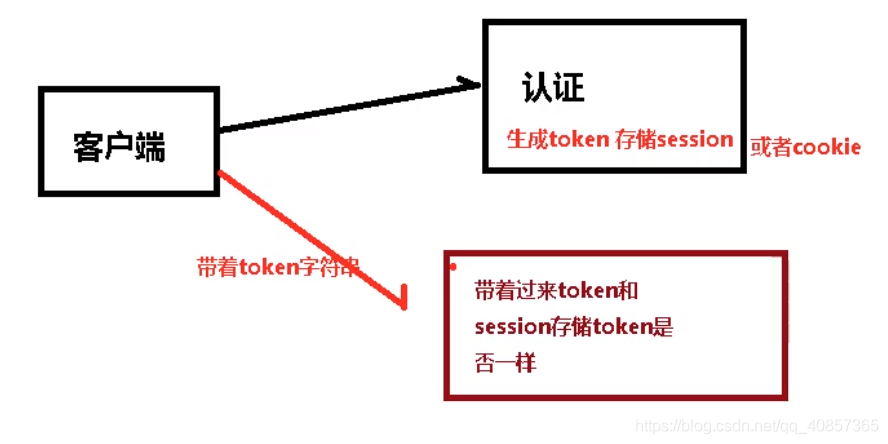
自动登录
- 实现原理
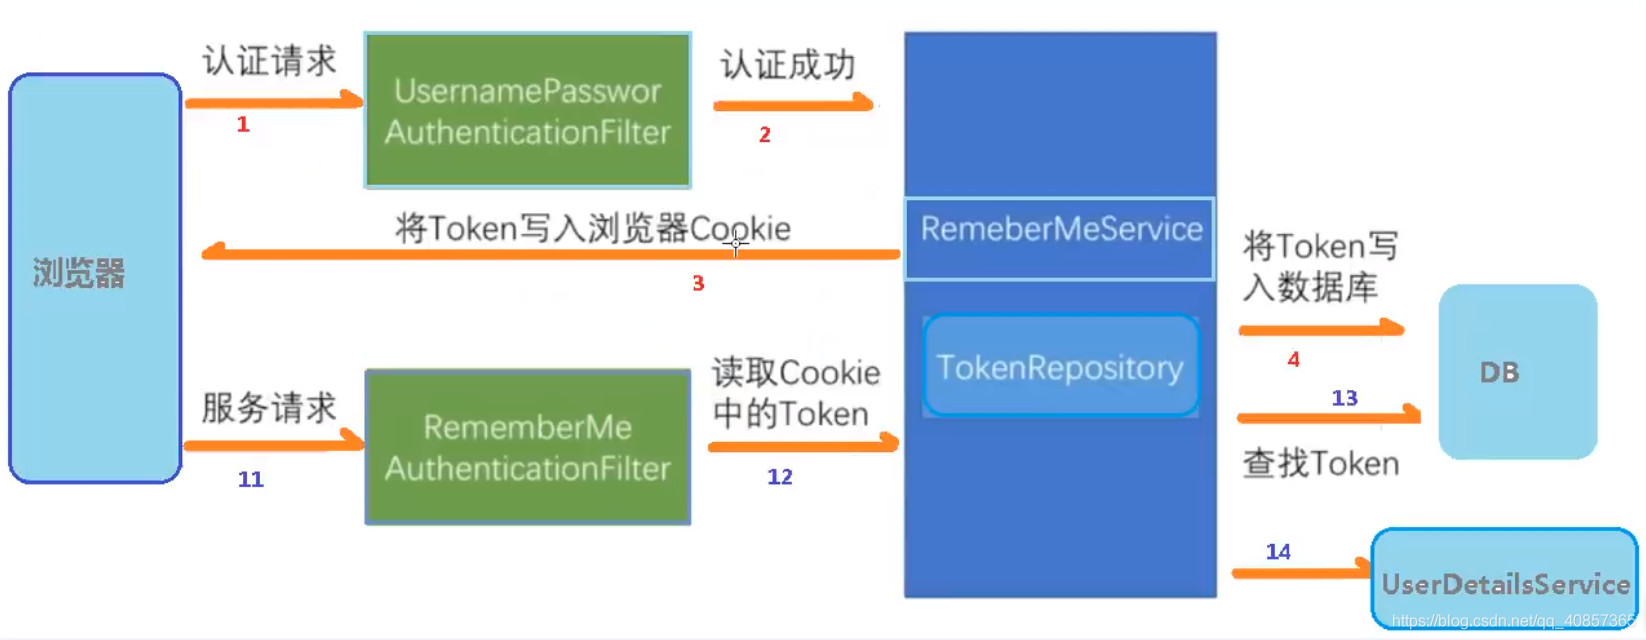
- 具体实现
- 创建数据库表
- 修改配置类,注入数据源
//注入数据源 @Autowired private DataSource dataSource; //配置对象 @Bean public PersistentTokenRepository persistentTokenRepository(){ JdbcTokenRepositoryImpl jdbcTokenRepository = new JdbcTokenRepositoryImpl(); jdbcTokenRepository.setDataSource(dataSource); jdbcTokenRepository.setCreateTableOnStartup(true); return jdbcTokenRepository; }- 配置类中配置自动登录
.rememberMe().tokenRepository(persistentTokenRepository()) .tokenValiditySeconds(60)- 登录页面添加复选框
<input type="checkbox" name="remember-me">自动登录- 数据库中存储的信息

CSRF:跨站请求伪造
-
原理
-
默认开启
-
针对PATCH、POST、PUT、DELETE
<input type="hidden" th:name="${_csrf.parameterName}" th:value="${_csrf.token}"/>
- GET、HEAD、TRACE、OPTIONS不做保护