一、 前言:
项目舍弃了原本的SSH框架,改用Spring Boot框架,并且要引入Spring Security为系统提供安全访问控制解决方案,接下来记录一下这两天在Spring Boot中引入Spring Security 的过程。主要参考了以下项目、博客和手册:(目前最新的Spring Security版本为5.0.4,我使用的是5.0.3,前三个链接中用的应该都是Spring Security 4.x或更早版本,想学习最新的Spring Security还是好好读以下第四个链接,Spring Security 5官方文档)
我对Spring Security也还是一知半解,勉强配置好可以使用。可能有一些理解是错误的,或者有一些说法不严谨,请各位见谅和指正。等这段时间忙过去要从头看一下英文版官方手册。
https://github.com/lenve/vhr
https://www.cnkirito.moe/categories/Spring-Security/
https://blog.csdn.net/code__code/article/details/53885510
https://docs.spring.io/spring-security/site/docs/5.0.3.RELEASE/reference/htmlsingle/
-------------------------------------------------------------------------------------------------------------------
二、 Spring Security的原理简介:
Spring Security的安全访问控制分为Authentication(认证)和Authorization(授权,也叫“访问控制”)。认证指的是用户登录的信息验证,判断你账号密码是否正确;授权指的是当用户访问一个页面时判断他有没有这个权限。
一般流程为:
①当用户登录时,前端将用户输入的用户名、密码信息传输到后台,后台用一个类对象将其封装起来,通常使用的是UsernamePasswordAuthenticationToken这个类。
②程序负责验证这个类对象。验证方法是调用Service根据username从数据库中取用户信息到实体类的实例中,比较两者的密码,如果密码正确就成功登陆,同时把包含着用户的用户名、密码、所具有的权限等信息的类对象放到SecurityContextHolder(安全上下文容器,类似Session)中去。
③用户访问一个资源的时候,首先判断是否是受限资源。如果是的话还要判断当前是否未登录,没有的话就跳到登录页面。
④如果用户已经登录,访问一个受限资源的时候,程序要根据url去数据库中取出该资源所对应的所有可以访问的角色,然后拿着当前用户的所有角色一一对比,判断用户是否可以访问。
三、 开发步骤
1. 新建项目
(开发环境IDEA企业版)
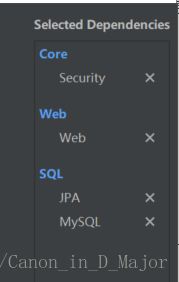
新建一个项目,选择Spring Initializr,选择下一步,写好项目的各种信息,选择下一步,选择引入哪些dependency。这里要注意一下,对于一个Spring boot项目来说,最简单的就是选择Web下的Web这个依赖,然后点下一步,确认项目的地址,完成。其他的依赖我们可以在写项目的过程中用到哪个添加哪个,只要在pom.xml文件中添加一个dependency标签就好了。当然,你也可以在创建项目的时候就把要用到的依赖选中,这样项目创建完后pom.xml里面就已经有了这几个dependency的标签了。下面是我选的几个dependency。
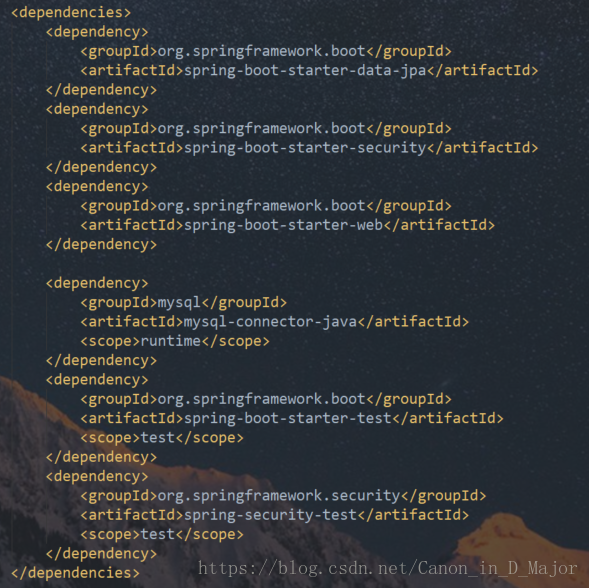
创建完,pom.xml文件中的dependency是这样的。
2. 准备工作
在正式写代码之前先做几个准备工作。为了项目的代码分层要分包,再就是把默认的application.properties删掉换成application.yml。
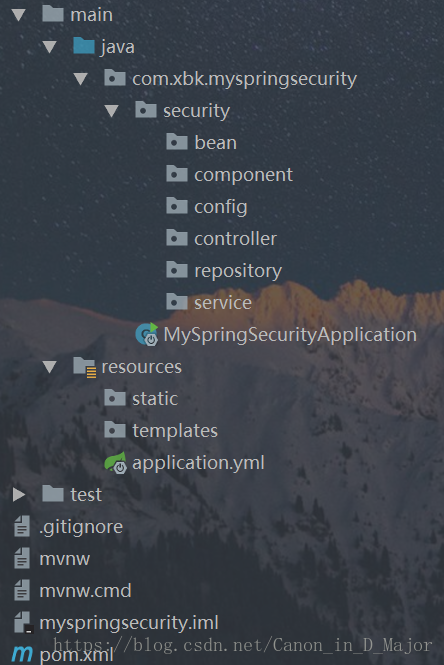
其中,bean是用来存放Entity实体类;component包存放一些Component类,这些类大多被@Component注解,是框架运行过程中需要用到的类;config用来存放一些于Security相关的配置类;controller包存放Controller类,根据前端访问的地址决定如何向前端返回数据;repository包用来存放repository接口,这些接口是用来从数据库中取数据封装成对象的;service存放一些service类,需要依赖Repository接口,实现一些功能逻辑。
3. 建库
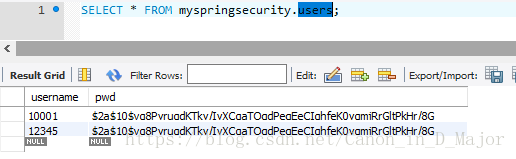
MySQL数据库。用户角色与权限管理细分为5个表——用户表、用户-角色表、角色表、角色-权限表、权限表。
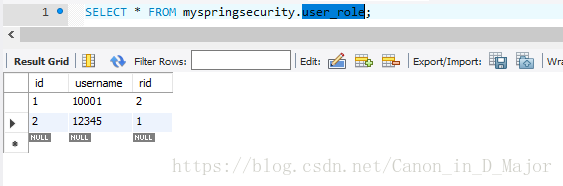
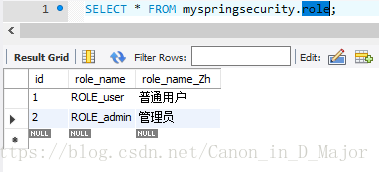
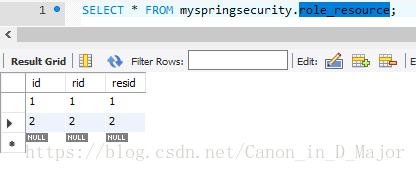
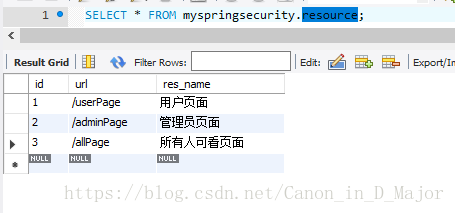
以上就是五个表最简单的结构,几条用来测试的简单数据。
至于用户表为什么用users而不用user命名,是因为user在MySQL中是关键字,最好避免使用,所以使用users。不过没关系,在实体类中我们还是用User作为类名的。如今的Spring Boot框架将程序与数据库的耦合度又降低了一个档次,在程序中配置数据库连接和ORM的时候,只有很少地方要注明一下数据库的表名字。
用户的密码是使用BCrypt加密后存储到数据库中的。BCrypt是Spring Security官方推荐的加密方式,在Spring Secueity框架中也提供了这种加密方式,后面会详细介绍。
4. 属性配置文件
接下来写项目的属性配置文件application.yml。
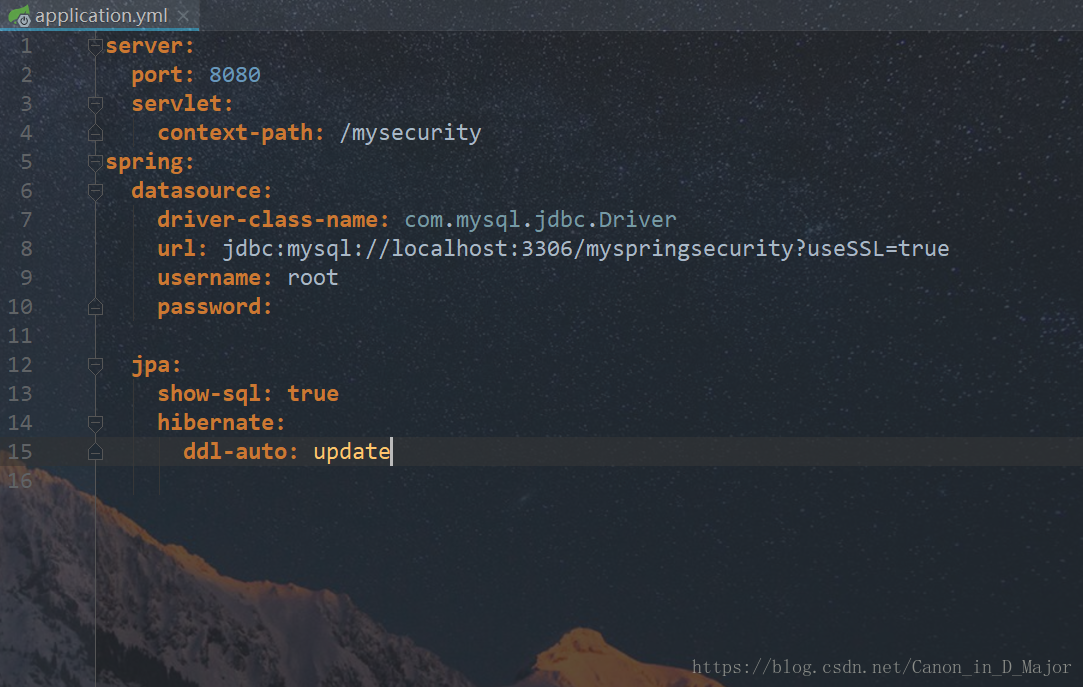
port是服务器的端口,context-path是访问地址前缀,这样我们项目的入口就是http://localhost:8080/mysecurity/。接下来是jdbc的配置,有jdbc经验的一看就懂(不要忘记填密码)。接下来,show-sql为true使得项目进行数据库查询的时候在控制台打印sql语句,方便我们常看和排查错误,ddl-auto有几个属性可选——update、create、create-drop、none、validate,关于它们的区别不懂的话百度一下就明白选哪个了。
如果你是第一次使用yml文件,要注意一个细节,在“:”后面写参数的时候要先打一个空格,这是yml文件格式规定。
5. bean包
在bean包里创建实体类。拿users表来举例。为users表创建实体类的时候,类名、成员变量名字可以不和数据库的表名、列名对应,只要用注解(@Table、@Column)说明一下就好了。另外要在public class User头上加一个@Entity注解。然后添加getter、setter,最好加一个无参构造方法。

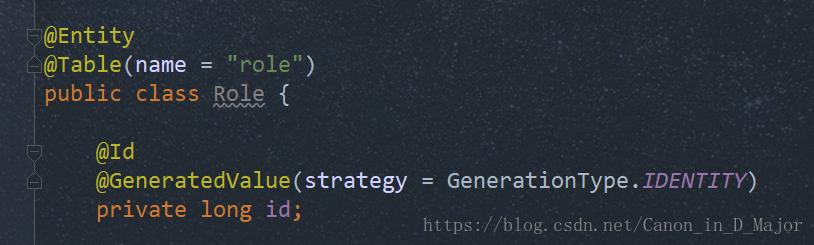
如果主键在数据库中是自增主键,那么在实体类中要这么注解一下。这个注解是用来声明自增主键和它的增长策略。
6. repository包
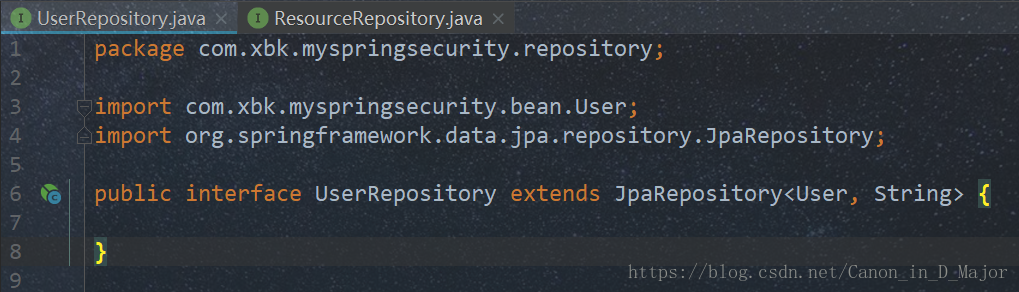
创建完实体类后,要创建repository接口,这就相当于DAO,作用是从数据库取出数据放到对应的实体类中。注意repository是接口类型,且需要继承JpaRepository<T, ID>。前面的T指的是取出数据后封装到哪个类中,后面的ID指的是它的主键类型,下面是我的user的repository接口。
一般情况下这样就可以了,不用声明函数。使用的时候是这个样子的:
-
@Autowired
-
private UserRepository userRepository;
-
-
public List<User> findAllUsers() {
-
List<User> userList = userRepository.findAll();
-
return userList;
-
}
我猜是spring boot帮你把这个接口实现了然后把实例注入到userRepository。所以,虽然你写的是接口,后面却可以使用,而且它还帮你实现了几个方法。
repository接口使用起来很方便,有些方法不需要写,它已经隐示提供了。比如,虽然你的接口里面什么都没写,但已经可以调用userRepository.findAll()方法了。还有一些方法只需要你在接口里面写一行抽象函数声明,不需要有函数体(但是必须按要求给函数命名),就可以在Service里面调用了。
以下这种方式允许你按列名查找数据,同样不需要你写函数体,但是要注意这个抽象函数的命名:findByXxxx(··· ···)。
-
public
interface ResourceRepository extends JpaRepository<Resource, Long> {
-
-
public List<Resource> findByUrl(String url);
-
}
如果你有自己的sql语句,那么你的repository要另外继承一个JpaSpecificationExecutor<T>,T是你的实体类。这样就允许你自己写sql语句。
比如RoleRepository这个接口。这个接口功能比较重要,因为Spring Security框架中某些地方需要根据当前用户查找他对应的所有Role,也有些地方需要根据用户访问的URL查找这个URL对应的所有Role。一种实现方法是在User、Resource的实体类里面添加一个属性:
-
@OneToMany
-
@JoinColumn
-
private List<Role> roles;
使用OneToMany注解,使Repository在从数据库中取users表的记录存放到User实体类中的时候,还会将每条user记录对应的role表中那几条记录一起取出来放到List<Role>中。是一种很方便的方式。如果不使用这种方式,我们也可以在取User的时候只取User,不取它关联的数据,而是在使用那些数据的时候再从数据库查询出来填充到List<Role>中去。
第一种方法简化了使用,但是并没有效率的提升,而且有时我们不需要使用到关联数据,而只用到User本身的数据的时候,它还是帮我们从数据库中把无用数据取了出来。这样不仅浪费了空间还降低了效率,因此我们用第二种方法。
这就是RoleRepository重要的原因,它负责根据Url返回它对应的所有Role,根据用户名返回用户对应的所有Role。
-
package com.xbk.myspringsecurity.security.repository;
-
-
import com.xbk.myspringsecurity.security.bean.Role;
-
import org.springframework.data.jpa.repository.JpaRepository;
-
import org.springframework.data.jpa.repository.JpaSpecificationExecutor;
-
import org.springframework.data.jpa.repository.Query;
-
-
import java.util.List;
-
-
public
interface RoleRepository extends JpaRepository<Role, Long>, JpaSpecificationExecutor<Role> {
-
-
//自定义sql语句并且开启本地sql
-
//根据用户名查找该用户所有权限
-
@Query(value =
"select r.* from role r, user_role ur where ur.username = ?1 and ur.rid = r.id", nativeQuery =
true)
-
public List<Role> findRolesOfUser(String username);
-
-
//根据resource的主键查找resource允许的所有权限
-
@Query(value =
"select r.* from role r, resource_role rr where rr.res_id = ?1 and rr.rid = r.id", nativeQuery =
true)
-
public List<Role> findRolesOfResource(long resourceId);
-
}
nativeQuery的意思是是否开启本地Sql,默认为false。@Query注解设定了一些写SQL语句的规则,简化了自定义sql语句的形式。你也可以不使用它提供的方式,开启nativeQuery,在数据库中怎么写sql就怎么在这里写sql。
7. service包
service包里面都是一些Service类,主要是对Repository做了封装。另外一些逻辑代码和数据库操作代码以及事务管理要写在Service的函数里面。里面主要包括UserService、RoleService、ResourceService等类。
-
package com.xbk.myspringsecurity.security.service;
-
-
import com.xbk.myspringsecurity.security.bean.Role;
-
import com.xbk.myspringsecurity.security.repository.RoleRepository;
-
import org.springframework.beans.factory.annotation.Autowired;
-
import org.springframework.stereotype.Service;
-
-
import java.util.List;
-
-
@Service
-
public
class RoleService {
-
-
@Autowired
-
private RoleRepository roleRepository;
-
-
public List<Role> getRolesOfUser(String username)
-
{
-
return roleRepository.findRolesOfUser(username);
-
}
-
-
public List<Role> getRolesOfResource(long id)
-
{
-
return roleRepository.findRolesOfResource(id);
-
}
-
}
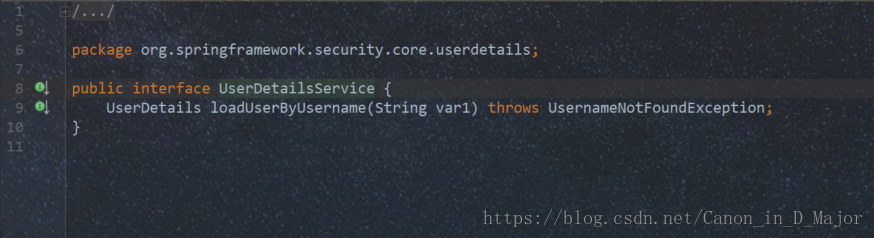
8. 为框架实现UserDetails接口和UserDetailsService接口
在我们的程序中,必须要有一个类,实现UserDetailsService这个接口并且重写它的loadUserByUsername(String s)这个函数。另外也必须要有一个类,实现UserDetails接口并重写它其中的几个方法。
为什么呢?这涉及到Spring Security框架的认证的原理。在用户登录的时候,程序将用户输入的的用户名和密码封装成一个类对象。然后根据用户名去数据库中查找用户的数据,封装成一个类对象放在内存中。注意,一个是用户输入的数据,一个是数据库中的数据。将两个对象比对,如果密码正确,就把用户信息的封装(包含着身份信息、细节信息等)存到SecurityContextHolder中(类似Session),使用的时候还要取出来。
而这个过程中,从数据库中取出的用户信息的封装不是简单的User实例,而是一个实现了UserDetails这个接口的类的对象,这个对象里面不仅有用户的账号密码信息,还有一些判断账号是否可用、判断账号是否过期、判断账号是否被锁定的函数。
在验证过程中,负责根据用户输入的用户名返回数据库中用户信息的封装这个功能的就是Service,它实现了UserDetailsService,重写了它的loadUserByUsername(String s)方法,这个方法就是根据用户名返回了UserDetails的一个具体实现。
图片是两个接口的源代码。

有些人习惯直接使User实体类实现UserDetails接口,这样在这个类里面不仅要写users表的属性,还要重写UserDetails的方法,耦合度较高。User实体类原本只用来与数据库形成ORM映射,现在却要为框架提供其他功能。因此我们不这么做,而是重新写一个类,名叫UserDetailsImpl,实现UserDetails接口,添加一个List<Role>属性,重写接口的方法。在框架要用到UserDetails的地方,我们先把User查出来,然后用User去构造一个UserDetails。
这个UserDetailsImpl暂时放在Bean包里面。
-
package com.xbk.myspringsecurity.security.bean;
-
-
import com.xbk.myspringsecurity.security.service.RoleService;
-
import org.springframework.beans.factory.annotation.Autowired;
-
import org.springframework.security.core.GrantedAuthority;
-
import org.springframework.security.core.authority.SimpleGrantedAuthority;
-
import org.springframework.security.core.userdetails.UserDetails;
-
-
import java.util.ArrayList;
-
import java.util.Collection;
-
import java.util.List;
-
-
//一定要有一个类,实现UserDetails接口,供程序调用
-
public
class UserDetailsImpl implements UserDetails {
-
-
private String username;
-
private String password;
-
//包含着用户对应的所有Role,在使用时调用者给对象注入roles
-
private List<Role> roles;
-
-
@Autowired
-
private RoleService roleService;
-
-
public void setRoles(List<Role> roles) {
-
this.roles = roles;
-
}
-
-
//无参构造
-
public UserDetailsImpl() {
-
}
-
-
//用User构造
-
public UserDetailsImpl(User user) {
-
this.username = user.getUsername();
-
this.password = user.getPassword();
-
}
-
-
//用User和List<Role>构造
-
public UserDetailsImpl(User user, List<Role> roles) {
-
this.username = user.getUsername();
-
this.password = user.getPassword();
-
this.roles = roles;
-
}
-
-
public List<Role> getRoles()
-
{
-
return roles;
-
}
-
-
@Override
-
//返回用户所有角色的封装,一个Role对应一个GrantedAuthority
-
public Collection<? extends GrantedAuthority> getAuthorities() {
-
List<GrantedAuthority> authorities =
new ArrayList<>();
-
for(Role role : roles) {
-
authorities.add(
new SimpleGrantedAuthority(role.getRoleName()));
-
}
-
return authorities;
-
}
-
-
@Override
-
public String getPassword() {
-
return password;
-
}
-
-
@Override
-
public String getUsername() {
-
return username;
-
}
-
-
@Override
-
//判断账号是否已经过期,默认没有过期
-
public boolean isAccountNonExpired() {
-
return
true;
-
}
-
-
@Override
-
//判断账号是否被锁定,默认没有锁定
-
public boolean isAccountNonLocked() {
-
return
true;
-
}
-
-
@Override
-
//判断信用凭证是否过期,默认没有过期
-
public boolean isCredentialsNonExpired() {
-
return
true;
-
}
-
-
@Override
-
//判断账号是否可用,默认可用
-
public boolean isEnabled() {
-
return
true;
-
}
-
}
UserDetailsService也需要被实现,我们在写UserService时直接实现这个接口就可以。所以UserService跟其他Service有些不同。
-
package com.xbk.myspringsecurity.security.service;
-
-
import com.xbk.myspringsecurity.security.bean.User;
-
import com.xbk.myspringsecurity.security.bean.UserDetailsImpl;
-
import com.xbk.myspringsecurity.security.repository.UserRepository;
-
import org.springframework.beans.factory.annotation.Autowired;
-
import org.springframework.security.core.userdetails.UserDetails;
-
import org.springframework.security.core.userdetails.UserDetailsService;
-
import org.springframework.security.core.userdetails.UsernameNotFoundException;
-
import org.springframework.stereotype.Service;
-
-
import javax.transaction.Transactional;
-
import java.util.List;
-
-
@Service
-
//框架需要使用到一个实现了UserDetailsService接口的类
-
public
class UserService implements UserDetailsService{
-
-
@Autowired
-
private UserRepository userRepository;
-
-
@Autowired
-
private RoleService roleService;
-
-
@Transactional
-
public List<User> getAllUser()
-
{
-
return userRepository.findAll();
-
}
-
-
@Transactional
-
public List<User> getByUsername(String username)
-
{
-
return userRepository.findByUsername(username);
-
}
-
-
@Override
-
//重写UserDetailsService接口里面的抽象方法
-
//根据用户名 返回一个UserDetails的实现类的实例
-
public UserDetails loadUserByUsername(String s) throws UsernameNotFoundException {
-
System.out.println(
"查找用户:" + s);
-
User user = getByUsername(s).get(
0);
-
if(user ==
null)
-
{
-
throw
new UsernameNotFoundException(
"没有该用户");
-
}
-
-
//查到User后将其封装为UserDetails的实现类的实例供程序调用
-
//用该User和它对应的Role实体们构造UserDetails的实现类
-
return
new UserDetailsImpl(user, roleService.getRolesOfUser(user.getUsername()));
-
}
-
}
简单来讲就是程序接收到了用户输入的用户名,交给了UserService,它根据用户名去数据库中取到用户的信息,封装到实体类User的实例中,然后使用该User实例,再利用RoleService(封装了RoleRopository)查出该User对用的roles,构造一个UserDetailsImpl的对象,把这个对象返回给程序。
9. Component包
(1) 实现FilterInvocationSecurityMetadataSource接口
写一个类,实现FilterInvocationSecurityMetadataSource这个接口,供系统调用,放在Component包中。作用是在用户请求一个地址的时候,截获这个地址,告诉程序访问这个地址需要哪些权限角色。不要忘记写@Component注解。
-
package com.xbk.myspringsecurity.security.component;
-
-
import com.xbk.myspringsecurity.security.bean.Resource;
-
import com.xbk.myspringsecurity.security.bean.Role;
-
import com.xbk.myspringsecurity.security.service.ResourceService;
-
import com.xbk.myspringsecurity.security.service.RoleService;
-
import org.springframework.beans.factory.annotation.Autowired;
-
import org.springframework.security.access.ConfigAttribute;
-
import org.springframework.security.access.SecurityConfig;
-
import org.springframework.security.web.FilterInvocation;
-
import org.springframework.security.web.access.intercept.FilterInvocationSecurityMetadataSource;
-
import org.springframework.stereotype.Component;
-
-
import java.util.Collection;
-
import java.util.List;
-
-
@Component
-
//接收用户请求的地址,返回访问该地址需要的所有权限
-
public
class FilterInvocationSecurityMetadataSourceImpl implements FilterInvocationSecurityMetadataSource {
-
-
@Autowired
-
private ResourceService resourceService;
-
-
@Override
-
//接收用户请求的地址,返回访问该地址需要的所有权限
-
public Collection<ConfigAttribute> getAttributes(Object o) throws IllegalArgumentException {
-
//得到用户的请求地址,控制台输出一下
-
String requestUrl = ((FilterInvocation) o).getRequestUrl();
-
System.out.println(
"用户请求的地址是:" + requestUrl);
-
-
//如果登录页面就不需要权限
-
if (
"/login".equals(requestUrl)) {
-
return
null;
-
}
-
-
Resource resource = resourceService.getResourceByUrl(requestUrl);
-
-
//如果没有匹配的url则说明大家都可以访问
-
if(resource ==
null) {
-
return SecurityConfig.createList(
"ROLE_LOGIN");
-
}
-
-
//将resource所需要到的roles按框架要求封装返回(ResourceService里面的getRoles方法是基于RoleRepository实现的)
-
List<Role> roles = resourceService.getRoles(resource.getId());
-
int size = roles.size();
-
String[] values =
new String[size];
-
for (
int i =
0; i < size; i++) {
-
values[i] = roles.get(i).getRoleName();
-
}
-
return SecurityConfig.createList(values);
-
}
-
-
@Override
-
public Collection<ConfigAttribute> getAllConfigAttributes() {
-
return
null;
-
}
-
-
@Override
-
public boolean supports(Class<?> aClass) {
-
return
false;
-
}
-
}
(2) 实现AccessDecisionManager接口
写一个类,实现AccessDecisionManager,放在Component包中。这个类的作用是接收上面那个类返回的访问当前url所需要的权限列表(decide方法的第三个参数),再结合当前用户的信息(decide方法的第一个参数),决定用户是否可以访问这个url。不要忘记写@Component注解。
-
package com.xbk.myspringsecurity.security.component;
-
-
import org.springframework.security.access.AccessDecisionManager;
-
import org.springframework.security.access.AccessDeniedException;
-
import org.springframework.security.access.ConfigAttribute;
-
import org.springframework.security.authentication.AnonymousAuthenticationToken;
-
import org.springframework.security.authentication.BadCredentialsException;
-
import org.springframework.security.authentication.InsufficientAuthenticationException;
-
import org.springframework.security.core.Authentication;
-
import org.springframework.security.core.GrantedAuthority;
-
import org.springframework.stereotype.Component;
-
-
import java.util.Collection;
-
import java.util.Iterator;
-
-
@Component
-
//Security需要用到一个实现了AccessDecisionManager接口的类
-
//类功能:根据当前用户的信息,和目标url涉及到的权限,判断用户是否可以访问
-
//判断规则:用户只要匹配到目标url权限中的一个role就可以访问
-
public
class AccessDecisionManagerImpl implements AccessDecisionManager{
-
@Override
-
public void decide(Authentication authentication, Object o, Collection<ConfigAttribute> collection) throws AccessDeniedException, InsufficientAuthenticationException {
-
-
//迭代器遍历目标url的权限列表
-
Iterator<ConfigAttribute> iterator = collection.iterator();
-
while (iterator.hasNext()) {
-
ConfigAttribute ca = iterator.next();
-
-
String needRole = ca.getAttribute();
-
if (
"ROLE_LOGIN".equals(needRole)) {
-
if (authentication
instanceof AnonymousAuthenticationToken) {
-
throw
new BadCredentialsException(
"未登录");
-
}
else
-
return;
-
}
-
-
//遍历当前用户所具有的权限
-
Collection<? extends GrantedAuthority> authorities = authentication.getAuthorities();
-
for (GrantedAuthority authority : authorities) {
-
if (authority.getAuthority().equals(needRole)) {
-
return;
-
}
-
}
-
}
-
-
//执行到这里说明没有匹配到应有权限
-
throw
new AccessDeniedException(
"权限不足!");
-
}
-
-
@Override
-
public boolean supports(ConfigAttribute configAttribute) {
-
return
true;
-
}
-
-
@Override
-
public boolean supports(Class<?> aClass) {
-
return
true;
-
}
-
}
(3)实现AccessDeniedHandler接口
写一个类,实现AccessDeniedHandler,放在Component保包中。作用是自定义403响应内容。不要忘记写@Component注解。
-
package com.xbk.myspringsecurity.config;
-
-
import org.springframework.security.access.AccessDeniedException;
-
import org.springframework.security.web.access.AccessDeniedHandler;
-
import org.springframework.stereotype.Component;
-
-
import javax.servlet.ServletException;
-
import javax.servlet.http.HttpServletRequest;
-
import javax.servlet.http.HttpServletResponse;
-
import java.io.IOException;
-
import java.io.PrintWriter;
-
-
@Component
-
//自定义403响应内容
-
public
class MyAccessDeniedHandler implements AccessDeniedHandler {
-
-
@Override
-
public void handle(HttpServletRequest request, HttpServletResponse response, AccessDeniedException e) throws IOException, ServletException {
-
response.setStatus(HttpServletResponse.SC_FORBIDDEN);
-
response.setCharacterEncoding(
"UTF-8");
-
PrintWriter out = response.getWriter();
-
out.write(
"{\"status\":\"error\",\"msg\":\"权限不足,请联系管理员!\"}");
-
out.flush();
-
out.close();
-
}
-
}
10. Config包
写一个类,继承WebSecurityConfigurerAdapter类,这是Spring Security的重头戏,是一个配置类,需要放在Config包中。
不要忘记写@Configuration注解。
-
package com.xbk.myspringsecurity.config;
-
-
import com.xbk.myspringsecurity.service.UserDetailsServiceImpl;
-
import org.springframework.beans.factory.annotation.Autowired;
-
import org.springframework.context.annotation.Configuration;
-
import org.springframework.security.authentication.BadCredentialsException;
-
import org.springframework.security.authentication.DisabledException;
-
import org.springframework.security.config.annotation.ObjectPostProcessor;
-
import org.springframework.security.config.annotation.authentication.builders.AuthenticationManagerBuilder;
-
import org.springframework.security.config.annotation.web.builders.HttpSecurity;
-
import org.springframework.security.config.annotation.web.builders.WebSecurity;
-
import org.springframework.security.config.annotation.web.configuration.EnableWebSecurity;
-
import org.springframework.security.config.annotation.web.configuration.WebSecurityConfigurerAdapter;
-
import org.springframework.security.core.Authentication;
-
import org.springframework.security.core.AuthenticationException;
-
import org.springframework.security.core.userdetails.UsernameNotFoundException;
-
import org.springframework.security.crypto.bcrypt.BCryptPasswordEncoder;
-
import org.springframework.security.web.access.intercept.FilterSecurityInterceptor;
-
import org.springframework.security.web.authentication.AuthenticationFailureHandler;
-
import org.springframework.security.web.authentication.AuthenticationSuccessHandler;
-
-
import javax.servlet.ServletException;
-
import javax.servlet.http.HttpServletRequest;
-
import javax.servlet.http.HttpServletResponse;
-
import java.io.IOException;
-
import java.io.PrintWriter;
-
-
@Configuration
-
@EnableWebSecurity
-
public
class WebSecurityConfig extends WebSecurityConfigurerAdapter {
-
-
@Autowired
-
private UserService userService;
-
-
//根据一个url请求,获得访问它所需要的roles权限
-
@Autowired
-
MyFilterInvocationSecurityMetadataSource myFilterInvocationSecurityMetadataSource;
-
-
//接收一个用户的信息和访问一个url所需要的权限,判断该用户是否可以访问
-
@Autowired
-
MyAccessDecisionManager myAccessDecisionManager;
-
-
//403页面
-
@Autowired
-
MyAccessDeniedHandler myAccessDeniedHandler;
-
-
/**定义认证用户信息获取来源,密码校验规则等*/
-
@Override
-
protected void configure(AuthenticationManagerBuilder auth) throws Exception {
-
/**有以下几种形式,使用第3种*/
-
//inMemoryAuthentication 从内存中获取
-
//auth.inMemoryAuthentication().passwordEncoder(new BCryptPasswordEncoder()).withUser("user1").password(new BCryptPasswordEncoder().encode("123123")).roles("USER");
-
-
//jdbcAuthentication从数据库中获取,但是默认是以security提供的表结构
-
//usersByUsernameQuery 指定查询用户SQL
-
//authoritiesByUsernameQuery 指定查询权限SQL
-
//auth.jdbcAuthentication().dataSource(dataSource).usersByUsernameQuery(query).authoritiesByUsernameQuery(query);
-
-
//注入userDetailsService,需要实现userDetailsService接口
-
auth.userDetailsService(userDetailsService).passwordEncoder(
new BCryptPasswordEncoder());
-
}
-
-
//在这里配置哪些页面不需要认证
-
@Override
-
public void configure(WebSecurity web) throws Exception {
-
web.ignoring().antMatchers(
"/",
"/noAuthenticate");
-
}
-
-
/**定义安全策略*/
-
@Override
-
protected void configure(HttpSecurity http) throws Exception {
-
http.authorizeRequests()
//配置安全策略
-
.withObjectPostProcessor(
new ObjectPostProcessor<FilterSecurityInterceptor>() {
-
@Override
-
public <O extends FilterSecurityInterceptor>
O postProcess(O o) {
-
o.setSecurityMetadataSource(myFilterInvocationSecurityMetadataSource);
-
o.setAccessDecisionManager(myAccessDecisionManager);
-
return o;
-
}
-
})
-
// .antMatchers("/hello").hasAuthority("ADMIN")
-
.and()
-
.formLogin()
-
.loginPage(
"/login")
-
.usernameParameter(
"username")
-
.passwordParameter(
"password")
-
.permitAll()
-
.failureHandler(
new AuthenticationFailureHandler() {
-
@Override
-
public void onAuthenticationFailure(HttpServletRequest httpServletRequest, HttpServletResponse httpServletResponse, AuthenticationException e) throws IOException, ServletException {
-
httpServletResponse.setContentType(
"application/json;charset=utf-8");
-
PrintWriter out = httpServletResponse.getWriter();
-
StringBuffer sb =
new StringBuffer();
-
sb.append(
"{\"status\":\"error\",\"msg\":\"");
-
if (e
instanceof UsernameNotFoundException || e
instanceof BadCredentialsException) {
-
sb.append(
"用户名或密码输入错误,登录失败!");
-
}
else
if (e
instanceof DisabledException) {
-
sb.append(
"账户被禁用,登录失败,请联系管理员!");
-
}
else {
-
sb.append(
"登录失败!");
-
}
-
sb.append(
"\"}");
-
out.write(sb.toString());
-
out.flush();
-
out.close();
-
}
-
})
-
.successHandler(
new AuthenticationSuccessHandler() {
-
@Override
-
public void onAuthenticationSuccess(HttpServletRequest httpServletRequest, HttpServletResponse httpServletResponse, Authentication authentication) throws IOException, ServletException {
-
httpServletResponse.setContentType(
"application/json;charset=utf-8");
-
PrintWriter out = httpServletResponse.getWriter();
-
// ObjectMapper objectMapper = new ObjectMapper();
-
String s =
"{\"status\":\"success\",\"msg\":" +
"}";
-
out.write(s);
-
out.flush();
-
out.close();
-
}
-
})
-
.and()
-
.logout()
-
.permitAll()
-
.and()
-
.csrf()
-
.disable()
-
.exceptionHandling()
-
.accessDeniedHandler(myAccessDeniedHandler);
-
}
-
-
}
下面我们来剖析一下这个类中的几个方法。
(1) protected void configure(AuthenticationManagerBuilder auth)
这个方法的作用是定义认证用户信息获取来源、密码校验规则。认证用户信息来源有三种,第一种是内存获取。
auth.inMemoryAuthentication().withUser("user1").password("123123").roles("USER");
这是直接在代码中中写好用户名、密码、角色,如果不止一个用户,那么要在后面继续写 .and().withUser("user2")……。这是在运行时将用户信息存储到内存里面,前端发过来的用户名和密码就跟内存中的用户信息比较,是最简单的方式,但是可扩展性最差。可以用来测试,项目中一般不会使用这种方法。
第二种方式是使用jdbcAuthentication从数据库中获取,但是默认是以security提供的表结构,可扩展性低。
-
//usersByUsernameQuery 指定查询用户SQL
-
//authoritiesByUsernameQuery 指定查询权限SQL
-
auth.jdbcAuthentication().dataSource(dataSource).usersByUsernameQuery(query).authoritiesByUsernameQuery(query);
第三种方式是注入userDetailsService,也就是我们的UserService,这种方法可扩展性最高。
auth.userDetailsService(userService);
注意,以上说的三种方法的实现都是基于Security4及更早版本,这些版本还没有修改密码存储和加密。而在Spring Security 5中,如果还是这么写,那么应该会报一个异常——There is no PasswordEncoder mapped for the id “null”;这是因为Spring security 5.0中新增了多种加密方式,也改变了密码存储的格式。
简单来说,security5中密码的存储格式是:{id}加密后密码。前面的id是加密方式,id可以是bcrypt、sha256等,后面跟着的是加密后的密码。也就是说,程序拿到传过来的密码的时候,会首先查找被“{”和“}”包括起来的id,来确定后面的密码是被怎么样加密的,如果找不到就认为id是null。具体可以看另一篇博客。
前端传密码过来时我们没有为它加密,也没有为它加"{id}",于是程序找不到加密方式,默认id为null,这也就是为什么我们的程序会报错:There is no PasswordEncoder mapped for the id “null”。
因此我们一方面要对前端传过来的密码进行加密,另一方面也要对后端的用户信息数据来源里面的用户密码加密处理。
使用BCrypt加密方式。
第一种方式,内存获取,修改之后是这样的。
auth.inMemoryAuthentication().passwordEncoder(new BCryptPasswordEncoder()).withUser("user1").password(new BCryptPasswordEncoder().encode("123123")).roles("USRE");
在inMemoryAuthentication()后面多了".passwordEncoder(new BCryptPasswordEncoder())",这相当于登陆时用BCrypt加密方式对用户密码进行处理。以前的".password("123456")" 变成了 ".password(new BCryptPasswordEncoder().encode("123456"))" ,这相当于对内存中的密码进行Bcrypt编码加密。比对时一致,说明密码正确,允许登陆。
第二种方法不做了解。
第三种方法修改之后是这样的。
auth.userDetailsService(userService).passwordEncoder(new BCryptPasswordEncoder());
这就是要对用户输入的密码加密处理。另外,我们在数据库的用户表中存储用户账号密码信息的时候,存储的应该是使用BCrypt加密处理后的用户密码,而不是用户原始密码。所以在用户注册和修改密码的代码中不要忘记对密码用BCrypt加密处理。
(2) public void configure(WebSecurity web)
这个方法的作用时声明哪些页面不需要权限验证。
(3) protected void configure(HttpSecurity http)
这个方法的作用是配置安全策略。以http.authorizeRequests()开头,需要什么添加什么,每一个小模块用.and()连接。
.formLogin()用来配置登陆页面。简单的配置如下:
-
.formLogin()
-
.permitAll()
//允许所有人访问
不声明登录页面则使用security自带的登陆页面。如果想使用自定义的登录页面,首先要修改成这个样子。
-
.formLogin()
-
.loginPage(
"/login")
//指定登录页面
-
.usernameParameter(
"username")
//指定页面中对应用户名的参数名称
-
.passwordParameter(
"password")
//指定页面中对应密码的参数名称
-
.permitAll()
这样,在你访问受限页面时,如果当前没有登陆,那么地址栏会跳转到一个登陆的url,具体是哪个url就要看你在.loginPage()里面怎么写的了。
比如我这里写的是/login,那么我访问http://localhost:8080/security/adminPage (管理员页面)时,地址栏重定向成http://localhost:8080/security/login。
那我们怎么将自己写的自定义登陆页面与上面这个url连接起来呢?
首先写一个Controller类,这个类负责根据请求的url向前端返回字符串、数据、网页等。
-
package com.xbk.myspringsecurity.security.controller;
-
-
-
import com.xbk.myspringsecurity.security.service.UserService;
-
import org.springframework.beans.factory.annotation.Autowired;
-
import org.springframework.stereotype.Controller;
-
import org.springframework.web.bind.annotation.GetMapping;
-
import org.springframework.web.bind.annotation.RestController;
-
-
@Controller
-
public
class SecurityController {
-
-
@GetMapping(value =
"/login")
-
public String login()
-
{
-
return
"myLoginPage";
-
}
-
}
我们需要写一个html文件,起名为myLoginPage.html,放在项目文件夹-src-main-resources-templates文件夹下。

前提是要在pom.xml 中引入thymeleaf这个依赖。

这样当你访问受限资源时,网址重定向到/login这个url,又因为你在Controller里面生命了访问/login时调用public String login()方法,返回了myLoginPage,于是程序就去templates文件夹下寻找对应页面。
.successHandler()和.failureHandler()定义了登陆页面的登陆成功和登录失败后所做的事情。
.logout()配置了退出的相关操作。用户访问/logout就可以退出登录。
-
.logout()
-
.permitAll()
//声明用户退出页面允许所有人访问
11. 结束
配置好这些后基本就完成了。
一、 前言:
项目舍弃了原本的SSH框架,改用Spring Boot框架,并且要引入Spring Security为系统提供安全访问控制解决方案,接下来记录一下这两天在Spring Boot中引入Spring Security 的过程。主要参考了以下项目、博客和手册:(目前最新的Spring Security版本为5.0.4,我使用的是5.0.3,前三个链接中用的应该都是Spring Security 4.x或更早版本,想学习最新的Spring Security还是好好读以下第四个链接,Spring Security 5官方文档)
我对Spring Security也还是一知半解,勉强配置好可以使用。可能有一些理解是错误的,或者有一些说法不严谨,请各位见谅和指正。等这段时间忙过去要从头看一下英文版官方手册。
https://github.com/lenve/vhr
https://www.cnkirito.moe/categories/Spring-Security/
https://blog.csdn.net/code__code/article/details/53885510
https://docs.spring.io/spring-security/site/docs/5.0.3.RELEASE/reference/htmlsingle/
-------------------------------------------------------------------------------------------------------------------
二、 Spring Security的原理简介:
Spring Security的安全访问控制分为Authentication(认证)和Authorization(授权,也叫“访问控制”)。认证指的是用户登录的信息验证,判断你账号密码是否正确;授权指的是当用户访问一个页面时判断他有没有这个权限。
一般流程为:
①当用户登录时,前端将用户输入的用户名、密码信息传输到后台,后台用一个类对象将其封装起来,通常使用的是UsernamePasswordAuthenticationToken这个类。
②程序负责验证这个类对象。验证方法是调用Service根据username从数据库中取用户信息到实体类的实例中,比较两者的密码,如果密码正确就成功登陆,同时把包含着用户的用户名、密码、所具有的权限等信息的类对象放到SecurityContextHolder(安全上下文容器,类似Session)中去。
③用户访问一个资源的时候,首先判断是否是受限资源。如果是的话还要判断当前是否未登录,没有的话就跳到登录页面。
④如果用户已经登录,访问一个受限资源的时候,程序要根据url去数据库中取出该资源所对应的所有可以访问的角色,然后拿着当前用户的所有角色一一对比,判断用户是否可以访问。
三、 开发步骤
1. 新建项目
(开发环境IDEA企业版)
新建一个项目,选择Spring Initializr,选择下一步,写好项目的各种信息,选择下一步,选择引入哪些dependency。这里要注意一下,对于一个Spring boot项目来说,最简单的就是选择Web下的Web这个依赖,然后点下一步,确认项目的地址,完成。其他的依赖我们可以在写项目的过程中用到哪个添加哪个,只要在pom.xml文件中添加一个dependency标签就好了。当然,你也可以在创建项目的时候就把要用到的依赖选中,这样项目创建完后pom.xml里面就已经有了这几个dependency的标签了。下面是我选的几个dependency。
创建完,pom.xml文件中的dependency是这样的。
2. 准备工作
在正式写代码之前先做几个准备工作。为了项目的代码分层要分包,再就是把默认的application.properties删掉换成application.yml。
其中,bean是用来存放Entity实体类;component包存放一些Component类,这些类大多被@Component注解,是框架运行过程中需要用到的类;config用来存放一些于Security相关的配置类;controller包存放Controller类,根据前端访问的地址决定如何向前端返回数据;repository包用来存放repository接口,这些接口是用来从数据库中取数据封装成对象的;service存放一些service类,需要依赖Repository接口,实现一些功能逻辑。
3. 建库
MySQL数据库。用户角色与权限管理细分为5个表——用户表、用户-角色表、角色表、角色-权限表、权限表。
以上就是五个表最简单的结构,几条用来测试的简单数据。
至于用户表为什么用users而不用user命名,是因为user在MySQL中是关键字,最好避免使用,所以使用users。不过没关系,在实体类中我们还是用User作为类名的。如今的Spring Boot框架将程序与数据库的耦合度又降低了一个档次,在程序中配置数据库连接和ORM的时候,只有很少地方要注明一下数据库的表名字。
用户的密码是使用BCrypt加密后存储到数据库中的。BCrypt是Spring Security官方推荐的加密方式,在Spring Secueity框架中也提供了这种加密方式,后面会详细介绍。
4. 属性配置文件
接下来写项目的属性配置文件application.yml。
port是服务器的端口,context-path是访问地址前缀,这样我们项目的入口就是http://localhost:8080/mysecurity/。接下来是jdbc的配置,有jdbc经验的一看就懂(不要忘记填密码)。接下来,show-sql为true使得项目进行数据库查询的时候在控制台打印sql语句,方便我们常看和排查错误,ddl-auto有几个属性可选——update、create、create-drop、none、validate,关于它们的区别不懂的话百度一下就明白选哪个了。
如果你是第一次使用yml文件,要注意一个细节,在“:”后面写参数的时候要先打一个空格,这是yml文件格式规定。
5. bean包
在bean包里创建实体类。拿users表来举例。为users表创建实体类的时候,类名、成员变量名字可以不和数据库的表名、列名对应,只要用注解(@Table、@Column)说明一下就好了。另外要在public class User头上加一个@Entity注解。然后添加getter、setter,最好加一个无参构造方法。
如果主键在数据库中是自增主键,那么在实体类中要这么注解一下。这个注解是用来声明自增主键和它的增长策略。
6. repository包
创建完实体类后,要创建repository接口,这就相当于DAO,作用是从数据库取出数据放到对应的实体类中。注意repository是接口类型,且需要继承JpaRepository<T, ID>。前面的T指的是取出数据后封装到哪个类中,后面的ID指的是它的主键类型,下面是我的user的repository接口。
一般情况下这样就可以了,不用声明函数。使用的时候是这个样子的:
-
@Autowired
-
private UserRepository userRepository;
-
-
public List<User> findAllUsers() {
-
List<User> userList = userRepository.findAll();
-
return userList;
-
}
我猜是spring boot帮你把这个接口实现了然后把实例注入到userRepository。所以,虽然你写的是接口,后面却可以使用,而且它还帮你实现了几个方法。
repository接口使用起来很方便,有些方法不需要写,它已经隐示提供了。比如,虽然你的接口里面什么都没写,但已经可以调用userRepository.findAll()方法了。还有一些方法只需要你在接口里面写一行抽象函数声明,不需要有函数体(但是必须按要求给函数命名),就可以在Service里面调用了。
以下这种方式允许你按列名查找数据,同样不需要你写函数体,但是要注意这个抽象函数的命名:findByXxxx(··· ···)。
-
public
interface ResourceRepository extends JpaRepository<Resource, Long> {
-
-
public List<Resource> findByUrl(String url);
-
}
如果你有自己的sql语句,那么你的repository要另外继承一个JpaSpecificationExecutor<T>,T是你的实体类。这样就允许你自己写sql语句。
比如RoleRepository这个接口。这个接口功能比较重要,因为Spring Security框架中某些地方需要根据当前用户查找他对应的所有Role,也有些地方需要根据用户访问的URL查找这个URL对应的所有Role。一种实现方法是在User、Resource的实体类里面添加一个属性:
-
@OneToMany
-
@JoinColumn
-
private List<Role> roles;
使用OneToMany注解,使Repository在从数据库中取users表的记录存放到User实体类中的时候,还会将每条user记录对应的role表中那几条记录一起取出来放到List<Role>中。是一种很方便的方式。如果不使用这种方式,我们也可以在取User的时候只取User,不取它关联的数据,而是在使用那些数据的时候再从数据库查询出来填充到List<Role>中去。
第一种方法简化了使用,但是并没有效率的提升,而且有时我们不需要使用到关联数据,而只用到User本身的数据的时候,它还是帮我们从数据库中把无用数据取了出来。这样不仅浪费了空间还降低了效率,因此我们用第二种方法。
这就是RoleRepository重要的原因,它负责根据Url返回它对应的所有Role,根据用户名返回用户对应的所有Role。
-
package com.xbk.myspringsecurity.security.repository;
-
-
import com.xbk.myspringsecurity.security.bean.Role;
-
import org.springframework.data.jpa.repository.JpaRepository;
-
import org.springframework.data.jpa.repository.JpaSpecificationExecutor;
-
import org.springframework.data.jpa.repository.Query;
-
-
import java.util.List;
-
-
public
interface RoleRepository extends JpaRepository<Role, Long>, JpaSpecificationExecutor<Role> {
-
-
//自定义sql语句并且开启本地sql
-
//根据用户名查找该用户所有权限
-
@Query(value =
"select r.* from role r, user_role ur where ur.username = ?1 and ur.rid = r.id", nativeQuery =
true)
-
public List<Role> findRolesOfUser(String username);
-
-
//根据resource的主键查找resource允许的所有权限
-
@Query(value =
"select r.* from role r, resource_role rr where rr.res_id = ?1 and rr.rid = r.id", nativeQuery =
true)
-
public List<Role> findRolesOfResource(long resourceId);
-
}
nativeQuery的意思是是否开启本地Sql,默认为false。@Query注解设定了一些写SQL语句的规则,简化了自定义sql语句的形式。你也可以不使用它提供的方式,开启nativeQuery,在数据库中怎么写sql就怎么在这里写sql。
7. service包
service包里面都是一些Service类,主要是对Repository做了封装。另外一些逻辑代码和数据库操作代码以及事务管理要写在Service的函数里面。里面主要包括UserService、RoleService、ResourceService等类。
-
package com.xbk.myspringsecurity.security.service;
-
-
import com.xbk.myspringsecurity.security.bean.Role;
-
import com.xbk.myspringsecurity.security.repository.RoleRepository;
-
import org.springframework.beans.factory.annotation.Autowired;
-
import org.springframework.stereotype.Service;
-
-
import java.util.List;
-
-
@Service
-
public
class RoleService {
-
-
@Autowired
-
private RoleRepository roleRepository;
-
-
public List<Role> getRolesOfUser(String username)
-
{
-
return roleRepository.findRolesOfUser(username);
-
}
-
-
public List<Role> getRolesOfResource(long id)
-
{
-
return roleRepository.findRolesOfResource(id);
-
}
-
}
8. 为框架实现UserDetails接口和UserDetailsService接口
在我们的程序中,必须要有一个类,实现UserDetailsService这个接口并且重写它的loadUserByUsername(String s)这个函数。另外也必须要有一个类,实现UserDetails接口并重写它其中的几个方法。
为什么呢?这涉及到Spring Security框架的认证的原理。在用户登录的时候,程序将用户输入的的用户名和密码封装成一个类对象。然后根据用户名去数据库中查找用户的数据,封装成一个类对象放在内存中。注意,一个是用户输入的数据,一个是数据库中的数据。将两个对象比对,如果密码正确,就把用户信息的封装(包含着身份信息、细节信息等)存到SecurityContextHolder中(类似Session),使用的时候还要取出来。
而这个过程中,从数据库中取出的用户信息的封装不是简单的User实例,而是一个实现了UserDetails这个接口的类的对象,这个对象里面不仅有用户的账号密码信息,还有一些判断账号是否可用、判断账号是否过期、判断账号是否被锁定的函数。
在验证过程中,负责根据用户输入的用户名返回数据库中用户信息的封装这个功能的就是Service,它实现了UserDetailsService,重写了它的loadUserByUsername(String s)方法,这个方法就是根据用户名返回了UserDetails的一个具体实现。
图片是两个接口的源代码。
有些人习惯直接使User实体类实现UserDetails接口,这样在这个类里面不仅要写users表的属性,还要重写UserDetails的方法,耦合度较高。User实体类原本只用来与数据库形成ORM映射,现在却要为框架提供其他功能。因此我们不这么做,而是重新写一个类,名叫UserDetailsImpl,实现UserDetails接口,添加一个List<Role>属性,重写接口的方法。在框架要用到UserDetails的地方,我们先把User查出来,然后用User去构造一个UserDetails。
这个UserDetailsImpl暂时放在Bean包里面。
-
package com.xbk.myspringsecurity.security.bean;
-
-
import com.xbk.myspringsecurity.security.service.RoleService;
-
import org.springframework.beans.factory.annotation.Autowired;
-
import org.springframework.security.core.GrantedAuthority;
-
import org.springframework.security.core.authority.SimpleGrantedAuthority;
-
import org.springframework.security.core.userdetails.UserDetails;
-
-
import java.util.ArrayList;
-
import java.util.Collection;
-
import java.util.List;
-
-
//一定要有一个类,实现UserDetails接口,供程序调用
-
public
class UserDetailsImpl implements UserDetails {
-
-
private String username;
-
private String password;
-
//包含着用户对应的所有Role,在使用时调用者给对象注入roles
-
private List<Role> roles;
-
-
@Autowired
-
private RoleService roleService;
-
-
public void setRoles(List<Role> roles) {
-
this.roles = roles;
-
}
-
-
//无参构造
-
public UserDetailsImpl() {
-
}
-
-
//用User构造
-
public UserDetailsImpl(User user) {
-
this.username = user.getUsername();
-
this.password = user.getPassword();
-
}
-
-
//用User和List<Role>构造
-
public UserDetailsImpl(User user, List<Role> roles) {
-
this.username = user.getUsername();
-
this.password = user.getPassword();
-
this.roles = roles;
-
}
-
-
public List<Role> getRoles()
-
{
-
return roles;
-
}
-
-
@Override
-
//返回用户所有角色的封装,一个Role对应一个GrantedAuthority
-
public Collection<? extends GrantedAuthority> getAuthorities() {
-
List<GrantedAuthority> authorities =
new ArrayList<>();
-
for(Role role : roles) {
-
authorities.add(
new SimpleGrantedAuthority(role.getRoleName()));
-
}
-
return authorities;
-
}
-
-
@Override
-
public String getPassword() {
-
return password;
-
}
-
-
@Override
-
public String getUsername() {
-
return username;
-
}
-
-
@Override
-
//判断账号是否已经过期,默认没有过期
-
public boolean isAccountNonExpired() {
-
return
true;
-
}
-
-
@Override
-
//判断账号是否被锁定,默认没有锁定
-
public boolean isAccountNonLocked() {
-
return
true;
-
}
-
-
@Override
-
//判断信用凭证是否过期,默认没有过期
-
public boolean isCredentialsNonExpired() {
-
return
true;
-
}
-
-
@Override
-
//判断账号是否可用,默认可用
-
public boolean isEnabled() {
-
return
true;
-
}
-
}
UserDetailsService也需要被实现,我们在写UserService时直接实现这个接口就可以。所以UserService跟其他Service有些不同。
-
package com.xbk.myspringsecurity.security.service;
-
-
import com.xbk.myspringsecurity.security.bean.User;
-
import com.xbk.myspringsecurity.security.bean.UserDetailsImpl;
-
import com.xbk.myspringsecurity.security.repository.UserRepository;
-
import org.springframework.beans.factory.annotation.Autowired;
-
import org.springframework.security.core.userdetails.UserDetails;
-
import org.springframework.security.core.userdetails.UserDetailsService;
-
import org.springframework.security.core.userdetails.UsernameNotFoundException;
-
import org.springframework.stereotype.Service;
-
-
import javax.transaction.Transactional;
-
import java.util.List;
-
-
@Service
-
//框架需要使用到一个实现了UserDetailsService接口的类
-
public
class UserService implements UserDetailsService{
-
-
@Autowired
-
private UserRepository userRepository;
-
-
@Autowired
-
private RoleService roleService;
-
-
@Transactional
-
public List<User> getAllUser()
-
{
-
return userRepository.findAll();
-
}
-
-
@Transactional
-
public List<User> getByUsername(String username)
-
{
-
return userRepository.findByUsername(username);
-
}
-
-
@Override
-
//重写UserDetailsService接口里面的抽象方法
-
//根据用户名 返回一个UserDetails的实现类的实例
-
public UserDetails loadUserByUsername(String s) throws UsernameNotFoundException {
-
System.out.println(
"查找用户:" + s);
-
User user = getByUsername(s).get(
0);
-
if(user ==
null)
-
{
-
throw
new UsernameNotFoundException(
"没有该用户");
-
}
-
-
//查到User后将其封装为UserDetails的实现类的实例供程序调用
-
//用该User和它对应的Role实体们构造UserDetails的实现类
-
return
new UserDetailsImpl(user, roleService.getRolesOfUser(user.getUsername()));
-
}
-
}
简单来讲就是程序接收到了用户输入的用户名,交给了UserService,它根据用户名去数据库中取到用户的信息,封装到实体类User的实例中,然后使用该User实例,再利用RoleService(封装了RoleRopository)查出该User对用的roles,构造一个UserDetailsImpl的对象,把这个对象返回给程序。
9. Component包
(1) 实现FilterInvocationSecurityMetadataSource接口
写一个类,实现FilterInvocationSecurityMetadataSource这个接口,供系统调用,放在Component包中。作用是在用户请求一个地址的时候,截获这个地址,告诉程序访问这个地址需要哪些权限角色。不要忘记写@Component注解。
-
package com.xbk.myspringsecurity.security.component;
-
-
import com.xbk.myspringsecurity.security.bean.Resource;
-
import com.xbk.myspringsecurity.security.bean.Role;
-
import com.xbk.myspringsecurity.security.service.ResourceService;
-
import com.xbk.myspringsecurity.security.service.RoleService;
-
import org.springframework.beans.factory.annotation.Autowired;
-
import org.springframework.security.access.ConfigAttribute;
-
import org.springframework.security.access.SecurityConfig;
-
import org.springframework.security.web.FilterInvocation;
-
import org.springframework.security.web.access.intercept.FilterInvocationSecurityMetadataSource;
-
import org.springframework.stereotype.Component;
-
-
import java.util.Collection;
-
import java.util.List;
-
-
@Component
-
//接收用户请求的地址,返回访问该地址需要的所有权限
-
public
class FilterInvocationSecurityMetadataSourceImpl implements FilterInvocationSecurityMetadataSource {
-
-
@Autowired
-
private ResourceService resourceService;
-
-
@Override
-
//接收用户请求的地址,返回访问该地址需要的所有权限
-
public Collection<ConfigAttribute> getAttributes(Object o) throws IllegalArgumentException {
-
//得到用户的请求地址,控制台输出一下
-
String requestUrl = ((FilterInvocation) o).getRequestUrl();
-
System.out.println(
"用户请求的地址是:" + requestUrl);
-
-
//如果登录页面就不需要权限
-
if (
"/login".equals(requestUrl)) {
-
return
null;
-
}
-
-
Resource resource = resourceService.getResourceByUrl(requestUrl);
-
-
//如果没有匹配的url则说明大家都可以访问
-
if(resource ==
null) {
-
return SecurityConfig.createList(
"ROLE_LOGIN");
-
}
-
-
//将resource所需要到的roles按框架要求封装返回(ResourceService里面的getRoles方法是基于RoleRepository实现的)
-
List<Role> roles = resourceService.getRoles(resource.getId());
-
int size = roles.size();
-
String[] values =
new String[size];
-
for (
int i =
0; i < size; i++) {
-
values[i] = roles.get(i).getRoleName();
-
}
-
return SecurityConfig.createList(values);
-
}
-
-
@Override
-
public Collection<ConfigAttribute> getAllConfigAttributes() {
-
return
null;
-
}
-
-
@Override
-
public boolean supports(Class<?> aClass) {
-
return
false;
-
}
-
}
(2) 实现AccessDecisionManager接口
写一个类,实现AccessDecisionManager,放在Component包中。这个类的作用是接收上面那个类返回的访问当前url所需要的权限列表(decide方法的第三个参数),再结合当前用户的信息(decide方法的第一个参数),决定用户是否可以访问这个url。不要忘记写@Component注解。
-
package com.xbk.myspringsecurity.security.component;
-
-
import org.springframework.security.access.AccessDecisionManager;
-
import org.springframework.security.access.AccessDeniedException;
-
import org.springframework.security.access.ConfigAttribute;
-
import org.springframework.security.authentication.AnonymousAuthenticationToken;
-
import org.springframework.security.authentication.BadCredentialsException;
-
import org.springframework.security.authentication.InsufficientAuthenticationException;
-
import org.springframework.security.core.Authentication;
-
import org.springframework.security.core.GrantedAuthority;
-
import org.springframework.stereotype.Component;
-
-
import java.util.Collection;
-
import java.util.Iterator;
-
-
@Component
-
//Security需要用到一个实现了AccessDecisionManager接口的类
-
//类功能:根据当前用户的信息,和目标url涉及到的权限,判断用户是否可以访问
-
//判断规则:用户只要匹配到目标url权限中的一个role就可以访问
-
public
class AccessDecisionManagerImpl implements AccessDecisionManager{
-
@Override
-
public void decide(Authentication authentication, Object o, Collection<ConfigAttribute> collection) throws AccessDeniedException, InsufficientAuthenticationException {
-
-
//迭代器遍历目标url的权限列表
-
Iterator<ConfigAttribute> iterator = collection.iterator();
-
while (iterator.hasNext()) {
-
ConfigAttribute ca = iterator.next();
-
-
String needRole = ca.getAttribute();
-
if (
"ROLE_LOGIN".equals(needRole)) {
-
if (authentication
instanceof AnonymousAuthenticationToken) {
-
throw
new BadCredentialsException(
"未登录");
-
}
else
-
return;
-
}
-
-
//遍历当前用户所具有的权限
-
Collection<? extends GrantedAuthority> authorities = authentication.getAuthorities();
-
for (GrantedAuthority authority : authorities) {
-
if (authority.getAuthority().equals(needRole)) {
-
return;
-
}
-
}
-
}
-
-
//执行到这里说明没有匹配到应有权限
-
throw
new AccessDeniedException(
"权限不足!");
-
}
-
-
@Override
-
public boolean supports(ConfigAttribute configAttribute) {
-
return
true;
-
}
-
-
@Override
-
public boolean supports(Class<?> aClass) {
-
return
true;
-
}
-
}
(3)实现AccessDeniedHandler接口
写一个类,实现AccessDeniedHandler,放在Component保包中。作用是自定义403响应内容。不要忘记写@Component注解。
-
package com.xbk.myspringsecurity.config;
-
-
import org.springframework.security.access.AccessDeniedException;
-
import org.springframework.security.web.access.AccessDeniedHandler;
-
import org.springframework.stereotype.Component;
-
-
import javax.servlet.ServletException;
-
import javax.servlet.http.HttpServletRequest;
-
import javax.servlet.http.HttpServletResponse;
-
import java.io.IOException;
-
import java.io.PrintWriter;
-
-
@Component
-
//自定义403响应内容
-
public
class MyAccessDeniedHandler implements AccessDeniedHandler {
-
-
@Override
-
public void handle(HttpServletRequest request, HttpServletResponse response, AccessDeniedException e) throws IOException, ServletException {
-
response.setStatus(HttpServletResponse.SC_FORBIDDEN);
-
response.setCharacterEncoding(
"UTF-8");
-
PrintWriter out = response.getWriter();
-
out.write(
"{\"status\":\"error\",\"msg\":\"权限不足,请联系管理员!\"}");
-
out.flush();
-
out.close();
-
}
-
}
10. Config包
写一个类,继承WebSecurityConfigurerAdapter类,这是Spring Security的重头戏,是一个配置类,需要放在Config包中。
不要忘记写@Configuration注解。
-
package com.xbk.myspringsecurity.config;
-
-
import com.xbk.myspringsecurity.service.UserDetailsServiceImpl;
-
import org.springframework.beans.factory.annotation.Autowired;
-
import org.springframework.context.annotation.Configuration;
-
import org.springframework.security.authentication.BadCredentialsException;
-
import org.springframework.security.authentication.DisabledException;
-
import org.springframework.security.config.annotation.ObjectPostProcessor;
-
import org.springframework.security.config.annotation.authentication.builders.AuthenticationManagerBuilder;
-
import org.springframework.security.config.annotation.web.builders.HttpSecurity;
-
import org.springframework.security.config.annotation.web.builders.WebSecurity;
-
import org.springframework.security.config.annotation.web.configuration.EnableWebSecurity;
-
import org.springframework.security.config.annotation.web.configuration.WebSecurityConfigurerAdapter;
-
import org.springframework.security.core.Authentication;
-
import org.springframework.security.core.AuthenticationException;
-
import org.springframework.security.core.userdetails.UsernameNotFoundException;
-
import org.springframework.security.crypto.bcrypt.BCryptPasswordEncoder;
-
import org.springframework.security.web.access.intercept.FilterSecurityInterceptor;
-
import org.springframework.security.web.authentication.AuthenticationFailureHandler;
-
import org.springframework.security.web.authentication.AuthenticationSuccessHandler;
-
-
import javax.servlet.ServletException;
-
import javax.servlet.http.HttpServletRequest;
-
import javax.servlet.http.HttpServletResponse;
-
import java.io.IOException;
-
import java.io.PrintWriter;
-
-
@Configuration
-
@EnableWebSecurity
-
public
class WebSecurityConfig extends WebSecurityConfigurerAdapter {
-
-
@Autowired
-
private UserService userService;
-
-
//根据一个url请求,获得访问它所需要的roles权限
-
@Autowired
-
MyFilterInvocationSecurityMetadataSource myFilterInvocationSecurityMetadataSource;
-
-
//接收一个用户的信息和访问一个url所需要的权限,判断该用户是否可以访问
-
@Autowired
-
MyAccessDecisionManager myAccessDecisionManager;
-
-
//403页面
-
@Autowired
-
MyAccessDeniedHandler myAccessDeniedHandler;
-
-
/**定义认证用户信息获取来源,密码校验规则等*/
-
@Override
-
protected void configure(AuthenticationManagerBuilder auth) throws Exception {
-
/**有以下几种形式,使用第3种*/
-
//inMemoryAuthentication 从内存中获取
-
//auth.inMemoryAuthentication().passwordEncoder(new BCryptPasswordEncoder()).withUser("user1").password(new BCryptPasswordEncoder().encode("123123")).roles("USER");
-
-
//jdbcAuthentication从数据库中获取,但是默认是以security提供的表结构
-
//usersByUsernameQuery 指定查询用户SQL
-
//authoritiesByUsernameQuery 指定查询权限SQL
-
//auth.jdbcAuthentication().dataSource(dataSource).usersByUsernameQuery(query).authoritiesByUsernameQuery(query);
-
-
//注入userDetailsService,需要实现userDetailsService接口
-
auth.userDetailsService(userDetailsService).passwordEncoder(
new BCryptPasswordEncoder());
-
}
-
-
//在这里配置哪些页面不需要认证
-
@Override
-
public void configure(WebSecurity web) throws Exception {
-
web.ignoring().antMatchers(
"/",
"/noAuthenticate");
-
}
-
-
/**定义安全策略*/
-
@Override
-
protected void configure(HttpSecurity http) throws Exception {
-
http.authorizeRequests()
//配置安全策略
-
.withObjectPostProcessor(
new ObjectPostProcessor<FilterSecurityInterceptor>() {
-
@Override
-
public <O extends FilterSecurityInterceptor>
O postProcess(O o) {
-
o.setSecurityMetadataSource(myFilterInvocationSecurityMetadataSource);
-
o.setAccessDecisionManager(myAccessDecisionManager);
-
return o;
-
}
-
})
-
// .antMatchers("/hello").hasAuthority("ADMIN")
-
.and()
-
.formLogin()
-
.loginPage(
"/login")
-
.usernameParameter(
"username")
-
.passwordParameter(
"password")
-
.permitAll()
-
.failureHandler(
new AuthenticationFailureHandler() {
-
@Override
-
public void onAuthenticationFailure(HttpServletRequest httpServletRequest, HttpServletResponse httpServletResponse, AuthenticationException e) throws IOException, ServletException {
-
httpServletResponse.setContentType(
"application/json;charset=utf-8");
-
PrintWriter out = httpServletResponse.getWriter();
-
StringBuffer sb =
new StringBuffer();
-
sb.append(
"{\"status\":\"error\",\"msg\":\"");
-
if (e
instanceof UsernameNotFoundException || e
instanceof BadCredentialsException) {
-
sb.append(
"用户名或密码输入错误,登录失败!");
-
}
else
if (e
instanceof DisabledException) {
-
sb.append(
"账户被禁用,登录失败,请联系管理员!");
-
}
else {
-
sb.append(
"登录失败!");
-
}
-
sb.append(
"\"}");
-
out.write(sb.toString());
-
out.flush();
-
out.close();
-
}
-
})
-
.successHandler(
new AuthenticationSuccessHandler() {
-
@Override
-
public void onAuthenticationSuccess(HttpServletRequest httpServletRequest, HttpServletResponse httpServletResponse, Authentication authentication) throws IOException, ServletException {
-
httpServletResponse.setContentType(
"application/json;charset=utf-8");
-
PrintWriter out = httpServletResponse.getWriter();
-
// ObjectMapper objectMapper = new ObjectMapper();
-
String s =
"{\"status\":\"success\",\"msg\":" +
"}";
-
out.write(s);
-
out.flush();
-
out.close();
-
}
-
})
-
.and()
-
.logout()
-
.permitAll()
-
.and()
-
.csrf()
-
.disable()
-
.exceptionHandling()
-
.accessDeniedHandler(myAccessDeniedHandler);
-
}
-
-
}
下面我们来剖析一下这个类中的几个方法。
(1) protected void configure(AuthenticationManagerBuilder auth)
这个方法的作用是定义认证用户信息获取来源、密码校验规则。认证用户信息来源有三种,第一种是内存获取。
auth.inMemoryAuthentication().withUser("user1").password("123123").roles("USER");
这是直接在代码中中写好用户名、密码、角色,如果不止一个用户,那么要在后面继续写 .and().withUser("user2")……。这是在运行时将用户信息存储到内存里面,前端发过来的用户名和密码就跟内存中的用户信息比较,是最简单的方式,但是可扩展性最差。可以用来测试,项目中一般不会使用这种方法。
第二种方式是使用jdbcAuthentication从数据库中获取,但是默认是以security提供的表结构,可扩展性低。
-
//usersByUsernameQuery 指定查询用户SQL
-
//authoritiesByUsernameQuery 指定查询权限SQL
-
auth.jdbcAuthentication().dataSource(dataSource).usersByUsernameQuery(query).authoritiesByUsernameQuery(query);
第三种方式是注入userDetailsService,也就是我们的UserService,这种方法可扩展性最高。
auth.userDetailsService(userService);
注意,以上说的三种方法的实现都是基于Security4及更早版本,这些版本还没有修改密码存储和加密。而在Spring Security 5中,如果还是这么写,那么应该会报一个异常——There is no PasswordEncoder mapped for the id “null”;这是因为Spring security 5.0中新增了多种加密方式,也改变了密码存储的格式。
简单来说,security5中密码的存储格式是:{id}加密后密码。前面的id是加密方式,id可以是bcrypt、sha256等,后面跟着的是加密后的密码。也就是说,程序拿到传过来的密码的时候,会首先查找被“{”和“}”包括起来的id,来确定后面的密码是被怎么样加密的,如果找不到就认为id是null。具体可以看另一篇博客。
前端传密码过来时我们没有为它加密,也没有为它加"{id}",于是程序找不到加密方式,默认id为null,这也就是为什么我们的程序会报错:There is no PasswordEncoder mapped for the id “null”。
因此我们一方面要对前端传过来的密码进行加密,另一方面也要对后端的用户信息数据来源里面的用户密码加密处理。
使用BCrypt加密方式。
第一种方式,内存获取,修改之后是这样的。
auth.inMemoryAuthentication().passwordEncoder(new BCryptPasswordEncoder()).withUser("user1").password(new BCryptPasswordEncoder().encode("123123")).roles("USRE");
在inMemoryAuthentication()后面多了".passwordEncoder(new BCryptPasswordEncoder())",这相当于登陆时用BCrypt加密方式对用户密码进行处理。以前的".password("123456")" 变成了 ".password(new BCryptPasswordEncoder().encode("123456"))" ,这相当于对内存中的密码进行Bcrypt编码加密。比对时一致,说明密码正确,允许登陆。
第二种方法不做了解。
第三种方法修改之后是这样的。
auth.userDetailsService(userService).passwordEncoder(new BCryptPasswordEncoder());
这就是要对用户输入的密码加密处理。另外,我们在数据库的用户表中存储用户账号密码信息的时候,存储的应该是使用BCrypt加密处理后的用户密码,而不是用户原始密码。所以在用户注册和修改密码的代码中不要忘记对密码用BCrypt加密处理。
(2) public void configure(WebSecurity web)
这个方法的作用时声明哪些页面不需要权限验证。
(3) protected void configure(HttpSecurity http)
这个方法的作用是配置安全策略。以http.authorizeRequests()开头,需要什么添加什么,每一个小模块用.and()连接。
.formLogin()用来配置登陆页面。简单的配置如下:
-
.formLogin()
-
.permitAll()
//允许所有人访问
不声明登录页面则使用security自带的登陆页面。如果想使用自定义的登录页面,首先要修改成这个样子。
-
.formLogin()
-
.loginPage(
"/login")
//指定登录页面
-
.usernameParameter(
"username")
//指定页面中对应用户名的参数名称
-
.passwordParameter(
"password")
//指定页面中对应密码的参数名称
-
.permitAll()
这样,在你访问受限页面时,如果当前没有登陆,那么地址栏会跳转到一个登陆的url,具体是哪个url就要看你在.loginPage()里面怎么写的了。
比如我这里写的是/login,那么我访问http://localhost:8080/security/adminPage (管理员页面)时,地址栏重定向成http://localhost:8080/security/login。
那我们怎么将自己写的自定义登陆页面与上面这个url连接起来呢?
首先写一个Controller类,这个类负责根据请求的url向前端返回字符串、数据、网页等。
-
package com.xbk.myspringsecurity.security.controller;
-
-
-
import com.xbk.myspringsecurity.security.service.UserService;
-
import org.springframework.beans.factory.annotation.Autowired;
-
import org.springframework.stereotype.Controller;
-
import org.springframework.web.bind.annotation.GetMapping;
-
import org.springframework.web.bind.annotation.RestController;
-
-
@Controller
-
public
class SecurityController {
-
-
@GetMapping(value =
"/login")
-
public String login()
-
{
-
return
"myLoginPage";
-
}
-
}
我们需要写一个html文件,起名为myLoginPage.html,放在项目文件夹-src-main-resources-templates文件夹下。
前提是要在pom.xml 中引入thymeleaf这个依赖。
这样当你访问受限资源时,网址重定向到/login这个url,又因为你在Controller里面生命了访问/login时调用public String login()方法,返回了myLoginPage,于是程序就去templates文件夹下寻找对应页面。
.successHandler()和.failureHandler()定义了登陆页面的登陆成功和登录失败后所做的事情。
.logout()配置了退出的相关操作。用户访问/logout就可以退出登录。
-
.logout()
-
.permitAll()
//声明用户退出页面允许所有人访问
11. 结束
配置好这些后基本就完成了。