SpringBoot整合Spring Security安全框架(一)
SpringSecurity是一款安全框架。它在 Spring Framework 基础上,Spring Security 充分利用了依赖注入(DI,Dependency Injection)和面向切面编程(AOP)功能,为应用系统提供声明式的安全访问控制功能。它是一个轻量级的安全框架,它确保基于Spring的应用程序提供身份验证和授权支持,主要包括两个操作“认证”与“验证”(也就是权限控制)。
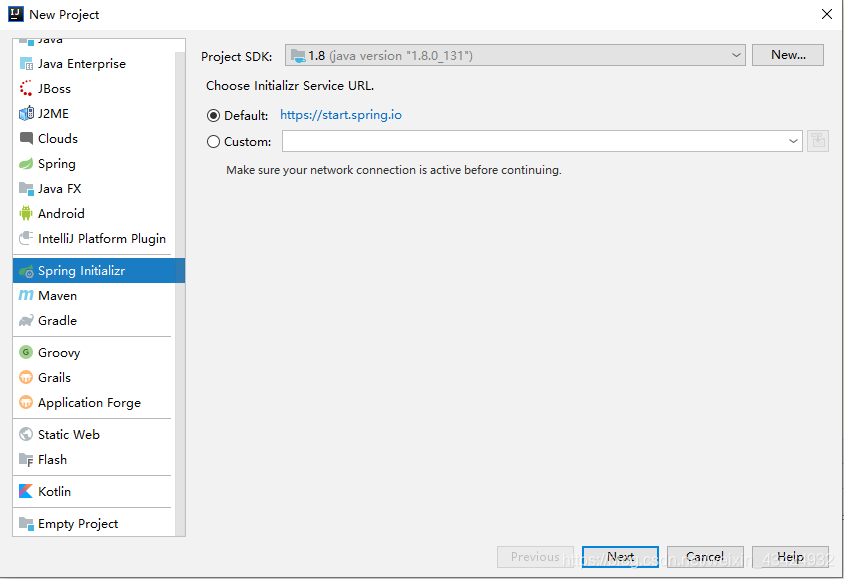
快速创建springboot项目
使用创建向导
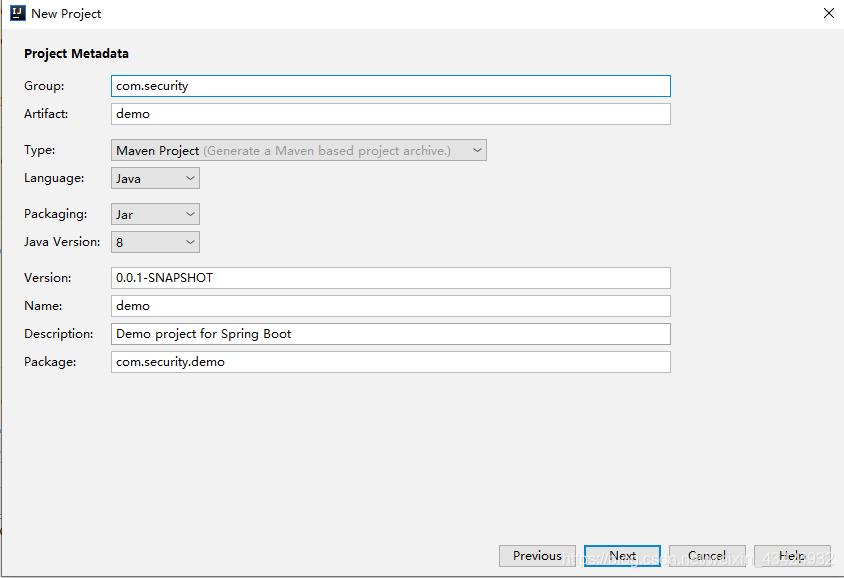
填写好包名和项目名。
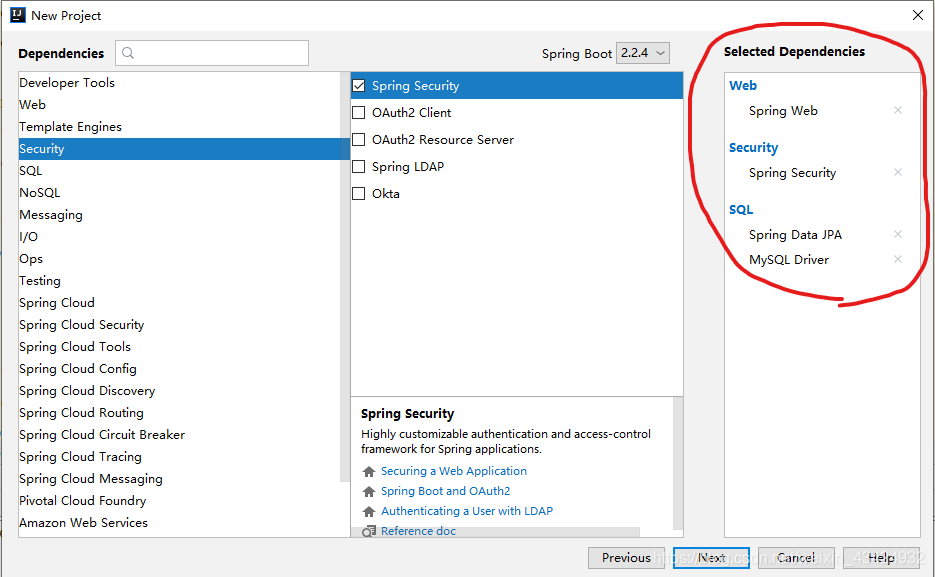
主要选择web、security、jap和mysql driver这几个模块。
创建完成后的项目pom文件。
<?xml version="1.0" encoding="UTF-8"?>
<project xmlns="http://maven.apache.org/POM/4.0.0" xmlns:xsi="http://www.w3.org/2001/XMLSchema-instance"
         xsi:schemaLocation="http://maven.apache.org/POM/4.0.0 https://maven.apache.org/xsd/maven-4.0.0.xsd">
    <modelVersion>4.0.0</modelVersion>
    <parent>
        <groupId>org.springframework.boot</groupId>
        <artifactId>spring-boot-starter-parent</artifactId>
        <version>2.2.4.RELEASE</version>
        <relativePath/> <!-- lookup parent from repository -->
    </parent>
    <groupId>com.security</groupId>
    <artifactId>demo</artifactId>
    <version>0.0.1-SNAPSHOT</version>
    <name>demo</name>
    <description>Demo project for Spring Boot</description>

    <properties>
        <java.version>1.8</java.version>
    </properties>

    <dependencies>
        <dependency>
            <groupId>org.springframework.boot</groupId>
            <artifactId>spring-boot-starter-data-jpa</artifactId>
        </dependency>
        <dependency>
            <groupId>org.springframework.boot</groupId>
            <artifactId>spring-boot-starter-security</artifactId>
        </dependency>
        <dependency>
            <groupId>org.springframework.boot</groupId>
            <artifactId>spring-boot-starter-web</artifactId>
        </dependency>

        <dependency>
            <groupId>mysql</groupId>
            <artifactId>mysql-connector-java</artifactId>
            <scope>runtime</scope>
        </dependency>
        <dependency>
            <groupId>org.springframework.boot</groupId>
            <artifactId>spring-boot-starter-test</artifactId>
            <scope>test</scope>
            <exclusions>
                <exclusion>
                    <groupId>org.junit.vintage</groupId>
                    <artifactId>junit-vintage-engine</artifactId>
                </exclusion>
            </exclusions>
        </dependency>
        <dependency>
            <groupId>org.springframework.security</groupId>
            <artifactId>spring-security-test</artifactId>
            <scope>test</scope>
        </dependency>
    </dependencies>

    <build>
        <plugins>
            <plugin>
                <groupId>org.springframework.boot</groupId>
                <artifactId>spring-boot-maven-plugin</artifactId>
            </plugin>
        </plugins>
    </build>

</project>
新建WebSecurityConfig 配置类
新建WebSecurityConfig 配置类,继承WebSecurityConfigurerAdapter,并重写它的configure方法来设置一些web安全的细节。
当前在内存中配置两个用户 admin和user。
package com.security.demo.config;

import org.springframework.context.annotation.Bean;
import org.springframework.context.annotation.Configuration;
import org.springframework.security.config.annotation.authentication.builders.AuthenticationManagerBuilder;
import org.springframework.security.config.annotation.method.configuration.EnableGlobalMethodSecurity;
import org.springframework.security.config.annotation.web.configuration.EnableWebSecurity;
import org.springframework.security.config.annotation.web.configuration.WebSecurityConfigurerAdapter;
import org.springframework.security.crypto.bcrypt.BCryptPasswordEncoder;
import org.springframework.security.crypto.password.PasswordEncoder;

@Configuration
//开启Spring Security的功能
@EnableWebSecurity
//添加@EnableGlobalMethodSecurity注解开启Spring方法级安全
//prePostEnabled属性决定Spring Security的前注解是否可用@PreAuthorize,@PostAuthorize等注解,设置为true
@EnableGlobalMethodSecurity(prePostEnabled=true)
public class WebSecurityConfig extends WebSecurityConfigurerAdapter {

    @Override
    protected void configure(AuthenticationManagerBuilder auth) throws Exception {

        /*
         * 在内存中配置两个用户 admin和user
         */
        auth.inMemoryAuthentication()
                .withUser("admin")
                .password(passwordEncoder().encode("123456"))
                .roles("admin");

        auth.inMemoryAuthentication()
                .withUser("user")
                .password(passwordEncoder().encode("123456"))
                .roles("user");
    }

    /*
     * 指定加密方式
     */
    @Bean
    public PasswordEncoder passwordEncoder() {
        return new BCryptPasswordEncoder();
    }
}
稍微测试一下
新建controller用于测试。
package com.security.demo.controller;

import org.springframework.security.access.prepost.PreAuthorize;
import org.springframework.stereotype.Controller;
import org.springframework.web.bind.annotation.GetMapping;
import org.springframework.web.bind.annotation.ResponseBody;

@Controller
public class HelloController {

    @GetMapping("/helloAdmin")
    @ResponseBody
    @PreAuthorize("hasAnyRole('admin')")
    public String helloAdmin() {
        return "I am Admin";
    }

    @GetMapping("/helloUser")
    @ResponseBody
    @PreAuthorize("hasAnyRole('admin','user')")
    public String helloUser() {
        return "I am User";
    }
}
配置数据库
spring:
  datasource:
    url: jdbc:mysql://localhost:3306/springboot?serverTimezone=Asia/Shanghai
    driver-class-name: com.mysql.jdbc.Driver
    username: root
    password: 123456

  jpa:
    database: mysql
    show-sql: true
    hibernate:
      ddl-auto: update
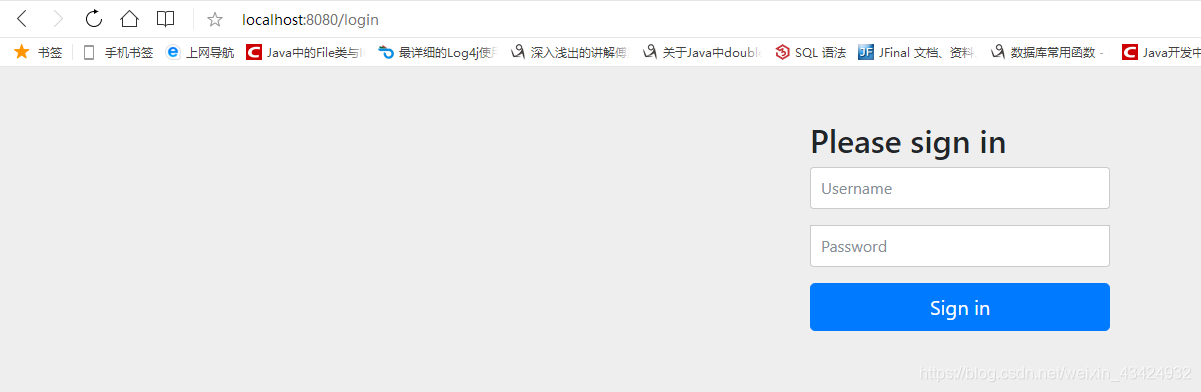
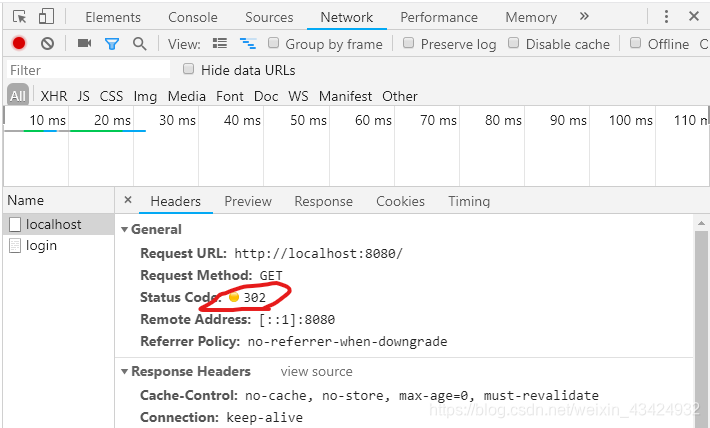
是时候启动项目了。启动项目访问http://localhost:8080/helloUser接口,页面会自动跳转到登录页面,这时Spring Security就生效了的,此时的接口都是被保护的,我们需要通过验证才能访问。 而这个登录页面也是Spring Security自带的。
用刚才在内存中设置的user用户登录进去,访问helloUser接口成功。

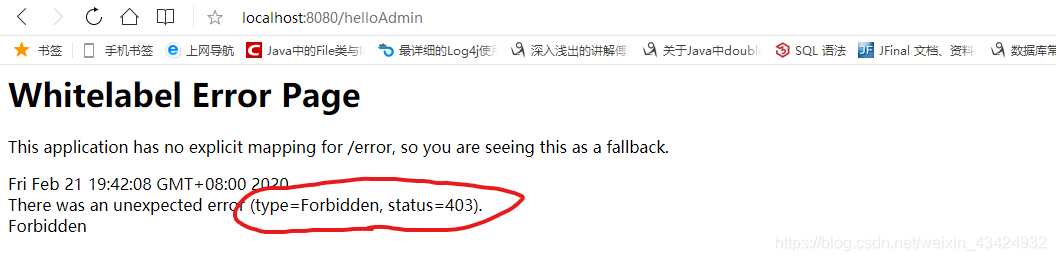
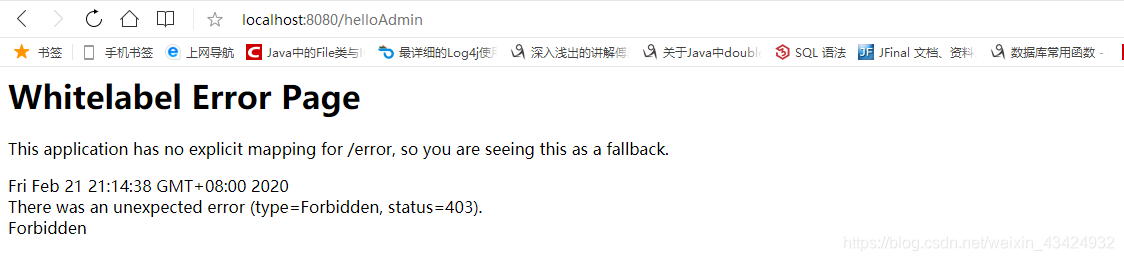
而访问helloAdmin接口就会被禁止,报错403。这是理所当然的,因为我们的user用户只拥有user角色,而helloAdmin接口需要admin角色才能访问。
重新运行项目(一定要重新运行项目,现在还没法退出登录),登录admin用户的账号,就两个接口都能访问了。效果如下:

上面的操作只是为了展示一下spring security的作用,实际项目中基于内存的身份权限认证并不具有太多的使用价值。讲上面的主要也是为了引出下面基于数据库的身份权限认证。
基于数据库的身份权限认证
修改配置类
修改WebSecurityConfig 配置类,删掉之前重写的configure方法。
@Configuration
//开启Spring Security的功能
@EnableWebSecurity
//添加@EnableGlobalMethodSecurity注解开启Spring方法级安全
// prePostEnabled 决定Spring Security的前注解是否可用 [@PreAuthorize,@PostAuthorize,..],设置为true
@EnableGlobalMethodSecurity(prePostEnabled=true)
public class WebSecurityConfig extends WebSecurityConfigurerAdapter {

    /*
     * 指定加密方式
     */
    @Bean
    public PasswordEncoder passwordEncoder() {
        return new BCryptPasswordEncoder();
    }
}
新建实体类
新建UserInfo 实体类。
package com.security.demo.bean;

import java.util.List;
import javax.persistence.Entity;
import javax.persistence.FetchType;
import javax.persistence.GeneratedValue;
import javax.persistence.Id;
import javax.persistence.JoinColumn;
import javax.persistence.JoinTable;
import javax.persistence.ManyToMany;

@Entity
public class UserInfo {

    @Id @GeneratedValue
    private long uid;//主键.

    private String username;//用户名.
    private String password;//密码.

    //用户--角色:多对多的关系.
    @ManyToMany(fetch=FetchType.EAGER)//立即从数据库中进行加载数据;
    @JoinTable(name = "UserRole", joinColumns = { @JoinColumn(name = "uid") }, inverseJoinColumns ={@JoinColumn(name = "role_id") })
    private List<Role> roles;

    public List<Role> getRoles() {
        return roles;
    }

    public void setRoles(List<Role> roles) {
        this.roles = roles;
    }

    public long getUid() {
        return uid;
    }

    public void setUid(long uid) {
        this.uid = uid;
    }

    public String getUsername() {
        return username;
    }

    public void setUsername(String username) {
        this.username = username;
    }

    public String getPassword() {
        return password;
    }

    public void setPassword(String password) {
        this.password = password;
    }
}
新建Role 实体类。
package com.security.demo.bean;

import javax.persistence.Entity;
import javax.persistence.GeneratedValue;
import javax.persistence.Id;

@Entity
public class Role {
    @Id @GeneratedValue
    private long rid;//主键.
    private String name;//角色名称.
    private String description;//角色描述.

    public Role() {
    }

    public Role(String name, String description) {
        this.name = name;
        this.description = description;
    }

    public long getRid() {
        return rid;
    }
    public void setRid(long rid) {
        this.rid = rid;
    }
    public String getName() {
        return name;
    }
    public void setName(String name) {
        this.name = name;
    }
    public String getDescription() {
        return description;
    }
    public void setDescription(String description) {
        this.description = description;
    }
}
新建Repository
由于我们用的jpa,所以要新建Repository接口 。
package com.security.demo.repository;

import com.security.demo.bean.UserInfo;
import org.springframework.data.jpa.repository.JpaRepository;

public interface UserInfoRepository extends JpaRepository<UserInfo,Long> {

    UserInfo findByUsername(String username);

}
新建RoleRepository 。
package com.security.demo.repository;

import com.security.demo.bean.Role;
import org.springframework.data.jpa.repository.JpaRepository;

public interface RoleRepository extends JpaRepository<Role,Long>{

}
实现UserDetailsService接口
新建CustomUserDetailService ,重写其loadUserByUsername方法,这个方法会被自动调用。
package com.security.demo.config;

import com.security.demo.bean.Role;
import com.security.demo.bean.UserInfo;
import com.security.demo.repository.UserInfoRepository;
import org.springframework.beans.factory.annotation.Autowired;
import org.springframework.security.core.GrantedAuthority;
import org.springframework.security.core.authority.SimpleGrantedAuthority;
import org.springframework.security.core.userdetails.User;
import org.springframework.security.core.userdetails.UserDetails;
import org.springframework.security.core.userdetails.UserDetailsService;
import org.springframework.security.core.userdetails.UsernameNotFoundException;
import org.springframework.stereotype.Component;

import java.util.ArrayList;
import java.util.List;

@Component
public class CustomUserDetailService implements UserDetailsService{

    @Autowired
    private UserInfoRepository userInfoRepository;

    @Override
    public UserDetails loadUserByUsername(String username) throws UsernameNotFoundException {
        System.out.println("=================================================");
        //通过username获取用户信息
        UserInfo userInfo = userInfoRepository.findByUsername(username);
        if(userInfo == null) {
            throw new UsernameNotFoundException("not found");
        }

        //定义权限列表.
        List<GrantedAuthority> authorities = new ArrayList<>();
        // 用户可以访问的资源名称(或者说用户所拥有的权限) 注意:必须"ROLE_"开头
        for(Role role:userInfo.getRoles()) {
            authorities.add(new SimpleGrantedAuthority("ROLE_"+role.getName()));
        }

        User userDetails = new User(userInfo.getUsername(),userInfo.getPassword(),authorities);
        return userDetails;
    }
}
添加用户
下面用单元测试往数据库添加两个用户。在此之前先修改一下最开始自动生成的spring-boot-starter-test依赖。
<dependency>
    <groupId>org.springframework.boot</groupId>
    <artifactId>spring-boot-starter-test</artifactId>
    <scope>test</scope>
</dependency>
运行单元测试自动生成表并添加用户。
package com.security.demo;

import com.security.demo.bean.UserInfo;
import com.security.demo.repository.UserInfoRepository;
import org.junit.jupiter.api.Test;
import org.junit.runner.RunWith;
import org.springframework.beans.factory.annotation.Autowired;
import org.springframework.boot.test.context.SpringBootTest;
import org.springframework.security.crypto.password.PasswordEncoder;
import org.springframework.test.context.junit4.SpringRunner;

@RunWith(SpringRunner.class)
@SpringBootTest(classes = DemoApplication.class)
class DemoApplicationTests {

    @Autowired
    private UserInfoRepository userInfoRepository;

    @Autowired
    private PasswordEncoder passwordEncoder;

    @Test
    void contextLoads() {
        UserInfo admin = new UserInfo();
        admin.setUsername("admin");
        admin.setPassword(passwordEncoder.encode("123456"));
        userInfoRepository.save(admin);

        UserInfo user = new UserInfo();
        user.setUsername("user");
        user.setPassword(passwordEncoder.encode("123456"));
        userInfoRepository.save(user);
    }
}
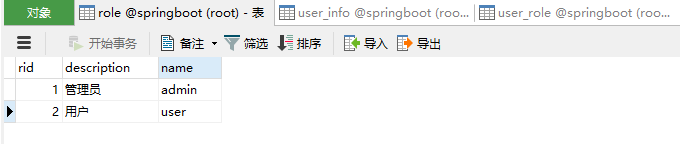
运行测试类后,jpa为我们自动生成了role表、user_info表和他们的关联表user_role表。当前手动添加了admin和user两个角色。
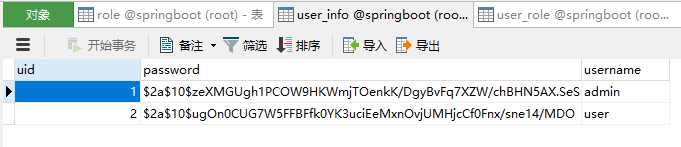
自动生成了user_info表,并成功添加了admin和user两个用户。
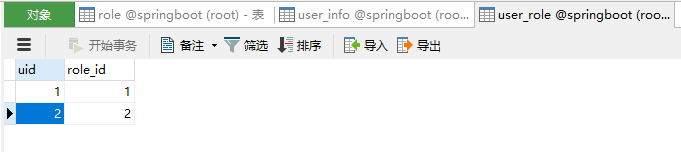
自动生成了用户和角色的关联表,当前为多对多的关系。当前手动为用户1添加admin角色,为用户2添加user角色。
接下来启动项目,用刚才添加的两个用户测试接口请求,效果和之前是一样的。
先登录user用户,user用户可以访问helloUser接口。

user用户没有admin权限,不能访问helloAdmin接口。
重启项目,登录admin用户,admin用户两个接口都可以访问。
至此springboot整合security安全框架就已经初具雏形了。但上面用的一直都是spring security自带的登录页面,实际项目中可能并不能满足我们的需求,所以下面来自定义一些页面。
扩展
自定义登录页面
引入thymeleaf依赖。
<dependency>
    <groupId>org.springframework.boot</groupId>
    <artifactId>spring-boot-starter-thymeleaf</artifactId>
</dependency>
修改全局配置文件,添加thymeleaf的配置。
spring:
  # 模板引擎
  thymeleaf:
    mode: HTML
    encoding: utf-8
    # 禁用缓存
    cache: false
修改WebSecurityConfig配置类,重写其configure方法。
@Override
protected void configure(HttpSecurity http) throws Exception {
	// 定义哪些URL需要被保护、哪些不需要被保护
    http.authorizeRequests()
    		// 设置所有人都可以访问登录页面
            .antMatchers("/login").permitAll()
            // 任何请求,登录后可以访问
            .anyRequest().authenticated()
            .and()
            .formLogin().loginPage("/login")
    ;
}
新建login页面,路径\src\main\resources\templates\login.html
<!DOCTYPE html>
<html xmlns="http://www.w3.org/1999/xhtml" xmlns:th="http://www.thymeleaf.org">
<head>
    <title>Spring Security Login </title>
</head>
<body>
<div th:if="${param.error}">
    用户名密码错误!请重新登录!
</div>

<form th:action="@{/login}" method="post">
    <div><label> 用户名 : <input type="text" name="username"/> </label></div>
    <div><label> 密码: <input type="password" name="password"/> </label></div>
    <div><input type="submit" value="登录"/></div>
</form>
</body>
</html>
最后修改controller,添加login接口,thymeleaf模板引擎会自动帮我们找到页面。
@GetMapping("/login")
public String login() {
    return "login";
}
好了,运行项目,测试一番。可以看到访问任意接口,都会为我们重定向到login。
可以看到我们自定义的登录页面已经出现了。

可以用之前的账号登录一下user/123456,admin/123456,效果和之前的也是一样的。这里就不在展示了。
自定义首页
除此之外还可以自定义主页。修改WebSecurityConfig配置类,在configure方法中取消对首页的拦截。
@Override
protected void configure(HttpSecurity http) throws Exception {
    // 定义哪些URL需要被保护、哪些不需要被保护
    http.authorizeRequests()
            // 设置所有人都可以访问登录页面
            .antMatchers("/login").permitAll()
            .antMatchers("/index","/").permitAll()
            // 任何请求,登录后可以访问
            .anyRequest().authenticated()
            .and()
            .formLogin().loginPage("/login")
    ;
}
新建首页,路径\src\main\resources\templates\index.html。
<!DOCTYPE html>
<html xmlns="http://www.w3.org/1999/xhtml" xmlns:th="http://www.thymeleaf.org">
<head>
    <title>HelloWorld</title>
</head>
<body>
<h1>HelloWorld!</h1>

<p><a th:href="@{/helloUser}">user page</a></p>
<p> <a th:href="@{/helloAdmin}">admin page</a></p>
</body>
</html>
修改controller,添加index接口。
@GetMapping({"/index","/"})
public String index() {
    return "index";
}
运行项目,请求http://localhost:8080,来到首页。
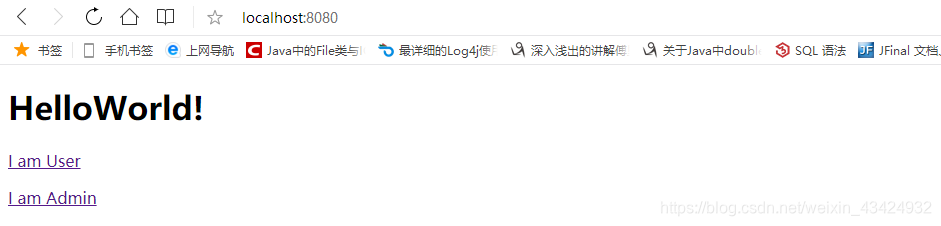
然后点击I am User或者I am Admin都会重定向到登录页面。
之后的效果也是和之前一样,这里就不展示了。
退出登录
到目前为止,我们要重新登录用户都需要重启项目,这显然不是我们想看到的。
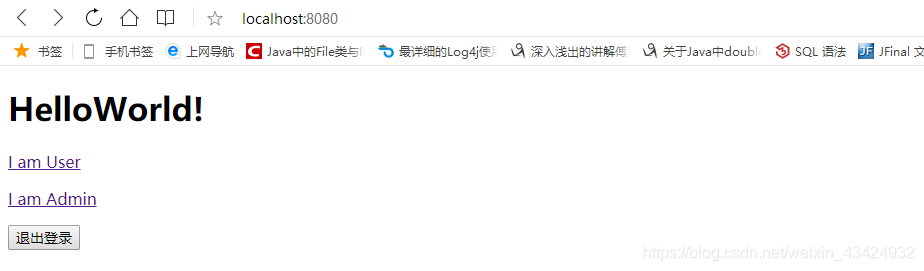
修改首页。直接请求logout接口并用post提交,springsecurity就知道这是要退出了。
<!DOCTYPE html>
<html xmlns="http://www.w3.org/1999/xhtml" xmlns:th="http://www.thymeleaf.org">
<head>
    <title>HelloWorld</title>
</head>
<body>
<h1>HelloWorld!</h1>

<p><a th:href="@{/helloUser}">I am User</a></p>
<p><a th:href="@{/helloAdmin}">I am Admin</a></p>

<form th:action="@{/logout}" method="post">
    <input type="submit" value="退出登录"/>
</form>
</body>
</html>
现在就不必每次登录用户都需要重启项目了。这里就不展示测试了,效果和上面是一样的。
自定义403页面
不过每次权限不够都看到403的ErrorPage也是我们不想的,所以下面自定义一个403页面。
新建403页面,路径\src\main\resources\templates\error\403.html。这个页面spring会自动找到,不需要额外的配置。
<!DOCTYPE html>
<html xmlns="http://www.w3.org/1999/xhtml" xmlns:th="http://www.thymeleaf.org">
<head>
    <title>没有权限</title>
</head>
<body>

<h1 th:inline="text">抱歉!</h1>
<p>您没有权限访问该页面!</p>
<p><a th:href="@{index}">返回首页</a></p>
</body>
</html>
之后重新运行项目,登录user用户并访问helloAdmin接口就会来到我们自定义的403页面了。

Spring Security基于Spring开发,项目中如果使用Spring框架,用Spring Security做权限可以无缝衔接。而且Spring Security功能比Shiro更加丰富,例如安全防护方面。
相对于Spring Security,Shiro的配置和使用比较简单,Spring Security上手复杂些。Shiro依赖性低,不需要任何框架和容器,可以独立运行,而Spring Security依赖Spring容器。
目前大部分的业务场景,两个框架都是可以满足需求的,具体用哪个就看项目要求和喜好了。
