目录
2、在pom.xml添加spring security的依赖
摘要:本文介绍了在spring boot如何使用spring security,spring security的基本配置。如何实现自定义登录,自定义登录成功处理,自定义登录失败处理。
1、创建工程
创建一个spring boot的工程,添加一个web功能,工程目录结构如下:

创建controller包,创建一个UserController测试控制器类,添加一个测试接口:

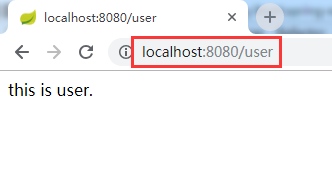
启动,在浏览器上面输入http://localhost:8080/user,查看输出结果:
2、在pom.xml添加spring security的依赖
<dependency>

    <groupId>org.springframework.boot</groupId>

    <artifactId>spring-boot-starter-security</artifactId>

</dependency>重启项目,在次请求http://localhost:8080/user
跳转到如下界面,这是应为spring security生效了。此时所有的接口是被保护的,需要通过验证后才能登录。spring security提供了一个默认的用户user,密码在启动的时候输出在日志上面了。

输入user,和日志输出的密码

点击登录后,跳转到输出的结果界面:

如果不想在配置spring security就生效的话,可以在配置文件application.properties中输入:
# security 使能 -- 好像并没有什么用 -_-!

spring.security.basic.enabled=false
刚才看到的登录框是SpringSecurity是框架自己提供的,被称为httpBasicLogin。显示它不是我们产品上想要的,我们前端一般是通过表单提交的方式进行用户登录验证的,所以我们就需要自定义自己的认证逻辑了。
3、自定义用户认证逻辑
每个系统肯定是有自己的一套用户体系的,所以我们需要自定义自己的认证逻辑以及登录界面。 这里我们需要先对SpringSecurity进行相应的配置。
添加Spring Security配置类WebSecurityConfig,该类是实现抽象类WebSecurityConfigurerAdapter。
@Configuration
public class WebSecurityConfig extends WebSecurityConfigurerAdapter {

    @Override
    protected void configure(HttpSecurity http) throws Exception {
        http.formLogin()                    //  定义当需要用户登录时候,转到的登录页面。
                .loginPage("/login.html")           // 设置登录页面
                .loginProcessingUrl("/login")  // 自定义的登录接口
                .and()
                .authorizeRequests()        // 定义哪些URL需要被保护、哪些不需要被保护
                .antMatchers("/login.html").permitAll()     // 设置所有人都可以访问登录页面
                .anyRequest()               // 任何请求,登录后可以访问
                .authenticated()
                .and()
                .csrf().disable();          // 关闭csrf防护
    }

}配置用户认证逻辑,实现接口UserDetailsService的实现类MyUserDetailsService。
/**
 * @Auther: chisj [email protected]
 * @Date: 2018-10-26 17:13
 * @Description:
 */
@Component
@Slf4j
public class MyUserDetailsService implements UserDetailsService {

    @Autowired
    private PasswordEncoder passwordEncoder;

    @Override
    public UserDetails loadUserByUsername(String username) throws UsernameNotFoundException {
        log.info("用户的用户名: {}", username);

        String password = passwordEncoder.encode("123456");
        log.info("password: {}", password);

        // 参数分别是:用户名,密码,用户权限
        User user = new User(username, password, AuthorityUtils.commaSeparatedStringToAuthorityList("admin"));
        return user;
    }

}可以看到,这里没有做过多的校验,仅仅是验证了密码必须为123456。重启应用程序:
在浏览器上面访问:http://localhost:8080/user

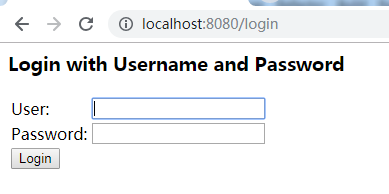
发现登录界面发生了变化,这是因为在配置类WebSecurityConfig中设置了默认的登录界面:
http.formLogin().loginPage("/login.html")这个时候,用户名随便填写,密码填写不为123456,结果如下:

同时也在控制台打印了用户名信息:

然后我们使用正确的密码(123456)登录就会成功调用接口:

4、关于用户对象UserDetails
public interface UserDetails extends Serializable {
    // 封装了权限信息
    Collection<? extends GrantedAuthority> getAuthorities();
    // 密码信息
    String getPassword();
    // 登录用户名
    String getUsername();
    // 帐户是否过期
    boolean isAccountNonExpired();
    // 帐户是否被冻结
    boolean isAccountNonLocked();
    // 帐户密码是否过期,一般有的密码要求性高的系统会使用到,比较每隔一段时间就要求用户重置密码
    boolean isCredentialsNonExpired();
    // 帐号是否可用
    boolean isEnabled();
}
我们在返回UserDetails的实现类User的时候,可以通过User的构造方法,设置对应的参数
5、密码加密解密PasswordEncoder
SpringSecurity中有一个PasswordEncoder接口:
public interface PasswordEncoder {
    // 对密码进行加密
    String encode(CharSequence var1);
    // 对密码进行判断匹配
    boolean matches(CharSequence var1, String var2);
}
我们只需要自己实现这个接口,并在配置文件中配置一下就可以了。
这里我暂时以默认提供的一个实现类进行测试
@Bean
public PasswordEncoder passwordEncoder() {
    return new BCryptPasswordEncoder();
}
使用方法:

这里简单的对123456进行了加密的处理。我们可以进行测试,发现每次打印出来的password都是不一样的,这就是配置的BCryptPasswordEncoder所起到的作用。
6、自定义登录界面
实现简单的登录界面login.html:
<!DOCTYPE html>
<html lang="en">
<head>
    <meta charset="UTF-8">
    <title>登录页面</title>
</head>
<body>
<h2>自定义登录页面</h2>
<form action="/login"  method="post">
    <table>
        <tr>
            <td>用户名:</td>
            <td><input type="text" name="username"></td>
        </tr>
        <tr>
            <td>密码:</td>
            <td><input type="password" name="password"></td>
        </tr>
        <tr>
            <td colspan="2"><button type="submit">登录</button></td>
        </tr>
    </table>
</form>
</body>
</html>完成了登录页面之后,就需要将它配置进行SpringSecurity
@Override
protected void configure(HttpSecurity http) throws Exception {
    http.formLogin()                    //  定义当需要用户登录时候,转到的登录页面。
            .loginPage("/login.html")           // 设置登录页面
            .loginProcessingUrl("/login")  // 自定义的登录接口
            .and()
            .authorizeRequests()        // 定义哪些URL需要被保护、哪些不需要被保护
            .antMatchers("/login.html").permitAll()     // 设置所有人都可以访问登录页面
            .anyRequest()               // 任何请求,登录后可以访问
            .authenticated()
            .and()
            .csrf().disable();          // 关闭csrf防护
}
这样,每当我们访问被保护的接口的时候,就会调转到login.html页面。
7、自定义登录接口
使用http.formLogin().loginPage()之后,必须要设置自定义接口,不然怎么security怎么验证用户名和密码呢?
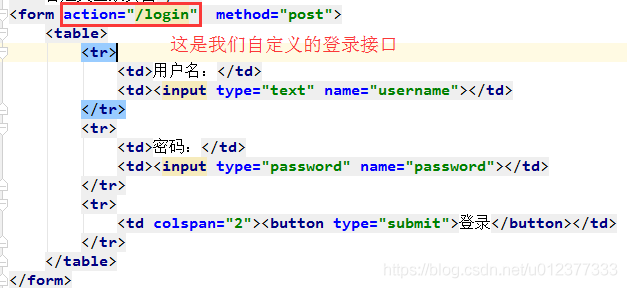
在自定义登录界面,大家可以看到,设置的请求路径为”/login“。可是我们并没有在controller中定义login的映射。
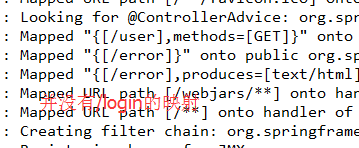
所以需要在http.formLogin().loginProcessingUrl("/login")来生成一个端点给前端调用。我们可以使用postman来模拟一下登录接口:

8、自定义处理成功
上面可以看到,当登录成功后,系统返回的404。提示我们找不到资源路径。我们可以通过自定义处理成功的方式返回我们想要的信息。

第一步:实现自定义成功处理实现类MyAuthenctiationSuccessHandler
/**
 * @Auther: chisj [email protected]
 * @Date: 2018-11-13 17:43
 * @Description:
 */
@Component
@Slf4j
public class MyAuthenctiationSuccessHandler extends SimpleUrlAuthenticationSuccessHandler {

    @Autowired
    private ObjectMapper objectMapper;

    @Autowired
    private SecurityProperties securityProperties;

    @Override
    public void onAuthenticationSuccess(HttpServletRequest request, HttpServletResponse response,
                                        Authentication authentication) throws IOException, ServletException {

        logger.info("登录成功");

        response.setContentType("application/json;charset=UTF-8");
        response.getWriter().write(objectMapper.writeValueAsString(authentication));
    }
}第二步:在WebSecurityConfig配置类中添加自定义处理功能方法
.successHandler(successHandler)
/**
 * @Auther: chisj [email protected]
 * @Date: 2018-10-26 17:09
 * @Description:
 */
@Configuration
public class WebSecurityConfig extends WebSecurityConfigurerAdapter {

    @Autowired
    private MyAuthenctiationSuccessHandler successHandler;

    @Override
    protected void configure(HttpSecurity http) throws Exception {
        http.formLogin()                            //  定义当需要用户登录时候,转到的登录页面。
                .loginPage("/login.html")           // 设置登录页面
                .loginProcessingUrl("/login")       // 自定义的登录接口
                .successHandler(successHandler)
                .and()
                .authorizeRequests()        // 定义哪些URL需要被保护、哪些不需要被保护
                .antMatchers("/login.html", "/login").permitAll()     // 设置所有人都可以访问登录页面
                .anyRequest()               // 任何请求,登录后可以访问
                .authenticated()
                .and()
                .csrf().disable();          // 关闭csrf防护
    }

}
如下设置:

9、自定义处理失败
当登录失败的时候呢?security提供自定义失败处理接口来提供给用户处理验证失败的情况。

第一步:实现自定义失败处理实现类MyAuthenctiationFailureHandler
/**
 * @Auther: chisj [email protected]
 * @Date: 2018-11-13 17:57
 * @Description:
 */
@Component
@Slf4j
public class MyAuthenctiationFailureHandler extends SimpleUrlAuthenticationFailureHandler {

    @Autowired
    private ObjectMapper objectMapper;

    @Autowired
    private SecurityProperties securityProperties;

    @Override
    public void onAuthenticationFailure(HttpServletRequest request, HttpServletResponse response,
                                        AuthenticationException exception) throws IOException, ServletException {

        logger.info("登录失败");

        response.setStatus(HttpStatus.INTERNAL_SERVER_ERROR.value());
        response.setContentType("application/json;charset=UTF-8");
        response.getWriter().write(objectMapper.writeValueAsString("登录失败"));
    }
}第二步:在WebSecurityConfig配置类中添加自定义处理功能方法
.failureHandler(failureHandler)
/**
 * @Auther: chisj [email protected]
 * @Date: 2018-10-26 17:09
 * @Description:
 */
@Configuration
public class WebSecurityConfig extends WebSecurityConfigurerAdapter {

    @Autowired
    private MyAuthenctiationSuccessHandler successHandler;

    @Autowired
    private MyAuthenctiationFailureHandler failureHandler;

    @Override
    protected void configure(HttpSecurity http) throws Exception {
        http.formLogin()                            //  定义当需要用户登录时候,转到的登录页面。
                .loginPage("/login.html")           // 设置登录页面
                .loginProcessingUrl("/login")       // 自定义的登录接口
                .successHandler(successHandler)
                .failureHandler(failureHandler)
                .and()
                .authorizeRequests()        // 定义哪些URL需要被保护、哪些不需要被保护
                .antMatchers("/login.html", "/login").permitAll()     // 设置所有人都可以访问登录页面
                .anyRequest()               // 任何请求,登录后可以访问
                .authenticated()
                .and()
                .csrf().disable();          // 关闭csrf防护
    }

}
如下设置:

10、示例代码
GitHub下载:点我下载
CSDN下载:点我下载