Angular 个人深究(四)【生命周期钩子】
定义:
每个组件都有一个被 Angular 管理的生命周期。
Angular 创建它,渲染它,创建并渲染它的子组件,在它被绑定的属性发生变化时检查它,并在它从 DOM 中被移除前销毁它。
Angular 提供了生命周期钩子,把这些关键生命时刻暴露出来,赋予你在它们发生时采取行动的能力。
除了那些组件内容和视图相关的钩子外,指令有相同生命周期钩子。
概览:
| ngOnChanges() | 当 Angular(重新)设置数据绑定输入属性时响应。 该方法接受当前和上一属性值的 SimpleChanges 对象 当被绑定的输入属性的值发生变化时调用,首次调用一定会发生在 |
| ngOnInit() | 在 Angular 第一次显示数据绑定和设置指令/组件的输入属性之后,初始化指令/组件。 在第一轮 |
| ngDoCheck() | 检测,并在发生 Angular 无法或不愿意自己检测的变化时作出反应。 在每个 Angular 变更检测周期中调用, |
| ngAfterContentInit() | 当把内容投影进组件之后调用。
扫描二维码关注公众号,回复:
3612432 查看本文章

第一次 |
| ngAfterContentChecked() | 每次完成被投影组件内容的变更检测之后调用。
|
| ngAfterViewInit() | 初始化完组件视图及其子视图之后调用。 第一次 |
| ngAfterViewChecked() | 每次做完组件视图和子视图的变更检测之后调用。
|
| ngOnDestroy() | 当 Angular 每次销毁指令/组件之前调用并清扫。 在这儿反订阅可观察对象和分离事件处理器,以防内存泄漏。 在 Angular 销毁指令/组件之前调用。 |
范例:
ngOnChanges()、ngInit
test2.component.ts
// test2.component.ts:

import { Component, OnInit,Input } from '@angular/core';
@Component({
  selector: 'app-test2',
  templateUrl: './test2.component.html',
  styleUrls: ['./test2.component.css']
})
//需要继承 OnInit、OnChanges 接口
export class Test2Component implements OnInit OnChanges{
// 两个input 来自 父组件 test1
	@Input() test2_value1: string;
	@Input() test2_value2: string;
  constructor() { }
  ngOnInit() {
          //判断 ngOnInit的执行顺序
		console.log("这里执行ngOnInit");
  }
	ngOnChanges(changes:SimpleChanges){
		console.log(changes);
		for (let propName in changes) {
			let chng = changes[propName];
			let cur  = JSON.stringify(chng.currentValue);
			let prev = JSON.stringify(chng.previousValue);
			console.log(`${propName}: 新值 = ${cur}, 旧值 = ${prev}`);
		}
	}
}
test1.component.html
<!-- test1.component.html -->
<p>
  test1 works!
</p>
<label> test1 value</label>
<input  type="text" [(ngModel)]="test1_value1" >
<input  type="text" [(ngModel)]="test1_value2" >
<!-- 将test1_value1的值给test2_value1... -->
<app-test2 [test2_value1]="test1_value1" [test2_value2]="test1_value2"></app-test2>
结果:

说明:
- 刚刷新页面时,将test2_value1、test2_value2的值 从 undefined 变成 1、2。
- 页面更改test1_value1,将test2_value1的值 从 1 变成 11。
- 以此类推, 可以使用 ngOnChanges对值发生变化时进行处理。
- ngInit 的执行顺序在 ngOnChanges之后,可以做一下初始化的工作
ngDoCheck()
test2.component.ts
import { Component, OnInit,Input,OnChanges,DoCheck} from '@angular/core';
@Component({
  selector: 'app-test2',
  templateUrl: './test2.component.html',
  styleUrls: ['./test2.component.css']
})
//需要实现 DoCheck 接口
export class Test2Component implements OnInit OnChanges DoCheck{
	@Input() test2_value1: string;
	@Input() test2_value2: string;
	constructor() { }

	ngOnInit() {
		//console.log("这里执行ngOnInit");
	}
	ngOnChanges(changes:SimpleChanges){
		//console.log(changes);
		for (let propName in changes) {
			let chng = changes[propName];
			let cur  = JSON.stringify(chng.currentValue);
			let prev = JSON.stringify(chng.previousValue);
			//console.log(`${propName}: 新值 = ${cur}, 旧值 = ${prev}`);
		}
	}
	ngDoCheck(){
    console.log("执行ngDoCheck");
  }
}
结果:

说明:
- 刷新页面的时候,执行了两次。
- 每次鼠标放到,input框上就会执行一次
- 更改input值,也会执行一次,开销非常大。慎用!
ngAfterContentInit()
app.component.ts
import { Component } from '@angular/core';

@Component({
  selector: 'app-root',
  //templateUrl: './app.component.html',
  //在app主组价中,将test2组件放到test1组件中,
  template: `<app-test1>
    <app-test2></app-test2>
    </app-test1>`,
  styleUrls: ['./app.component.css']
})
export class AppComponent {
  title = 'app';
}
test1.component.ts
import { Component, OnInit,OnChanges} from '@angular/core';

@Component({
  selector: 'app-test1',
  //templateUrl: './test1.component.html',
  //ng-content指定的是外来的组件 在组件app中定义的 test2组件
  //同样在test1组件中,也增加test2 组件
  template: `<div> <ng-content></ng-content> <app-test2></app-test2> </div>`,
  styleUrls: ['./test1.component.css']
})
export class Test1Component implements OnInit, OnChanges{
    test1_value1:string;
    test1_value2:string;
  constructor() { }

  ngOnInit() {
        this.test1_value1="1"
        this.test1_value2="2"
  }
    ngOnChanges(){
        console.log("onchange");
    }
}
test2.component.ts
import { Component, OnInit,Input ,OnChanges,DoCheck,SimpleChanges,AfterContentInit} from '@angular/core';
@Component({
  selector: 'app-test2',
  templateUrl: './test2.component.html',
  styleUrls: ['./test2.component.css']
})
export class Test2Component implements OnInit,OnChanges,DoCheck,AfterContentInit{
    @Input() test2_value1: string;
    @Input() test2_value2: string;
    constructor() { }

    ngOnInit() {
        //console.log("这里执行ngOnInit");
    }
    ngOnChanges(changes:SimpleChanges){
        //console.log(changes);
        for (let propName in changes) {
            let chng = changes[propName];
            let cur  = JSON.stringify(chng.currentValue);
            let prev = JSON.stringify(chng.previousValue);
            //console.log(`${propName}: 新值 = ${cur}, 旧值 = ${prev}`);
        }
    }
    ngDoCheck(){
    console.log("执行ngDoCheck");
  }
    ngAfterContentInit(){
        console.log("执行ngAfterContentInit");
    }
}
结果:
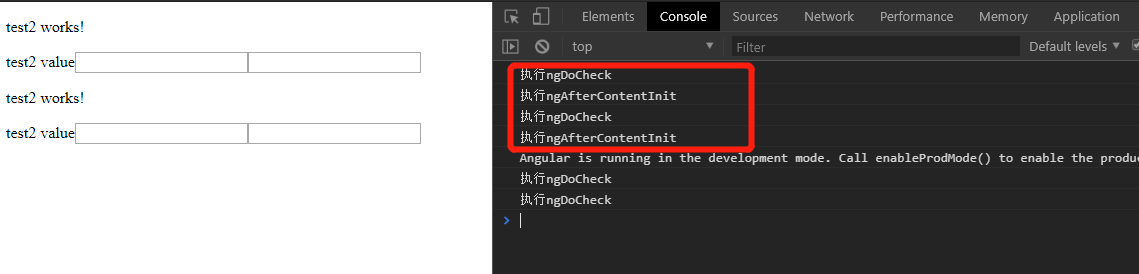
说明:
- ngAfterContentInit会在外来内容被投影到组件中之后 调用,也就是说当test2组件以html的形式投影到test1组件之后执行,
- 因为使用两种方式进行投影了两次,所以ngAfterContentInit执行了两次
- 其他操作只会增加ngDoCheck的次数,并没有增加ngAfterContentInit的次数
ngAfterContentCheck()
test2.component.ts
import { Component, OnInit,Input ,OnChanges,DoCheck,SimpleChanges,AfterContentInit,AfterContentCheck} from '@angular/core';
@Component({
  selector: 'app-test2',
  templateUrl: './test2.component.html',
  styleUrls: ['./test2.component.css']
})
export class Test2Component implements OnInit,OnChanges,DoCheck,AfterContentInit,AfterContentCheck{
    @Input() test2_value1: string;
    @Input() test2_value2: string;
    constructor() { }

    ngOnInit() {
        //console.log("这里执行ngOnInit");
    }
    ngOnChanges(changes:SimpleChanges){
        //console.log(changes);
        for (let propName in changes) {
            let chng = changes[propName];
            let cur  = JSON.stringify(chng.currentValue);
            let prev = JSON.stringify(chng.previousValue);
            //console.log(`${propName}: 新值 = ${cur}, 旧值 = ${prev}`);
        }
    }
    ngDoCheck(){
    console.log("执行ngDoCheck");
  }
    ngAfterContentInit(){
        console.log("执行ngAfterContentInit");
    }
    ngAfterContentChecked(){
        console.log("执行ngAfterContentChecked");
    }
}
结果:
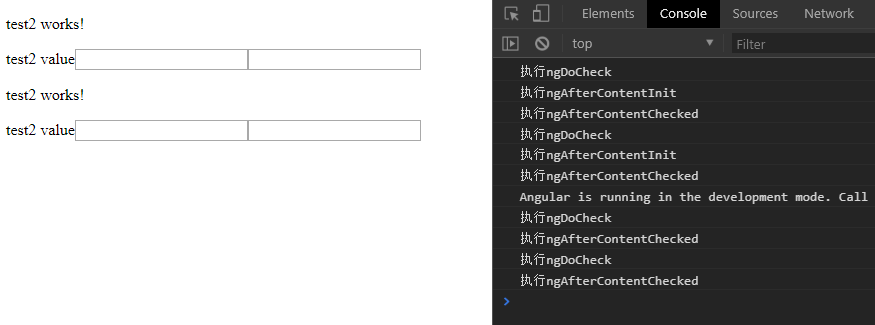
说明:
- 在执行ngDoCheck之后 一定会执行一次ngAfterContentInit
- 每次完成被投影组件内容的变更检测之后调用
- 其他代码没贴出来,就是跟上一个是一样的
ngAfterViewInit()
test1.component.ts
import { Component, OnInit,OnChanges,ViewChild} from '@angular/core';
import {Test2Component} from "../test2/test2.component"

@Component({
  selector: 'app-test1',
  //templateUrl: './test1.component.html',
  template: `<div>  <input  type="text" [(ngModel)]="test1_value1" >
<input  type="text" [(ngModel)]="test1_value2" ><ng-content></ng-content>
<app-test2 [test2_value1]="test1_value1" [test2_value2]="test1_value2"></app-test2> </div>`,
  styleUrls: ['./test1.component.css']
})
export class Test1Component implements OnInit, OnChanges{
    test1_value1:string;
    test1_value2:string;
  constructor() { }
    @ViewChild(Test2Component);
  ngOnInit() {
        this.test1_value1="1"
        this.test1_value2="2"
  }
    ngOnChanges(){
        console.log("onchange");
    }
}
test2.component.ts
import { Component, OnInit,Input ,OnChanges,DoCheck,SimpleChanges,AfterContentInit,AfterContentCheck, AfterViewChecked, AfterViewInit} from '@angular/core';
@Component({
  selector: 'app-test2',
  templateUrl: './test2.component.html',
  styleUrls: ['./test2.component.css']
})
export class Test2Component implements OnInit,OnChanges,DoCheck,AfterContentInit,AfterContentCheck ,AfterViewChecked, AfterViewInit{
    @Input() test2_value1: string;
    @Input() test2_value2: string;
    constructor() { }

    ngOnInit() {
        //console.log("这里执行ngOnInit");
    }
    ngOnChanges(changes:SimpleChanges){
        //console.log(changes);
        for (let propName in changes) {
            let chng = changes[propName];
            let cur  = JSON.stringify(chng.currentValue);
            let prev = JSON.stringify(chng.previousValue);
            //console.log(`${propName}: 新值 = ${cur}, 旧值 = ${prev}`);
        }
    }
    ngDoCheck(){
    console.log("执行ngDoCheck");
  }
    ngAfterContentInit(){
        console.log("执行ngAfterContentInit");
    }
    ngAfterContentChecked(){
        console.log("执行ngAfterContentChecked");
    }
    ngAfterViewInit(){
        console.log("执行ngAfterViewInit");
    }
}
结果:
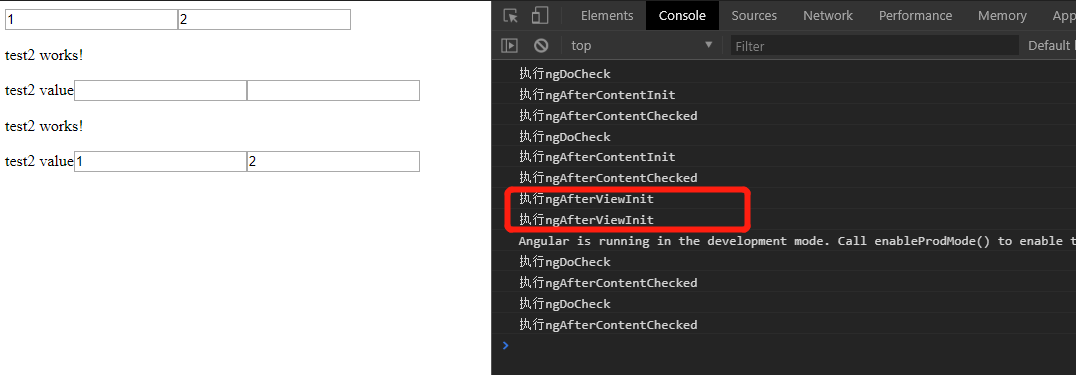
说明:
- 在每次创建了组件的子视图后调用,每次在test1组件中创建test2组件时都会调用,
- 在test1组件中,需要使用@ChildView 装饰器,将test2component装饰一下
ngAfterViewChecked
test2.component.ts
import { Component, OnInit,Input ,OnChanges,DoCheck,SimpleChanges,AfterContentInit,AfterContentCheck, AfterViewChecked, AfterViewInit} from '@angular/core';
@Component({
  selector: 'app-test2',
  templateUrl: './test2.component.html',
  styleUrls: ['./test2.component.css']
})
export class Test2Component implements OnInit,OnChanges,DoCheck,AfterContentInit,AfterContentCheck ,AfterViewChecked, AfterViewInit{
    @Input() test2_value1: string;
    @Input() test2_value2: string;
    constructor() { }

    ngOnInit() {
        //console.log("这里执行ngOnInit");
    }
    ngOnChanges(changes:SimpleChanges){
        //console.log(changes);
        for (let propName in changes) {
            let chng = changes[propName];
            let cur  = JSON.stringify(chng.currentValue);
            let prev = JSON.stringify(chng.previousValue);
            //console.log(`${propName}: 新值 = ${cur}, 旧值 = ${prev}`);
        }
    }
    ngDoCheck(){
    console.log("执行ngDoCheck");
  }
    ngAfterContentInit(){
        console.log("执行ngAfterContentInit");
    }
    ngAfterContentChecked(){
        console.log("执行ngAfterContentChecked");
    }
    ngAfterViewInit(){
        console.log("执行ngAfterViewInit");
    }
    ngAfterViewChecked(){
        console.log("执行ngAfterViewChecked");
    }
}
结果:
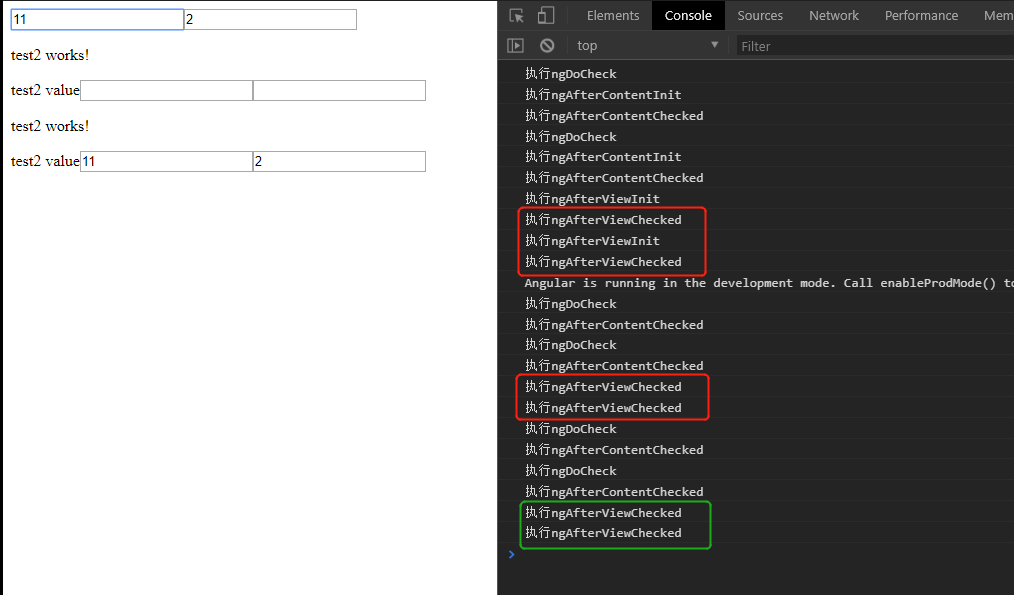
说明:
- 上图红色框是,页面刷新完后执行的ngAfterViewChecked,前两次是伴随init一起的,后面两个是,test1给test2赋值导致的
- 上图绿色框是,更改test1中的一个值,导致了更改了test2的值执行的ngAfterViewChecked
- 我再test1组件的两个input上,鼠标焦点来回切换时,同样也会执行ngAfterViewChecked,还是慎用这个钩子函数吧
OnDestroy
test1.component.ts
import { Component, OnInit,OnChanges,ViewChild} from '@angular/core';
import {Test2Component} from "../test2/test2.component"

@Component({
  selector: 'app-test1',
  //templateUrl: './test1.component.html',
  template: `
        <div>
            <input  type="text" [(ngModel)]="test1_value1" >
            <input  type="text" [(ngModel)]="test1_value2" >
            <ng-content></ng-content>
            <app-test2 [test2_value1]="test1_value1" [test2_value2]="test1_value2">
            </app-test2>
              <div *ngFor="let test of tests" appTest4 class="tests">
            {{test}}
        </div>
            <input type="button"value="add" (click)="addDiv()">
            <input type="button"value="delete"(click)="deleteDiv()">
        </div>`,
  styleUrls: ['./test1.component.css']
})
export class Test1Component implements OnInit, OnChanges{
    test1_value1:string;
    test1_value2:string;
    tests:any;
  constructor() { }
    @ViewChild(Test2Component) viewChild:Test2Component;
  ngOnInit() {
        this.test1_value1="1"
        this.test1_value2="2"
        this.tests=[1,2,3]
  }
    ngOnChanges(){
        console.log("onchange");
    }
    addDiv(){
        this.tests.push("1212");
    }
    deleteDiv(){
        this.tests=[];
    }
}
test4.directive.ts
import { Directive, OnInit, OnDestroy  } from '@angular/core';

@Directive({
  selector: '[appTest4]'
})
export class Test4Directive implements OnInit, OnDestroy{

  constructor() { }
  ngOnInit()    { console.log("test4 directive ngOnInit")}

  ngOnDestroy() { console.log("test4 directive ngDestroy");}
}
结果:
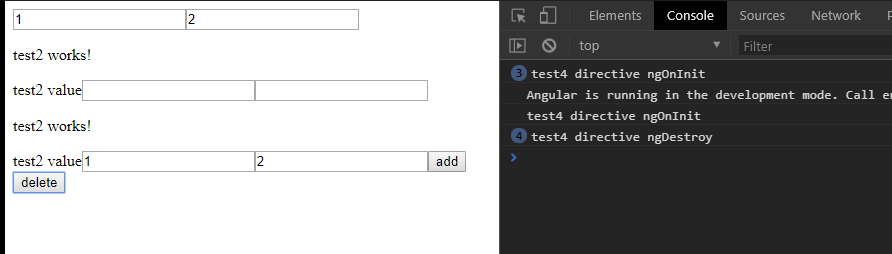
说明:
- 建立一个directive来 监测test1 组件中的 div的生成与销毁
- 开始有默认的三个值,所有ngOnInit执行了三次
- 添加一个值,又执行一次ngOnInit
- 删除所有的值,执行了4次ngDestroy
总结:
由于生命周期的存在,angular提供了众多的生命周期的钩子,让我们能够很好的在发生变化的时候进行处理。