OpenCV使用YOLO模型实现目标检测
目标检测算法主要分为两类:一类是基于Region Proposal(候选区域)的算法,如R-CNN系算法(R-CNN,Fast R-CNN, Faster R-CNN),它们是two-stage(两步法)的,需要先使用Selective search或者CNN网络(RPN)产生Region Proposal,然后再在Region Proposal上做分类与回归。而另一类是Yolo,SSD这类one-stage算法(一步法),其仅仅使用一个CNN网络直接预测不同目标的类别与位置。第一类方法是准确度高一些,但是速度慢,而第二类算法是速度快,但是准确性要低一些。
YOLO是一种比SSD还要快的目标检测网络模型,作者在其论文中说FPS是Fast R-CNN的100倍,这里首先简单的介绍一下YOLO网络基本结构,然后通过OpenCV C++调用Darknet的,实现目标检测。
OpenCV在3.3.1的版本中开始正式支持Darknet网络框架并且支持YOLO1与YOLO2以及YOLO Tiny网络模型的导入与使用。但很可惜,目前测试还不支持YOLO3,可能是因为YOLO3有个新层类型shortcut结构吧。另外,OpenCV dnn模块目前支持Caffe、TensorFlow、Torch、PyTorch等深度学习框架,关于《OpenCV调用TensorFlow预训练模型》可参考鄙人的另一份博客:https://blog.csdn.net/guyuealian/article/details/80570120
目录
1、YOLO网络
YOLO全称YOU ONLY Look Once表达的意思只要看一眼就能感知识别的物体了。YOLO的核心思想:就是利用整张图作为网络的输入,直接在输出层回归物体的bounding box位置和所属的类别。
(1)YOLO网络结构
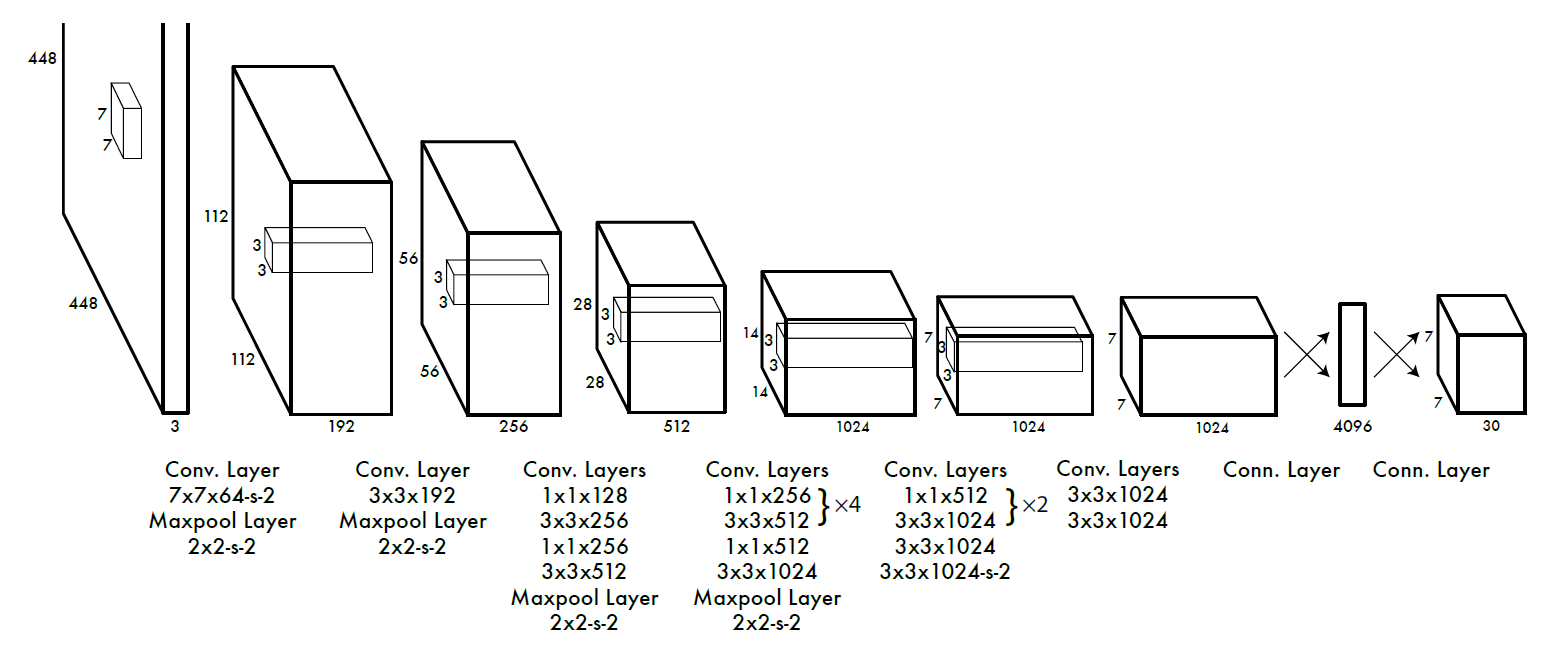
实现过程:首先把输入图像划分成S×S的格子,然后对每个格子都预测B个Bounding Boxes(物体框),每个Bounding Boxes都包含5个预测值:x,y,w,h和confidence(置信度),另外每个格子都预测C个类别的概率分数,但是这个概率分数和物体框的confidence置信度分数是不相关的。这样,每个单元格需要预测(B×5+C)个值。如果将输入图片划分为S×S个网格,那么最终预测值为S×S×(B×5+C)大小的张量。整个模型的预测值结构如下图所示。

- 1、将一幅图像分成SxS个网格(grid cell),如果某个object的中心 落在这个网格中,则这个网格就负责预测这个object。
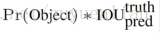
- 2、每个网格要预测B个bounding box,每个bounding box除了要回归自身的位置(x,y,w,h)之外,还要附带预测一个confidence值(每个bounding box要预测(x, y, w, h)和confidence共5个值)。这个confidence代表了所预测的box中含有object的置信度和这个box预测的有多准两重信息,其值是这样计算的:
说明:如果有object落在一个grid cell里,第一项取1,否则取0。 第二项是预测的bounding box和实际的ground truth之间的IOU值。
- 3、每个网格还要预测一个类别概率信息,记为C类。这样所有网格的类别概率就构成了class probability map
注意:class信息是针对每个网格的,confidence信息是针对每个bounding box的。
举个栗子:在PASCAL VOC中,图像输入为448x448,取S=7(将图像成7x7个网格(grid cell)),B=2(每个网格要预测2个bounding box),一共有C=20个类别(PASCAL VOC共有20类别)。则输出就是S x S x (5*B+C)=7x7x30的一个张量tensor。整个网络结构如下图所示:
4、在test的时候,每个网格预测的class信息和bounding box预测的confidence信息相乘,就得到每个bounding box的class-specific confidence score:
等式左边第一项就是每个网格预测的类别信息,第二三项就是每个bounding box预测的confidence。这个乘积即encode了预测的box属于某一类的概率,也有该box准确度的信息。5、得到每个box的class-specific confidence score以后,设置阈值,滤掉得分低的boxes,对保留的boxes进行NMS处理,就得到最终的检测结果。

这部分的讲解可以参考资料:https://blog.csdn.net/tangwei2014/article/details/50915317
(2)tiny-YOLO网络
tiny-YOLO网络模型是更加轻量级的微型YOLO网络,速度非常快,可以在移动端实时目标检测,但检测效果不算好。tiny-YOLO网络的网络结构如下:
与上面不同的是,tiny-YOLO网络模型每个Cell需要检测5个BOX,对每个BOX来说,包含如下数据
4个位置信息x、y、w、h
1个置信分数
基于VOC数据集的20个目标类别
所以对每个BOX来说,每个BOX有5+20=25个参数,5个BOX共有 5x25=125个参数。所以,tiny-YOLO网络模型最后一层卷积层深度是125。
2、OpenCV使用YOLO实现目标检测
OpenCV使用YOLO实现目标检测的代码如下,注意 OpenCV只是前馈网络,只支持预测,不能训练。
(1)代码实现过程
1、需要调用OpenCV DNN模块,所以头文件必须添加:opencv2/dnn.hpp,头文件和命名空间如下:
#include <opencv2/opencv.hpp>
#include <opencv2/dnn.hpp>

#include <fstream>
#include <iostream>
#include <algorithm>
#include <cstdlib>
using namespace std;
using namespace cv;
using namespace cv::dnn;
2、全局的变量:如confidenceThreshold置信度的阈值,项目根目录,这个参数根据自己的项目改改就好
float confidenceThreshold = 0.25;
string pro_dir = "E:/opencv_dnn/opencv_tutorial/"; //项目根目录
3、加载网络模型
	// 加载网络模型
	String modelConfiguration = pro_dir+"data/models/yolov2-tiny-voc/yolov2-tiny-voc.cfg";
	String modelBinary = pro_dir+"data/models/yolov2-tiny-voc/yolov2-tiny-voc.weights";
	dnn::Net net = readNetFromDarknet(modelConfiguration, modelBinary);
	if (net.empty())
	{
		printf("Could not load net...\n");
		return;
	}
4、加载网络模型
     // 加载分类信息
	vector<string> classNamesVec;
	string clsNames = pro_dir + "data/models/yolov2-tiny-voc/voc.names";
	ifstream classNamesFile(clsNames);
	if (classNamesFile.is_open())
	{
		string className = "";
		while (std::getline(classNamesFile, className))
			classNamesVec.push_back(className);
	}
5、加载被检测的图像
	// 加载图像
	string image_path = pro_dir + "data/images/dog.jpg";
	Mat frame = imread(image_path);
	Mat inputBlob = blobFromImage(frame, 1 / 255.F, Size(416, 416), Scalar(), true, false);
	net.setInput(inputBlob, "data");
6、进行目标检测:
	// 进行目标检测
	Mat detectionMat = net.forward("detection_out");
	vector<double> layersTimings;
	double freq = getTickFrequency() / 1000;
	double time = net.getPerfProfile(layersTimings) / freq;
	ostringstream ss;
	ss << "detection time: " << time << " ms";
	putText(frame, ss.str(), Point(20, 20), 0, 0.5, Scalar(0, 0, 255));
7、检测结果并显示:
	// 输出结果
	for (int i = 0; i < detectionMat.rows; i++)
	{
		const int probability_index = 5;
		const int probability_size = detectionMat.cols - probability_index;
		float *prob_array_ptr = &detectionMat.at<float>(i, probability_index);
		size_t objectClass = max_element(prob_array_ptr, prob_array_ptr + probability_size) - prob_array_ptr;
		float confidence = detectionMat.at<float>(i, (int)objectClass + probability_index);
		if (confidence > confidenceThreshold)
		{
			float x = detectionMat.at<float>(i, 0);
			float y = detectionMat.at<float>(i, 1);
			float width = detectionMat.at<float>(i, 2);
			float height = detectionMat.at<float>(i, 3);
			int xLeftBottom = static_cast<int>((x - width / 2) * frame.cols);
			int yLeftBottom = static_cast<int>((y - height / 2) * frame.rows);
			int xRightTop = static_cast<int>((x + width / 2) * frame.cols);
			int yRightTop = static_cast<int>((y + height / 2) * frame.rows);
			Rect object(xLeftBottom, yLeftBottom,
				xRightTop - xLeftBottom,
				yRightTop - yLeftBottom);
			rectangle(frame, object, Scalar(0, 0, 255), 2, 8);
			if (objectClass < classNamesVec.size())
			{
				ss.str("");
				ss << confidence;
				String conf(ss.str());
				String label = String(classNamesVec[objectClass]) + ": " + conf;
				int baseLine = 0;
				Size labelSize = getTextSize(label, FONT_HERSHEY_SIMPLEX, 0.5, 1, &baseLine);
				rectangle(frame, Rect(Point(xLeftBottom, yLeftBottom),
					Size(labelSize.width, labelSize.height + baseLine)),
					Scalar(255, 255, 255), CV_FILLED);
				putText(frame, label, Point(xLeftBottom, yLeftBottom + labelSize.height),
					FONT_HERSHEY_SIMPLEX, 0.5, Scalar(0, 0, 0));
			}
		}
	}
	imshow("YOLO-Detections", frame);
	waitKey(0);
	return;
(2)完整的代码:
这里提供图片测试image_detection()和视频测试 video_detection()的方法,完整 是项目代码如下:
#include <opencv2/opencv.hpp>
#include <opencv2/dnn.hpp>

#include <fstream>
#include <iostream>
#include <algorithm>
#include <cstdlib>
using namespace std;
using namespace cv;
using namespace cv::dnn;

float confidenceThreshold = 0.25;
string pro_dir = "E:/opencv_dnn/opencv_tutorial/"; //项目根目录

void video_detection();
void image_detection();
int main(int argc, char** argv)
{
	//image_detection();//图片测试
	video_detection();//视频测试
}

void video_detection() {
	String modelConfiguration = pro_dir + "data/models/yolov2-tiny-voc/yolov2-tiny-voc.cfg";
	String modelBinary = pro_dir + "data/models/yolov2-tiny-voc/yolov2-tiny-voc.weights";
	dnn::Net net = readNetFromDarknet(modelConfiguration, modelBinary);
	if (net.empty())
	{
		printf("Could not load net...\n");
		return;
	}

	vector<string> classNamesVec;
	string clsNames = pro_dir + "data/models/yolov2-tiny-voc/voc.names";
	ifstream classNamesFile(clsNames);
	if (classNamesFile.is_open())
	{
		string className = "";
		while (std::getline(classNamesFile, className))
			classNamesVec.push_back(className);
	}

	// VideoCapture capture(0);
	VideoCapture capture;
	string video_file = pro_dir+"data/images/lane.avi";
	capture.open(video_file);
	if (!capture.isOpened()) {
		printf("could not open the camera...\n");
		return;
	}

	Mat frame;
	while (capture.read(frame))
	{
		if (frame.empty())
			if (frame.channels() == 4)
				cvtColor(frame, frame, COLOR_BGRA2BGR);
		Mat inputBlob = blobFromImage(frame, 1 / 255.F, Size(416, 416), Scalar(), true, false);
		net.setInput(inputBlob, "data");
		Mat detectionMat = net.forward("detection_out");
		vector<double> layersTimings;
		double freq = getTickFrequency() / 1000;
		double time = net.getPerfProfile(layersTimings) / freq;
		ostringstream ss;
		ss << "FPS: " << 1000 / time << " ; time: " << time << " ms";
		putText(frame, ss.str(), Point(20, 20), 0, 0.5, Scalar(0, 0, 255));

		for (int i = 0; i < detectionMat.rows; i++)
		{
			const int probability_index = 5;
			const int probability_size = detectionMat.cols - probability_index;
			float *prob_array_ptr = &detectionMat.at<float>(i, probability_index);
			size_t objectClass = max_element(prob_array_ptr, prob_array_ptr + probability_size) - prob_array_ptr;
			float confidence = detectionMat.at<float>(i, (int)objectClass + probability_index);
			if (confidence > confidenceThreshold)
			{
				float x = detectionMat.at<float>(i, 0);
				float y = detectionMat.at<float>(i, 1);
				float width = detectionMat.at<float>(i, 2);
				float height = detectionMat.at<float>(i, 3);
				int xLeftBottom = static_cast<int>((x - width / 2) * frame.cols);
				int yLeftBottom = static_cast<int>((y - height / 2) * frame.rows);
				int xRightTop = static_cast<int>((x + width / 2) * frame.cols);
				int yRightTop = static_cast<int>((y + height / 2) * frame.rows);
				Rect object(xLeftBottom, yLeftBottom,
					xRightTop - xLeftBottom,
					yRightTop - yLeftBottom);
				rectangle(frame, object, Scalar(0, 255, 0));
				if (objectClass < classNamesVec.size())
				{
					ss.str("");
					ss << confidence;
					String conf(ss.str());
					String label = String(classNamesVec[objectClass]) + ": " + conf;
					int baseLine = 0;
					Size labelSize = getTextSize(label, FONT_HERSHEY_SIMPLEX, 0.5, 1, &baseLine);
					rectangle(frame, Rect(Point(xLeftBottom, yLeftBottom),
						Size(labelSize.width, labelSize.height + baseLine)),
						Scalar(255, 255, 255), CV_FILLED);
					putText(frame, label, Point(xLeftBottom, yLeftBottom + labelSize.height),
						FONT_HERSHEY_SIMPLEX, 0.5, Scalar(0, 0, 0));
				}
			}
		}
		imshow("YOLOv3: Detections", frame);
		if (waitKey(1) >= 0) break;
	}
}

void image_detection() {
	// 加载网络模型
	String modelConfiguration = pro_dir+"data/models/yolov2-tiny-voc/yolov2-tiny-voc.cfg";
	String modelBinary = pro_dir+"data/models/yolov2-tiny-voc/yolov2-tiny-voc.weights";
	dnn::Net net = readNetFromDarknet(modelConfiguration, modelBinary);
	if (net.empty())
	{
		printf("Could not load net...\n");
		return;
	}
	// 加载分类信息
	vector<string> classNamesVec;
	string clsNames = pro_dir + "data/models/yolov2-tiny-voc/voc.names";
	ifstream classNamesFile(clsNames);
	if (classNamesFile.is_open())
	{
		string className = "";
		while (std::getline(classNamesFile, className))
			classNamesVec.push_back(className);
	}

	// 加载图像
	string image_path = pro_dir + "data/images/dog.jpg";
	Mat frame = imread(image_path);
	Mat inputBlob = blobFromImage(frame, 1 / 255.F, Size(416, 416), Scalar(), true, false);
	net.setInput(inputBlob, "data");

	// 进行目标检测
	Mat detectionMat = net.forward("detection_out");
	vector<double> layersTimings;
	double freq = getTickFrequency() / 1000;
	double time = net.getPerfProfile(layersTimings) / freq;
	ostringstream ss;
	ss << "detection time: " << time << " ms";
	putText(frame, ss.str(), Point(20, 20), 0, 0.5, Scalar(0, 0, 255));

	// 输出结果
	for (int i = 0; i < detectionMat.rows; i++)
	{
		const int probability_index = 5;
		const int probability_size = detectionMat.cols - probability_index;
		float *prob_array_ptr = &detectionMat.at<float>(i, probability_index);
		size_t objectClass = max_element(prob_array_ptr, prob_array_ptr + probability_size) - prob_array_ptr;
		float confidence = detectionMat.at<float>(i, (int)objectClass + probability_index);
		if (confidence > confidenceThreshold)
		{
			float x = detectionMat.at<float>(i, 0);
			float y = detectionMat.at<float>(i, 1);
			float width = detectionMat.at<float>(i, 2);
			float height = detectionMat.at<float>(i, 3);
			int xLeftBottom = static_cast<int>((x - width / 2) * frame.cols);
			int yLeftBottom = static_cast<int>((y - height / 2) * frame.rows);
			int xRightTop = static_cast<int>((x + width / 2) * frame.cols);
			int yRightTop = static_cast<int>((y + height / 2) * frame.rows);
			Rect object(xLeftBottom, yLeftBottom,
				xRightTop - xLeftBottom,
				yRightTop - yLeftBottom);
			rectangle(frame, object, Scalar(0, 0, 255), 2, 8);
			if (objectClass < classNamesVec.size())
			{
				ss.str("");
				ss << confidence;
				String conf(ss.str());
				String label = String(classNamesVec[objectClass]) + ": " + conf;
				int baseLine = 0;
				Size labelSize = getTextSize(label, FONT_HERSHEY_SIMPLEX, 0.5, 1, &baseLine);
				rectangle(frame, Rect(Point(xLeftBottom, yLeftBottom),
					Size(labelSize.width, labelSize.height + baseLine)),
					Scalar(255, 255, 255), CV_FILLED);
				putText(frame, label, Point(xLeftBottom, yLeftBottom + labelSize.height),
					FONT_HERSHEY_SIMPLEX, 0.5, Scalar(0, 0, 0));
			}
		}
	}
	imshow("YOLO-Detections", frame);
	waitKey(0);
	return;
}
3、YOLO的缺点
- YOLO对相互靠的很近的物体,还有很小的群体 检测效果不好,这是因为一个网格中只预测了两个框,并且只属于一类。
- 对测试图像中,同一类物体出现的新的不常见的长宽比和其他情况是。泛化能力偏弱。
- 由于损失函数的问题,定位误差是影响检测效果的主要原因。尤其是大小物体的处理上,还有待加强。
4、参考资料:
[1].《论文阅读笔记:You Only Look Once: Unified, Real-Time Object Detection》https://blog.csdn.net/tangwei2014/article/details/50915317
[2]. https://blog.csdn.net/xiaohu2022/article/details/79211732
[3]. https://blog.csdn.net/u014380165/article/details/72616238