OpenCV+Python实现目标检测和目标计数
目标检测
什么是目标检测
定义
目标检测:
Object Detection,中文名目标检测,是一种与计算机视觉和图像处理相关的计算机技术,用于检测数字图像和视频中某一类语义对象 (如人、建筑物或汽车)的实例。 通俗易懂的解释,就是在图像中检测感兴趣的目标,并且对此进行一定的处理和操作,如提取、计数等。
运用
比较常见的目标检测运用,就是道路车辆计算、人流量计数等等。
Ps:在目的动机上,颜色识别,可能也属于目标检测。
衍生
随着深度学习的发展,目标检测的任务可以通过构建神经网络或者训练模型来完成,当前主流的基于深度学习的目标检测方法可分为检测部件、数据增强、优化方法和学习策略四个方面。
本文主要是简单的给出几个目标检测的项目示例,是一个比较初级的项目学习实战,提供给需要的新手小白。
目标检测流程
1.导入图像并进行滤波处理
2.计算距离峰值
3.执行连通组件分析和分水岭算法
4.输出结果
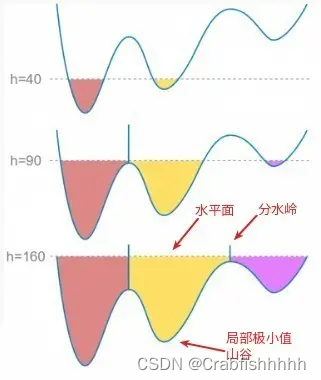
什么是分水岭算法
分水岭算法是一种基于地理形态分析的图像分割算法,模仿地理结构来实现对不同物体的分类。分水岭算法将图像看作一个拓扑地形图,其中灰度值被认为是地形高度值。高灰度值对应山峰,低灰度值对应山谷。
基于图像标记(mark)的分水岭算法,测出地线距离,并将其作为阈值,对整个图像进行了分区
分水岭算法的整个过程:
1.把梯度图像中的所有像素按照灰度值进行分类,并设定一个测地距离阈值。
2.找到灰度值最小的像素点(默认标记为灰度值最低点),让threshold从最小值开始增长,这些点为起始点。
3.水平面在增长的过程中,会碰到周围的邻域像素,测量这些像素到起始点(灰度值最低点)的测地距离,如果小于设定阈值,则将这些像素淹没,否则在这些像素上设置大坝,这样就对这些邻域像素进行了分类。
代码展示和分析
先入为主,我们先来看看我们到底要实现什么效果
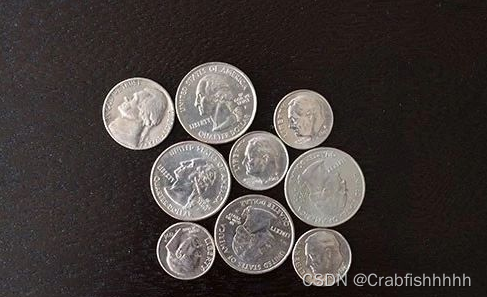
这个是一张多硬币的原图:
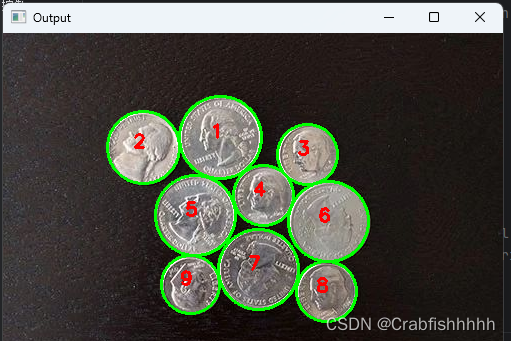
我们想要实现检测图像中大小不同的硬币,并且进行计数,于是乎,通过目标检测,我们得到的是这个结果。
呼呼呼------- 在学习计算机视觉的道路上终于学习到一个能够马上派上用场的东西了!!!
赶紧开始吧!
1.导入图像并进行滤波处理
from skimage.feature import peak_local_max
from skimage.segmentation import watershed
from scipy import ndimage
import numpy as np
import imutils
import cv2
image = cv2.imread("D:/PycharmProjects/pythonProject/Pic/coin.jpg")
#执行均值迁移滤波
shifted = cv2.pyrMeanShiftFiltering(image, 21, 51)
#将均值迁移后的图像转换为灰度图像并应用Otsu阈值化
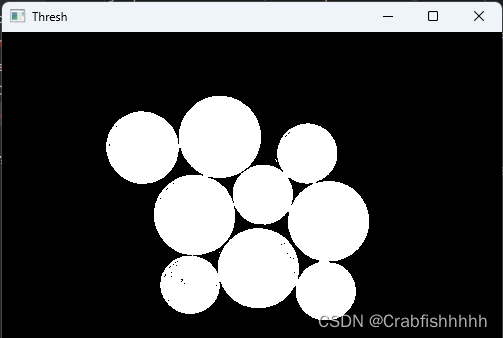
gray = cv2.cvtColor(shifted, cv2.COLOR_BGR2GRAY)
thresh = cv2.threshold(gray, 0, 255, cv2.THRESH_BINARY | cv2.THRESH_OTSU)[1]
二值化后的图像结果就是这样的。
2.计算距离峰值
#计算距离变换图
D = ndimage.distance_transform_edt(thresh)
localMax = peak_local_max(D,  min_distance=35, labels=thresh)
3.执行连通组件分析和分水岭算法
#执行连通组件分析和分水岭算法
mask = np.zeros(D.shape, dtype=bool)
mask[tuple(localMax.T)] = True
markers, _ = ndimage.label(mask)
labels = watershed(-D, markers, mask=thresh)
4.输出结果
#标记并绘制检测到的目标
for label in np.unique(labels):
    # if the label is zero, we are examining the 'background'
    # so simply ignore it
    if label == 0:
        continue

    # otherwise, allocate memory for the label region and draw
    # it on the mask
    mask = np.zeros(gray.shape, dtype="uint8")
    mask[labels == label] = 255

    # detect contours in the mask and grab the largest one
    cnts = cv2.findContours(mask.copy(), cv2.RETR_EXTERNAL,
                            cv2.CHAIN_APPROX_SIMPLE)
    cnts = imutils.grab_contours(cnts)
    c = max(cnts, key=cv2.contourArea)

    # draw a circle enclosing the object
    ((x, y), r) = cv2.minEnclosingCircle(c)
    cv2.circle(image, (int(x), int(y)), int(r), (0, 255, 0), 2)
    cv2.putText(image, "{}".format(label), (int(x) - 10, int(y)),
                cv2.FONT_HERSHEY_SIMPLEX, 0.6, (0, 0, 255), 2)

# show the output image
cv2.imshow("Output", image)
cv2.waitKey(0)
cv2.destroyAllWindows()
整体代码
# import the necessary packages
from skimage.feature import peak_local_max
from skimage.segmentation import watershed
from scipy import ndimage
import numpy as np
import imutils
import cv2

# load the image and perform pyramid mean shift filtering
# to aid the thresholding step
image = cv2.imread("D:/PycharmProjects/pythonProject/Pic/coin.jpg")
shifted = cv2.pyrMeanShiftFiltering(image, 21, 51)
cv2.imshow("Input", image)
cv2.waitKey(0)
cv2.destroyAllWindows()
# convert the mean shift image to grayscale, then apply
# Otsu's thresholding
gray = cv2.cvtColor(shifted, cv2.COLOR_BGR2GRAY)
thresh = cv2.threshold(gray, 0, 255,
                       cv2.THRESH_BINARY | cv2.THRESH_OTSU)[1]
cv2.imshow("Thresh", thresh)
cv2.waitKey(0)
cv2.destroyAllWindows()
print(thresh.shape)
# compute the exact Euclidean distance from every binary
# pixel to the nearest zero pixel, then find peaks in this
# distance map
D = ndimage.distance_transform_edt(thresh)
print(D.shape)
localMax = peak_local_max(D,  min_distance=35,
                          labels=thresh)
print("localMax:",localMax.shape)
mask = np.zeros(D.shape,dtype = bool)
print(mask.shape)
mask[tuple(localMax.T)] = True
# perform a connected component analysis on the local peaks,
# using 8-connectivity, then appy the Watershed algorithm
markers, _ = ndimage.label(mask)
print(markers.shape)
labels = watershed(-D, markers, mask=thresh)
print("[INFO] {} unique segments found".format(len(np.unique(labels)) - 1))

# loop over the unique labels returned by the Watershed
# algorithm
for label in np.unique(labels):
    # if the label is zero, we are examining the 'background'
    # so simply ignore it
    if label == 0:
        continue

    # otherwise, allocate memory for the label region and draw
    # it on the mask
    mask = np.zeros(gray.shape, dtype="uint8")
    mask[labels == label] = 255

    # detect contours in the mask and grab the largest one
    cnts = cv2.findContours(mask.copy(), cv2.RETR_EXTERNAL,
                            cv2.CHAIN_APPROX_SIMPLE)
    cnts = imutils.grab_contours(cnts)
    c = max(cnts, key=cv2.contourArea)

    # draw a circle enclosing the object
    ((x, y), r) = cv2.minEnclosingCircle(c)
    cv2.circle(image, (int(x), int(y)), int(r), (0, 255, 0), 2)
    cv2.putText(image, "{}".format(label), (int(x) - 10, int(y)),
                cv2.FONT_HERSHEY_SIMPLEX, 0.6, (0, 0, 255), 2)

# show the output image
cv2.imshow("Output", image)
cv2.waitKey(0)
cv2.destroyAllWindows()
项目实战总结
目标检测在当下也算是比较火的一个方向,在计算机视觉领域,对感兴趣的部分进行锁定和检测可以节约资源,减少算力浪费,目前的目标检测已经很成熟,并且在yolo5模型大火的情况下,目标检测的实现还是相对简单的,不过还是比较依赖于带有标签的数据集…等等等等,不过这不是本篇需要考虑的事情。
本篇旨在简单介绍目标检测的经典流程,让大家大致了解目标检测到底在干啥,并且介绍了一种较为经典的分割算法——分水岭算法,旨在增广见闻,博学笃志。
希望大家可以在自己感兴趣的领域一步一步脚踏实地地往前走。