版权声明:小博主大三在读,水平有限,希望大家多多指导,Personal Page:holeungliu.com https://blog.csdn.net/soulmeetliang/article/details/79222466
应用Mask-RCNN做染色体图像分割,染色体存在交叉重叠情况,故需要标注重叠染色体作为训练集,于是带来了两个问题,数据不足的情况下,重叠染色体到哪里找?重叠染色体的标注如何做?
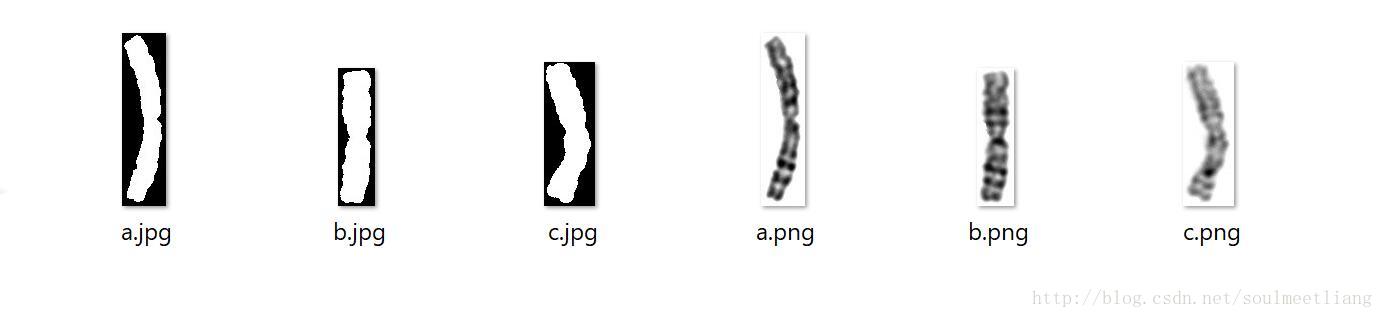
问题1解决:用单染色体图叠加。
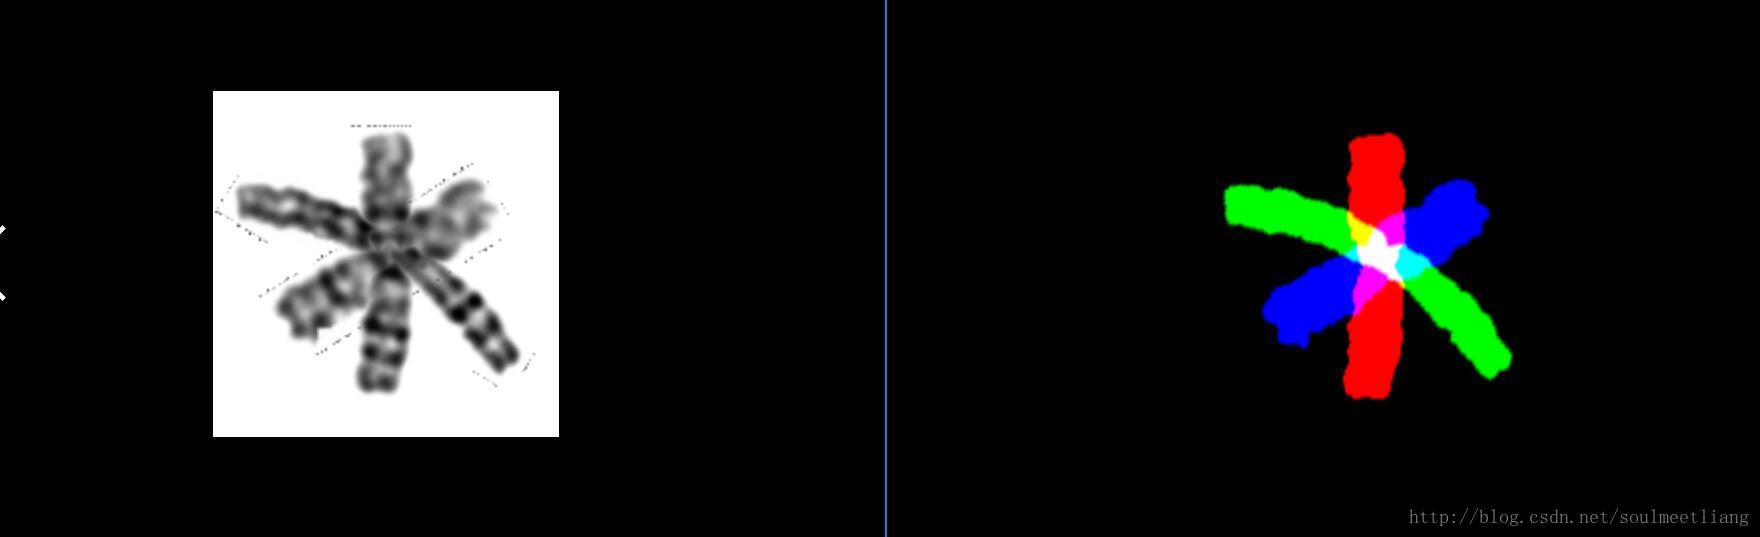
问题2解决:用多通道图像作为标注,每个通道标注一个分割目标。
效果从上图到下图:
在这里贴上代码,关键词图像二值化、灰度图转RGB、图像叠加、图像仿射变换
import cv2
import numpy as np
import skimage.io
import math
import sys, getopt,os
import matplotlib
import matplotlib.pyplot as plt

def addImage(img1, img2, img_add): #叠加
    h, w, _ = img1.shape
    for i in range(3):
        for j in range(h):
            for k in range(w):
                img_add[j-1][k-1][i-1] = min(img1[j-1][k-1][i-1],img2[j-1][k-1][i-1])
    return img_add

def rotate(
    img,  #image matrix
    angle, #angle of rotation
    length, #shape
    ismask, #1:mask, 0:img
    mask = None #消除边界线
    ):
    height = img.shape[0]
    width = img.shape[1]

    if angle%180 == 0:
        scale = 1
    elif angle%90 == 0:
        scale = float(max(height, width))/min(height, width)
    else:
        scale = math.sqrt(pow(height,2)+pow(width,2))/min(height, width)
    #print 'scale %f\n' %scale

    H = np.float32([[1,0,(length-width)/2],[0,1,(length-height)/2]]) # 平移
    rotateImg = cv2.warpAffine(img, H, (length,length))
    rotateMat = cv2.getRotationMatrix2D((length/2, length/2), angle, 1) #旋转
    rotateImg = cv2.warpAffine(rotateImg, rotateMat, (length,length))
    if(ismask == 0):
        rotateImg = np.where(rotateImg == 0, 255, rotateImg)
        for i in range(3):
            rotateImg[:,:,i] = np.where(mask==0, 255, rotateImg[:,:,i]) #用mask去边界框
    return rotateImg #rotated image

def mask(mask):
    result = mask[:,:,1]   #分离三通道
    return result

dataset_img_dir = 'C:\\Users\\soulm\\Downloads\\染色体\\rgb\\1\\img'
dataset_mask_dir = 'C:\\Users\\soulm\\Downloads\\染色体\\rgb\\1\\mask'
img_names = next(os.walk(dataset_img_dir))[2]
mask_names = next(os.walk(dataset_mask_dir))[2]
img_names.sort()
mask_names.sort()

for j in range(len(img_names)):
    mask1=skimage.io.imread(os.path.join(dataset_mask_dir,mask_names[j-1])) #读图
    mask2=skimage.io.imread(os.path.join(dataset_mask_dir,mask_names[j]))
    mask3=skimage.io.imread(os.path.join(dataset_mask_dir,mask_names[j+1]))
    img1=skimage.io.imread(os.path.join(dataset_img_dir,img_names[j-1]))
    img2=skimage.io.imread(os.path.join(dataset_img_dir,img_names[j]))
    img3=skimage.io.imread(os.path.join(dataset_img_dir,img_names[j+1]))
    length = max(mask1.shape[0],mask1.shape[1],mask2.shape[0],mask2.shape[1],mask3.shape[0],mask3.shape[1]) #取最大作为变换后图像尺寸
    background=cv2.resize(skimage.io.imread(os.path.join(" ","background.jpg")),
                          (length,length),interpolation=cv2.INTER_CUBIC)  #background加白底

    for i in range(360):

        mask_temp1 = rotate(mask1[:,:,1],-i,length,1) #mask旋转
        mask_temp2 = rotate(mask2[:,:,1],i,length,1)
        mask_temp3 = rotate(mask3[:,:,1],0,length,1)

        img_temp1 = rotate(img1,-i,length,0,mask_temp1)#img旋转
        img_temp3 = rotate(img2,i,length,0,mask_temp2)
        img_temp4 = rotate(img3,0,length,0,mask_temp3)
        img_temp2 = addImage(img_temp1, img_temp3, background)
        img_result = addImage(img_temp2, img_temp4, background)


        mask_result = np.dstack((mask_temp1,mask_temp2,mask_temp3))

        (shotname,extension) = os.path.splitext(mask_names[j]) #文件名,拓展名
        cv2.imwrite(str(shotname)+"_"+str(i)+"_mask"+".png",mask_result)
        cv2.imwrite(str(shotname)+"_"+str(i)+"_img"+".png",img_result)
import cv2
import numpy as np
import skimage.io
import math
import sys, getopt,os
import matplotlib
import matplotlib.pyplot as plt

def twovalue(img):
    print(img.shape)

    temp = np.zeros(img.shape[:3])
    temp = np.where(img < 245, 255, temp)
    temp = np.where(img >= 255, 0, temp)
    return temp

dataset_dir = 'C:\\Users\\soulm\\Downloads\\染色体\\rgb\\1\\img'
img_names = next(os.walk(dataset_dir))[2]
img_names.sort()

for i in range(len(img_names)):
    print(img_names[i-1])
    img = skimage.io.imread(os.path.join(dataset_dir,img_names[i-1]))
    img = twovalue(img)
    (shotname,extension) = os.path.splitext(img_names[i-1]) #文件名,拓展名
    cv2.imwrite(str(shotname) + ".jpg",img)

#gray2rgb
dataset_dir = 'C:\\Users\\soulm\\Downloads\\染色体\\rgb\\1\\img'
img_names = next(os.walk(dataset_dir))[2]
img_names.sort()

for i in range(len(img_names)):
    print(img_names[i-1])
    img = skimage.io.imread(os.path.join(dataset_dir,img_names[i-1]))
    if len(img.shape) == 2:
        img = cv2.cvtColor(img, cv2.COLOR_GRAY2RGB)
    (shotname,extension) = os.path.splitext(img_names[i]) #文件名,拓展名
    cv2.imwrite(str(shotname)+".png",img)