Unity leapmotion开发实录(3)
本系列文章将会从一个初学者的脚步去讲解unity和leapmotion协同开发的一系列问题:
特:本人水平有限所以有错误请及时指正
本人也会引用一些代码如果有所侵犯请联系删除
扫描二维码关注公众号,回复: 3342162 查看本文章
自2015.11.22开始周更
因个人原因上周拖更现在更新
1,核心组件的使用。
在unity的官方文档中中很明显并没有给出如何去怎样很好的去使用给出的资源那我们先来明确一下 core asset中的资源都是用来干什么的
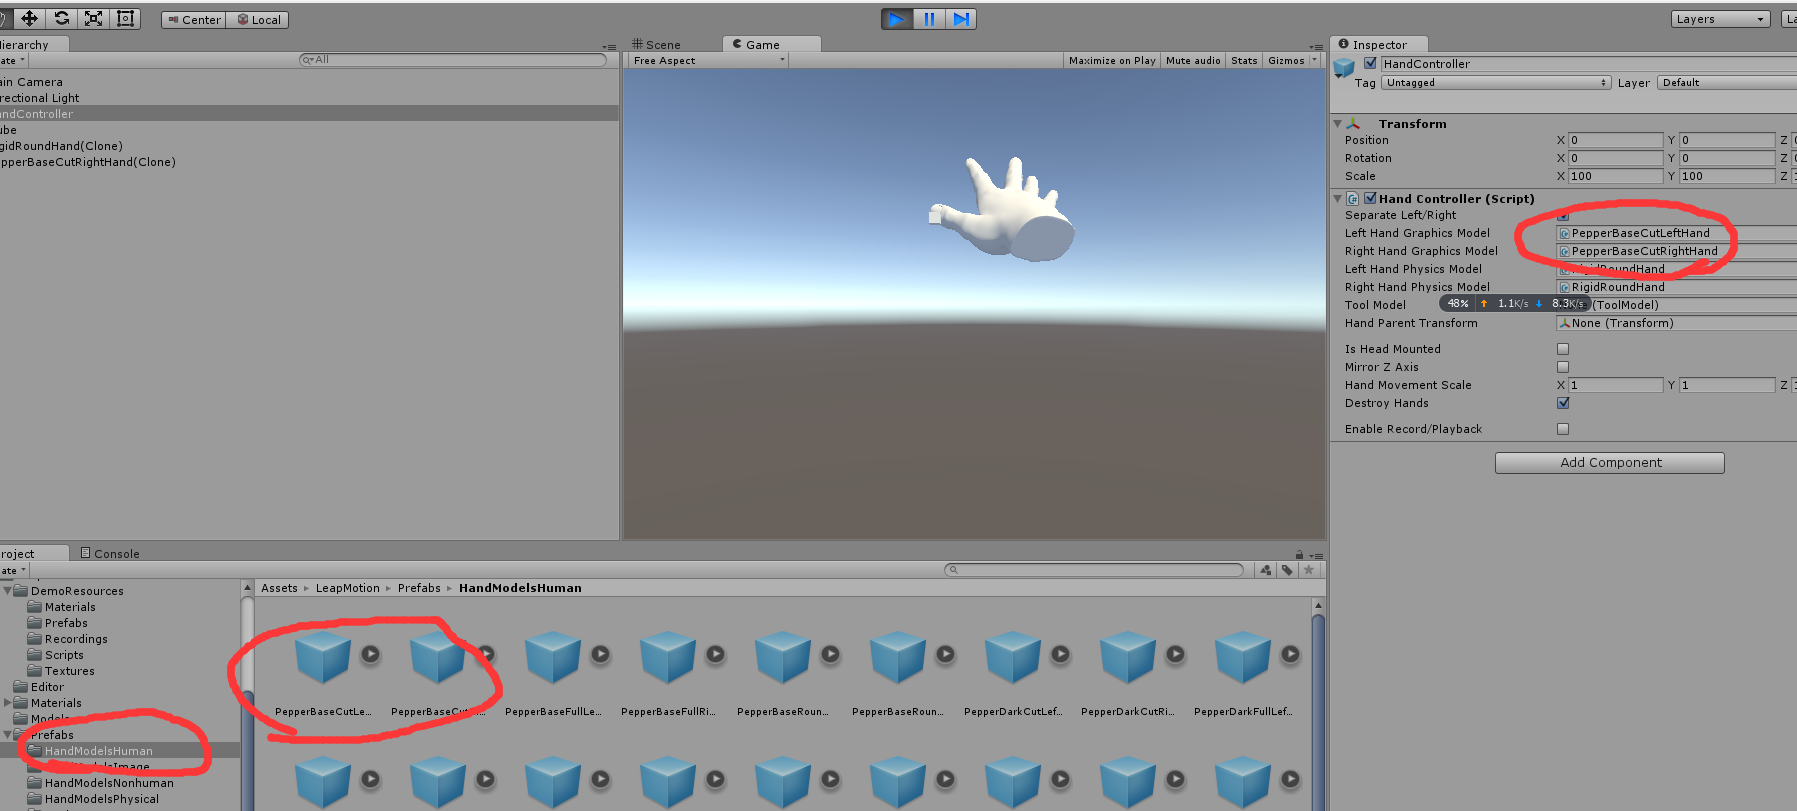
(1).handcontroller(以下简化为hc)
这个组件的目的就是在空间具象化出传感器检测到的手,以及传感器本身的检测范围,我们可以在inspector 面板中清楚地看到他的构成
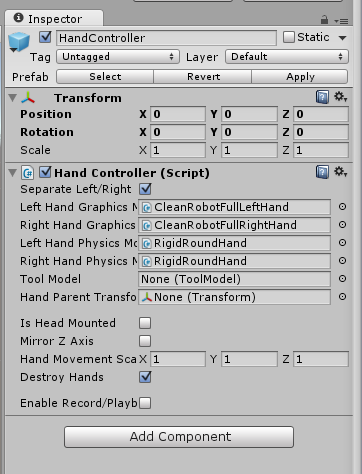
这里的命名十分清楚,在hc的脚本中包含了左右手的模型,包括
图像模型
物理模型
工具模型
是否头戴的选项(主要用于协同oculus的开发)
以及其他一些可供调整的选项
让我们点进图像模型去看又会发现一些更有意思的问题
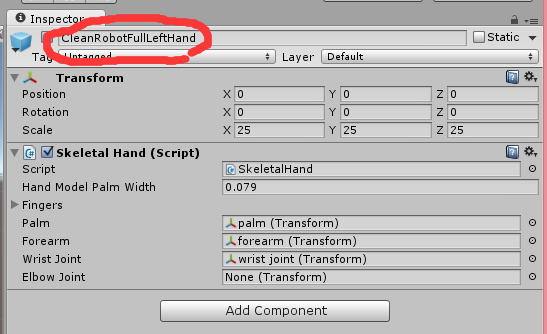
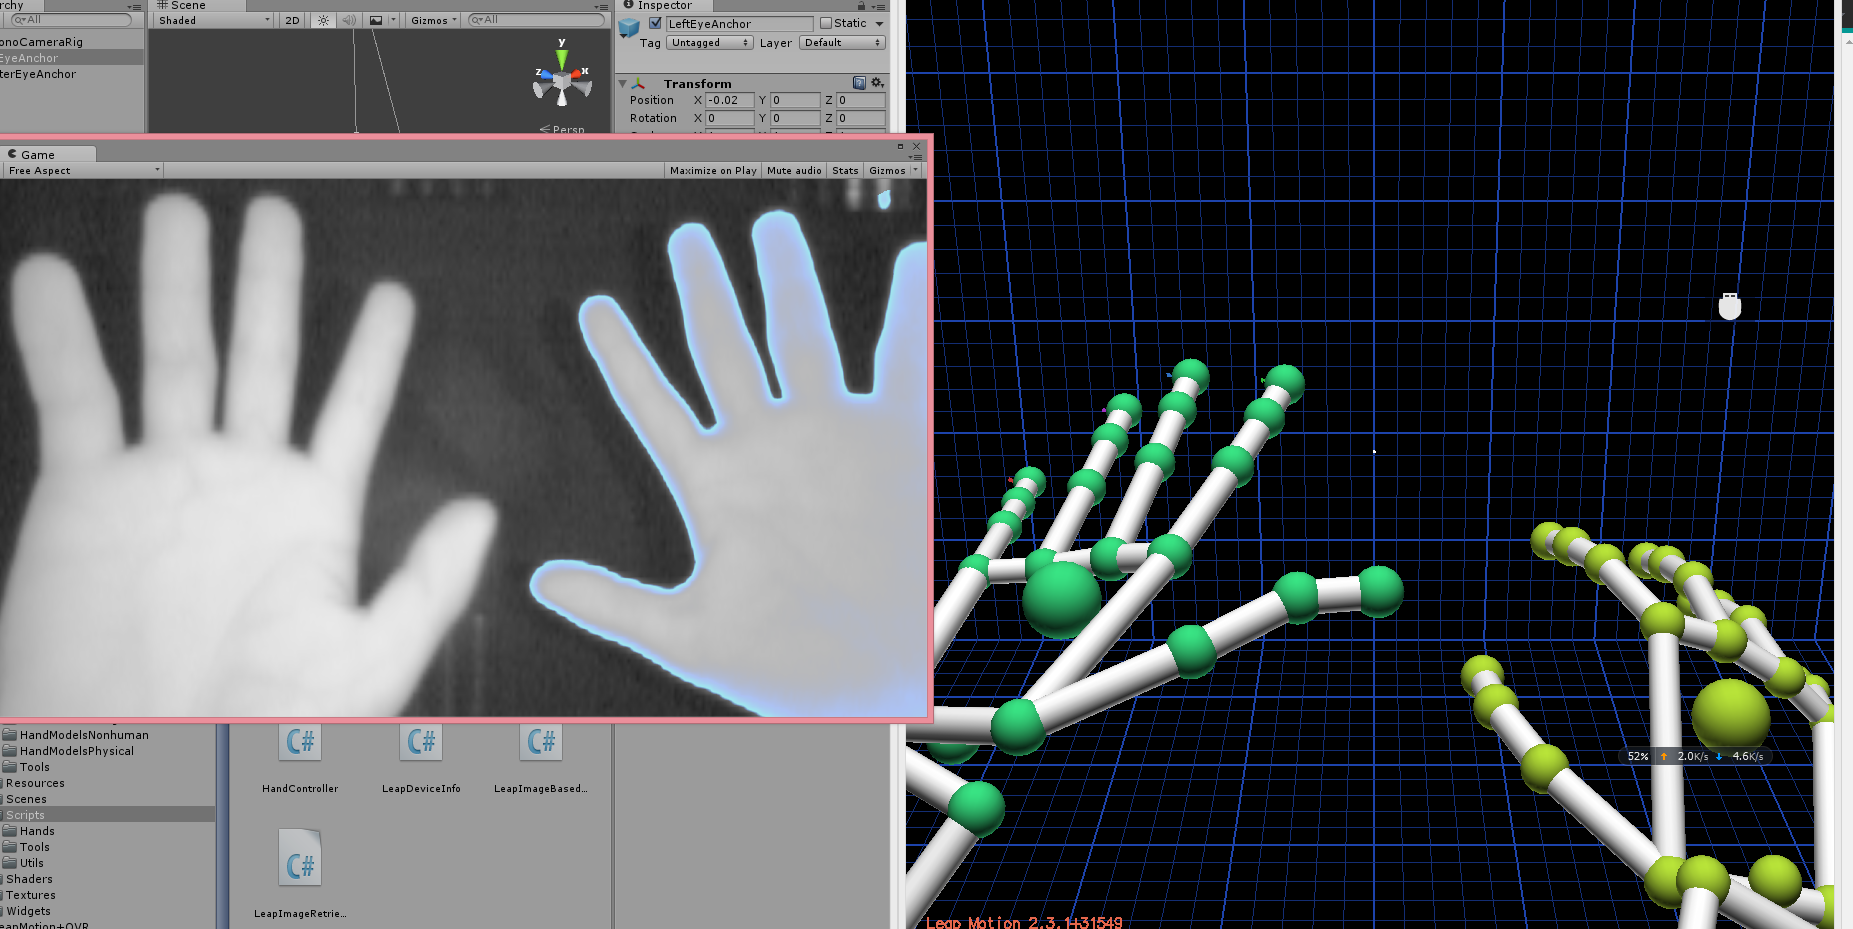
首先我们会发现这些图像模型都是一些预制体他们由统一的skeletalhand脚本控制 这是他们的灵魂所在
是这个脚本把一些零散的模型组合在一起成为一个手 统一之下既然会有skeletalhand 那么skeletalfinger 这些脚本共同控制着在场景中手的运动是符合人体规律,也符合数据的(虽然在具体过程中还是会出现偏差和bug)
了解了由骨骼拼成的图像化手的模型,再来了解物理模型
与图像模型进行比较
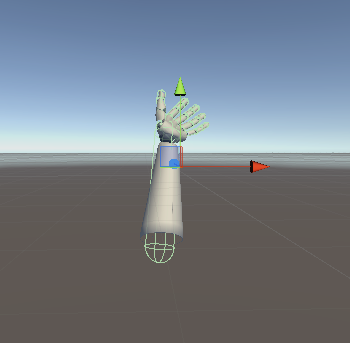
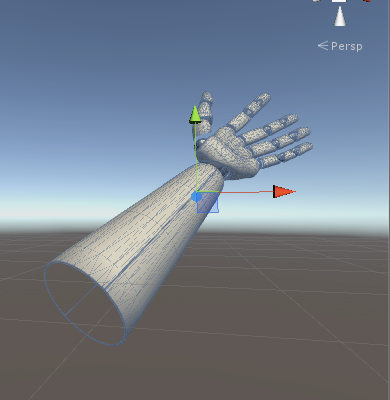
我们会发现从中发现很大的不同 物理模型的网格为了减少计算提高性能
仅仅用一些粗略的网格去勾绘触发区域 但是 这也基本足够用 因为触发本身就是不精确的 且此种网格因为涉及了很多计算本身就是极为耗费性能的。
在这套物理系统中 我们可以轻松方便的设计触发 ,碰撞
当你新建了一个预设的cube或者其他物体且使用他们的collider的话可以用下面一段代码轻松地检测碰撞以及触发
:
void OnTriggerEnter(Collider collider)
    {
        print(collider.gameObject.name + ":" + Time.time);

    }
当然你也可能发现 我们在选择图形模型的时候出现了很多预制体,实际上这里出现的预制体也就都是手的不同的图形模型 我们可以根据左右手分别选择左右手的图形模型 其中包括了机器,仿真,纯白,为了达到更高的调试效果 我们推荐使用白色基础模型 因为他的渲染需求小很多 能够更清晰的反馈问题
此外工具模式可用性极低 在我的测试中即使工具异常明显 识别率成功率几乎是不可用的 因此我们在程序中几乎不需要考虑工具模式。
(2).SCENCE
在scence文件夹中 存在着很多leap用作演示的工程 他们统一基于core asset中的公用资源编写 所以所有文件都是可见的 都是可重用的 他们为我们的开发带来了很多思路 以及方法
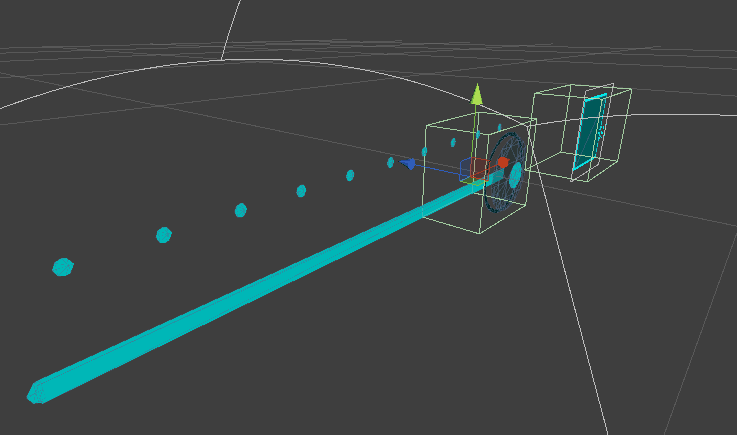
比如我们以其中的imagine hand 就可以清晰的看出 leapmotion的工作进程以及识别算法的思路
:在正常的识别模式之下 采用了高噪点的模式同时蓝色边沿就是景深图像经过算法处理后 形成单帧的手势运算图形
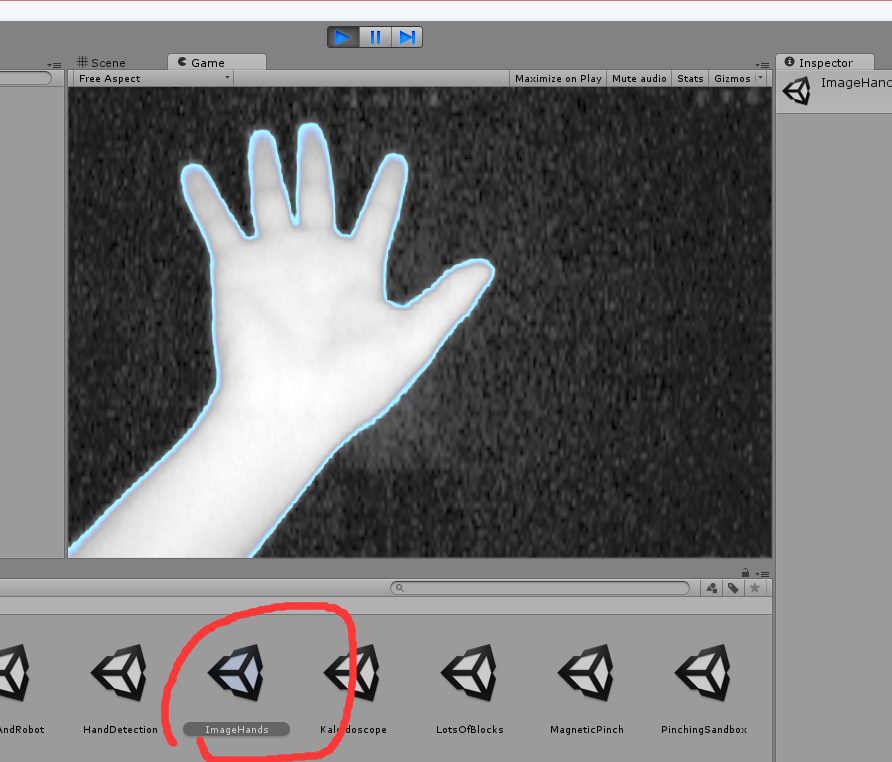
我们如果直接采集图像和图形化检视面板作比较的话 就不难发现 这种描边+景深处理的形式
在这写预置的场景中甚至有一些解决了我们无从下手的设计问题
在这些设计工作上我们可以根据这些例子 这些demo直接去设计从而省去了很多的探索过程
鉴于下一章直接要讲一些功能的实现方式 我们在此直接贴出一些unity中物体操作的代码供大家调试
using UnityEngine;
using System.Collections;

public class mover : MonoBehaviour {

    // Use this for initialization
    void Start () {

        //x轴坐标
        //float xPostion = -5f;
        //z轴坐标
        //float zPostion = 10f;
        //直接将当前物体移动到x轴为xPostion,y轴为0,z轴为zPostion的三维空间位置。
        transform.position = new Vector3(0.1f,0.1f,0.1f);//初始化坐标

    }

    // Update is called once per frame
    /*
void Update () {
        /*
        //移动速度
        float TranslateSpeed = 0.1f;

        //Vector3.forward 表示“向前”
        transform.Translate(Vector3.forward *TranslateSpeed);
         //单方向移动*/


        /*
        //轴移动速度移动速度
        float xSpeed = 0.01f;

        //z轴移动速度移动速度
        float  zSpeed = 0.01f;
        float ySpeed = 0.01f;

        //向x轴移动xSpeed,同时想z轴移动zSpeed,y轴不动
        transform.Translate(xSpeed,ySpeed,zSpeed);
        */


    /*

        //按下键盘“上方向键”控制cube的位置

        if(Input.GetKey(KeyCode.UpArrow))
        {
            Debug.Log ("up");
            transform.Translate(0.1f,0f,0f);}
        if(Input.GetKey(KeyCode.LeftArrow))
        {
            Debug.Log("left");
            transform.Translate(0f,0.1f,0f);}
        if(Input.GetKey(KeyCode.DownArrow))
        {
            Debug.Log("down");
            transform.Translate(-0.1f,0f,0f);}
        if(Input.GetKey(KeyCode.RightArrow))
        {
            Debug.Log("right");
            transform.Translate(0f,-0.1f,0f);}


        //按下鼠标左键(0对应左键 , 1对应右键 , 2对应中键)
        /*
        if(Input.GetMouseButton(0))
            Debug.Log ("mouse down");
        Input.GetAxis("Mouse X");//鼠标横向增量(横向移动)
        Input.GetAxis("Mouse Y");//鼠标纵向增量(纵向移动)
        */

    /*
        //旋转
        this.transform.Rotate (Vector3.up, 0.3f);
        this.transform.Rotate (Vector3.right, 0.3f);
        this.transform.Rotate (Vector3.forward, 0.3F);
*/
    /*
        //缩放
        float speed = 0.1f;
        float x;
        float z;
        x = Input.GetAxis("Horizontal") * Time.deltaTime * speed;    //水平
        z = Input.GetAxis("Vertical") * Time.deltaTime * speed;      //垂直//"Fire1","Fine2","Fine3"映射到Ctrl,Alt,Cmd键和鼠标的三键或腰杆按钮。新的输入轴可以在Input Manager中添加。
        transform.localScale += new Vector3(x, 0, z);


    */

        //鼠标按着左键移动


/*


    void Update()
    {

        move ();

    }
    void move()//move函数可复用
    {   float speed = 0.1f;
        float y;
        float x;
        if (Input.GetMouseButton (0)){
            y = Input.GetAxis ("Mouse X") * Time.deltaTime * speed;
            x = Input.GetAxis ("Mouse Y") * Time.deltaTime * speed;
            transform.Translate(x*5,y*5,0);
            Debug.Log("x="+x);
            Debug.Log("y="+y);
        }
    }
*/
/*
    float speed = 100.0f;
    float x;
    float z;
    float y;
  //鼠标控制旋转

    void Update () {
        if(Input.GetMouseButton(0)){//鼠标按着左键移动
            y = Input.GetAxis("Mouse X") * Time.deltaTime * speed;
            x = Input.GetAxis("Mouse Y") * Time.deltaTime * speed;
            Debug.Log("X="+x);
            Debug.Log("y="+y);


        }
        else{x = y = 0 ;}//检测鼠标如果没有在按压状态下移动的话,返回坐标归零
        transform.Rotate(new Vector3(x,y,0));
        /**---------------其它旋转方式----------------**///transform.Rotate(Vector3.up *Time.deltaTime * speed);//绕Y轴 旋转//用于平滑旋转至自定义目标

    /*  pinghuaxuanzhuan();}

            //平滑旋转至自定义角度
    void OnGUI(){if(GUI.Button(new Rect(Screen.width - 110,10,100,50),"set Rotation")){//自定义角度
            targetRotation = Quaternion.Euler(45.0f,45.0f,45.0f);// 直接设置旋转角度
        iszhuan = true;}
        }

        bool iszhuan= false;
        Quaternion targetRotation;

        void pinghuaxuanzhuan(){if(iszhuan){
                transform.rotation = Quaternion.Slerp(transform.rotation, targetRotation, Time.deltaTime * 3);//平缓旋转函数可复用
            }
        }
       */
        /*
         * 脚本bug处理总结:
         * 1,情况一:官方样板如果出现bug,则为编译框架问题改正方法:project->assembly csoption->build/general->target framework由3.5改为4.5
         * 2,情况二:如果提示符号问题,很可能是空格所带来的问题,mono对编辑区空格宽容度较低,提示脚本中某行的问题,如果确定语法没错,很可能是因为空格的问题
         * 3,情况三:单精度后必须加f  1.0 错  1.0f对
         * 4,情况四:复制粘贴的代码需要大量精力来重新对格式进行debug,因此如果不是两三百行以上,尽量自己重写
         * 5,情况五:如果编译错误很可能是因为空白区域留有字符
         * /


*/

}
注:以上代码均为不同功能片段凑成 不是直接复制粘贴运行就能完成功能 至于怎么修改和去除注释 我想就不用我教了
此外我们需要对摄像机的位置进行调整的话 可以用以下代码 用以保证摄像机永远对着物体拍摄
以下代码的脚本需附在摄像机上 以此摄像机的轨迹就是以物体为球心的球面
using UnityEngine;
using System.Collections;

public class camral : MonoBehaviour {
    public Vector3 v1, v2;
    public GameObject cube;

    // Use this for initialization
    void Start () {
        cube =  GameObject.Find("House N251015");//house xxxx为物体的名字

    }

    // Update is called once per frame
    void Update () {
        if (Input.GetKey (KeyCode.UpArrow))
            this.transform.RotateAround (cube.transform.position, Vector3.right, Time.deltaTime*10f);
        if (Input.GetKey (KeyCode.DownArrow))
            this.transform.RotateAround (cube.transform.position, Vector3.left, Time.deltaTime * 10f);
        if (Input.GetKey (KeyCode.LeftArrow))
            this.transform.RotateAround (cube.transform.position, Vector3.down, Time.deltaTime * 10f);
        if (Input.GetKey (KeyCode.RightArrow))
            this.transform.RotateAround (cube.transform.position, Vector3.up, Time.deltaTime * 10f);


    }
}
在后期的开发中我们还需要对物体的坐标进行世界坐标化 以免旋转过后因为自身坐标的变化而引起方向的混乱 因此 我们物体的操作 都要有基于世界坐标的版本
using UnityEngine;
using System.Collections;

public class world_v : MonoBehaviour {
    public GameObject cube;
    // Use this for initialization
    void Start () {
        this.cube.transform.position = new Vector3 (0f, 0f, 0f);

    }

    // Update is called once per frame
    void Update () {


        if(Input.GetKey(KeyCode.UpArrow))
        {
            Debug.Log ("up");
            this.cube.transform.Translate(Vector3.up * Time.deltaTime, Space.World);

        //  this.cube.transform.Translate(0f,0.1f,0f);
        }
        if(Input.GetKey(KeyCode.LeftArrow))
        {
            Debug.Log("left");
            this.cube.transform.Translate(Vector3.left * Time.deltaTime, Space.World);
        }
            //this.cube.transform.Translate(-0.1f,0f,0f);}
        if(Input.GetKey(KeyCode.DownArrow))
        {
            Debug.Log("down");
            this.cube.transform.Translate(Vector3.down * Time.deltaTime, Space.World);
        //this.cube.transform.Translate(0f,-0.1f,0f);
        }
        if(Input.GetKey(KeyCode.RightArrow))
        {
            Debug.Log("right");
            this.cube.transform.Translate(Vector3.right * Time.deltaTime, Space.World);
            //this.cube.transform.Translate(0.1f,0f,0f);
        }
        if (Input.GetKey (KeyCode.W)) {
            Debug.Log ("z+");
            this.cube.transform.Translate(Vector3.forward * Time.deltaTime, Space.World);
        //  this.cube.transform.Translate (0f, 0f, 0.1f);
        }
        if (Input.GetKey (KeyCode.S)) {
            Debug.Log("z-");
            this.cube.transform.Translate(Vector3.back* Time.deltaTime, Space.World);
            //this.cube.transform.Translate(0f,0f,-0.1f);


//________________________________________________________________


        }
        if (Input.GetKey (KeyCode.Y)) {
            //this.cube.transform.Rotate(new Vector3(1,0,0));
            this.cube.transform.Rotate(Vector3.up *1f, Space.World);
        }
        if(Input.GetKey(KeyCode.U))
        {
            //this.cube.transform.Rotate(new Vector3(0,1,0));
            this.cube.transform.Rotate(Vector3.left *1f, Space.World);
        }
        if(Input.GetKey(KeyCode.I))
        {
            //this.cube.transform.Rotate(new Vector3(0,0,1));
            this.cube.transform.Rotate(Vector3.forward *1f, Space.World);
        }
        if (Input.GetKey (KeyCode.H)) {
            //this.cube.transform.Rotate(new Vector3(-1,0,0));
            this.cube.transform.Rotate(Vector3.down *1f, Space.World);
        }
        if (Input.GetKey (KeyCode.J)) {
            //this.cube.transform.Rotate(new Vector3(0,-1,0));
            this.cube.transform.Rotate(Vector3.right *1f, Space.World);
        }
        if (Input.GetKey (KeyCode.K)) {
            //this.cube.transform.Rotate(new Vector3(0,0,-1));
            this.cube.transform.Rotate(Vector3.back *1f, Space.World);
         }

    }
}
描述了以上一些操作 在unity中你就可以让物体动起来了并且按照一定的路线去规定物体怎么去运动 也为我们的进一步交互打好了基础
下周的内容将是真正意义上开发的开始 请仔细完成以上代码的功能
just do it ! goodbye next week