在上一篇用YOLOv2模型训练VOC数据集中,我们尝试用YOLOv2来训练voc数据集,但我想训练自己的数据集,那么YOLOv2如何做fine-tuning呢?我们一步一步来做~
1 准备数据
1.1 建立层次结构
首先在darknet/data文件夹下创建一个文件夹fddb2016,文件层次如下
--fddb2016
    --Annotations
        2002_07_19_big_img_130.xml
        2002_07_25_big_img_84.xml
        2002_08_01_big_img_1445.xml
        2002_08_08_big_img_277.xml
        2002_08_16_big_img_637.xml
        2002_08_25_big_img_199.xml
        2003_01_01_big_img_698.xml
        .
        .
        .
    --ImageSets
        --Main
            test.txt
            trainval.txt
    --JPEGImages
        2002_07_19_big_img_130.jpg
        2002_07_25_big_img_84.jpg
        2002_08_01_big_img_1445.jpg
        2002_08_08_big_img_277.jpg
        2002_08_16_big_img_637.jpg
        2002_08_25_big_img_199.jpg
        2003_01_01_big_img_698.jpg
        .
        .
        .
--labels- 1
- 2
- 3
- 4
- 5
- 6
- 7
- 8
- 9
- 10
- 11
- 12
- 13
- 14
- 15
- 16
- 17
- 18
- 19
- 20
- 21
- 22
- 23
- 24
- 25
- 26
- 27
- 28
- 1
- 2
- 3
- 4
- 5
- 6
- 7
- 8
- 9
- 10
- 11
- 12
- 13
- 14
- 15
- 16
- 17
- 18
- 19
- 20
- 21
- 22
- 23
- 24
- 25
- 26
- 27
- 28
trainval.txt中存放的是图片的名称,我们来看一下
2002_08_11_big_img_591
2002_08_26_big_img_265
2002_07_19_big_img_423
2002_08_24_big_img_490
2002_08_31_big_img_17676
2002_07_31_big_img_228
.
.
.- 1
- 2
- 3
- 4
- 5
- 6
- 7
- 8
- 9
- 1
- 2
- 3
- 4
- 5
- 6
- 7
- 8
- 9
1.2 xml2txt
因为yolo读取的是txt文档,所以我们要将xml的benchmark修改为txt格式,程序如下所示:
import xml.etree.ElementTree as ET
import pickle
import os
from os import listdir, getcwd
from os.path import join
import cv2

#sets=[('fddb2016', 'train'), ('fddb2016', 'val')]
#classes = ["aeroplane", "bicycle", "bird", "boat", "bottle", "bus", "car", "cat", "chair", "cow", "diningtable", "dog", "horse", "motorbike", "person", "pottedplant", "sheep", "sofa", "train", "tvmonitor"]
classes = ["face"]

def convert(size, box):
    dw = 1./size[0]
    dh = 1./size[1]
    x = (box[0] + box[1])/2.0
    y = (box[2] + box[3])/2.0
    w = box[1] - box[0]
    h = box[3] - box[2]
    x = x*dw
    w = w*dw
    y = y*dh
    h = h*dh
    return (x,y,w,h)

def convert_annotation(w, h, image_id):
    in_file = open('fddb2016/Annotations/%s.xml' % image_id)
    out_file = open('fddb2016/labels/%s.txt'% image_id, 'w')
    print in_file
    tree=ET.parse(in_file)
    root = tree.getroot()
    size = root.find('size')

    for obj in root.iter('object'):
        difficult = obj.find('difficult').text
        cls = obj.find('name').text
        if cls not in classes or int(difficult) == 1:
            continue
        cls_id = classes.index(cls)
        xmlbox = obj.find('bndbox')
        b = (float(xmlbox.find('xmin').text), float(xmlbox.find('xmax').text), float(xmlbox.find('ymin').text), float(xmlbox.find('ymax').text))
        bb = convert((w,h), b)
        out_file.write(str(cls_id) + " " + " ".join([str(a) for a in bb]) + '\n')

wd = getcwd()

if not os.path.exists('fddb2016/labels/'):
    os.makedirs('fddb2016/labels/')
image_ids = open('fddb2016/ImageSets/Main/trainval.txt').read().strip().split()
list_file = open('fddb2016_train.txt', 'w')
for image_id in image_ids:
    list_file.write('%s/fddb2016/JPEGImages/%s.jpg\n'% (wd, image_id))
    image = cv2.imread('%s/fddb2016/JPEGImages/%s.jpg'%(wd, image_id))
    h, w, c = image.shape
    convert_annotation(w, h, image_id)
list_file.close()- 1
- 2
- 3
- 4
- 5
- 6
- 7
- 8
- 9
- 10
- 11
- 12
- 13
- 14
- 15
- 16
- 17
- 18
- 19
- 20
- 21
- 22
- 23
- 24
- 25
- 26
- 27
- 28
- 29
- 30
- 31
- 32
- 33
- 34
- 35
- 36
- 37
- 38
- 39
- 40
- 41
- 42
- 43
- 44
- 45
- 46
- 47
- 48
- 49
- 50
- 51
- 52
- 53
- 54
- 55
- 1
- 2
- 3
- 4
- 5
- 6
- 7
- 8
- 9
- 10
- 11
- 12
- 13
- 14
- 15
- 16
- 17
- 18
- 19
- 20
- 21
- 22
- 23
- 24
- 25
- 26
- 27
- 28
- 29
- 30
- 31
- 32
- 33
- 34
- 35
- 36
- 37
- 38
- 39
- 40
- 41
- 42
- 43
- 44
- 45
- 46
- 47
- 48
- 49
- 50
- 51
- 52
- 53
- 54
- 55
2 Fine tuning
2.1 修改.cfg文件
如果你想用22层模型的就修改cfg/yolo-voc.cfg,你想用9层的模型就修改cfg/tiny-yolo-voc.cfg,两者修改方式一样,我们以yolo-voc.cfg为例:
复制cfg文件
$cp cfg/yolo-voc.cfg cfg/yolo-fddb.cfg- 1
- 1
打开yolo-fddb.cfg文件,并作如下修改
a. 将learning_rate=0.0001改为learning_rate=0.00005
b. 将max_batches = 45000改为max_batches = 200000
c. 将classes=20改为classes=1
d. 将最后一层[convolutional]层的filters=125改为filters=30,filters的计算公式如下,请根据你自己数据的类别数量修改
filters=num∗(classes+coords+1)=5∗(1+4+1)=30
最后结果如下:
[net]
batch=64
subdivisions=8
width=416
height=416
channels=3
momentum=0.9
decay=0.0005
angle=0
saturation = 1.5
exposure = 1.5
hue=.1

learning_rate=0.0005
max_batches = 200000
policy=steps
steps=100,25000,35000
scales=10,.1,.1
.
.
.

[convolutional]
size=1
stride=1
pad=1
filters=30
activation=linear
[region]
anchors = 1.08,1.19,  3.42,4.41,  6.63,11.38,  9.42,5.11,  16.62,10.52
bias_match=1
classes=1
coords=4
num=5
softmax=1
jitter=.2
rescore=1

object_scale=5
noobject_scale=1
class_scale=1
coord_scale=1

absolute=1
thresh = .6
random=0- 1
- 2
- 3
- 4
- 5
- 6
- 7
- 8
- 9
- 10
- 11
- 12
- 13
- 14
- 15
- 16
- 17
- 18
- 19
- 20
- 21
- 22
- 23
- 24
- 25
- 26
- 27
- 28
- 29
- 30
- 31
- 32
- 33
- 34
- 35
- 36
- 37
- 38
- 39
- 40
- 41
- 42
- 43
- 44
- 45
- 46
- 1
- 2
- 3
- 4
- 5
- 6
- 7
- 8
- 9
- 10
- 11
- 12
- 13
- 14
- 15
- 16
- 17
- 18
- 19
- 20
- 21
- 22
- 23
- 24
- 25
- 26
- 27
- 28
- 29
- 30
- 31
- 32
- 33
- 34
- 35
- 36
- 37
- 38
- 39
- 40
- 41
- 42
- 43
- 44
- 45
- 46
2.2 修改voc.names文件
复制voc.names文件
$cp data/voc.names data/fddb.names- 1
- 1
修改fddb.names文件,结果如下
face- 1
- 1
2.3 修改voc.data文件
复制voc.data文件
$cp cfg/voc.data cfg/fddb.data- 1
- 1
修改voc.data文件,结果如下
classes= 1
train  = /home/usrname/darknet-v2/data/fddb2016_train.txt
valid  = valid  = /home/pjreddie/data/voc/2007_test.txt
names = data/fddb.names
backup = /home/guoyana/my_files/local_install/darknet-v2/backup- 1
- 2
- 3
- 4
- 5
- 1
- 2
- 3
- 4
- 5
3 开始训练
YOLOv2已经支持多gpu了,利用voc数据集得到的权重来训练,运行以下命令即可开始
./darknet detector train ./cfg/fddb.data ./cfg/yolo-fddb.cfg backup/yolo-voc_6000.weights -gpus 0,1,2,3- 1
- 1
4 结果
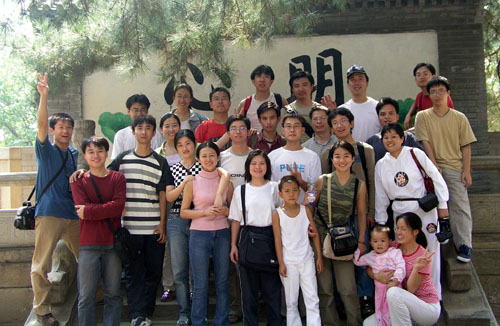
3中有个问题:一般预训练模型都用图像分类的模型,而不是用检测模型训练的。所以上面的方法还是有问题的,loss降到0.1之后就不再下降了。最后没用预训练模型来训练网络,迭代了18000次后的效果如下所示(注:图片来自百度图片)

权重文件已上传到百度云盘,需要的可以自行下载yolo-fddb_20000.weights
(END)
- 顶
- 2
- 踩
在上一篇用YOLOv2模型训练VOC数据集中,我们尝试用YOLOv2来训练voc数据集,但我想训练自己的数据集,那么YOLOv2如何做fine-tuning呢?我们一步一步来做~
1 准备数据
1.1 建立层次结构
首先在darknet/data文件夹下创建一个文件夹fddb2016,文件层次如下
--fddb2016
    --Annotations
        2002_07_19_big_img_130.xml
        2002_07_25_big_img_84.xml
        2002_08_01_big_img_1445.xml
        2002_08_08_big_img_277.xml
        2002_08_16_big_img_637.xml
        2002_08_25_big_img_199.xml
        2003_01_01_big_img_698.xml
        .
        .
        .
    --ImageSets
        --Main
            test.txt
            trainval.txt
    --JPEGImages
        2002_07_19_big_img_130.jpg
        2002_07_25_big_img_84.jpg
        2002_08_01_big_img_1445.jpg
        2002_08_08_big_img_277.jpg
        2002_08_16_big_img_637.jpg
        2002_08_25_big_img_199.jpg
        2003_01_01_big_img_698.jpg
        .
        .
        .
--labels- 1
- 2
- 3
- 4
- 5
- 6
- 7
- 8
- 9
- 10
- 11
- 12
- 13
- 14
- 15
- 16
- 17
- 18
- 19
- 20
- 21
- 22
- 23
- 24
- 25
- 26
- 27
- 28
- 1
- 2
- 3
- 4
- 5
- 6
- 7
- 8
- 9
- 10
- 11
- 12
- 13
- 14
- 15
- 16
- 17
- 18
- 19
- 20
- 21
- 22
- 23
- 24
- 25
- 26
- 27
- 28
trainval.txt中存放的是图片的名称,我们来看一下
2002_08_11_big_img_591
2002_08_26_big_img_265
2002_07_19_big_img_423
2002_08_24_big_img_490
2002_08_31_big_img_17676
2002_07_31_big_img_228
.
.
.- 1
- 2
- 3
- 4
- 5
- 6
- 7
- 8
- 9
- 1
- 2
- 3
- 4
- 5
- 6
- 7
- 8
- 9
1.2 xml2txt
因为yolo读取的是txt文档,所以我们要将xml的benchmark修改为txt格式,程序如下所示:
import xml.etree.ElementTree as ET
import pickle
import os
from os import listdir, getcwd
from os.path import join
import cv2

#sets=[('fddb2016', 'train'), ('fddb2016', 'val')]
#classes = ["aeroplane", "bicycle", "bird", "boat", "bottle", "bus", "car", "cat", "chair", "cow", "diningtable", "dog", "horse", "motorbike", "person", "pottedplant", "sheep", "sofa", "train", "tvmonitor"]
classes = ["face"]

def convert(size, box):
    dw = 1./size[0]
    dh = 1./size[1]
    x = (box[0] + box[1])/2.0
    y = (box[2] + box[3])/2.0
    w = box[1] - box[0]
    h = box[3] - box[2]
    x = x*dw
    w = w*dw
    y = y*dh
    h = h*dh
    return (x,y,w,h)

def convert_annotation(w, h, image_id):
    in_file = open('fddb2016/Annotations/%s.xml' % image_id)
    out_file = open('fddb2016/labels/%s.txt'% image_id, 'w')
    print in_file
    tree=ET.parse(in_file)
    root = tree.getroot()
    size = root.find('size')

    for obj in root.iter('object'):
        difficult = obj.find('difficult').text
        cls = obj.find('name').text
        if cls not in classes or int(difficult) == 1:
            continue
        cls_id = classes.index(cls)
        xmlbox = obj.find('bndbox')
        b = (float(xmlbox.find('xmin').text), float(xmlbox.find('xmax').text), float(xmlbox.find('ymin').text), float(xmlbox.find('ymax').text))
        bb = convert((w,h), b)
        out_file.write(str(cls_id) + " " + " ".join([str(a) for a in bb]) + '\n')

wd = getcwd()

if not os.path.exists('fddb2016/labels/'):
    os.makedirs('fddb2016/labels/')
image_ids = open('fddb2016/ImageSets/Main/trainval.txt').read().strip().split()
list_file = open('fddb2016_train.txt', 'w')
for image_id in image_ids:
    list_file.write('%s/fddb2016/JPEGImages/%s.jpg\n'% (wd, image_id))
    image = cv2.imread('%s/fddb2016/JPEGImages/%s.jpg'%(wd, image_id))
    h, w, c = image.shape
    convert_annotation(w, h, image_id)
list_file.close()- 1
- 2
- 3
- 4
- 5
- 6
- 7
- 8
- 9
- 10
- 11
- 12
- 13
- 14
- 15
- 16
- 17
- 18
- 19
- 20
- 21
- 22
- 23
- 24
- 25
- 26
- 27
- 28
- 29
- 30
- 31
- 32
- 33
- 34
- 35
- 36
- 37
- 38
- 39
- 40
- 41
- 42
- 43
- 44
- 45
- 46
- 47
- 48
- 49
- 50
- 51
- 52
- 53
- 54
- 55
- 1
- 2
- 3
- 4
- 5
- 6
- 7
- 8
- 9
- 10
- 11
- 12
- 13
- 14
- 15
- 16
- 17
- 18
- 19
- 20
- 21
- 22
- 23
- 24
- 25
- 26
- 27
- 28
- 29
- 30
- 31
- 32
- 33
- 34
- 35
- 36
- 37
- 38
- 39
- 40
- 41
- 42
- 43
- 44
- 45
- 46
- 47
- 48
- 49
- 50
- 51
- 52
- 53
- 54
- 55
2 Fine tuning
2.1 修改.cfg文件
如果你想用22层模型的就修改cfg/yolo-voc.cfg,你想用9层的模型就修改cfg/tiny-yolo-voc.cfg,两者修改方式一样,我们以yolo-voc.cfg为例:
复制cfg文件
$cp cfg/yolo-voc.cfg cfg/yolo-fddb.cfg- 1
- 1
打开yolo-fddb.cfg文件,并作如下修改
a. 将learning_rate=0.0001改为learning_rate=0.00005
b. 将max_batches = 45000改为max_batches = 200000
c. 将classes=20改为classes=1
d. 将最后一层[convolutional]层的filters=125改为filters=30,filters的计算公式如下,请根据你自己数据的类别数量修改
filters=num∗(classes+coords+1)=5∗(1+4+1)=30
最后结果如下:
[net]
batch=64
subdivisions=8
width=416
height=416
channels=3
momentum=0.9
decay=0.0005
angle=0
saturation = 1.5
exposure = 1.5
hue=.1

learning_rate=0.0005
max_batches = 200000
policy=steps
steps=100,25000,35000
scales=10,.1,.1
.
.
.

[convolutional]
size=1
stride=1
pad=1
filters=30
activation=linear
[region]
anchors = 1.08,1.19,  3.42,4.41,  6.63,11.38,  9.42,5.11,  16.62,10.52
bias_match=1
classes=1
coords=4
num=5
softmax=1
jitter=.2
rescore=1

object_scale=5
noobject_scale=1
class_scale=1
coord_scale=1

absolute=1
thresh = .6
random=0- 1
- 2
- 3
- 4
- 5
- 6
- 7
- 8
- 9
- 10
- 11
- 12
- 13
- 14
- 15
- 16
- 17
- 18
- 19
- 20
- 21
- 22
- 23
- 24
- 25
- 26
- 27
- 28
- 29
- 30
- 31
- 32
- 33
- 34
- 35
- 36
- 37
- 38
- 39
- 40
- 41
- 42
- 43
- 44
- 45
- 46
- 1
- 2
- 3
- 4
- 5
- 6
- 7
- 8
- 9
- 10
- 11
- 12
- 13
- 14
- 15
- 16
- 17
- 18
- 19
- 20
- 21
- 22
- 23
- 24
- 25
- 26
- 27
- 28
- 29
- 30
- 31
- 32
- 33
- 34
- 35
- 36
- 37
- 38
- 39
- 40
- 41
- 42
- 43
- 44
- 45
- 46
2.2 修改voc.names文件
复制voc.names文件
$cp data/voc.names data/fddb.names- 1
- 1
修改fddb.names文件,结果如下
face- 1
- 1
2.3 修改voc.data文件
复制voc.data文件
$cp cfg/voc.data cfg/fddb.data- 1
- 1
修改voc.data文件,结果如下
classes= 1
train  = /home/usrname/darknet-v2/data/fddb2016_train.txt
valid  = valid  = /home/pjreddie/data/voc/2007_test.txt
names = data/fddb.names
backup = /home/guoyana/my_files/local_install/darknet-v2/backup- 1
- 2
- 3
- 4
- 5
- 1
- 2
- 3
- 4
- 5
3 开始训练
YOLOv2已经支持多gpu了,利用voc数据集得到的权重来训练,运行以下命令即可开始
./darknet detector train ./cfg/fddb.data ./cfg/yolo-fddb.cfg backup/yolo-voc_6000.weights -gpus 0,1,2,3- 1
- 1
4 结果
3中有个问题:一般预训练模型都用图像分类的模型,而不是用检测模型训练的。所以上面的方法还是有问题的,loss降到0.1之后就不再下降了。最后没用预训练模型来训练网络,迭代了18000次后的效果如下所示(注:图片来自百度图片)
权重文件已上传到百度云盘,需要的可以自行下载yolo-fddb_20000.weights
(END)