Fragment碎片
一.Fragment的概述
1.概述:
Fragment其实可以理解为一个具有自己生命周期的控件,只不过这个控件又有点特殊,它有自己的处理输入事件的能力,有自己的生命周期,又必须依赖于Activity,能互相通信和托管。
2.使用Fragment的好处
- 代码复用。特别适用于模块化的开发,因为一个 Fragment可以被多个Activity嵌套,有个共同的业务模块就可以复用了,是模块化UI的良好组件。
- Activity用来管理Fragment.Fragment的生命周期是寄托到Activity中,Fragment可以被Attach添加和Detach释放。
- 可控性。Fragment可以像普通对象那样自由的创建和控制,传递参数更加容易和方便,也不用处理系统相关的事情,显示方式、替换、不管是整体还是部分,都可以做到相应的更改。
- Fragments是view controllers,它们包含可测试的,解耦的业务逻辑块,由于Fragments是构建在views之上的,而views很容易实现动画效果,因此Fragments在屏幕切换时具有更好的控制。
总结重点:
Fragment是为了解决不同屏幕适配。和局部页面的刷新。(使用ViewPage实现页卡切换)
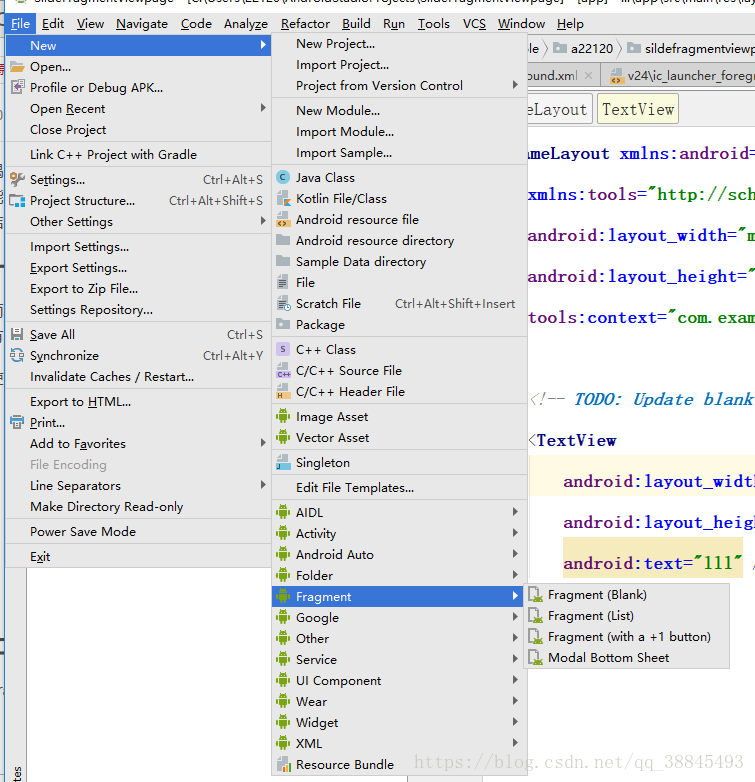
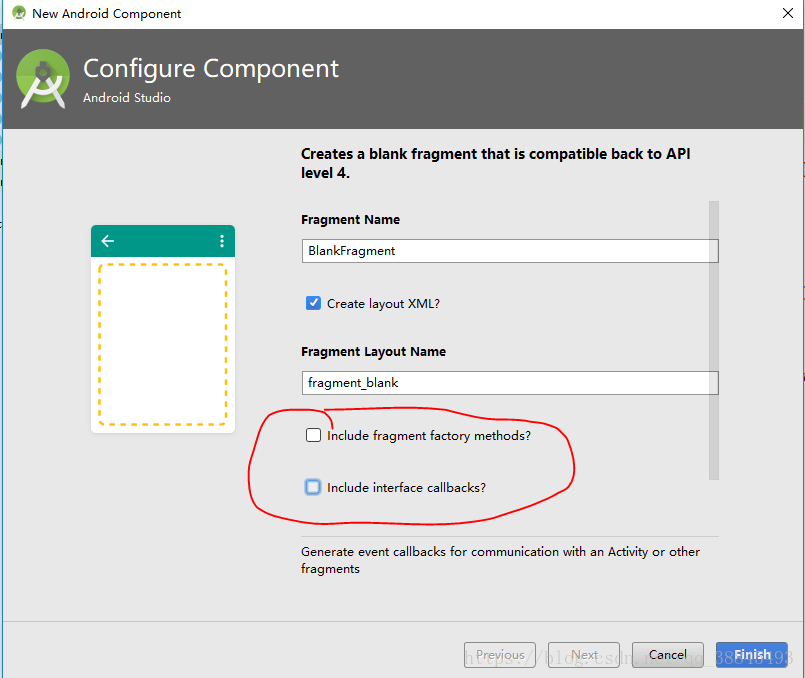
二.如何创建一个Fragment(Blank,空的)
划重点:必须把下图的红标的勾选去掉,去掉,去掉!!!
三.两种添加Fragment的方法
Fragment存在静态和动态两种添加方式
第一种 静态添加
创建之后完成就可以在布局用fragmen(注意是小写) 标签添加name选择静态添加fragment
 <fragment
    android:name="com.example.a22120.myapplication.Fragment_page.OneFragment"
     android:layout_width="0px"
     android:layout_height="match_parent"
     android:layout_weight="1"
     android:id="@+id/one"
/>
静态添加的例子
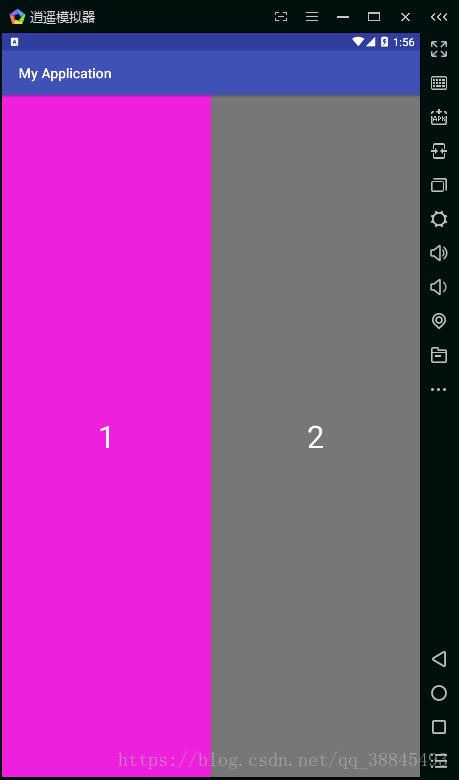
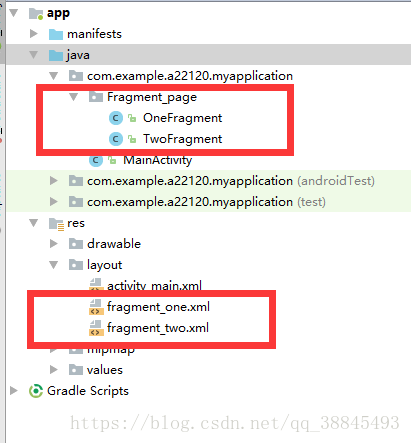
- 创建两个fragment(OneFragment,TwoFragment)
便会有两个fragment.xml布局文件
将他们分别设置不同的颜色
<FrameLayout xmlns:android="http://schemas.android.com/apk/res/android"
    xmlns:tools="http://schemas.android.com/tools"
    android:layout_width="match_parent"
    android:layout_height="match_parent"
    android:background="#ee1d"
    tools:context="com.example.a22120.myapplication.Fragment_page.OneFragment">

    <!-- TODO: Update blank fragment layout -->
    <TextView
        android:layout_width="match_parent"
        android:layout_height="match_parent"
        android:text="1"
        android:textColor="#fff"
        android:gravity="center"
        android:textSize="80px"
        />

</FrameLayout>
最后在activity_main.xml布局文件中使用
<?xml version="1.0" encoding="utf-8"?>
<LinearLayout xmlns:android="http://schemas.android.com/apk/res/android"
    xmlns:app="http://schemas.android.com/apk/res-auto"
    xmlns:tools="http://schemas.android.com/tools"
    android:layout_width="match_parent"
    android:layout_height="match_parent"
    tools:context="com.example.a22120.myapplication.MainActivity">
 <fragment
     android:name="com.example.a22120.myapplication.Fragment_page.OneFragment"
     android:layout_width="0px"
     android:layout_height="match_parent"
     android:layout_weight="1"
     android:id="@+id/one"
/>
 <fragment
     android:name="com.example.a22120.myapplication.Fragment_page.TwoFragment"
     android:layout_width="0px"
     android:layout_height="match_parent"
     android:layout_weight="1"
     android:id="@+id/two"
     />
</LinearLayout>
注意:静态添加Fragment必须有id,并使用name寻找Fragment的路径
第二种 动态添加的两种方法
动态添加相对于静态添加更加常用需要熟练掌握,接下来我们讲解两种动态添加的方法
方法一:
如下图效果:点击不同的导航,出现不同的页面

我们做一个简单版本的
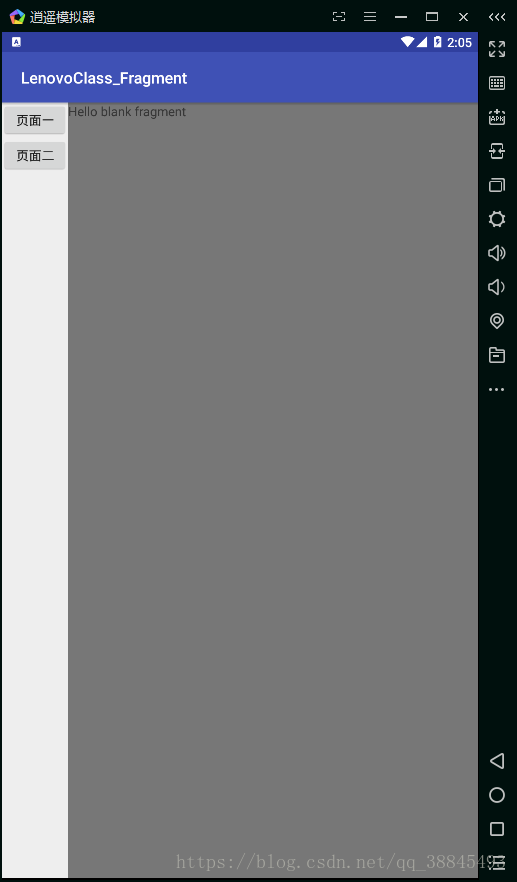
1.首先创建两个Fragment,并且会自动生成两个fragment.xml的布局文件

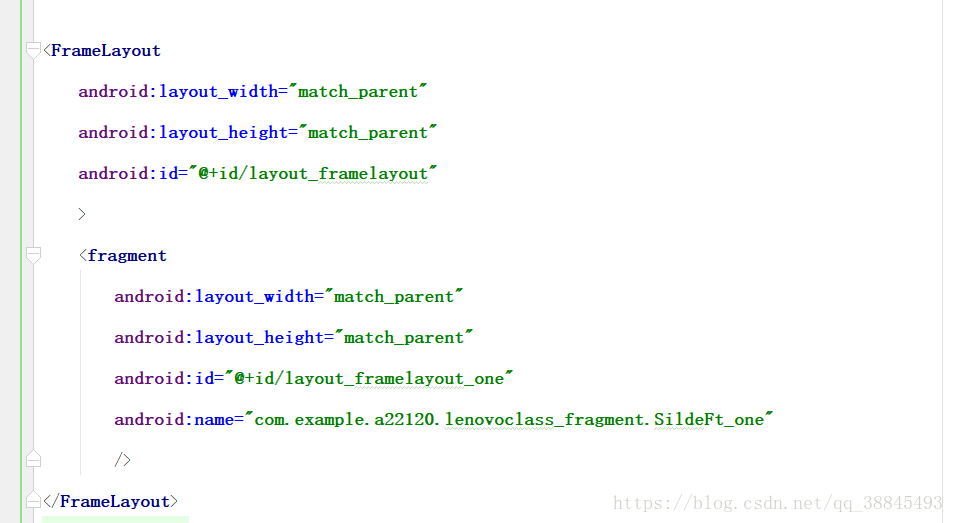
2.在main_activity.xml 主方法布局文件中添加两个按钮,和一个 < FrameLayout >,在< FrameLayout >中添加一个< fragment >, 预设置为BlankFragment。
activity_main.xml (即界面的布局)代码
<?xml version="1.0" encoding="utf-8"?>
<LinearLayout xmlns:android="http://schemas.android.com/apk/res/android"
    xmlns:app="http://schemas.android.com/apk/res-auto"
    xmlns:tools="http://schemas.android.com/tools"
    android:layout_width="match_parent"
    android:layout_height="match_parent"
    tools:context="com.example.a22120.lenovoclass_fragment.MainActivity">

    <LinearLayout
        android:layout_width="wrap_content"
        android:layout_height="wrap_content"
        android:orientation="vertical"
        >
        <Button
            android:layout_width="150px"
            android:layout_height="80px"
            android:text="页面一"
            android:id="@+id/btn_one"
            />
        <Button
            android:layout_width="150px"
            android:layout_height="80px"
            android:text="页面二"
            android:id="@+id/btn_two"
            />

    </LinearLayout>

<FrameLayout
    android:layout_width="match_parent"
    android:layout_height="match_parent"
    android:id="@+id/layout_framelayout"
    >
    <fragment
        android:layout_width="match_parent"
        android:layout_height="match_parent"
        android:id="@+id/layout_framelayout_one"
        android:name="com.example.a22120.lenovoclass_fragment.SildeFt_one"
        />
</FrameLayout>
</LinearLayout>
3.创建 FragmentTransaction fragmentTransaction; FragmentManager fragmentManager;
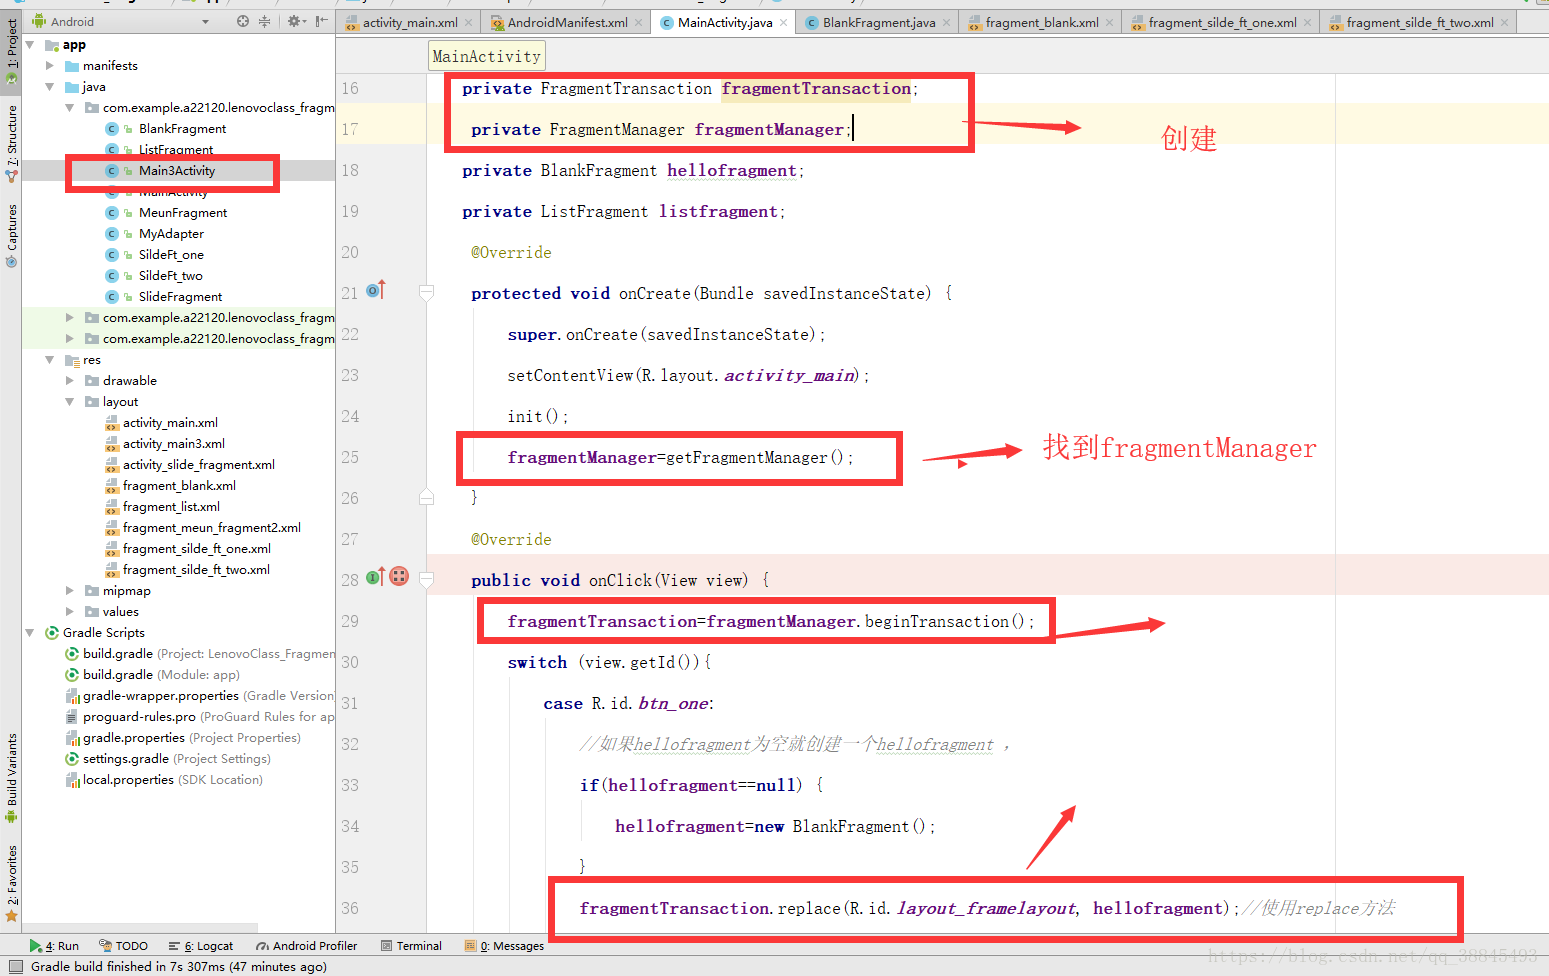
4.实现事件监听的接口,添加按钮的点击事件,之后用 fragmentTransaction调用replace方法,实现两个Fragment的切换
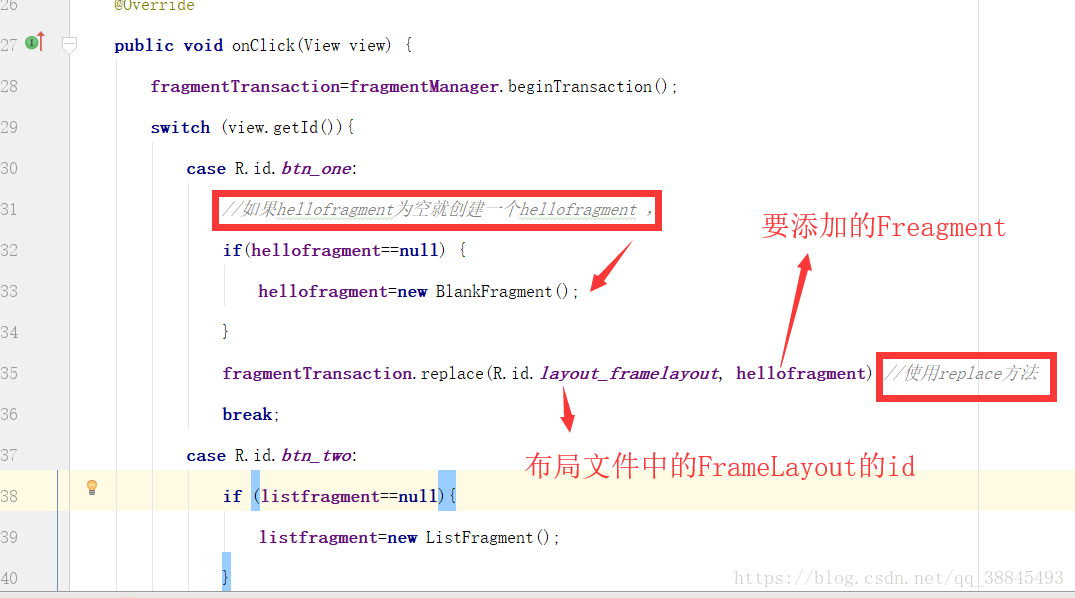
5.最后 fragmentTransaction.commit();
注意:必须调用commit()方法否则页面不显示!!

最终MainActivity的代码如下:
package com.example.a22120.lenovoclass_fragment;


import android.app.Fragment;
import android.app.FragmentManager;
import android.app.FragmentTransaction;
import android.support.v7.app.AppCompatActivity;
import android.os.Bundle;
import android.view.View;
import android.view.View.OnClickListener;
import android.widget.Button;

public class MainActivity extends AppCompatActivity implements OnClickListener{
   private Button btn_one,btn_two;

   private FragmentTransaction fragmentTransaction;
    private FragmentManager fragmentManager;
   private BlankFragment hellofragment;
   private ListFragment listfragment;
    @Override
    protected void onCreate(Bundle savedInstanceState) {
        super.onCreate(savedInstanceState);
        setContentView(R.layout.activity_main);
        init();
        fragmentManager=getFragmentManager();
    }
    @Override
    public void onClick(View view) {
        fragmentTransaction=fragmentManager.beginTransaction();
        switch (view.getId()){
            case R.id.btn_one:
                //如果hellofragment为空就创建一个hellofragment ,
                if(hellofragment==null) {
                    hellofragment=new BlankFragment();
                }
                fragmentTransaction.replace(R.id.layout_framelayout, hellofragment);//使用replace方法
                break;
            case R.id.btn_two:
                if (listfragment==null){
                    listfragment=new ListFragment();
                }
                fragmentTransaction.replace(R.id.layout_framelayout,listfragment);
                default:
                    break;
        }
        fragmentTransaction.commit();
    }

    public void init(){
        btn_one=findViewById(R.id.btn_one);
        btn_two=findViewById(R.id.btn_two);
        btn_one.setOnClickListener(this);
        btn_two.setOnClickListener(this);
    }
}
方法二:
1.使用适配器添加Fragment。把不同的Fragment实例化之后添加到List < Fragment >中
2.将List < Fragment >绑定到适配器(Adapter)中,

3.再个viewpager设置适配器(Adapter)
4.添加监听事件
具体使用方法请看标题五.Fragment的页卡滑动实例
五.Fragment的页卡滑动实例
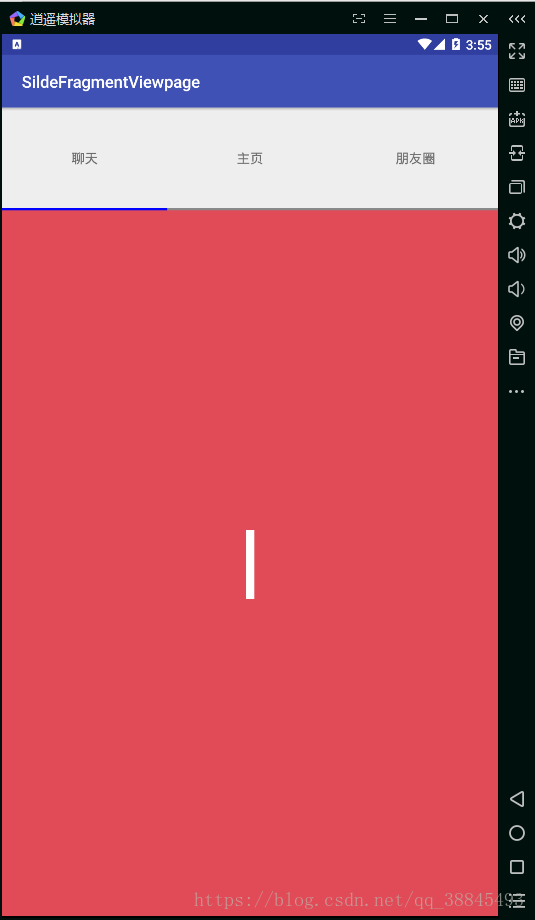
例子:左右滑动实现Fragment的页面改变,点击聊天按钮,也可改变要页面。
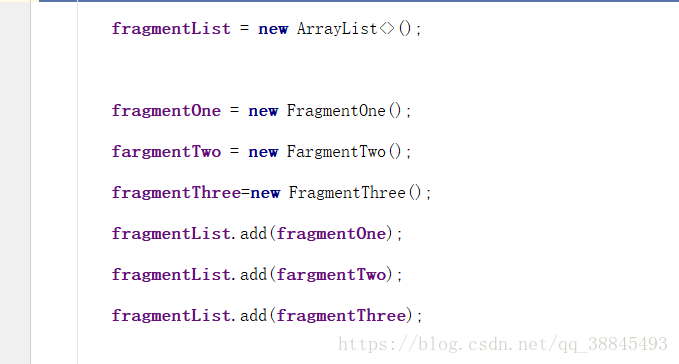
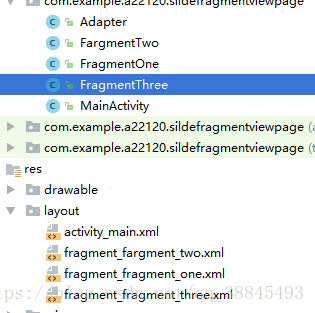
1.首先创建三个Fragment( FragmentOne,FargmentTwo,FragmentThree)
2.创建适配器
之后new一个新的类 Adapter(适配器)继承 FragmentPagerAdapter类实现他的方法
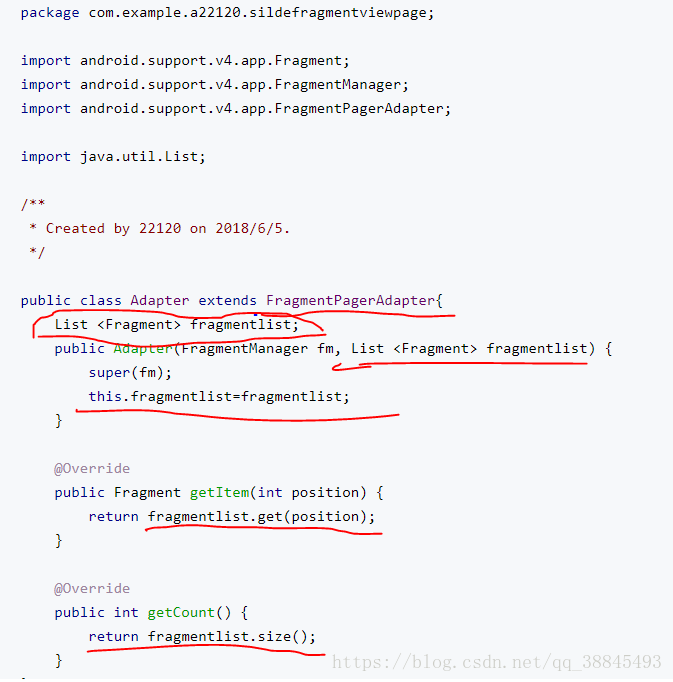
package com.example.a22120.sildefragmentviewpage;

import android.support.v4.app.Fragment;
import android.support.v4.app.FragmentManager;
import android.support.v4.app.FragmentPagerAdapter;

import java.util.List;

/**
 * Created by 22120 on 2018/6/5.
 */

public class Adapter extends FragmentPagerAdapter{
    List <Fragment> fragmentlist;
    public Adapter(FragmentManager fm, List <Fragment> fragmentlist) {
        super(fm);
        this.fragmentlist=fragmentlist;
    }

    @Override
    public Fragment getItem(int position) {
        return fragmentlist.get(position);
    }

    @Override
    public int getCount() {
        return fragmentlist.size();
    }
}
注意继承后有以下几处需要修改
3.编写MainActivity布局文件
<?xml version="1.0" encoding="utf-8"?>
<LinearLayout xmlns:android="http://schemas.android.com/apk/res/android"
    xmlns:app="http://schemas.android.com/apk/res-auto"
    xmlns:tools="http://schemas.android.com/tools"
    android:layout_width="match_parent"
    android:layout_height="match_parent"
    android:orientation="vertical"
    tools:context="com.example.a22120.sildefragmentviewpage.MainActivity">
   <LinearLayout
       android:layout_width="match_parent"
       android:layout_height="0px"
       android:layout_weight="1"
       >
       <TextView
           android:layout_width="0px"
           android:layout_height="match_parent"
           android:layout_weight="1"
           android:text="聊天"
           android:gravity="center"
           android:id="@+id/lay_charTop"
           />
       <TextView
           android:layout_width="0px"
           android:layout_height="match_parent"
           android:layout_weight="1"
           android:text="主页"
           android:gravity="center"
           android:id="@+id/lay_contentTop"
           />

       <TextView
           android:layout_width="0px"
           android:layout_height="match_parent"
           android:layout_weight="1"
           android:text="朋友圈"
           android:gravity="center"
           android:id="@+id/lay_friendsTop"
           />


   </LinearLayout>
    <LinearLayout
        android:layout_width="match_parent"
        android:layout_height="5px"
        >
        <View
            android:layout_width="0px"
            android:layout_height="match_parent"
            android:layout_weight="1"
            android:id="@+id/chars_bom"
            />
        <View
            android:layout_width="0px"
            android:layout_height="match_parent"
            android:layout_weight="1"
            android:id="@+id/content_bom"
            />
        <View
            android:layout_width="0px"
            android:layout_height="match_parent"
            android:layout_weight="1"
            android:id="@+id/frident_bom"
            />

    </LinearLayout>

    <LinearLayout
        android:layout_width="match_parent"
        android:layout_height="0px"
        android:layout_weight="7"
        >
        <android.support.v4.view.ViewPager
            android:layout_width="match_parent"
            android:layout_height="match_parent"
            android:id="@+id/lay_vp"
            ></android.support.v4.view.ViewPager>


    </LinearLayout>

</LinearLayout>
布局中只需写三个按钮添加一个VieqPager,设置id
4.MainActictivity主函数
package com.example.a22120.sildefragmentviewpage;
import android.graphics.Color;
import android.support.v4.app.Fragment;
import android.support.v4.view.ViewPager;
import android.support.v7.app.AppCompatActivity;
import android.os.Bundle;
import android.view.View;
import android.widget.TextView;
import java.util.ArrayList;
import java.util.List;
public class MainActivity extends AppCompatActivity implements View.OnClickListener{
private ViewPager viewPager;
List<Fragment> fragmentList;
FragmentOne fragmentOne;
FargmentTwo fargmentTwo;
FragmentThree fragmentThree;
TextView chars, contents, friends;
View chars_bom, content_bom, friend_bom;
@Override
protected void onCreate(Bundle savedInstanceState) {
super.onCreate(savedInstanceState);
setContentView(R.layout.activity_main);
viewPager = findViewById(R.id.lay_vp);
chars = findViewById(R.id.lay_charTop);
friends = findViewById(R.id.lay_friendsTop);
contents = findViewById(R.id.lay_contentTop);
chars_bom = findViewById(R.id.chars_bom);
content_bom = findViewById(R.id.content_bom);
friend_bom = findViewById(R.id.frident_bom);
//设置按钮监听
chars.setOnClickListener(this);
friends.setOnClickListener(this);
contents.setOnClickListener(this);
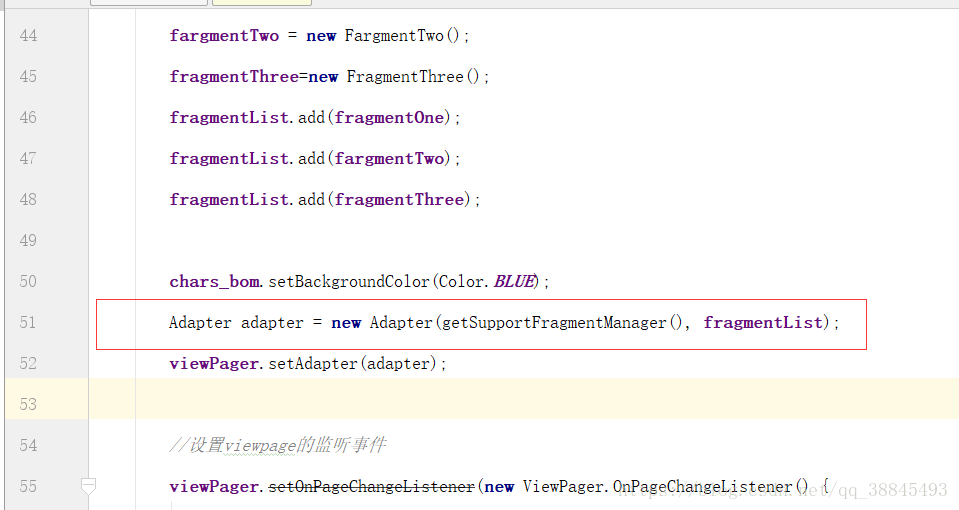
fragmentList = new ArrayList<>();
fragmentOne = new FragmentOne();
fargmentTwo = new FargmentTwo();
fragmentThree=new FragmentThree();
fragmentList.add(fragmentOne);
fragmentList.add(fargmentTwo);
fragmentList.add(fragmentThree);
chars_bom.setBackgroundColor(Color.BLUE);
Adapter adapter = new Adapter(getSupportFragmentManager(), fragmentList);
viewPager.setAdapter(adapter);
//设置viewpage的监听事件
viewPager.setOnPageChangeListener(new ViewPager.OnPageChangeListener() {
@Override
public void onPageScrolled(int position, float positionOffset, int positionOffsetPixels) {
}
//滑动后产生的变化
@Override
public void onPageSelected(int position) {
chars_bom.setBackgroundColor(Color.GRAY);
content_bom.setBackgroundColor(Color.GRAY);
friend_bom.setBackgroundColor(Color.GRAY);
switch (position) {
case 0:
chars_bom.setBackgroundColor(Color.BLUE);
break;
case 1:
content_bom.setBackgroundColor(Color.BLUE);
break;
case 2:
friend_bom.setBackgroundColor(Color.BLUE);
break;
default:
break;
}
}
@Override
public void onPageScrollStateChanged(int state) {
}
});
}
@Override
public void onClick(View view) {
switch (view.getId()){
case R.id.lay_charTop:
viewPager.setCurrentItem(0);
break;
case R.id.lay_contentTop:
viewPager.setCurrentItem(1);
break;
case R.id.lay_friendsTop:
viewPager.setCurrentItem(2);
break;
default:
break;
}
}
}
注意:
- 因为ViewPage是v4包下面的,Fragment需要是v4包下面的,而不是app包,此处与第一种动态不同。
- 使用viewPager改变Fragment的方法是 viewPager.setCurrentItem();,此例子中点击TextView后,产生监听事件,调用此方法,改变界面,实现效果。
- Fragment发生改变的监听事件是viewPager.setOnPageChangeListener(new ViewPager.OnPageChangeListener(),里面有三个方法(常用在第二个状态下写监听事件)。
五.fragment的生命周期
当Fragment与Activity发生关联时调用
•onAttach();依附
•onCreate();
创建该Fragment的视图
•onCreateView();
•onActivityCreated();
•onStart();
•onResume();
•onPause();
•onStop();
与onCreateView想对应,当该Fragment的视图被移除时调用
•onDestroyView();
•onDestroy();
与onAttach相对应,当Fragment与Activity关联被取消时调用
•onDetach();解绑
package com.example.myapplication.fragment_vp;


import android.content.Context;
import android.os.Bundle;
import android.support.annotation.Nullable;
import android.support.v4.app.Fragment;
import android.util.Log;
import android.view.LayoutInflater;
import android.view.View;
import android.view.ViewGroup;

import com.example.myapplication.R;

/**
 * A simple {@link Fragment} subclass.
 */
public class FriendFragment extends Fragment {

    private String TAG="FriendFragment";

    public FriendFragment() {
        // Required empty public constructor
    }


    @Override
    public void onAttach(Context context) {
        super.onAttach(context);
        Log.d(TAG, "onAttach:********* ");
    }

    @Override
    public void onCreate(@Nullable Bundle savedInstanceState) {
        super.onCreate(savedInstanceState);
        Log.d(TAG, "onCreate: *********");
    }

    @Override
    public View onCreateView(LayoutInflater inflater, ViewGroup container,
                             Bundle savedInstanceState) {
        // Inflate the layout for this fragment
        Log.d(TAG, "onCreateView: *********");
        return inflater.inflate(R.layout.fragment_friend, container, false);
    }
    @Override
    public void onStart() {
        super.onStart();
        Log.d(TAG, "onStart: *********");
    }

    @Override
    public void onResume() {
        super.onResume();
        Log.d(TAG, "onResume: *********");
    }

    @Override
    public void onPause() {
        super.onPause();
        Log.d(TAG, "onPause: *********");
    }

    @Override
    public void onDestroyView() {
        super.onDestroyView();
        Log.d(TAG, "onDestroyView: *********");
    }

    @Override
    public void onDestroy() {
        super.onDestroy();
        Log.d(TAG, "onDestroy:*********");
    }

    @Override
    public void onDetach() {
        super.onDetach();
        Log.d(TAG, "onDetach: *********");
    }

}