Handler 的工作主要包括消息的发送和就收过程,消息的发送可以通过 post 的一系列方法或者 send 的一系列方法来实现,post 的一系列方法最终是通过 send 的一系列方法来实现的,发送一条信息的典型过程如下所示:
    public final boolean sendMessage(Message msg)
    {
        return sendMessageDelayed(msg, 0);
    }

    public final boolean sendMessageDelayed(Message msg, long delayMillis)
    {
        if (delayMillis < 0) {
            delayMillis = 0;
        }
        return sendMessageAtTime(msg, SystemClock.uptimeMillis() + delayMillis);
    }

    public boolean sendMessageAtTime(Message msg, long uptimeMillis) {
        MessageQueue queue = mQueue;
        if (queue == null) {
            RuntimeException e = new RuntimeException(
                    this + " sendMessageAtTime() called with no mQueue");
            Log.w("Looper", e.getMessage(), e);
            return false;
        }
        return enqueueMessage(queue, msg, uptimeMillis);
    }

    private boolean enqueueMessage(MessageQueue queue, Message msg, long uptimeMillis) {
        msg.target = this;
        if (mAsynchronous) {
            msg.setAsynchronous(true);
        }
        return queue.enqueueMessage(msg, uptimeMillis);
    }
可以发现,Handler 发送消息的过程仅仅是向 MessageQueue 消息队列中插入了一条信息,MessageQueue 的 next 方法就会返回这条信息给 Looper ,Looper 收到消息后就开始处理了,最终是由 Looper 交由 Handler 的 dispatchMessage 方法处理,这个上篇文章已经说过了,即 Handler 的 dispatchMessage 会被调用,这时候 Handler 就进入处理消息的阶段,dispatchMessage 的实现如下所示:
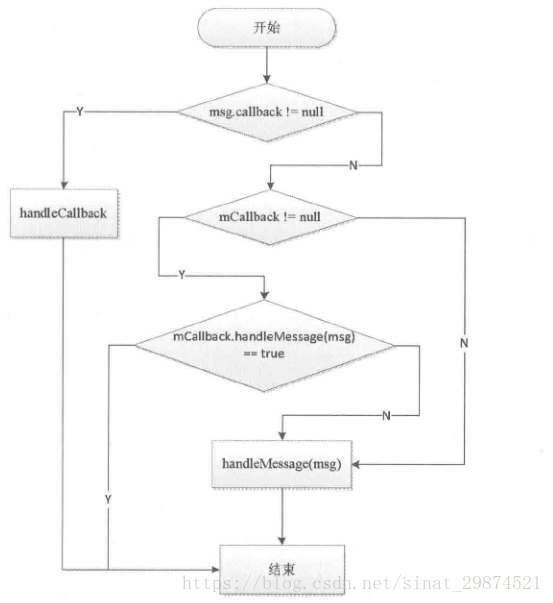
    public void dispatchMessage(Message msg) {
        if (msg.callback != null) {
            handleCallback(msg);
        } else {
            if (mCallback != null) {
                if (mCallback.handleMessage(msg)) {
                    return;
                }
            }
            handleMessage(msg);
        }
    }
Handler 处理消息的过程如下:
首先,检查 Message 的 callback 是否为 null,不为 null 就通过 HandlerCallback 来处理消息。Message 的 callback 是一个 Runnable 对象,实际上就是 Handler 的 post 方法所传递的 Runnable 对象。HandlerCallback 的逻辑也是很简单的,代码如下:
    private static void handleCallback(Message message) {
        message.callback.run();
    }
其次,检查 mCallback 是否为 null,不为 null 就调用 mCallback 的 handleMessage 方法来处理消息,Callback 是个接口,他的含义如下:
    /**
     * Callback interface you can use when instantiating a Handler to avoid
     * having to implement your own subclass of Handler.
     *
     * @param msg A {@link android.os.Message Message} object
     * @return True if no further handling is desired
     */
    public interface Callback {
        public boolean handleMessage(Message msg);
    }
通过 Callback 可以采用如下方式来创建 Handler 对象:Handler handler = new Handler(callback)。那么 Callback 的含义又是什么呢?源码里边的注释已经做了说明:可以用来创建一个 Handler 的实例但并不派生 Handler 的子类。在日常开发中,创建 Handler 最常见的方式就是派生一个 Handler 的子类并重写其 handleMessage 方法来处理具体的消息,而 Callback 给我们提供了另一种使用 Handler 的方法,当我们不想派生子类时,就可以使用 Callback 来实现。
最后调用 Handler 的 handleMessage 方法来处理消息,Handler 处理消息的过程可以归纳为一个流程图:
Handler 还有一个特殊的构造方法,那就是通过一个特定的 Looper 来构造 Handler,它的实现如下,通过这个特殊的构造可以实现一些特殊的功能
    /**
     * Use the provided {@link Looper} instead of the default one.
     *
     * @param looper The looper, must not be null.
     */
    public Handler(Looper looper) {
        this(looper, null, false);
    }
下面看一下 Handler 的一个默认构造方法 public Handler(),这个构造方法会调用下面的一个构造方法。很显然,如果当前没有 Looper 的话,就会跑出 “Can't create handler inside thread that has not called Looper.prepare()” 这个异常,这也解释了在没有了 Looper 的子线程中创建 Handler 会引发异常的原因。
    /**
     * Use the {@link Looper} for the current thread with the specified callback interface
     * and set whether the handler should be asynchronous.
     *
     * Handlers are synchronous by default unless this constructor is used to make
     * one that is strictly asynchronous.
     *
     * Asynchronous messages represent interrupts or events that do not require global ordering
     * with respect to synchronous messages.  Asynchronous messages are not subject to
     * the synchronization barriers introduced by {@link MessageQueue#enqueueSyncBarrier(long)}.
     *
     * @param callback The callback interface in which to handle messages, or null.
     * @param async If true, the handler calls {@link Message#setAsynchronous(boolean)} for
     * each {@link Message} that is sent to it or {@link Runnable} that is posted to it.
     *
     * @hide
     */
    public Handler(Callback callback, boolean async) {
        if (FIND_POTENTIAL_LEAKS) {
            final Class<? extends Handler> klass = getClass();
            if ((klass.isAnonymousClass() || klass.isMemberClass() || klass.isLocalClass()) &&
                    (klass.getModifiers() & Modifier.STATIC) == 0) {
                Log.w(TAG, "The following Handler class should be static or leaks might occur: " +
                    klass.getCanonicalName());
            }
        }

        mLooper = Looper.myLooper();
        if (mLooper == null) {
            throw new RuntimeException(
                "Can't create handler inside thread that has not called Looper.prepare()");
        }
        mQueue = mLooper.mQueue;
        mCallback = callback;
        mAsynchronous = async;
    }
————————————————————我是分割线————————————————————
主线程的消息循环
Android 的主线程就是 ActivityThread,主线程的入口方法为 main,在 main 方法中系统会通过 Looper.prepareMainLooper() 来创建主线程的 Looper 和 MessageQueue ,并通过 Looper.loop() 来开启主线程的消息循环,这个过程如下所示:
public static void main(String[] args) {
        Trace.traceBegin(Trace.TRACE_TAG_ACTIVITY_MANAGER, "ActivityThreadMain");
        SamplingProfilerIntegration.start();

        // CloseGuard defaults to true and can be quite spammy.  We
        // disable it here, but selectively enable it later (via
        // StrictMode) on debug builds, but using DropBox, not logs.
        CloseGuard.setEnabled(false);

        Environment.initForCurrentUser();

        // Set the reporter for event logging in libcore
        EventLogger.setReporter(new EventLoggingReporter());

        // Make sure TrustedCertificateStore looks in the right place for CA certificates
        final File configDir = Environment.getUserConfigDirectory(UserHandle.myUserId());
        TrustedCertificateStore.setDefaultUserDirectory(configDir);

        Process.setArgV0("<pre-initialized>");

        Looper.prepareMainLooper();

        ActivityThread thread = new ActivityThread();
        thread.attach(false);

        if (sMainThreadHandler == null) {
            sMainThreadHandler = thread.getHandler();
        }

        if (false) {
            Looper.myLooper().setMessageLogging(new
                    LogPrinter(Log.DEBUG, "ActivityThread"));
        }

        // End of event ActivityThreadMain.
        Trace.traceEnd(Trace.TRACE_TAG_ACTIVITY_MANAGER);
        Looper.loop();

        throw new RuntimeException("Main thread loop unexpectedly exited");
    }
主线程的消息循环开始了以后,ActivityThread 还需要一个 Handler 来和消息队列进行交互,这个 Handler 就是 ActivityThread.H,它内部定义了一组消息类型,主要包含了四大组件的启动和停止过程,如下所示:
    private class H extends Handler {
        public static final int LAUNCH_ACTIVITY         = 100;
        public static final int PAUSE_ACTIVITY          = 101;
        public static final int PAUSE_ACTIVITY_FINISHING= 102;
        public static final int STOP_ACTIVITY_SHOW      = 103;
        public static final int STOP_ACTIVITY_HIDE      = 104;
        public static final int SHOW_WINDOW             = 105;
        public static final int HIDE_WINDOW             = 106;
        public static final int RESUME_ACTIVITY         = 107;
        public static final int SEND_RESULT             = 108;
        public static final int DESTROY_ACTIVITY        = 109;
        public static final int BIND_APPLICATION        = 110;
        public static final int EXIT_APPLICATION        = 111;
        public static final int NEW_INTENT              = 112;
        public static final int RECEIVER                = 113;
        public static final int CREATE_SERVICE          = 114;
        public static final int SERVICE_ARGS            = 115;
        public static final int STOP_SERVICE            = 116;

        public static final int CONFIGURATION_CHANGED   = 118;
        public static final int CLEAN_UP_CONTEXT        = 119;
        public static final int GC_WHEN_IDLE            = 120;
        public static final int BIND_SERVICE            = 121;
        public static final int UNBIND_SERVICE          = 122;
        public static final int DUMP_SERVICE            = 123;
        public static final int LOW_MEMORY              = 124;
        public static final int ACTIVITY_CONFIGURATION_CHANGED = 125;
        public static final int RELAUNCH_ACTIVITY       = 126;
        public static final int PROFILER_CONTROL        = 127;
        public static final int CREATE_BACKUP_AGENT     = 128;
        public static final int DESTROY_BACKUP_AGENT    = 129;
        public static final int SUICIDE                 = 130;
        public static final int REMOVE_PROVIDER         = 131;
        public static final int ENABLE_JIT              = 132;
        public static final int DISPATCH_PACKAGE_BROADCAST = 133;
        public static final int SCHEDULE_CRASH          = 134;
        public static final int DUMP_HEAP               = 135;
        public static final int DUMP_ACTIVITY           = 136;
        public static final int SLEEPING                = 137;
        public static final int SET_CORE_SETTINGS       = 138;
        public static final int UPDATE_PACKAGE_COMPATIBILITY_INFO = 139;
        public static final int TRIM_MEMORY             = 140;
        public static final int DUMP_PROVIDER           = 141;
        public static final int UNSTABLE_PROVIDER_DIED  = 142;
        public static final int REQUEST_ASSIST_CONTEXT_EXTRAS = 143;
        public static final int TRANSLUCENT_CONVERSION_COMPLETE = 144;
        public static final int INSTALL_PROVIDER        = 145;
        public static final int ON_NEW_ACTIVITY_OPTIONS = 146;
        public static final int CANCEL_VISIBLE_BEHIND = 147;
        public static final int BACKGROUND_VISIBLE_BEHIND_CHANGED = 148;
        public static final int ENTER_ANIMATION_COMPLETE = 149;
        public static final int START_BINDER_TRACKING = 150;
        public static final int STOP_BINDER_TRACKING_AND_DUMP = 151;
        public static final int MULTI_WINDOW_MODE_CHANGED = 152;
        public static final int PICTURE_IN_PICTURE_MODE_CHANGED = 153;
        public static final int LOCAL_VOICE_INTERACTION_STARTED = 154;
        ...
}
ActivityThread 通过 ApplicationThread 和 ActivityManagerService(AMS) 进行进程间通信,AMS 以进程间通信的方式完成 ActivityThread 的请求后回调 ApplicationThread 中的 Binder 方法,然后 ApplicationThread 会像 H 发送消息,H 收到消息后会将 ApplicationThread 中的逻辑切换到 ActivityThread 中去执行,即切换到主线程去执行,这个过程就是主线程的消息循环模型。