文章目录
1、App中Handler的使用
我们都知道,Android的UI线程是线程不安全的,如果在子线程中尝试进行UI操作,程序就有可能会崩溃。相信大家在日常的工作当中都会经常遇到这个问题,解决的方案应该也是早已烂熟于心,即创建一个Message对象,然后借助Handler发送出去,之后在Handler的handleMessage()方法中获得刚才发送的Message对象,然后在这里进行UI操作就不会再出现崩溃了。具体实现代码如下:
public static final int WHAT = 1;

//声明一个主线程的Handler
private Handler handler = new Handler() {
    public void handleMessage(Message msg) {
        switch (msg.what) {
        case WHAT:
            //TODO
            break;
        default:
            break;
        }
    }
};

//创建一个线程并向主线程发送Message
new Thread(new Runnable() {
    @Override
    public void run() {
        Message msg = handler.obtainMessage();
        message.what = WHAT;
        handler.sendMessage(message);
    }
}).start();
那么Handler的原理是什么呢?
2、Java层Handler的原理
2.1 Handler模型
Handler机制是由Looper和MessageQueue来构建消息机制的。消息机制主要包含:
Message: 线程间通讯的数据单元,可以封装数据 。消息分为硬件产生的消息(如按钮、触摸)和软件生成的消息;
MessageQueue: 消息队列用来存放通过Handler发送的消息,它是一个按Message的when排序的优先级队列。(when:代表着被处理的时间)
Handler: 消息辅助类,主要功能向消息池发送各种消息事件(Handler.sendMessage())和处理相应消息事件(Handler.handleMessage());
Looper: 不断循环执行(Looper.loop()),按分发机制将消息分发给目标处理者。
2.2 图解Handler
我们先通过一张图整体了解一下Handler的处理流程,之后在详细分析源代码。
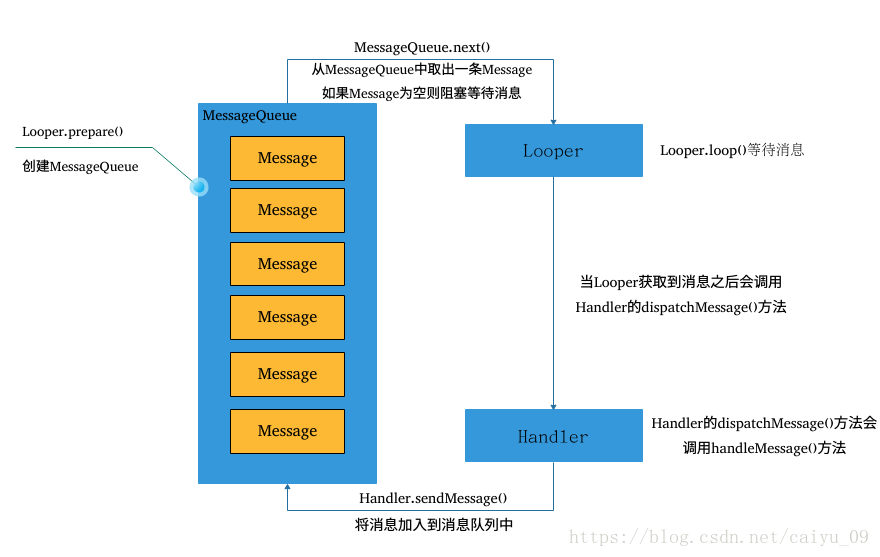
图解:
- 首先在使用Handler之前需要调用Looper.prepare()创建Looper对象,在该方法中会创建MessageQueue对象,该对象以链表的形式存储Message;
- 之后调用Looper.loop()方法,在该方法中会调用MessageQueue.next()方法获取Message,但是由于此时MessageQueue为空,Looper会阻塞等待消息;
- 当有消息发送时会调用Handler.sendMessage()方法,该方法会调用MessageQueue.enqueueMessage()方法将Message插入到MessageQueue中;
- 由于此时MessageQueue中存在消息,Looper会被唤醒并从MessageQueue中获取Message,之后会调用Handler.dispatchMessage()方法;
- Handler.dispatchMessage()会寻找target对象并调用其handleMessage方法;
2.3 Handler线程的典型实例
先展示一个典型的关于Handler/Looper的线程:
class LooperThread extends Thread {
    public Handler mHandler;
    public void run() {
    	// Looper.prepare()在每个线程只允许执行一次,该方法会创建Looper对象,Looper的构造方法中会创建一个MessageQueue对象
        Looper.prepare();
        mHandler = new Handler() {
            public void handleMessage(Message msg) {
                //TODO
            }
        };
        Looper.loop();
    }
}
2.4 Looper
2.4.1. Looper.prepare()
private static void prepare(boolean quitAllowed) {
    if (sThreadLocal.get() != null) {
    	// 如果此线程之前调用过Looper.prepare()方法会抛出异常
        throw new RuntimeException("Only one Looper may be created per thread");
    }
    sThreadLocal.set(new Looper(quitAllowed));
}

/**
 1. Initialize the current thread as a looper, marking it as an
 2. application's main looper. The main looper for your application
 3. is created by the Android environment, so you should never need
 4. to call this function yourself.  See also: {@link #prepare()}
 */
public static void prepareMainLooper() {
    // 调用Looper.prepare(false);
    prepare(false);
    synchronized (Looper.class) {
        if (sMainLooper != null) {
            throw new IllegalStateException("The main Looper has already been prepared.");
        }
        sMainLooper = myLooper();
    }
}
Looper.prepare()会创建Lopper对象并讲自己加入到ThreadLocal中
2.4.2. Looper构造函数
private Looper(boolean quitAllowed) {
    // 创建MessageQueue
    mQueue = new MessageQueue(quitAllowed);
    mThread = Thread.currentThread();
}
Looper的构造方法会创建MessageQueue
2.4.3. Looper.loop()
/**
 1. Run the message queue in this thread. Be sure to call
 2. {@link #quit()} to end the loop.
*/
public static void loop() {
   final Looper me = myLooper();
   if (me == null) {
       // 如果此线程在调用Looper.loop()之前未调用Looper.prepare()则抛出异常
       throw new RuntimeException("No Looper; Looper.prepare() wasn't called on this thread.");
   }
   // 获取Looper对象中的MessageQueue
   final MessageQueue queue = me.mQueue;

   // Make sure the identity of this thread is that of the local process,
   // and keep track of what that identity token actually is.
   Binder.clearCallingIdentity();
   final long ident = Binder.clearCallingIdentity();

   // Allow overriding a threshold with a system prop. e.g.
   // adb shell 'setprop log.looper.1000.main.slow 1 && stop && start'
   final int thresholdOverride =
           SystemProperties.getInt("log.looper."
                   + Process.myUid() + "."
                   + Thread.currentThread().getName()
                   + ".slow", 0);

   boolean slowDeliveryDetected = false;

   for (;;) {
       // 调用MessageQueue的next()方法,如果MessageQueue中有Message则返回,如果MessageQueue中没有Message则此处会阻塞等待消息
       Message msg = queue.next();
       if (msg == null) {
           // No message indicates that the message queue is quitting.
           return;
       }

       // This must be in a local variable, in case a UI event sets the logger
       final Printer logging = me.mLogging;
       if (logging != null) {
           logging.println(">>>>> Dispatching to " + msg.target + " " +
                   msg.callback + ": " + msg.what);
       }

           .
           .  // 此处代码省略
           .

       try {
       	   // 用于分发Message
           msg.target.dispatchMessage(msg);
           dispatchEnd = needEndTime ? SystemClock.uptimeMillis() : 0;
       } finally {
           if (traceTag != 0) {
               Trace.traceEnd(traceTag);
           }
       }

           .
           .  // 此处代码省略
           .

       msg.recycleUnchecked();
   }
}
loop()进入循环模式,不断重复下面的操作:
- 读取MessageQueue的下一条Message;
- 把Message分发给相应的target;
- 再把分发后的Message回收到消息池,以便重复利用。
2.5 Handler
2.5.1. Handler构造函数
/**
 * Use the {@link Looper} for the current thread with the specified callback interface
 * and set whether the handler should be asynchronous.
 *
 * Handlers are synchronous by default unless this constructor is used to make
 * one that is strictly asynchronous.
 *
 * Asynchronous messages represent interrupts or events that do not require global ordering
 * with respect to synchronous messages.  Asynchronous messages are not subject to
 * the synchronization barriers introduced by {@link MessageQueue#enqueueSyncBarrier(long)}.
 *
 * @param callback The callback interface in which to handle messages, or null.
 * @param async If true, the handler calls {@link Message#setAsynchronous(boolean)} for
 * each {@link Message} that is sent to it or {@link Runnable} that is posted to it.
 *
 * @hide
 */
public Handler(Callback callback, boolean async) {
    if (FIND_POTENTIAL_LEAKS) {
        final Class<? extends Handler> klass = getClass();
        if ((klass.isAnonymousClass() || klass.isMemberClass() || klass.isLocalClass()) &&
                (klass.getModifiers() & Modifier.STATIC) == 0) {
            Log.w(TAG, "The following Handler class should be static or leaks might occur: " +
                klass.getCanonicalName());
        }
    }
    // 必须先执行Looper.prepare(),才能获取Looper对象,否则为null.
    mLooper = Looper.myLooper();
    if (mLooper == null) {
        // 如果未执行Looper.prepare()则抛出异常
        throw new RuntimeException(
            "Can't create handler inside thread " + Thread.currentThread()
                    + " that has not called Looper.prepare()");
    }
    mQueue = mLooper.mQueue;
    mCallback = callback;
    mAsynchronous = async;
}
那为什么我们在APP中使用Handler的时候没有调用Looper.prepare()但是程序仍然能够正常运行呢?
这是因为Android在启动App的时候Zygote会创建App进程,之后会调用该进程ActivityThread的main方法
public static void main(String[] args) {
    Trace.traceBegin(Trace.TRACE_TAG_ACTIVITY_MANAGER, "ActivityThreadMain");

    // CloseGuard defaults to true and can be quite spammy.  We
    // disable it here, but selectively enable it later (via
    // StrictMode) on debug builds, but using DropBox, not logs.
    CloseGuard.setEnabled(false);

    Environment.initForCurrentUser();

    // Set the reporter for event logging in libcore
    EventLogger.setReporter(new EventLoggingReporter());

    // Make sure TrustedCertificateStore looks in the right place for CA certificates
    final File configDir = Environment.getUserConfigDirectory(UserHandle.myUserId());
    TrustedCertificateStore.setDefaultUserDirectory(configDir);

    Process.setArgV0("<pre-initialized>");

    Looper.prepareMainLooper();

    // Find the value for {@link #PROC_START_SEQ_IDENT} if provided on the command line.
    // It will be in the format "seq=114"
    long startSeq = 0;
    if (args != null) {
        for (int i = args.length - 1; i >= 0; --i) {
            if (args[i] != null && args[i].startsWith(PROC_START_SEQ_IDENT)) {
                startSeq = Long.parseLong(
                        args[i].substring(PROC_START_SEQ_IDENT.length()));
            }
        }
    }
    ActivityThread thread = new ActivityThread();
    thread.attach(false, startSeq);

    if (sMainThreadHandler == null) {
        sMainThreadHandler = thread.getHandler();
    }

    if (false) {
        Looper.myLooper().setMessageLogging(new
                LogPrinter(Log.DEBUG, "ActivityThread"));
    }

    // End of event ActivityThreadMain.
    Trace.traceEnd(Trace.TRACE_TAG_ACTIVITY_MANAGER);
    Looper.loop();

    throw new RuntimeException("Main thread loop unexpectedly exited");
}
可见在ActivityThread的main方法中系统已经为我们创建好了Looper,所以在我们使用Handler的时候并不需要调用Looper.prepare()方法
接下来我们继续看Handler中的其他方法
2.5.2. Handler.dispatchMessage()
/**
 1. Handle system messages here.
 */
public void dispatchMessage(Message msg) {
    if (msg.callback != null) {
        //当Message存在回调方法,回调msg.callback.run()方法;
        handleCallback(msg);
    } else {
        if (mCallback != null) {
            //当Handler存在Callback成员变量时,回调方法handleMessage();
            if (mCallback.handleMessage(msg)) {
                return;
            }
        }
        handleMessage(msg);
    }
}
分发消息流程:
- 当Message的回调方法不为空时,则回调方法msg.callback.run(),其中callBack数据类型为Runnable,否则进入步骤2;
- 当Handler的mCallback成员变量不为空时,则回调方法mCallback.handleMessage(msg),否则进入步骤3;
- 调用Handler自身的回调方法handleMessage(),该方法默认为空,Handler子类通过覆写该方法来完成具体的逻辑。
2.5.3. Handler.sendMessage()
/**
 * Pushes a message onto the end of the message queue after all pending messages
 * before the current time. It will be received in {@link #handleMessage},
 * in the thread attached to this handler.
 *
 * @return Returns true if the message was successfully placed in to the
 *         message queue.  Returns false on failure, usually because the
 *         looper processing the message queue is exiting.
 */
public final boolean sendMessage(Message msg)
{
    return sendMessageDelayed(msg, 0);
}

/**
 * Enqueue a message into the message queue after all pending messages
 * before (current time + delayMillis). You will receive it in
 * {@link #handleMessage}, in the thread attached to this handler.
 *
 * @return Returns true if the message was successfully placed in to the
 *         message queue.  Returns false on failure, usually because the
 *         looper processing the message queue is exiting.  Note that a
 *         result of true does not mean the message will be processed -- if
 *         the looper is quit before the delivery time of the message
 *         occurs then the message will be dropped.
 */
public final boolean sendMessageDelayed(Message msg, long delayMillis)
{
    if (delayMillis < 0) {
        delayMillis = 0;
    }
    return sendMessageAtTime(msg, SystemClock.uptimeMillis() + delayMillis);
}

/**
 * Enqueue a message into the message queue after all pending messages
 * before the absolute time (in milliseconds) <var>uptimeMillis</var>.
 * <b>The time-base is {@link android.os.SystemClock#uptimeMillis}.</b>
 * Time spent in deep sleep will add an additional delay to execution.
 * You will receive it in {@link #handleMessage}, in the thread attached
 * to this handler.
 *
 * @param uptimeMillis The absolute time at which the message should be
 *         delivered, using the
 *         {@link android.os.SystemClock#uptimeMillis} time-base.
 *
 * @return Returns true if the message was successfully placed in to the
 *         message queue.  Returns false on failure, usually because the
 *         looper processing the message queue is exiting.  Note that a
 *         result of true does not mean the message will be processed -- if
 *         the looper is quit before the delivery time of the message
 *         occurs then the message will be dropped.
 */
public boolean sendMessageAtTime(Message msg, long uptimeMillis) {
    MessageQueue queue = mQueue;
    if (queue == null) {
        RuntimeException e = new RuntimeException(
                this + " sendMessageAtTime() called with no mQueue");
        Log.w("Looper", e.getMessage(), e);
        return false;
    }
    return enqueueMessage(queue, msg, uptimeMillis);
}

private boolean enqueueMessage(MessageQueue queue, Message msg, long uptimeMillis) {
    msg.target = this;
    if (mAsynchronous) {
        msg.setAsynchronous(true);
    }
    return queue.enqueueMessage(msg, uptimeMillis);
}
Handler.sendMessage()等系列方法最终调用MessageQueue.enqueueMessage(msg, uptimeMillis),将消息添加到MessageQueue中。
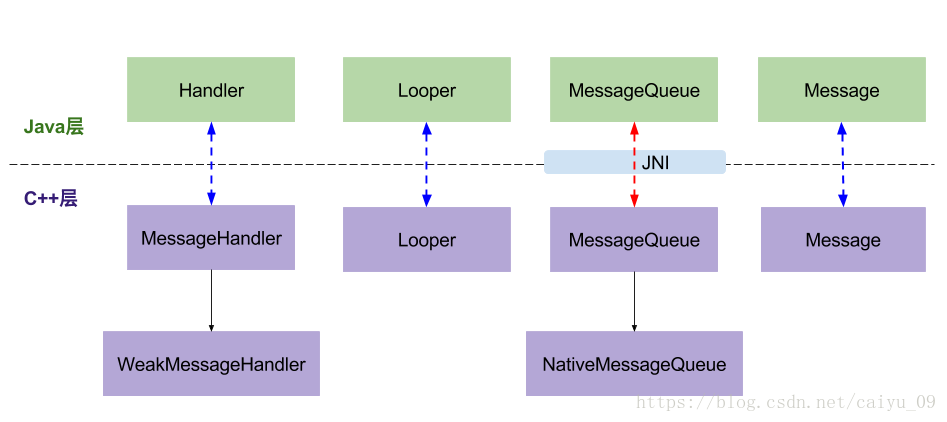
2.6 MessageQueue
MessageQueue是Handler的Java层和C++层的连接纽带,大部分核心方法都交给native层来处理,其中MessageQueue类中涉及的native方法如下:
private native static long nativeInit();
private native static void nativeDestroy(long ptr);
private native void nativePollOnce(long ptr, int timeoutMillis);
private native static void nativeWake(long ptr);
private native static boolean nativeIsPolling(long ptr);
private native static void nativeSetFileDescriptorEvents(long ptr, int fd, int events);
关于这些native方法会在第三节介绍
2.6.1. MessageQueue构造函数
MessageQueue(boolean quitAllowed) {
    mQuitAllowed = quitAllowed;
    //通过native方法初始化MessageQueue,其中mPtr保存的是NativeMessageQueue的引用
    mPtr = nativeInit();
}
2.6.2. MessageQueue.next()
Message next() {
    // Return here if the message loop has already quit and been disposed.
    // This can happen if the application tries to restart a looper after quit
    // which is not supported.
    final long ptr = mPtr;
    if (ptr == 0) {
        // 当消息循环已经退出,则直接返回
        return null;
    }

    // 循环迭代的首次为-1
    int pendingIdleHandlerCount = -1; // -1 only during first iteration
    int nextPollTimeoutMillis = 0;
    for (;;) {
        if (nextPollTimeoutMillis != 0) {
            Binder.flushPendingCommands();
        }
        // 阻塞操作,等待nextPollTimeoutMillis时长,或者MessageQueue被唤醒
        nativePollOnce(ptr, nextPollTimeoutMillis);

        synchronized (this) {
            // Try to retrieve the next message.  Return if found.
            final long now = SystemClock.uptimeMillis();
            Message prevMsg = null;
            Message msg = mMessages;
            if (msg != null && msg.target == null) {
                // 当消息Handler为空时,查询MessageQueue中的下一条异步消息Message,则退出循环。
                do {
                    prevMsg = msg;
                    msg = msg.next;
                } while (msg != null && !msg.isAsynchronous());
            }
            if (msg != null) {
                if (now < msg.when) {
                    // 当异步消息触发时间大于当前时间,则设置下一次轮询的超时时长
                    nextPollTimeoutMillis = (int) Math.min(msg.when - now, Integer.MAX_VALUE);
                } else {
                    // 取出一条消息,并返回
                    mBlocked = false;
                    if (prevMsg != null) {
                        prevMsg.next = msg.next;
                    } else {
                        mMessages = msg.next;
                    }
                    msg.next = null;
                    if (DEBUG) Log.v(TAG, "Returning message: " + msg);
                    // 设置消息的使用状态,即flags |= FLAG_IN_USE
                    msg.markInUse();
                    //成功地获取MessageQueue中的下一条即将要执行的Message
                    return msg;
                }
            } else {
                // 没有消息
                nextPollTimeoutMillis = -1;
            }

             .
             .  // 此处代码省略
             .

    }
}
nativePollOnce是阻塞操作(基于epoll机制),其中nextPollTimeoutMillis代表下一个消息到来前,还需要等待的时长;当nextPollTimeoutMillis = -1时,表示MessageQueue中无消息,会一直等待下去。
当处于空闲时,往往会执行IdleHandler中的方法。当nativePollOnce()返回后,next()从mMessages中提取一个消息。
nativePollOnce()在native做了大量的工作,想进一步了解可查看Native层Handler的原理。
2.6.3. MessageQueue.enqueueMessage()
boolean enqueueMessage(Message msg, long when) {
    // 每一个Message必须有一个target
    if (msg.target == null) {
        throw new IllegalArgumentException("Message must have a target.");
    }
    if (msg.isInUse()) {
        throw new IllegalStateException(msg + " This message is already in use.");
    }

    synchronized (this) {
        if (mQuitting) {    //正在退出时,回收Message,加入到消息池
            IllegalStateException e = new IllegalStateException(
                    msg.target + " sending message to a Handler on a dead thread");
            Log.w(TAG, e.getMessage(), e);
            msg.recycle();
            return false;
        }

        msg.markInUse();
        msg.when = when;
        Message p = mMessages;
        boolean needWake;
        if (p == null || when == 0 || when < p.when) {
            // p为null(代表MessageQueue没有消息) 或者Message的触发时间是队列中最早的,则进入该该分支
            msg.next = p;
            mMessages = msg;
            needWake = mBlocked; //当阻塞时需要唤醒
        } else {
            //将消息按时间顺序插入到MessageQueue中MessageQueue实际上为一个链结构。一般地,不需要唤醒
            //事件队列,除非消息队头存在barrier,并且同时Message是队列中最早的异步消息。
            // Inserted within the middle of the queue.  Usually we don't have to wake
            // up the event queue unless there is a barrier at the head of the queue
            // and the message is the earliest asynchronous message in the queue.
            needWake = mBlocked && p.target == null && msg.isAsynchronous();
            Message prev;
            for (;;) {
                prev = p;
                p = p.next;
                if (p == null || when < p.when) {
                    break;
                }
                if (needWake && p.isAsynchronous()) {
                    needWake = false;
                }
            }
            msg.next = p; // invariant: p == prev.next
            prev.next = msg;
        }

        // 消息没有退出,我们认为此时mPtr != 0
        if (needWake) {
            // 此处会唤醒MessageQueue nativePollOnce后面将会继续执行
            nativeWake(mPtr);
        }
    }
    return true;
}
3、Native层Handler的原理
为了更好的理解Handler接下来分析一下上面提到的几个native方法
3.1 nativeInit()
上文提到过在创建MessageQueue是会调用nativeInit()方法
MessageQueue(boolean quitAllowed) {
    mQuitAllowed = quitAllowed;
    //通过native方法初始化消息队列,其中mPtr保存的是NativeMessageQueue的引用
    mPtr = nativeInit();
}
接下来我们就看看这个方法在native层做了什么事情。
调用JNI函数
static jlong android_os_MessageQueue_nativeInit(JNIEnv* env, jclass clazz) {
    //初始化NativeMessageQueue
    NativeMessageQueue* nativeMessageQueue = new NativeMessageQueue();
    if (!nativeMessageQueue) {
        jniThrowRuntimeException(env, "Unable to allocate native queue");
        return 0;
    }
    nativeMessageQueue->incStrong(env);
    return reinterpret_cast<jlong>(nativeMessageQueue);
}
NativeMessageQueue的构造函数
NativeMessageQueue::NativeMessageQueue() : mPollEnv(NULL), mPollObj(NULL), mExceptionObj(NULL) {
    mLooper = Looper::getForThread();
    if (mLooper == NULL) {
        mLooper = new Looper(false); //创建native层的Looper
        Looper::setForThread(mLooper);
    }
}
Looper::getForThread(),功能类比于Java层的Looper.myLooper();
Looper::setForThread(mLooper),功能类比于Java层的ThreadLocal.set();
MessageQueue在Java层与Native层之间有着紧密的联系,但是Native层的Looper与Java层的Looper没有任何的关系,可以发现native层基本等价于用C++重写了Java层Looper的逻辑,故可以发现很多功能类似的地方。
Looper的构造函数
Looper::Looper(bool allowNonCallbacks) :
        mAllowNonCallbacks(allowNonCallbacks), mSendingMessage(false),
        mPolling(false), mEpollFd(-1), mEpollRebuildRequired(false),
        mNextRequestSeq(0), mResponseIndex(0), mNextMessageUptime(LLONG_MAX) {
    mWakeEventFd = eventfd(0, EFD_NONBLOCK); //构造唤醒事件的fd
    AutoMutex _l(mLock);
    rebuildEpollLocked();  //重建Epoll事件
}
注意一下这里的mWakeEventFd之后唤醒MessageQueue的时候会用到
void Looper::rebuildEpollLocked() {
    if (mEpollFd >= 0) {
        close(mEpollFd); //关闭旧的epoll实例
    }
    mEpollFd = epoll_create(EPOLL_SIZE_HINT); //创建新的epoll实例,并注册wake管道
    struct epoll_event eventItem;
    memset(& eventItem, 0, sizeof(epoll_event));
    eventItem.events = EPOLLIN; //可读事件
    eventItem.data.fd = mWakeEventFd;
    //将唤醒事件(mWakeEventFd)添加到epoll实例(mEpollFd)
    int result = epoll_ctl(mEpollFd, EPOLL_CTL_ADD, mWakeEventFd, & eventItem);

    for (size_t i = 0; i < mRequests.size(); i++) {
        const Request& request = mRequests.valueAt(i);
        struct epoll_event eventItem;
        request.initEventItem(&eventItem);
        //将request队列的事件,分别添加到epoll实例
        int epollResult = epoll_ctl(mEpollFd, EPOLL_CTL_ADD, request.fd, & eventItem);
        if (epollResult < 0) {
            ALOGE("Error adding epoll events for fd %d while rebuilding epoll set, errno=%d", request.fd, errno);
        }
    }
}
理解了epoll机制之后此段代码会非常容易理解,这个地方看不懂的可以去了解一下epoll机制
3.2 nativePollOnce()
之前在分析MessageQueue.next()函数的时候会使用到这个函数,而且还说过这个函数是阻塞操作,接下来就分析一下其阻塞的原因,
Message next() {
    final long ptr = mPtr;
    if (ptr == 0) {
        return null;
    }

    for (;;) {
        ...
        nativePollOnce(ptr, nextPollTimeoutMillis);
        ...
    }
    ...
}
调用JNI函数
static void android_os_MessageQueue_nativePollOnce(JNIEnv* env, jobject obj, jlong ptr, jint timeoutMillis) {
    //将Java层传递下来的mPtr转换为nativeMessageQueue对象
    NativeMessageQueue* nativeMessageQueue = reinterpret_cast<NativeMessageQueue*>(ptr);
    nativeMessageQueue->pollOnce(env, obj, timeoutMillis);
}
void NativeMessageQueue::pollOnce(JNIEnv* env, jobject pollObj, int timeoutMillis) {
    mPollEnv = env;
    mPollObj = pollObj;
    mLooper->pollOnce(timeoutMillis);
    mPollObj = NULL;
    mPollEnv = NULL;
    if (mExceptionObj) {
        env->Throw(mExceptionObj);
        env->DeleteLocalRef(mExceptionObj);
        mExceptionObj = NULL;
    }
}
inline int pollOnce(int timeoutMillis) {
    return pollOnce(timeoutMillis, NULL, NULL, NULL); 【5】
}

int Looper::pollOnce(int timeoutMillis, int* outFd, int* outEvents, void** outData) {
    int result = 0;
    for (;;) {
        while (mResponseIndex < mResponses.size()) {
            const Response& response = mResponses.itemAt(mResponseIndex++);
            int ident = response.request.ident;
            if (ident >= 0) {
                int fd = response.request.fd;
                int events = response.events;
                void* data = response.request.data;
                if (outFd != NULL) *outFd = fd;
                if (outEvents != NULL) *outEvents = events;
                if (outData != NULL) *outData = data;
                return ident;
            }
        }
        if (result != 0) {
            if (outFd != NULL) *outFd = 0;
            if (outEvents != NULL) *outEvents = 0;
            if (outData != NULL) *outData = NULL;
            return result;
        }
        // 我们只需要关注这个函数
        result = pollInner(timeoutMillis);
    }
}
int Looper::pollInner(int timeoutMillis) {
    ...
    int result = POLL_WAKE;
    mResponses.clear();
    mResponseIndex = 0;
    mPolling = true;
    struct epoll_event eventItems[EPOLL_MAX_EVENTS];
    // 此处就是nativePollOnce()会阻塞的原因
    int eventCount = epoll_wait(mEpollFd, eventItems, EPOLL_MAX_EVENTS, timeoutMillis);

    mPolling = false;
    mLock.lock();
    ... //省略后面的处理流程
}
通过上面的层层调用最终会调用到Looper::pollInner()函数,在该函数中会调用epoll_wait函数,这也正是nativePollOnce()会阻塞的原因
3.3 nativeWake()
上面分析了nativePollOnce()函数会阻塞的原因,那么MessageQueue是如果被唤醒的呢?
前面讲过当Handler发送消息是会调用到MessageQueue.enqueueMessage()函数
boolean enqueueMessage(Message msg, long when) {
    ...  //前面的处理流程省略
    if (needWake) {
            nativeWake(mPtr);
        }
}
在该函数的最后会调用nativeWake()函数
static void android_os_MessageQueue_nativeWake(JNIEnv* env, jclass clazz, jlong ptr) {
    NativeMessageQueue* nativeMessageQueue = reinterpret_cast<NativeMessageQueue*>(ptr);
    nativeMessageQueue->wake();
}
接下来看NativeMessageQueue的wake()函数
void NativeMessageQueue::wake() {
    mLooper->wake();
}
void Looper::wake() {
    uint64_t inc = 1;
    // 向mWakeEventFd写入字符1
    ssize_t nWrite = TEMP_FAILURE_RETRY(write(mWakeEventFd, &inc, sizeof(uint64_t)));
    if (nWrite != sizeof(uint64_t)) {
        if (errno != EAGAIN) {
            ALOGW("Could not write wake signal, errno=%d", errno);
        }
    }
}
还记得mWakeEventFd吗?在前面创建Looper的时候提到过
Looper::Looper(bool allowNonCallbacks) :
        mAllowNonCallbacks(allowNonCallbacks), mSendingMessage(false),
        mPolling(false), mEpollFd(-1), mEpollRebuildRequired(false),
        mNextRequestSeq(0), mResponseIndex(0), mNextMessageUptime(LLONG_MAX) {
    mWakeEventFd = eventfd(0, EFD_NONBLOCK); //构造唤醒事件的fd
    AutoMutex _l(mLock);
    rebuildEpollLocked();
}
epoll监听到mWakeEventFd有事件发生就会从阻塞状态被唤醒,进而继续执行后面的代码
3.4 总结
Java层的Handler和Native层的Handler的原理是相似的,所以这里没有过多的分析Native层的Handler。如下两点需要分清:
- Native层的Handler和Looper和Java层的Handler和Looper是独立的他们之间没有任何联系。
- 虽然Java层的MessageQueue保存着NativeMessageQueue的引用,但是MessageQueue在Java层和Native层有各自的存储结构,也就是说Java层和Native层的MessageQueue是相互独立的。