概要
1.简单案例入门
2.pom.xml文件解析
3.主程序注解解析
4.IDEA快速构建SpringBoot项目
优点
– 快速创建独立运行的Spring项目以及与主流框架集成
– 使用嵌入式的Servlet容器,应用无需打成WAR包
– starters自动依赖与版本控制
– 大量的自动配置,简化开发,也可修改默认值
– 无需配置XML,无代码生成,开箱即用
– 准生产环境的运行时应用监控
– 与云计算的天然集成
一、案例
1.创建一个maven工程:spring-boot-01-helloworld
2. 导入pom.xml文件依赖
    <groupId>cn.sunzh</groupId>
    <artifactId>spring-boot-01-helloworld</artifactId>
    <version>1.0-SNAPSHOT</version>

    <parent>
        <groupId>org.springframework.boot</groupId>
        <artifactId>spring-boot-starter-parent</artifactId>
        <version>1.5.9.RELEASE</version>
    </parent>

    <dependencies>
        <dependency>
            <groupId>org.springframework.boot</groupId>
            <artifactId>spring-boot-starter-web</artifactId>
        </dependency>
    </dependencies>

    <build>
        <finalName>${project.artifactId}</finalName>
        <plugins>
            <!-- 资源文件拷贝插件 -->
            <!-- 这个插件,可以将应用打包成一个可执行的jar包;-->
            <plugin>
                <groupId>org.springframework.boot</groupId>
                <artifactId>spring-boot-maven-plugin</artifactId>
            </plugin>
            <!-- java编译插件 -->
            <plugin>
                <groupId>org.apache.maven.plugins</groupId>
                <artifactId>maven-compiler-plugin</artifactId>
                <configuration>
                    <source>1.8</source>
                    <target>1.8</target>
                    <encoding>UTF-8</encoding>
                </configuration>
            </plugin>
        </plugins>
    </build>
3.Spring Boot启动主程序
package cn.sunzh;

import org.springframework.boot.SpringApplication;
import org.springframework.boot.autoconfigure.SpringBootApplication;

/**
 * @SpringBootApplication 来标注一个主程序类,说明这是一个Spring Boot应用
 */
@SpringBootApplication
public class HelloWorldMainApplication {

    public static void main(String[] args) {
        // SpringApplication中run方法,入参必须是被SpringBootApplication注解的类
        SpringApplication.run(HelloWorldMainApplication.class, args);
    }
}
4.控制层
package cn.sunzh.controller;

import org.springframework.stereotype.Controller;
import org.springframework.web.bind.annotation.RequestMapping;
import org.springframework.web.bind.annotation.ResponseBody;

@Controller
public class HelloWorldController {

    @ResponseBody
    @RequestMapping("/hello")
    public String hello(){
        return "hello world";
    }
}
或
package cn.sunzh.controller;

import org.springframework.web.bind.annotation.RequestMapping;
import org.springframework.web.bind.annotation.RestController;

//@ResponseBody
//@Controller
@RestController // @RestController 等价于 @ResponseBody + @Controller
public class HelloWorldController {

    @RequestMapping("/hello")
    public String hello(){
        return "hello world";
    }
}
5.1.1 启动方式一
运行HelloWorldMainApplication.java的main方法。
. ____ _ __ _ _
/\\ / ___'_ __ _ _(_)_ __ __ _ \ \ \ \
( ( )\___ | '_ | '_| | '_ \/ _` | \ \ \ \
\\/ ___)| |_)| | | | | || (_| | ) ) ) )
' |____| .__|_| |_|_| |_\__, | / / / /
=========|_|==============|___/=/_/_/_/
:: Spring Boot :: (v1.5.9.RELEASE)
2018-09-06 20:37:02.728 INFO 11816 --- [ main] cn.sunzh.HelloWorldMainApplication : Starting HelloWorldMainApplication on Sunzh with PID 11816 (D:\project\idea-workspace\spring-boot-01-helloworld\target\classes started by Sunzh in D:\project\idea-workspace\spring-boot-01-helloworld)
2018-09-06 20:37:02.731 INFO 11816 --- [ main] cn.sunzh.HelloWorldMainApplication : No active profile set, falling back to default profiles: default
2018-09-06 20:37:02.783 INFO 11816 --- [ main] ationConfigEmbeddedWebApplicationContext : Refreshing org.springframework.boot.context.embedded.AnnotationConfigEmbeddedWebApplicationContext@1c72da34: startup date [Thu Sep 06 20:37:02 CST 2018]; root of context hierarchy
....
....
2018-09-06 20:37:04.853 INFO 11816 --- [ main] s.b.c.e.t.TomcatEmbeddedServletContainer : Tomcat started on port(s): 8080 (http)
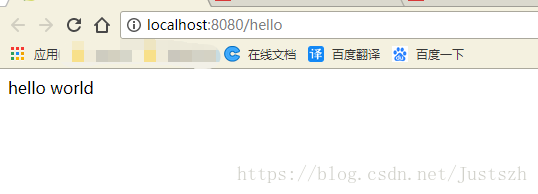
2018-09-06 20:37:04.858 INFO 11816 --- [ main] cn.sunzh.HelloWorldMainApplication : Started HelloWorldMainApplication in 2.385 seconds (JVM running for 3.317)5.1.2 页面访问
5.2.1 启动方式二
pom.xml添加插件spring-boot-maven-plugin
<!-- 资源文件拷贝插件 -->
<plugin>
    <groupId>org.springframework.boot</groupId>
    <artifactId>spring-boot-maven-plugin</artifactId>
</plugin>
打成的jar包在target内,拷贝至桌面。
在cmd中运行
C:\Users\Sunzh> cd C:\Users\Sunzh\Desktop
C:\Users\Sunzh\Desktop> java -jar spring-boot-01-helloworld-1.0-SNAPSHOT.jar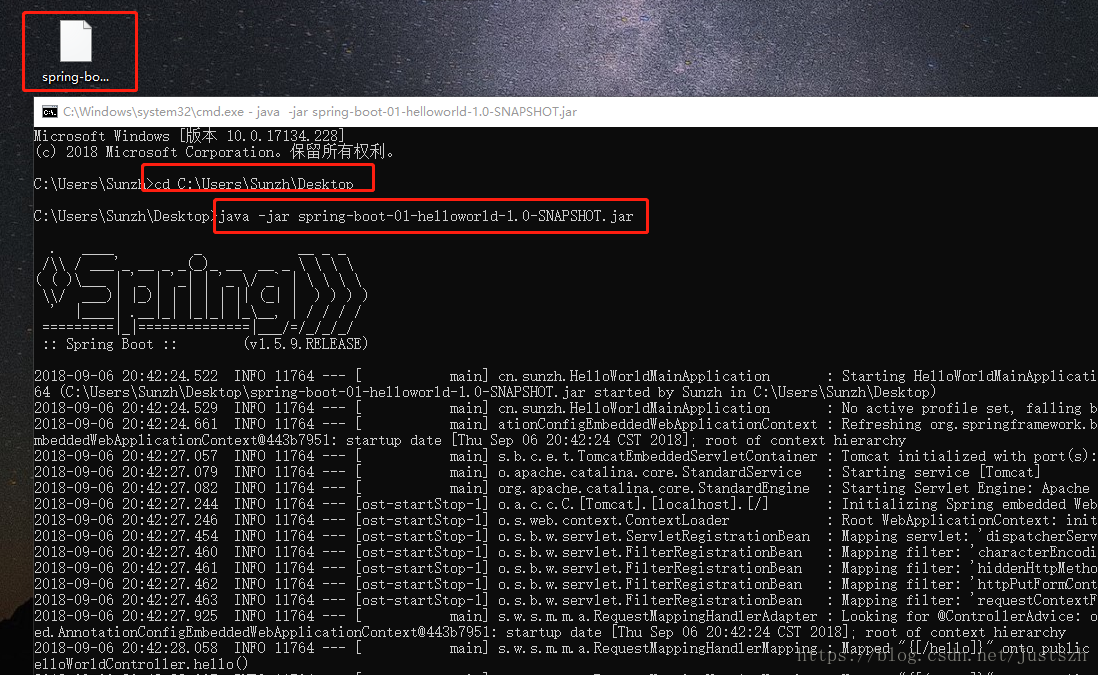
二、pom.xml解析
1.父项目
    <groupId>cn.sunzh</groupId>
    <artifactId>spring-boot-01-helloworld</artifactId>
    <version>1.0-SNAPSHOT</version>

    <parent>
        <groupId>org.springframework.boot</groupId>
        //按住ctrl,鼠标左击下面代码,进入parent的pom文件
        <artifactId>spring-boot-starter-parent</artifactId>
        <version>1.5.9.RELEASE</version>
    </parent>

进入spring-boot-01-helloworld的父类parent

    <modelVersion>4.0.0</modelVersion>
    <parent>
        <groupId>org.springframework.boot</groupId>
        <artifactId>spring-boot-dependencies</artifactId>
        <version>1.5.9.RELEASE</version>
        <relativePath>../../spring-boot-dependencies</relativePath>
    </parent>
    <artifactId>spring-boot-starter-parent</artifactId>
    <packaging>pom</packaging>
    <name>Spring Boot Starter Parent</name>

继续进入parent的父类dependencies

    <properties>
        <!-- Dependency versions -->
        <activemq.version>5.14.5</activemq.version>
        <antlr2.version>2.7.7</antlr2.version>
        <appengine-sdk.version>1.9.59</appengine-sdk.version>
        <artemis.version>1.5.5</artemis.version>
        <aspectj.version>1.8.13</aspectj.version>
        <assertj.version>2.6.0</assertj.version>
        ....
    </properties>
    <dependencies>
        <!-- Spring Boot -->
        <dependency>
            <groupId>org.springframework.boot</groupId>
            <artifactId>spring-boot</artifactId>
            <version>1.5.9.RELEASE</version>
        </dependency>
        <dependency>
            <groupId>org.springframework.boot</groupId>
            <artifactId>spring-boot</artifactId>
            <type>test-jar</type>
            <version>1.5.9.RELEASE</version>
        </dependency>
        ....
    </dependencies>
    Spring Boot Dependencies即是Spring Boot的版本仲裁中心;
    以后我们导入依赖默认是不需要写版本;(没有在dependencies里面管理的依赖自然需要声明版本号)
2.启动器
    <dependencies>
        <dependency>
            <groupId>org.springframework.boot</groupId>
            //按住ctrl,鼠标左击下面代码,进入spring-boot-starter-web的pom文件
            <artifactId>spring-boot-starter-web</artifactId>
        </dependency>
    </dependencies>

进入spring-boot-starter-web

    <parent>
        <groupId>org.springframework.boot</groupId>
        <artifactId>spring-boot-starter-parent</artifactId>
        <version>1.5.9.RELEASE</version>
    </parent>

进入spring-boot-starter-web的父类spring-boot-starters

    <parent>
        <groupId>org.springframework.boot</groupId>
        <artifactId>spring-boot-starters</artifactId>
        <version>1.5.9.RELEASE</version>
    </parent>

可以看到spring-boot-starters中引入了大量的模块
<modules>
        <module>spring-boot-starter</module>
        <module>spring-boot-starter-activemq</module>
        <module>spring-boot-starter-amqp</module>
        <module>spring-boot-starter-aop</module>
        <module>spring-boot-starter-artemis</module>
.....
        <module>spring-boot-starter-web</module>
        <module>spring-boot-starter-websocket</module>
        <module>spring-boot-starter-web-services</module>
</modules>
总结:
- Spring Boot为我们提供了简化企业级开发绝大多数场景的starter pom(启动器),只要引入了相应场景的starter
pom,相关技术的绝大部分配置将会消除(自动配置),从而简化我们开发。业务中我们就会使用到Spring
Boot为我们自动配置的bean。 - 参考 https://docs.spring.io/spring-boot/docs/1.5.9.RELEASE/reference/htmlsingle/#using-boot-starter
- 这些starters几乎涵盖了javaee所有常用场景,Spring Boot对这些场景依赖的jar也做了严格的测试与版本控制。我们不必担心jar版本合适度问题。
- spring-boot-dependencies里面定义了jar包的版本
三、主程序注解解析
/**
 * @SpringBootApplication 来标注一个主程序类,说明这是一个Spring Boot应用
 */
@SpringBootApplication
public class HelloWorldMainApplication {

    public static void main(String[] args) {

        // Spring应用启动起来
        SpringApplication.run(HelloWorldMainApplication.class, args);
    }
}
@SpringBootApplication注解是Spring Boot的核心注解,它其实是一个组合注解:
@Target({ElementType.TYPE})
@Retention(RetentionPolicy.RUNTIME)
@Documented
@Inherited
@SpringBootConfiguration    //这是Spring Boot项目的配置注解,这也是一个组合注解:
@EnableAutoConfiguration    //启用自动配置,该注解会使Spring Boot根据项目中依赖的jar包自动配置项目的配置项:
@ComponentScan(
    excludeFilters = {@Filter(
    type = FilterType.CUSTOM,
    classes = {TypeExcludeFilter.class}
), @Filter(
    type = FilterType.CUSTOM,
    classes = {AutoConfigurationExcludeFilter.class}
)}
)
public @interface SpringBootApplication {...}
@SpringBootConfiguration:Spring Boot的配置类;标注在某个类上,表示这是一个Spring Boot的配置类。
@Target({ElementType.TYPE})
@Retention(RetentionPolicy.RUNTIME)
@Documented
@Configuration      //通过该注解来表明该类是一个Spring的配置,相当于一个xml文件
public @interface SpringBootConfiguration {...}
@EnableAutoConfiguration:开启自动配置功能
@Target({ElementType.TYPE})
@Retention(RetentionPolicy.RUNTIME)
@Documented
@Inherited
@AutoConfigurationPackage       //默认扫描@SpringBootApplication所在类的同级目录以及它的子目录。
@Import({EnableAutoConfigurationImportSelector.class})  //@Import导入所有的自动配置场景
public @interface EnableAutoConfiguration {....}
关闭自动配置
/**
* @SpringBootApplication 来标注一个主程序类,说明这是一个Spring Boot应用
*/
@SpringBootApplication(exclude = {RedisAutoConfiguration.class}) //redis相关不被自动配置
public class HelloWorldMainApplication {
public static void main(String[] args) {
// Spring应用启动起来
SpringApplication.run(HelloWorldMainApplication.class, args);
}
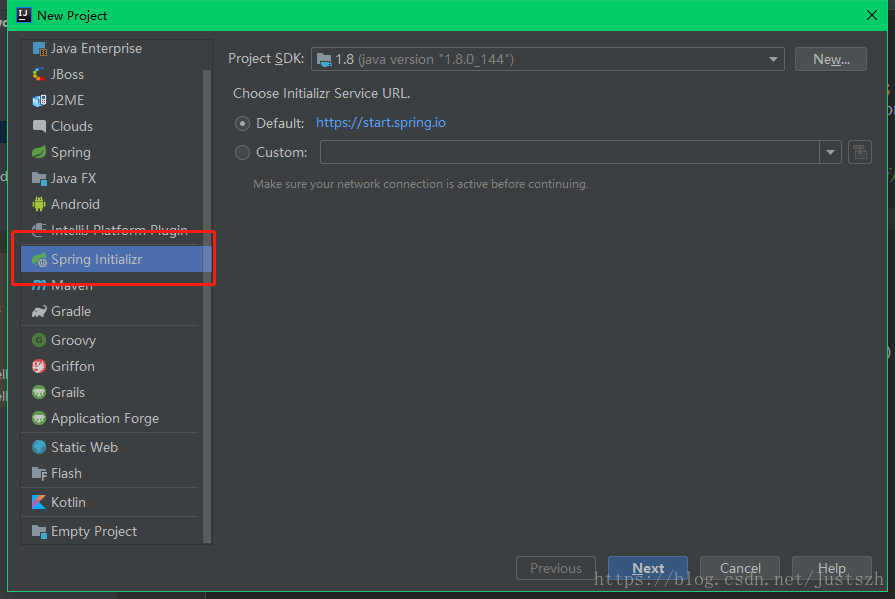
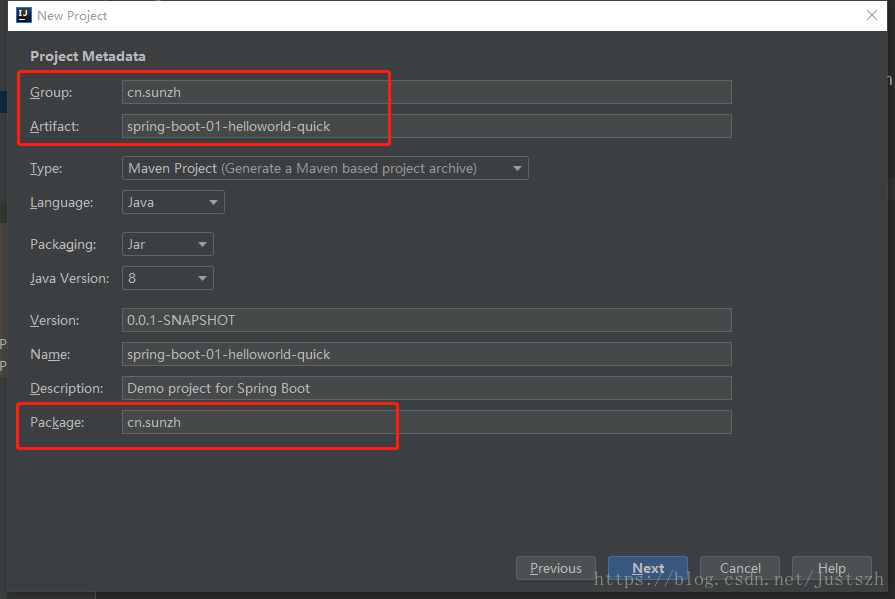
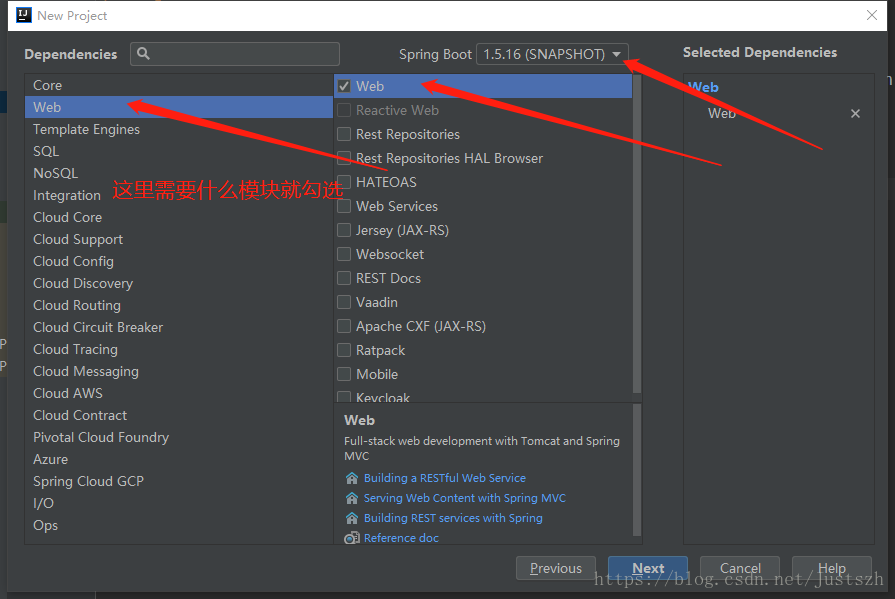
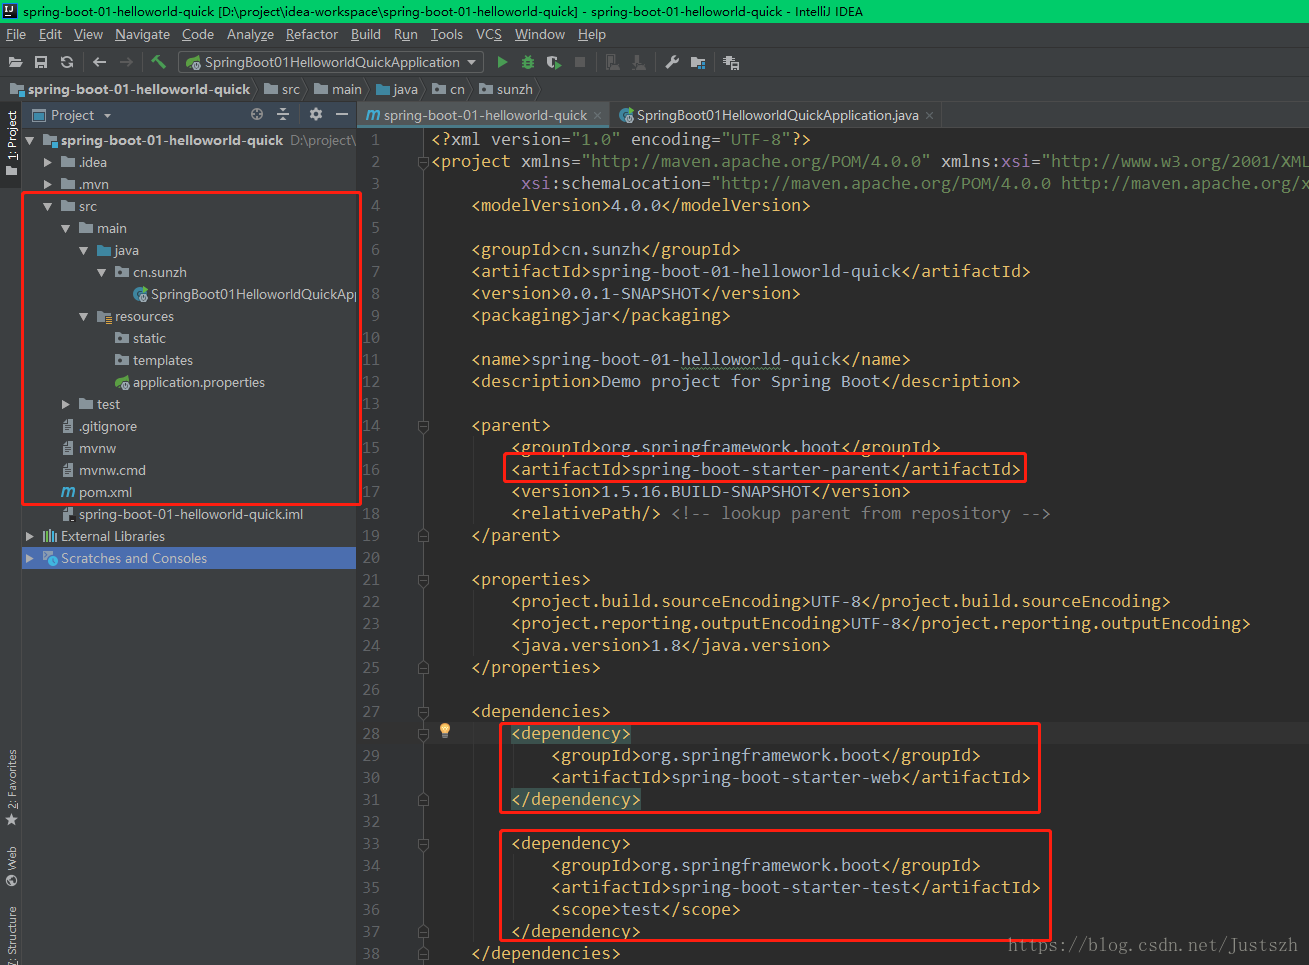
}四、IDEA快速构建SpringBoot项目