代码
先给出代码,再详细解释一下过程:


#include <opencv2/core/core.hpp>
#include <opencv2/imgproc/imgproc.hpp>
#include <opencv2/highgui/highgui.hpp>
#include <iostream>

using namespacecv;
using namespacestd;

#define GRAY_THRESH 150
#define HOUGH_VOTE 100

//#define DEGREE 27

intmain(intargc,char**argv)
{
//Read a single-channel image
constchar*filename="imageText.jpg";
Mat srcImg=imread(filename,CV_LOAD_IMAGE_GRAYSCALE);
if(srcImg.empty())
return-1;
imshow("source",srcImg);

Point center(srcImg.cols/2,srcImg.rows/2);

#ifdef DEGREE
//Rotate source image
Mat rotMatS=getRotationMatrix2D(center,DEGREE,1.0);
warpAffine(srcImg,srcImg,rotMatS,srcImg.size(),1,0,Scalar(255,255,255));
imshow("RotatedSrc",srcImg);
//imwrite("imageText_R.jpg",srcImg);
#endif

//Expand image to an optimal size, for faster processing speed
//Set widths of borders in four directions
//If borderType==BORDER_CONSTANT, fill the borders with (0,0,0)
Mat padded;
intopWidth=getOptimalDFTSize(srcImg.rows);
intopHeight=getOptimalDFTSize(srcImg.cols);
copyMakeBorder(srcImg,padded,0,opWidth-srcImg.rows,0,opHeight-srcImg.cols,BORDER_CONSTANT,Scalar::all(0));

Mat planes[]={Mat_<float>(padded),Mat::zeros(padded.size(),CV_32F)};
Mat comImg;
//Merge into a double-channel image
merge(planes,2,comImg);

//Use the same image as input and output,
//so that the results can fit in Mat well
dft(comImg,comImg);

//Compute the magnitude
//planes[0]=Re(DFT(I)), planes[1]=Im(DFT(I))
//magnitude=sqrt(Re^2+Im^2)
split(comImg,planes);
magnitude(planes[0],planes[1],planes[0]);

//Switch to logarithmic scale, for better visual results
//M2=log(1+M1)
Mat magMat=planes[0];
magMat+=Scalar::all(1);
log(magMat,magMat);

//Crop the spectrum
//Width and height of magMat should be even, so that they can be divided by 2
//-2 is 11111110 in binary system, operator & make sure width and height are always even
magMat=magMat(Rect(0,0,magMat.cols&-2,magMat.rows&-2));

//Rearrange the quadrants of Fourier image,
//so that the origin is at the center of image,
//and move the high frequency to the corners
intcx=magMat.cols/2;
intcy=magMat.rows/2;

Mat q0(magMat,Rect(0,0,cx,cy));
Mat q1(magMat,Rect(0,cy,cx,cy));
Mat q2(magMat,Rect(cx,cy,cx,cy));
Mat q3(magMat,Rect(cx,0,cx,cy));

Mat tmp;
q0.copyTo(tmp);
q2.copyTo(q0);
tmp.copyTo(q2);

q1.copyTo(tmp);
q3.copyTo(q1);
tmp.copyTo(q3);

//Normalize the magnitude to [0,1], then to[0,255]
normalize(magMat,magMat,0,1,CV_MINMAX);
Mat magImg(magMat.size(),CV_8UC1);
magMat.convertTo(magImg,CV_8UC1,255,0);
imshow("magnitude",magImg);
//imwrite("imageText_mag.jpg",magImg);

//Turn into binary image
threshold(magImg,magImg,GRAY_THRESH,255,CV_THRESH_BINARY);
imshow("mag_binary",magImg);
//imwrite("imageText_bin.jpg",magImg);

//Find lines with Hough Transformation
vector<Vec2f>lines;
floatpi180=(float)CV_PI/180;
Mat linImg(magImg.size(),CV_8UC3);
HoughLines(magImg,lines,1,pi180,HOUGH_VOTE,0,0);
intnumLines=lines.size();
for(intl=0;l<numLines;l++)
{
floatrho=lines[l][0],theta=lines[l][1];
Point pt1,pt2;
doublea=cos(theta),b=sin(theta);
doublex0=a*rho,y0=b*rho;
pt1.x=cvRound(x0+1000*(-b));
pt1.y=cvRound(y0+1000*(a));
pt2.x=cvRound(x0-1000*(-b));
pt2.y=cvRound(y0-1000*(a));
line(linImg,pt1,pt2,Scalar(255,0,0),3,8,0);
}
imshow("lines",linImg);
//imwrite("imageText_line.jpg",linImg);
if(lines.size()==3){
cout<<"found three angels:"<<endl;
cout<<lines[0][1]*180/CV_PI<<endl<<lines[1][1]*180/CV_PI<<endl<<lines[2][1]*180/CV_PI<<endl<<endl;
}

//Find the proper angel from the three found angels
floatangel=0;
floatpiThresh=(float)CV_PI/90;
floatpi2=CV_PI/2;
for(intl=0;l<numLines;l++)
{
floattheta=lines[l][1];
if(abs(theta)<piThresh||abs(theta-pi2)<piThresh)
continue;
else{
angel=theta;
break;
}
}

//Calculate the rotation angel
//The image has to be square,
//so that the rotation angel can be calculate right
angel=angel<pi2?angel:angel-CV_PI;
if(angel!=pi2){
floatangelT=srcImg.rows*tan(angel)/srcImg.cols;
angel=atan(angelT);
}
floatangelD=angel*180/(float)CV_PI;
cout<<"the rotation angel to be applied:"<<endl<<angelD<<endl<<endl;

//Rotate the image to recover
Mat rotMat=getRotationMatrix2D(center,angelD,1.0);
Mat dstImg=Mat::ones(srcImg.size(),CV_8UC3);
warpAffine(srcImg,dstImg,rotMat,srcImg.size(),1,0,Scalar(255,255,255));
imshow("result",dstImg);
//imwrite("imageText_D.jpg",dstImg);

waitKey(0);

return0;
}
过程
读取图片
Mat srcImg=imread(filename,CV_LOAD_IMAGE_GRAYSCALE);
if(srcImg.empty())
  return-1;
srcImg.empty()用来判断是否成功读进图像,如果srcImg中没有数据,在后面的步骤会产生内存错误。
由于处理的是文本,彩色信息不会提供额外帮助,所以要用CV_LOAD_IMAGE_GRAYSCALE表明以灰度形式读进图像。
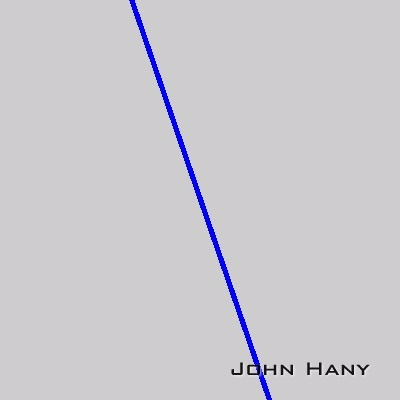
假定读取的图像如下:
旋转原图像(可选)
Point center(srcImg.cols/2, srcImg.rows/2);

#ifdef DEGREE
    //Rotate source image
    Mat rotMatS = getRotationMatrix2D(center, DEGREE, 1.0);
    warpAffine(srcImg, srcImg, rotMatS, srcImg.size(), 1, 0, Scalar(255,255,255));
    imshow("RotatedSrc", srcImg);
    //imwrite("H:\\imageText_02_R.jpg",srcImg);
#endif
如果手头没有这样的倾斜图像,可以选择一张正放的文本图像,再把第12行#define DEGREE那行前的注释符号去掉。然后这部分代码就会把所给的图像旋转你规定的角度,再交给后面处理。
图像延扩
Mat padded;
int opWidth = getOptimalDFTSize(srcImg.rows);
int opHeight = getOptimalDFTSize(srcImg.cols);
copyMakeBorder(srcImg, padded, 0, opWidth-srcImg.rows, 0, opHeight-srcImg.cols, BORDER_CONSTANT, Scalar::all(0));
OpenCV中的DFT采用的是快速算法,这种算法要求图像的尺寸是2、3和5的倍数时处理速度最快。所以需要用getOptimalDFTSize()找到最适合的尺寸,然后用copyMakeBorder()填充多余的部分。这里是让原图像和扩大的图像左上角对齐。填充的颜色如果是纯色对变换结果的影响不会很大,后面寻找倾斜线的过程又会完全忽略这一点影响。

DFT
Mat planes[]={Mat_<float>(padded),Mat::zeros(padded.size(),CV_32F)};
Mat comImg;

merge(planes,2,comImg);

dft(comImg,comImg);
DFT要分别计算实部和虚部,把要处理的图像作为输入的实部、一个全零的图像作为输入的虚部。dft()输入和输出应该分别为单张图像,所以要先用merge()把实虚部图像合并,分别处于图像comImg的两个通道内。计算得到的实虚部仍然保存在comImg的两个通道内。
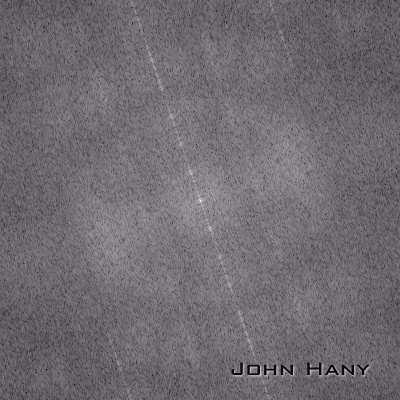
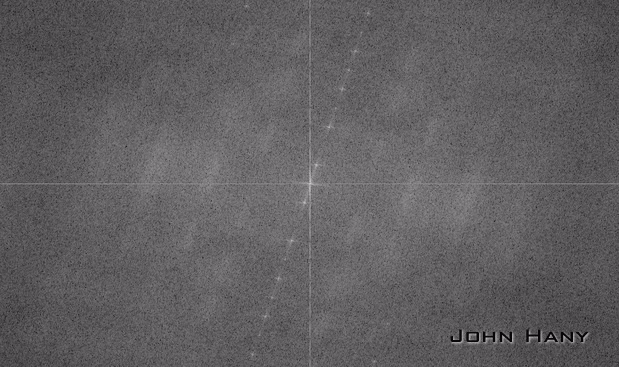
获得DFT图像
split(comImg, planes);
magnitude(planes[0], planes[1], planes[0]);

Mat magMat = planes[0];
magMat += Scalar::all(1);
log(magMat, magMat);
一般都会用幅度图像来表示图像傅里叶的变换结果(傅里叶谱)。
幅度的计算公式:magnitude = sqrt(Re(DFT)^2 + Im(DFT)^2)。
由于幅度的变化范围很大,而一般图像亮度范围只有[0,255],容易造成一大片漆黑,只有几个点很亮。所以要用log函数把数值的范围缩小。
magMat = magMat(Rect(0, 0, magMat.cols & -2, magMat.rows & -2));

int cx = magMat.cols/2;
int cy = magMat.rows/2;

Mat q0(magMat, Rect(0, 0, cx, cy));
Mat q1(magMat, Rect(0, cy, cx, cy));
Mat q2(magMat, Rect(cx, cy, cx, cy));
Mat q3(magMat, Rect(cx, 0, cx, cy));

Mat tmp;
q0.copyTo(tmp);
q2.copyTo(q0);
tmp.copyTo(q2);

q1.copyTo(tmp);
q3.copyTo(q1);
tmp.copyTo(q3);

normalize(magMat, magMat, 0, 1, CV_MINMAX);
Mat magImg(magMat.size(), CV_8UC1);
magMat.convertTo(magImg,CV_8UC1,255,0);
dft()直接获得的结果中,低频部分位于四角,高频部分位于中间。习惯上会把图像做四等份,互相对调,使低频部分位于图像中心,也就是让频域原点位于中心。
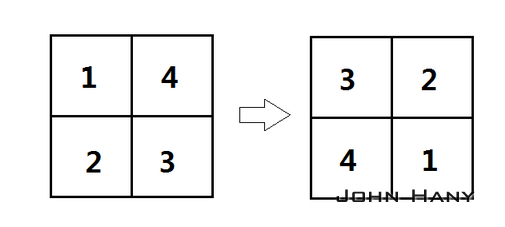
虽然用log()缩小了数据范围,但仍然不能保证数值都落在[0,255]之内,所以要先用normalize()规范化到[0,1]内,再用convertTo()把小数映射到[0,255]内的整数。结果保存在一幅单通道图像内:

Hough直线检测
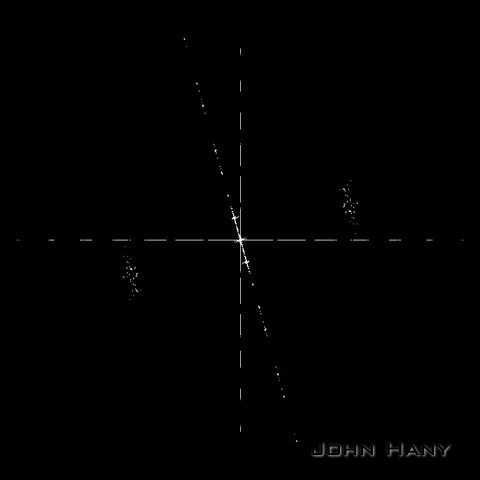
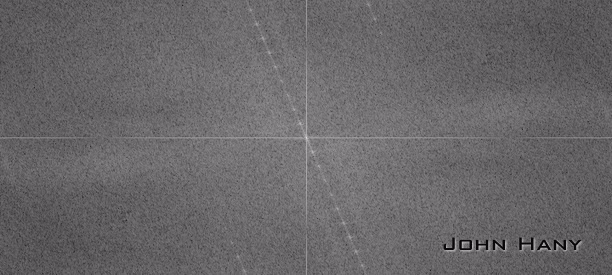
从傅里叶谱可以明显地看到一条过中心点的倾斜直线。要想求出这个倾斜角,首先要在图像上找出这条直线。
一个很方便的方法是采用霍夫(Hough)变换检测直线。
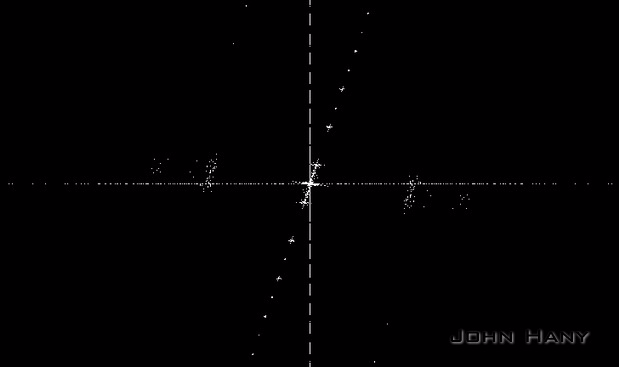
threshold(magImg,magImg,GRAY_THRESH,255,CV_THRESH_BINARY);
Hough变换要求输入图像是二值的,所以要用threshold()把图像二值化。
二值化的一种结果:
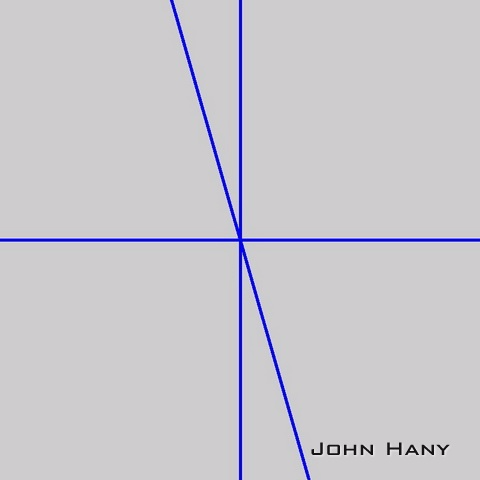
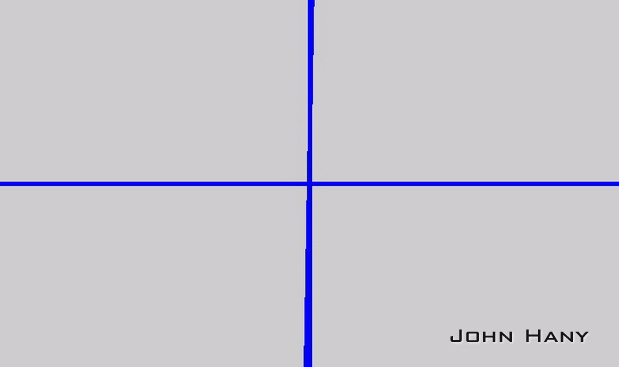
vector<Vec2f> lines;
float pi180 = (float)CV_PI/180;
Mat linImg(magImg.size(),CV_8UC3);
HoughLines(magImg,lines,1,pi180,HOUGH_VOTE,0,0);
int numLines = lines.size();
for(int l=0; l<numLines; l++)
{
    float rho = lines[l][0], theta = lines[l][1];
    Point pt1, pt2;
    double a = cos(theta), b = sin(theta);
    double x0 = a*rho, y0 = b*rho;
    pt1.x = cvRound(x0 + 1000*(-b));
    pt1.y = cvRound(y0 + 1000*(a));
    pt2.x = cvRound(x0 - 1000*(-b));
    pt2.y = cvRound(y0 - 1000*(a));
    line(linImg,pt1,pt2,Scalar(255,0,0),3,8,0);
}
这一部分用HoughLines()检测图像中可能存在的直线,并把直线参数保存在向量组lines中,然后绘制出找到的直线。
两个参数GRAY_THRESH和HOUGH_VOTE需要手动指定,不同的图像需要设置不同的参数,同一段文本旋转不同的角度也需要不同的参数。GRAY_THRESH越大,二值化的阈值就越高;HOUGH_VOTE越大,霍夫检测的投票数就越高(需要更多的共线点来确定一条直线)。说白了,如果发现二值化图像中直线附近有很多散点,就要适当提高GRAY_THRESH;如果发现从二值图像的一条直线上检测到了几条角度相差很小的直线,就需要适当提高HOUGH_VOTE。我们希望得到的结果时刚好检测到三条直线(有时只能检测到一条直线,后面会给出一个例子)。
检测到的直线:
计算倾斜角
上面得到了三个角度,一个是0度,一个是90度,另一个就是我们所需要的倾斜角。要把这个角找出来,而且要考虑误差。
由于DFT的特点,只有输入图像是正方形时,检测到的角才是文本真正旋转的角度。但我们的输入图像不一定是正方形的,所以要根据图像的长宽比改变这个角度。
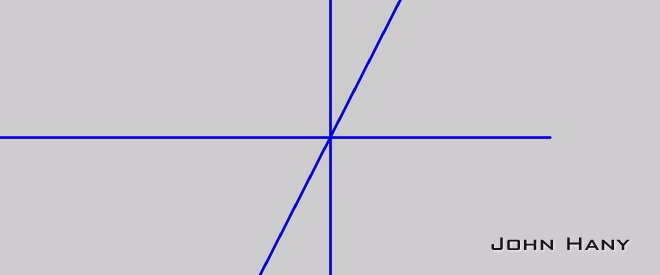
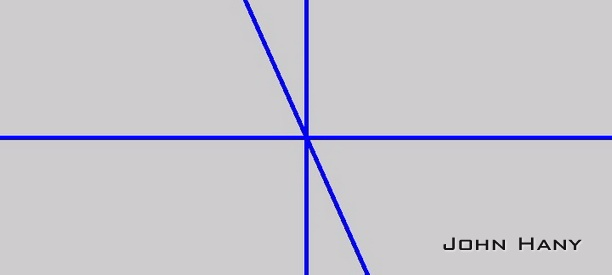
还有一个需要注意的细节,虽然HoughLines()输出的倾斜角在[0,180)之间,但在[0,90]和(90,180)之间这个角的含义是不同的。请看图示:
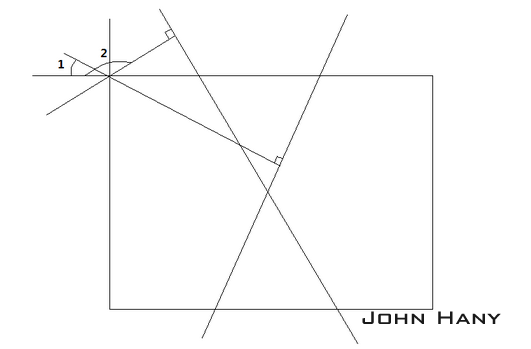
当倾斜角大于90度时,(180-倾斜角)才是直线相对竖直方向的偏离角度。在OpenCV中,逆时针旋转,角度为正。要把图像转回去,这个角度就变成了(倾斜角-180)。
校正图像
最后一步,当然是把图像转回去~
校正的结果:
一个检测单条直线的例子
原始图像:
傅里叶谱:
只有一条明显的直线。还好仅有的这条直线正是我们所需要的。
检测直线:
校正结果:
对中文的效果
我们来试试看这段程序对中文的校正效果。
输入图像:
傅里叶谱:

可以发现有许多条平行的亮线,其中过频域原点的那条长度最长,最容易检测出来。
检测直线:
校正结果:
虽然中文和英文在文字上有很大的不同,但字母(或者文字)的高度比较一致,使得行与行之间的分隔很明显。所以它们的频域特征是相似的。
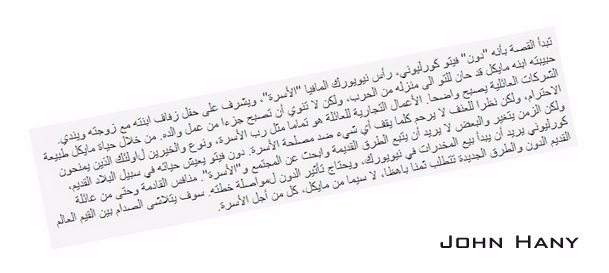
对其他语言文字的效果
我从IMDB.com摘取影片《教父》的英文介绍,然后用谷歌翻译成其他文字进行测试。
阿拉伯语
一枚反例
老挝语:

傅里叶谱:
一种二值化的结果:
直线检测:
这种文字的很多字母的上下方多了很多“笔画”(我不知道该怎么称呼那些小曲线),让行与行之间的分离变得不明显,使得频域特征变得不明显。
虽然用肉眼可以看出傅里叶谱中存在一条倾斜的直线,但它的亮度太低,二值化过程很难排除噪声,导致直线检测会首先检出噪声产生的直线。这也是我的程序目前受限之处。需要增加一个过滤散点噪声的步骤以增加程序的适用范围。
参考:Discrete Fourier Transform — OpenCV 2.4.7.0 documentation
代码还可以在这里下载:https://github.com/johnhany/textRotCorrect
2014.1.3更新:
由于文章内的图片右下角存在水印,若直接使用文章内的图片进行处理会使频域原点附近增加一团亮点,妨碍直线的检出。而且为了节省空间,图片是经过缩小的,使得字母的边缘变得模糊,频域特征也减弱。为此我提供了十幅没有水印的图片,供想要亲手实验的朋友使用。下载链接