fragment是什么呢 fragment相当于一块画布 可以根据要求在fragment更改界面 就是说不换activity的情况下把局部布局给改了
下面用实例来说明
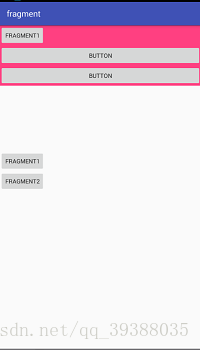
当我点击FRAFMENT1时界面是这样的
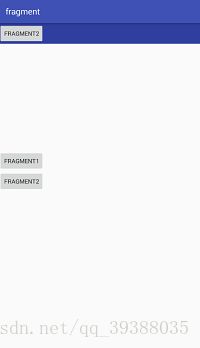
当我点击FRAFMENT2时界面是这样的
这是最基础的fragment的应用
接下来看下我的布局(activity_main.xml 和fragment1和fragment1)
activity_main
<?xml version="1.0" encoding="utf-8"?>
<LinearLayout xmlns:android="http://schemas.android.com/apk/res/android"
    xmlns:app="http://schemas.android.com/apk/res-auto"
    xmlns:tools="http://schemas.android.com/tools"
    android:layout_width="match_parent"
    android:layout_height="match_parent"
    tools:context="com.example.shinelon.fragment.MainActivity"
    android:orientation="vertical">

   <LinearLayout
       android:id="@+id/layout"
       android:layout_width="match_parent"
       android:layout_height="300dp"
       android:orientation="vertical"></LinearLayout>
    <Button
        android:layout_width="wrap_content"
        android:layout_height="wrap_content"
        android:id="@+id/bt1"
        android:text="fragment1"/>
    <Button
        android:layout_width="wrap_content"
        android:layout_height="wrap_content"
        android:id="@+id/bt2"
        android:text="fragment2"/>

</LinearLayout>
fragment1
<?xml version="1.0" encoding="utf-8"?>
<LinearLayout xmlns:android="http://schemas.android.com/apk/res/android"
    android:orientation="vertical" android:layout_width="match_parent"
    android:layout_height="match_parent"
    android:background="@color/colorAccent">
<Button
    android:layout_width="wrap_content"
    android:layout_height="wrap_content"
    android:text="fragment1"/>

    <Button
        android:id="@+id/button"
        android:layout_width="match_parent"
        android:layout_height="wrap_content"
        android:text="Button" />

    <Button
        android:id="@+id/button2"
        android:layout_width="match_parent"
        android:layout_height="wrap_content"
        android:text="Button" />
</LinearLayout>
fragment2
<?xml version="1.0" encoding="utf-8"?>
<LinearLayout xmlns:android="http://schemas.android.com/apk/res/android"
    android:orientation="vertical" android:layout_width="match_parent"
    android:layout_height="match_parent"
    android:background="@color/colorPrimaryDark">
    <Button
        android:layout_width="wrap_content"
        android:layout_height="wrap_content"
        android:text="fragment2"/>
</LinearLayout>
最后我们来控制这些布局需要用到class(Mainactivity.class fragment1.class fragment2.class )
Mainactivity
import android.app.FragmentManager;
import android.app.FragmentTransaction;
import android.support.v7.app.AppCompatActivity;
import android.os.Bundle;
import android.view.View;
import android.widget.Button;

public class MainActivity extends AppCompatActivity implements View.OnClickListener{
    private Button F1;
    private Button F2;
    private FragmentManager manager;
    private FragmentTransaction transaction;
    @Override
    protected void onCreate(Bundle savedInstanceState) {
        super.onCreate(savedInstanceState);
        setContentView(R.layout.activity_main);
    F1= (Button) findViewById(R.id.bt1);
    F2= (Button) findViewById(R.id.bt2);
        F1.setOnClickListener(this);
        F2.setOnClickListener(this);

        //这里开始是fragment布局的添加

    manager=getFragmentManager();
        transaction=manager.beginTransaction();
        //指定fragment的id的布局  然后给他添加控件  fragment2.class也一样  这是第一次加载  所以下面是transaction.add()的方法
        transaction.add(R.id.layout,new fragment1());
        transaction.commit();
    }
//点击事件时
    @Override
    public void onClick(View v) {
        transaction=manager.beginTransaction();
      switch (v.getId()){
          case R.id.bt1:
          //在这里是从新加载  所以就要用到transaction.replace()的了
              transaction.replace(R.id.layout,new fragment1());
              break;
          case R.id.bt2:
              transaction.replace(R.id.layout,new fragment2());
              break;

      }
      transaction.commit();
    }
}
fragment1
import android.app.Fragment;
import android.os.Bundle;
import android.support.annotation.Nullable;
import android.view.LayoutInflater;
import android.view.View;
import android.view.ViewGroup;

/**
 * Created by Shinelon on 2017/12/3.
 */

public class fragment1 extends Fragment {
    @Nullable
    @Override
    public View onCreateView(LayoutInflater inflater, @Nullable ViewGroup container, Bundle savedInstanceState) {
        View view=inflater.inflate(R.layout.fragment1,null);
           //这里就是把view返回给MainActivity里的方法
        return view;
    }
}
fragment2
import android.app.Fragment;
import android.os.Bundle;
import android.support.annotation.Nullable;
import android.view.LayoutInflater;
import android.view.View;
import android.view.ViewGroup;

/**
 * Created by Shinelon on 2017/12/3.
 */

public class fragment2 extends Fragment {
    @Nullable
    @Override
    public View onCreateView(LayoutInflater inflater, @Nullable ViewGroup container, Bundle savedInstanceState) {
        View view=inflater.inflate(R.layout.fragment2,null);
        //这里就是把view返回给MainActivity里的方法
        return view;
    }
}
这就是最简单的fragment 后面我在给你们写fragment间的传值