从TFRrecord文件中多线程的读取数据
从这一篇开始,要啃一些硬骨头了,不过掌握这一篇的内容就等于是掌握了深度学习中最重要的内容之一了
1. TFRecord文件介绍
前一篇我们已经获取了用于训练和测试的数据,这些数据需要生成一个一个的mini-batch喂给神经网络让它学习,我们希望这个mini-batch能快速产生,而且每一个mini-batch中image和label必须要互相对应(错误的label,网络必然学到错误的结果),与此同时,我们还希望这个batch是乱序的。出于这些要求,我们选用从TFRecord文件中多线程的读取数据的方式来产生mini-batch。(这是TensorFlow为解决数据导入而设计的标准方式)
TFRecord文件中将数据通过tf.train.Example Protocol Buffer的格式存储,实际上就是一个数据打包的过程,我们的一组数据应该包括一幅转置后的图(image)和一幅没有转置的图(label),同时这些图还有行数,列数,通道数等属性,对于分类问题可能还有类别,我们通过tf.train.Example Protocol Buffer格式,将同一组的相关属性打包,这样就整合了同一组数据中不同类型不同大小的属性封装到一起,这样给我们的管理数据带来了极大的便利。每一组打包好的数据结构中,都包含了一个从属性名称到取值的字典,其中属性名称是一个字符串,属性的取值可以为字符串,实数列表或者整数列表。对于本系列博客将要处理的问题,图片都是28x28的灰度图像,我们只需将image和与之对应的label封装到一起,属性名称分别为‘image’和‘label’,属性取值为对应图像的像素值,每一幅图片的尺寸和通道都是固定的,就不用打包了。
2. 生成TFRecord文件
为了统一文件路径,在大量写代码之前,我们先统一文件路径吧,我们统一在E盘建一个名为MNIST_data的文件夹,其中有下列子文件夹:

| 文件夹 | 存放内容 |
|---|---|
| code | 代码 |
| models | 训练好的神经网络模型 |
| result | 测试结果 |
| TensorBoard | 训练过程可视化文件 |
| test_images | 测试数据 |
| test_labels | 测试数据理想输出 |
| train_images | 训练数据 转置后的图像 |
| train_labels | 训练数据 未转置的图像 |
按照,第一部分对TFRecord文件的介绍,我们开始将数据存放到TFRecord文件中。程序如下:(备注:初学的话不要过多的在意代码的细节,知道流程看懂代码就ok啦)拷贝到Spyder或Notebook中运行,代码估计需要好几分钟,可以歇会儿了。如果报错说找不到PIL包,你知道的吧:activate TensorFlow、 conda install pillow(不知道的话回看第二篇)
import os
import tensorflow as tf
from PIL import Image

image_path = 'E:\\MNIST_data\\train_images\\'                      # 输入图像的路径
label_path = 'E:\\MNIST_data\\train_labels\\'                      # 输出图像的路径
TFRecord_path = 'E:\\MNIST_data\\tfrecord\\train_data_set.tfrecord'# 输出TFRecord文件的路径

def _bytes_feature(value): # 生成字符串型的属性,用于存储图片像素信息,根据自己问题的要求选择要存的属性
     return tf.train.Feature(bytes_list=tf.train.BytesList(value=[value]))

# 将image_path和label_path中的图片一一对应封装在TFRecord_path中
def generate_TFRecordfile(image_path,label_path,TFRecord_path):
    images = []
    labels = []
    for file in os.listdir(image_path):
        images.append(image_path+file) # 得到所有转置图像的文件名
    for file in os.listdir(label_path):
        labels.append(label_path+file) # 得到所有未转置图像的文件名
    num_examples = len(images)         # 统计有多少用于训练的图片
    print('There are %d images for training\n'%(num_examples))

    writer = tf.python_io.TFRecordWriter(TFRecord_path) #创建一个writer写TFRecord文件
    for index in range(num_examples):
        print(index)
        image = Image.open(images[index]) # 打开一个image
        image = image.tobytes()           # 转换为字符型格式(因为之前生成的也是字符串型的属性嘛)
        label = Image.open(labels[index]) # 打开一个对应的label
        label = label.tobytes()           # 转换为字符型格式(因为之前生成的也是字符串型的属性嘛)
        #将一个样例转换为Example Protocol Buffer的格式,并且一组数据的信息都写入这个数据结构中,(打包咯)
        example = tf.train.Example(features=tf.train.Features(feature={
            'image':_bytes_feature(image),
            'label':_bytes_feature(label)}))
        writer.write(example.SerializeToString())#将这个example 写入TFRecord文件
    print('TFRecord file was generated successfully\n')
    writer.close()
generate_TFRecordfile(image_path,label_path,TFRecord_path) # 调用函数
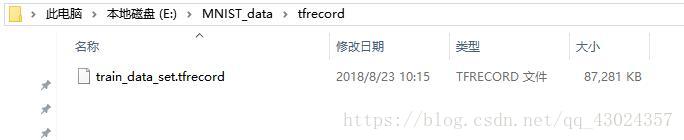
运行结束,在我们的tfrecord文件夹中就有了用于训练的数据所生成的TFRecord文件:
3.多线程读取TFRecord文件
数据存好了,现在拉出来溜溜
首先你要知道tensorflow数据读取机制,这里先看看这篇文章:https://zhuanlan.zhihu.com/p/27238630
你要确保你知道:
1:文件名队列是用来存放所有数据的(你会想,我的TFRecord文件里面不就是存放的数据吗,干嘛还要加这样一个文件名队列,原因是我们训练时同一组数据想要使用不止一次,而且希望随机的将数据读出来,通过创建文件名队列就能完成这些要求)使用的函数tf.train.string_input_producer(files,shuffle ,num_epochs )将files中的数据是否(shuffle)随机的放入文件名队列中num_epochs次,比如我们有55000个用于训练的数据存放在files,shuffle=True,num_epochs=2,那么创建文件名队列之后,文件名队列中就含有110000组打乱后的数据(image和对应的label可没有打乱哦,因为它们被我们封装成一个整体了嘛,一组就是一个image和一个label)同时在队列的最后有一个结束标记,当所有数据都使用过两次之后,再尝试读取数据,这个结束标记就会报出一个OutOfRangeError的错误,我们捕捉这个错误然后跳出循环,结束训练。
2:使用tf.train.string_input_producer创建文件名队列后,整个系统其实还是处于“停滞状态”的,也就是说,我们文件名并没有真正被加入到队列中。此时如果我们开始计算,因为内存队列中什么也没有,计算单元就会一直等待,导致整个系统被阻塞。所以我们需要在之后使用tf.train.start_queue_runners,才会启动填充队列的线程,这时系统就不再“停滞”。此后计算单元就可以拿到数据并进行计算,整个程序也就跑起来了。
3:多线程协同完成,对于我们用户来说只需要控制它什么时候开始,什么时候结束就好了。多线程的启动就是使用2中介绍的tf.train.start_queue_runners在开始运算前加入使用这个函数启动多线程,多线程的停止通过tf.Coordinator类来实现,这个类中提供了should_stop、request_stop还有join三个函数。在启动线程之前,需要先声明一个tf.Coordinator类的对象,并将这个对象传入每一个创建的线程中,所以你会看到这样两行代码:
coord = tf.train.Coordinator()
threads = tf.train.start_queue_runners(sess=sess,coord=coord)
启动的线程需要一直查询tf.Coordinator类中提供的should_stop函数,当这个函数的返回值为True时,也就是需要线程(英文为:thread)should stop了,那么这个线程就需要停止了,每一个启动的线程都可以调用request_stop函数来通知其他线程停止,当某一个线程调用request_stop之后,should_stop函数的返回值就会变为True,这样其他线程就可以同时停止了。下面这块不完整的代码就是在做这个事。
try:
    for step in range(5500):
        if coord.should_stop(): # 读到结束标记后coord.should_stop()变为True,跳出循环
            break
        image_batch,label_batch = sess.run([Image_Batch,Label_Batch])# 得到一个mini-batch

except tf.errors.OutOfRangeError: # 捕捉文件名队列中的结束标记
    print('epoch limit reached')
    coord.request_stop() #通知其它线程停止读取数据
finally:
    coord.request_stop()
    coord.join(threads) # 等待所有线程退出
下面读一读代码吧:
import tensorflow as tf
import numpy as np
import matplotlib.pyplot as plt
from PIL import Image

image_path = 'E:\\MNIST_data\\train_images\\'                # 输入图像的路径
label_path = 'E:\\MNIST_data\\train_labels\\'                 # 输出图像的路径
TFRecord_path = 'E:\\MNIST_data\\tfrecord\\train_data_set.tfrecord'# 输出TFRecord文件的路径

img_W = 28      # 图像宽度
img_H = 28      # 图像高度
batch_size = 10 # 每个mini-batch含有的样本数量
min_after_dequeue = 1000 # 队列中最少文件数量
capacity = min_after_dequeue + 3*batch_size # 队列中最多文件数量
num_threads = 5 #读取数据的线程数

def get_batch(TFRecord_path):
    reader = tf.TFRecordReader() # 创建一个reader来读取TFRecord文件中的样例
    files = tf.train.match_filenames_once(TFRecord_path) # 获取文件列表
    # 创建文件名队列,乱序,每个样本使用num_epochs次
    filename_queue = tf.train.string_input_producer(files,shuffle = True,num_epochs = 1)

    # 读取并解析一个样本
    _,example = reader.read(filename_queue)
    features = tf.parse_single_example(
        example,
        features={
            'image':tf.FixedLenFeature([],tf.string),
            'label':tf.FixedLenFeature([],tf.string)})

    # 使用tf.decode_raw将字符串解析成图像对应的像素数组 ()
    images = tf.decode_raw(features['image'],tf.uint8)
    labels = tf.decode_raw(features['label'],tf.uint8)

    # 所得像素数组为shape为((img_W*img_H),),应该reshape
    images = tf.reshape(images, shape=[img_W,img_H])
    labels = tf.reshape(labels, shape=[img_W,img_H])

    #在这里添加图像预处理函数(optional)

    #使用tf.train.shuffle_batch来随机组合数据生成用于随机梯度下降的mini-batch
    Image_Batch,Label_Batch = tf.train.shuffle_batch([images,labels],
                                             batch_size = batch_size,
                                             num_threads = 5,
                                             min_after_dequeue = min_after_dequeue,
                                             capacity = capacity)
    return Image_Batch,Label_Batch

Image_Batch,Label_Batch = get_batch(TFRecord_path)
init_op = (tf.local_variables_initializer(),tf.global_variables_initializer())#初始化操作
with tf.Session() as sess:
    sess.run(init_op)
    coord = tf.train.Coordinator() # 用于协调多个线程同时终止
    threads = tf.train.start_queue_runners(sess=sess,coord=coord) # 启动线程
    try:
        for step in range(5500):
            if coord.should_stop(): # 读到结束标记后coord.should_stop()变为True,跳出循环
                break
            image_batch,label_batch = sess.run([Image_Batch,Label_Batch])# 得到一个mini-batch
            #这里就可以feed进入网络,进行训练啦

        #画个图
        img = image_batch[0,:,:] # 取一个mini-batch(10张)中的一张出来看看
        img = np.reshape(img,[28,28])
        img = Image.fromarray(img.astype('uint8')).convert('L')
        plt.imshow(img)
        plt.show()
    except tf.errors.OutOfRangeError: # 捕捉文件名队列中的结束标记
        print('epoch limit reached')
        coord.request_stop() #通知其它线程停止读取数据
    finally:
        coord.request_stop()
        coord.join(threads) #等待所有线程退出
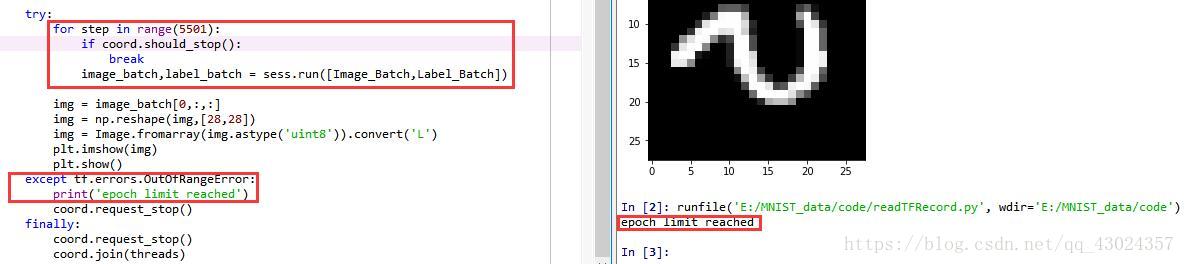
运行代码得到结果:

这时,每一个mini-batch有10张组数据,一共循环了5500步取出了5500个mini-batch,也就是取出了55000组数据,我们训练集中恰好含有55000组数据,因此每张图恰好使用了一次,如果循环次数变为5501步在取第5501个batch时,取到的是一个结束标记,这时产生一个OutOfRangeError的错误得到如下结果:
4.总结
本篇博客的主要内容是:
1:如何将数据封装到TFRecord文件中
2:如何多线程的读取TFRecord文件中的数据并生成一个可以用于训练的mini-batch
内容确实不好理解,我也不确定是否讲的清楚,感兴趣的可以结合以下资源加深理解:
《TensorFlow实战Google深度学习框架》第7章
十图详解tensorflow数据读取机制:https://zhuanlan.zhihu.com/p/27238630
自制TFRecord数据集 读取、显示及代码详解:https://blog.csdn.net/qq_36330643/article/details/77366083
最后整合一下代码:
import tensorflow as tf
import numpy as np
import matplotlib.pyplot as plt
from PIL import Image

image_path = 'E:\\MNIST_data\\train_images\\'                # 输入图像的路径
label_path = 'E:\\MNIST_data\\train_labels\\'                # 输出图像的路径
TFRecord_path = 'E:\\MNIST_data\\tfrecord\\train_data_set.tfrecord'# 输出TFRecord文件的路径

img_W = 28      # 图像宽度
img_H = 28      # 图像高度
batch_size = 10 # 每个mini-batch含有的样本数量
min_after_dequeue = 1000 # 队列中最少文件数量
capacity = min_after_dequeue + 3*batch_size # 队列中最多文件数量

def _bytes_feature(value): # 生成字符串型的属性,用于存储图片像素信息,根据自己问题的要求选择要存的属性
     return tf.train.Feature(bytes_list=tf.train.BytesList(value=[value]))

# 将image_path和label_path中的图片一一对应封装在TFRecord_path中
def generate_TFRecordfile(image_path,label_path,TFRecord_path):
    images = []
    labels = []
    for file in os.listdir(image_path):
        images.append(image_path+file) # 得到所有转置图像的文件名
    for file in os.listdir(label_path):
        labels.append(label_path+file) # 得到所有未转置图像的文件名
    num_examples = len(images)         # 统计有多少用于训练的图片
    print('There are %d images for training\n'%(num_examples))

    writer = tf.python_io.TFRecordWriter(TFRecord_path) #创建一个writer写TFRecord文件
    for index in range(num_examples):
        print(index)
        image = Image.open(images[index]) # 打开一个image
        image = image.tobytes()           # 转换为字符型格式(因为之前生成的也是字符串型的属性嘛)
        label = Image.open(labels[index]) # 打开一个对应的label
        label = label.tobytes()           # 转换为字符型格式(因为之前生成的也是字符串型的属性嘛)
        #将一个样例转换为Example Protocol Buffer的格式,并且一组数据的信息都写入这个数据结构中,(打包咯)
        example = tf.train.Example(features=tf.train.Features(feature={
            'image':_bytes_feature(image),
            'label':_bytes_feature(label)}))
        writer.write(example.SerializeToString())#将这个example 写入TFRecord文件
    print('TFRecord file was generated successfully\n')
    writer.close()

def get_batch(TFRecord_path):
    reader = tf.TFRecordReader() # 创建一个reader来读取TFRecord文件中的样例
    files = tf.train.match_filenames_once(TFRecord_path) # 获取文件列表
    # 创建文件名队列,乱序,每个样本使用num_epochs次
    filename_queue = tf.train.string_input_producer(files,shuffle = True,num_epochs = 1)

    # 读取并解析一个样本
    _,example = reader.read(filename_queue)
    features = tf.parse_single_example(
        example,
        features={
            'image':tf.FixedLenFeature([],tf.string),
            'label':tf.FixedLenFeature([],tf.string)})

    # 使用tf.decode_raw将字符串解析成图像对应的像素数组 ()
    images = tf.decode_raw(features['image'],tf.uint8)
    labels = tf.decode_raw(features['label'],tf.uint8)

    # 所得像素数组为shape为((img_W*img_H),),应该reshape
    images = tf.reshape(images, shape=[img_W,img_H])
    labels = tf.reshape(labels, shape=[img_W,img_H])

    #在这里添加图像预处理函数(optional)

    #使用tf.train.shuffle_batch来随机组合数据生成用于随机梯度下降的mini-batch
    Image_Batch,Label_Batch = tf.train.shuffle_batch([images,labels],
                                             batch_size = batch_size,
                                             num_threads = 5,
                                             min_after_dequeue = min_after_dequeue,
                                             capacity = capacity)
    return Image_Batch,Label_Batch

generate_TFRecordfile(image_path,label_path,TFRecord_path) # 调用函数生成TFRecord文件
Image_Batch,Label_Batch = get_batch(TFRecord_path)   # 调用函数多线程读取TFRecord文件生成mini-batch
init_op = (tf.local_variables_initializer(),tf.global_variables_initializer())#初始化操作
with tf.Session() as sess:
    sess.run(init_op)
    coord = tf.train.Coordinator() # 用于协调多个线程同时终止
    threads = tf.train.start_queue_runners(sess=sess,coord=coord) # 启动线程
    try:
        for step in range(5500):
            if coord.should_stop(): # 读到结束标记后coord.should_stop()变为True,跳出循环
                break
            image_batch,label_batch = sess.run([Image_Batch,Label_Batch])# 得到一个mini-batch
            #这里就可以feed进入网络,进行训练啦

        #画个图
        img = image_batch[0,:,:] # 取一个mini-batch(10张)中的一张出来看看
        img = np.reshape(img,[28,28])
        img = Image.fromarray(img.astype('uint8')).convert('L')
        plt.imshow(img)
        plt.show()
    except tf.errors.OutOfRangeError: # 捕捉文件名队列中的结束标记
        print('epoch limit reached')
        coord.request_stop() #通知其它线程停止读取数据
    finally:
        coord.request_stop()
        coord.join(threads) #等待所有线程退出