之所以写这篇博客,是因为我在这个上面浪费了两三天时间,算是总结出来一个比较正确的安装流程。
电脑配置:型号:ThinkPad E470,220G固态硬盘,8G内存,双显卡:Intel HD Graphics 620和NVIDIA GeForce 940MX。
系统:Win10与Ubuntu14.04双系统。关于双系统的安装较为简单,首先是用rufus制作一个U盘系统安装盘,记得选择MER for BIOS or UEFI。然后一步步安装,在系统安装位置选择界面,选择与Win10共存,即安装出来的是双系统。
本文主要参考了如下教程:
ROS indigo安装:
http://wiki.ros.org/indigo/Installation/Ubuntu
http://wiki.ros.org/ROS/Tutorials/InstallingandConfiguringROSEnvironment
MoveIt:http://moveit.ros.org/install/。
UR配置文件:
http://wiki.ros.org/ur_gazebo?distro=indigo
https://blog.csdn.net/jayandchuxu/article/details/54693870

https://github.com/ThomasTimm/ur_modern_driver,
Kinect配置:
https://blog.csdn.net/sunbibei/article/details/51594824
https://github.com/OpenKinect/libfreenect2
https://developer.nvidia.com/cuda-75-downloads-archive
https://github.com/code-iai/iai_kinect2
当Ubuntu系统安装好之后,开始安装ROS indigo,官网上有详细的安装的步骤,摘抄如下:
1)、安装ROS
ROS Indigo ONLY supportsSaucy (13.10) and Trusty (14.04) for debian packages.
Configure yourUbuntu repositories
Configure your Ubuntu repositories to allow "restricted,""universe," and "multiverse."
Setup yoursources.list
Setup your computer to accept software from packages.ros.org.
· sudo sh -c 'echo "debhttp://packages.ros.org/ros/ubuntu $(lsb_release -sc) main" >/etc/apt/sources.list.d/ros-latest.list'
Set up your keys
· sudo apt-key adv --keyserverhkp://ha.pool.sks-keyservers.net:80 --recv-key421C365BD9FF1F717815A3895523BAEEB01FA116
Installation
First, make sure your Debian package index is up-to-date:
· sudo apt-get update
· Desktop-FullInstall: (Recommended) : ROS, rqt, rviz, robot-generic libraries, 2D/3D simulators and 2D/3Dperception
o sudo apt-get install ros-indigo-desktop-full
To find available packages, use:
apt-cache search ros-indigo
Initialize rosdep
Before you can use ROS, you will need to initialize rosdep. rosdep enables youto easily install system dependencies for source you want to compile and isrequired to run some core components in ROS.
· sudo rosdep init
· rosdep update
Environment setup
It's convenient if the ROS environmentvariables are automatically added to your bash session every time a new shellis launched:
· echo "source /opt/ros/indigo/setup.bash">> ~/.bashrc
· source ~/.bashrc
Getting rosinstall
rosinstall is a frequently used command-line tool in ROS that is distributedseparately. It enables you to easily download many source trees for ROSpackages with one command.
To install this tool on Ubuntu, run:
· sudo apt-get installpython-rosinstall
2)、建立工作空间
Managing Your Environment
$ printenv | grep ROS
Create a ROS Workspace
Let's create and build a catkin workspace:
$ mkdir -p ~/catkin_ws/src
$ cd ~/catkin_ws/
$ catkin_make
Before continuing source your new setup.*shfile:
$ source devel/setup.bash
To make sure your workspace is properly overlayed by the setup script, makesure ROS_PACKAGE_PATH environmentvariable includes the directory you're in.
$ echo $ROS_PACKAGE_PATH
/home/youruser/catkin_ws/src:/opt/ros/kinetic/share
为了后续更好地使用工作空间,在此增加两句命令:
· echo "source ~/catkin_ws/devel/setup.bash">> ~/.bashrc
· source ~/.bashrc
这样不用每次打开一个Terminald都去source setup.bash文件了。
至此ROS安装完毕。
接下来就是安装MoveIt和UR机器人的配置文件。
3)、MoveIt:ROS Indigo
Install Ubuntu Packages
Simplyrun:
sudo apt-get install ros-indigo-moveit
Optional: Install PR2 UbuntuPackages for MoveIt!
sudo apt-get install ros-indigo-moveit-full-pr2Setup your environment
source /opt/ros/indigo/setup.bash4)、UR机器人配置文件(与Gazebo配合)(不建议用这种方式安装,推荐用git clone)
To simulate a UR5 and control it in simulation, first installthe necessary packages:
$ sudo apt-get install \
ros-indigo-ur-gazebo \
ros-indigo-ur5-moveit-config \
ros-indigo-ur-kinematics
git clone的安装方式(推荐使用)
git clone -b indigo https://github.com/ros-industrial/universal_robot.gitTo launch the simulated arm and a controller for it, run(记得将models文件放在~/.gazebo文件夹下面):
$ roslaunch ur_gazebo ur5.launch
and in another terminal:
$ roslaunch ur5_moveit_config ur5_moveit_planning_execution.launch sim:=true
To control the simulated arm from RViz, also run:
$ roslaunch ur5_moveit_config moveit_rviz.launch config:=true
安装ur_modern_driver驱动包
安装驱动包之前,需要先安装ur_msgs包
$ sudo apt-get install ros-indigo-ur-msgs
然后进入工作空间的src中,git clone源码编译
$ cd ~/catkin_ws/src
$ git clone https://github.com/ThomasTimm/ur_modern_driver.git
$ cd ~/catkin_ws
$ catkin_make
然后就可以连接真实机器人啦
If you would like to run this package to connect to the hardware, you only need to run the following launch file.
roslaunch ur_modern_driver ur5_bringup.launch robot_ip:=192.168.1.111
Where ROBOT_IP_ADDRESS is your UR arm's IP and XX is '5' or '10' depending on your robot.
roslaunch ur5_moveit_config ur5_moveit_planning_executing.launch
roslaunch ur5_moveit_config moveit_rviz.launch config:=true
完成上述步骤后,切记要更新update(不是升级upgrade)系统,因为这对后面安装完显卡驱动之后,能不能顺利开机进入系统有很大的影响。更新完之后,重启,接着安装kinect2的驱动。
5)、安装libfreenect2 (Kinect2驱动)
· Download libfreenect2 source
git clone https://github.com/OpenKinect/libfreenect2.gitcd libfreenect2· (Ubuntu 14.04 only) Download upgrade deb files
cd depends; ./download_debs_trusty.sh· Install build tools
sudo apt-get install build-essential cmake pkg-config· Install libusb. The version must be >= 1.0.20.
(Ubuntu 14.04 only) sudo dpkg -i debs/libusb*deb· Install TurboJPEG
(Ubuntu 14.04 to 16.04) sudo apt-get install libturbojpeg libjpeg-turbo8-dev· Install OpenGL
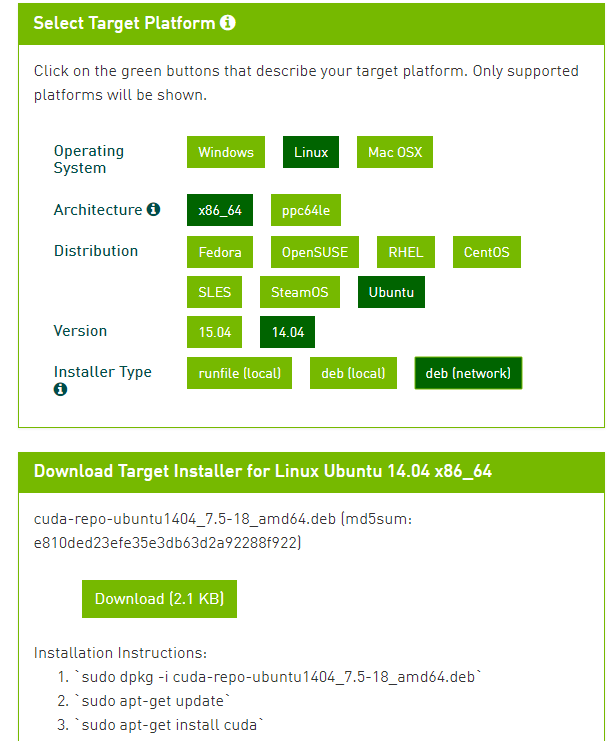
(Ubuntu 14.04 only) sudo dpkg -i debs/libglfw3*deb; sudo apt-get install -f· Install CUDA (optional, Nvidia only):
(Ubuntu 14.04 only) Download cuda-repo-ubuntu1404...*.deb ("deb(network)") from Nvidia website developer.nvidia.com/cuda-downloads , follow their installation instructions,including apt-getinstall cuda which installs Nvidia graphics driver.(关于Nvidia显卡驱动的安装,访问官网,新建terminal,运行安装程序)
安装完成之后,接着运行如下命令:
OpenCL/CUDA with Nvidia
Also install nvidia-modprobe and opencl-headers.
sudo apt-get install nvidia-modprobe opencl-headers
You also need to add CUDA paths to the system environment, add these lines to you ~/.bashrc:
export LD_LIBRARY_PATH="/usr/local/cuda/lib64:${LD_LIBRARY_PATH}"
export PATH="/usr/local/cuda/bin:${PATH}"
A system-wide configuration of the libary path can be created with the following commands:
echo "/usr/local/cuda/lib64" | sudo tee /etc/ld.so.conf.d/cuda.conf
sudo ldconfig
· Install OpenNI2 (optional)
(Ubuntu 14.04 only) sudo apt-add-repository ppa:deb-rob/ros-trusty && sudo apt-get update (You don't need this if you have ROS repos), then sudo apt-get install libopenni2-dev· Build
cd .. (back to the libfreenect2 root directory first)mkdir build && cd buildcmake .. -DCMAKE_INSTALL_PREFIX=$HOME/freenect2 -DENABLE_CXX11=ON -DCUDA_PROPAGATE_HOST_FLAGS=offmakemake install
· Set up udev rules for device access:
sudo cp ../platform/linux/udev/90-kinect2.rules /etc/udev/rules.d/then replug the Kinect.
· Run the test program:
./bin/Protonect· Run OpenNI2 test (optional):
sudoapt-get install openni2-utils && sudo make install-openni2 &&NiViewer2. Environment variable LIBFREENECT2_PIPELINE canbe set to cl, cuda, etc to specify the pipeline.
6)、安装IAI Kinect2 (Kinect在ROS中使用的配置包)
Clone this repository into catkin workspace, install the dependencies andbuild it:
cd ~/catkin_ws/src/
git clone https://github.com/code-iai/iai_kinect2.git
cd iai_kinect2
rosdep install -r --from-paths .
cd ~/catkin_ws
catkin_make -DCMAKE_BUILD_TYPE="Release"
Note: rosdep willoutput errors on not being able to locate kinect2_bridge and depth_registration.That is fine because they are all part of the iai_kinect2 package and rosdep doesnot know these packages.
Connect your sensor and run kinect2_bridge:
roslaunch kinect2_bridge kinect2_bridge.launch
Calibrate your sensor using the kinect2_calibration.
Add the calibration files to the kinect2_bridge/data/<serialnumber> folder.
Restart kinect2_bridge and view the results using
rosrun kinect2_viewer kinect2_viewer kinect2 sd cloud
至此,Kinect2的驱动以及与ROS的依赖包安装完成。
完成之后,测试MoveIt可用
roslaunch ur5_moveit_config demo.launch
如果没问题,就算安装成功了。
然后重启,应该可以立即进入Ubuntu系统桌面,而不会在启动界面停留十几分钟。在后续的使用过程中,轻易不要更新。