轮廓发现–边缘
轮廓发现是基于图像边缘提取的基础寻找对象轮廓的方法,所以边缘提取的阈值选定会影响最终轮廓结果拓扑:就是把实体抽象成与其大小、形状无关的点,而把连接实体的线路抽象成“线”,进而以图的形式来表示这些点与线之间关系的方法,其目的在于研究这些点、
线之间的相连关系。表示点和线之间关系的图被称为拓扑结构图。
步骤:
输入图像转为灰度图像cvtcolor
使用Canny进行边缘提取,得到二值图像
使用findContours寻找轮廓
使用drawContours绘制;轮廓
API:
findContours( // 在二值图像上发现轮廓
InputOutputArray  binImg, // 输入图像,非0的像素被看成1,0的像素值保持不变,8-bit。findContours 会改动输入图像 binImg 中元素的值?
OutputArrayOfArrays  contours,//  全部发现的轮廓对象
OutputArray hierachy, // 图像的拓扑结构,可选,该轮廓发现算法正是基于图像拓扑结构实现。  发现的层次
int mode, //  mode轮廓检索模式,可以通过cv::RetrievalModes()查看详细信息
RETR_EXTERNAL:表示只检测最外层轮廓,对所有轮廓设置hierarchy[i][2]=hierarchy[i][3]=-1
RETR_LIST:提取所有轮廓,并放置在list中,检测的轮廓不建立等级关系
RETR_CCOMP:提取所有轮廓,并将轮廓组织成双层结构(two-level hierarchy),顶层为连通域的外围边界,次层位内层边界
RETR_TREE:提取所有轮廓并重新建立网状轮廓结构
RETR_FLOODFILL:官网没有介绍,应该是洪水填充法
int method,// method:轮廓近似方法可以通过cv::ContourApproximationModes()查看详细信息
CHAIN_APPROX_NONE:获取每个轮廓的每个像素,相邻的两个点的像素位置差不超过1
CHAIN_APPROX_SIMPLE:压缩水平方向,垂直方向,对角线方向的元素,值保留该方向的重点坐标,如果一个矩形轮廓只需4个点来保存轮廓信息
CHAIN_APPROX_TC89_L1和CHAIN_APPROX_TC89_KCOS使用Teh-Chinl链逼近算法中的一种
Point offset=Point()//  轮廓像素的位移,默认(0, 0)没有位移
)

drawContours( // 绘制轮廓,一次只能根据轮廓索引号绘制一次,需要循环所有发现的轮廓
InputOutputArray  binImg, // 输出图像
OutputArrayOfArrays  contours,//  全部发现的轮廓对象
Int contourIdx// 轮廓索引号
const Scalar & color,// 绘制时候颜色
int  thickness,// 绘制线宽,如果传 -1 表示填充轮廓
int  lineType ,// 线的类型LINE_8
InputArray hierarchy,// 拓扑结构图,   发现的层次
int maxlevel,// 最大层数, 0只绘制当前的,1表示绘制绘制当前及其内嵌的轮廓
Point offset=Point()// 轮廓位移,可选  默认0
)
代码:
#include <opencv2/opencv.hpp>
#include<iostream>
#include<math.h>
#include <string>
#include<fstream>
using namespace cv;
using namespace std;

Mat src, graysrc, dst;
int threadhold_value = 100;
int threadhold_max = 250;
void getContours(int, void*) {
    Mat Canny_out;
    vector<vector<Point>>points;//每个轮廓由一系列点组成
    //vector<Vec4i> h;//层次  图像的拓扑结构
    Canny(graysrc, Canny_out, threadhold_value, threadhold_value * 2);
    findContours(Canny_out, points, RETR_EXTERNAL, CHAIN_APPROX_SIMPLE);
    //绘制轮廓
    //因为要用不同颜色区分轮廓,所以这里用的CV_8UC3 3通道彩色图,如果是CV_8UC1 绘制的就是灰度图,
    //感官上不好区分
    dst = Mat::zeros(src.size(), CV_8UC3);
    RNG rng(12345);
    for (int i = 0; i < points.size(); i++) {
        Scalar color = Scalar(rng.uniform(0, 255), rng.uniform(0, 255), rng.uniform(0, 255));
        drawContours(dst, points, i, color);
        imshow("dst", dst);
    }
}

int main() {
    src = imread("C:\\Users\\Administrator\\Desktop\\pic\\z2.jpg");
    cvtColor(src, graysrc, CV_RGB2BGRA);
    imshow("input", src);
    getContours(0, 0);
    createTrackbar("yuzhi", "dst", &threadhold_value, threadhold_max, getContours);
    waitKey(0);
}
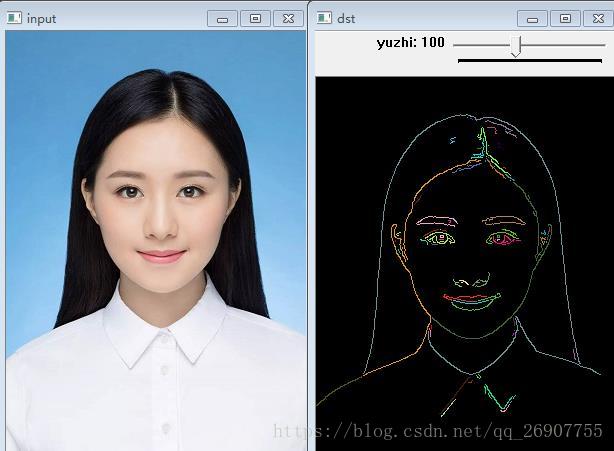
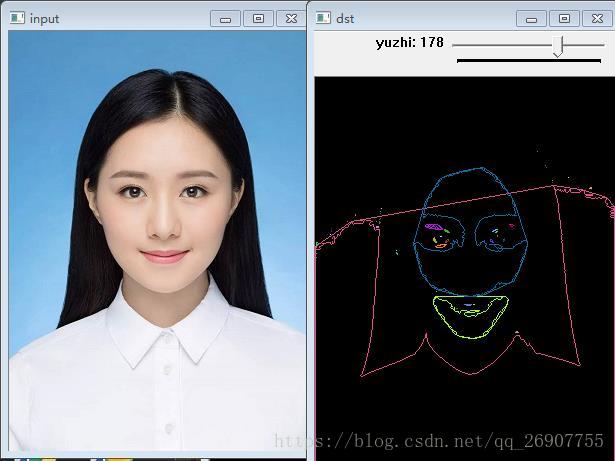
结果:
凸包:在一个多变形边缘或者内部任意两个点的连线都包含在多边形边界或者内部。
包含点集合s中所有点的最小凸边型称为凸包
Graham 扫描算法:
首先选择Y方向最低的点作为起始点p0
从p0开始极坐标扫描,依次添加p1….pn(排序顺序是根据极坐标的角度大小,逆时针方向)
对每个点pi来说,如果添加pi点到凸包中导致一个左转向(逆时针方向)则添加该点到凸包,
反之如果导致一个右转向(顺时针方向)删除该点从凸包中。
API:
convexHull( // 发现凸包
InputArray points, // 输入候选点,来自findContours
OutputArray hull, // 返现的凸包
bool clockwise, // default true, 顺时针方向
bool returnPoints // true 表示返回点个数,如果第二个参数是 vector<Point>则自动忽略
)
步骤:
- 首先把图像转为灰度
- 再转二值图像//threshold
- 通过发现轮廓得到候选点
- convexHull发现凸包
- 绘制
代码:
#include <opencv2/opencv.hpp>
#include<iostream>
#include<math.h>
#include <string>
#include<fstream>
using namespace cv;
using namespace std;

Mat src, graysrc, binsrc,dst;
int threadhold_value = 100;
int threadhold_max = 255;
RNG rng(12345);
void getConvexHull(int, void*) {
    vector<vector<Point>> contours;
    threshold(graysrc, binsrc, threadhold_value, threadhold_max, THRESH_BINARY);//转为二值图像
    findContours(binsrc, contours, RETR_EXTERNAL, CHAIN_APPROX_SIMPLE);//发现轮廓
    vector<vector<Point>> convex(contours.size());
    for (size_t i = 0; i < contours.size(); i++) {//发现凸包
        convexHull(contours[i], convex[i]);
    }
    //绘制凸包
    dst = Mat::zeros(src.size(), CV_8UC3);
    for (size_t j = 0; j < contours.size(); j++) {
        Scalar color = Scalar(rng.uniform(0, 255), rng.uniform(0, 255), rng.uniform(0, 255));
        drawContours(dst, contours, j, color);
        drawContours(dst, convex, j, color);
    }
    imshow("dst", dst);
}

int main() {
    src = imread("C:\\Users\\Administrator\\Desktop\\pic\\z2.jpg");
    imshow("input", src);
    cvtColor(src, graysrc, CV_RGB2GRAY);
    getConvexHull(0, 0);
    createTrackbar("yuzhi", "dst", &threadhold_value, threadhold_max, getConvexHull);

    waitKey(0);
}
结果:
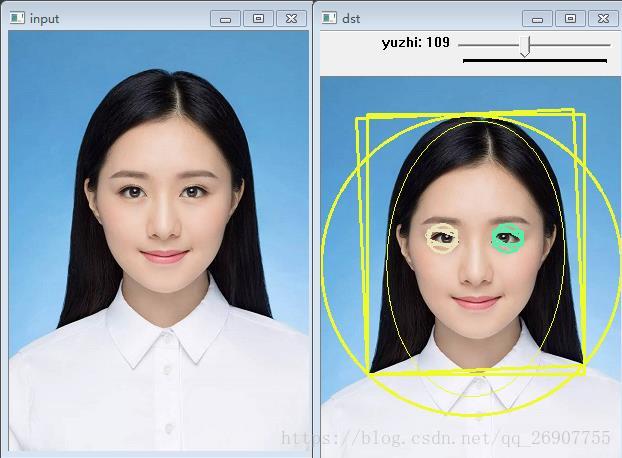
轮廓周围绘制圆和矩形:
RDP算法:
1. 判断起始点(当前点)与终点的距离是否小于 epsilon, 若小于,结束,不小于执行2
2. 选取起始点(当前点)A的后两个位置的点C,判断它们之间的距离是否小于 epsilon, 若小于,点C与它们的中间点B都舍弃,若不小于,执行3
3. 判断A与B,B与C的距离,若有一者小于 epsilon,则点B舍弃,否则保留。然后点C作为起始点(当前点)重复 1 2 3 步骤,直到终点(这里得出的是一系列符合要求的点)
API:
approxPolyDP ( // 基于RDP算法实现,目的是减少多边形轮廓点数
InputArray  curve, // 一般是由图像的轮廓点组成的点集  Mat(vector<Point>)
OutputArray approxCurve, // 表示输出的多边形点集
double  epsilon, // 主要表示输出的精度,轮廓点之间距离小于这个值,就去掉
bool  closed // 表示输出的多边形是否封闭
)
cv::boundingRect(InputArray points) // 得到轮廓周围最小矩形左上交点坐标和右下角点坐标,绘制一个矩形
cv::minAreaRect(InputArray  points) // 得到一个旋转的矩形,返回旋转矩形

cv::minEnclosingCircle ( // 得到轮廓周围最小椭圆
InputArray points, // 得到最小区域圆形
Point2f& center, // 圆心位置 输出参数
float& radius // 圆的半径 输出参数
)
cv::fitEllipse(InputArray  points) // 得到最小椭圆,若points的点数size小于5,会报错
代码:
扫描二维码关注公众号,回复:
2808251 查看本文章

#include <opencv2/opencv.hpp>
#include<iostream>
#include<math.h>
#include <string>
#include<fstream>
using namespace cv;
using namespace std;

Mat src, graysrc,binsrc, dst;
int threadhold_value = 100;
int threadhold_max = 255;
RNG rng(12345);
void getPolyRd(int, void*) {
    vector<vector<Point>>controus;
    threshold(graysrc, binsrc, threadhold_value, threadhold_max, THRESH_BINARY);
    findContours(binsrc, controus, RETR_CCOMP, CHAIN_APPROX_SIMPLE);
    vector < vector<Point>>controus_ploy(controus.size());//减少点数后的轮廓集合
    vector<Rect> poly_rects(controus.size());//轮廓点形成的矩形
    vector<Point2f>ccs(controus.size());//轮廓点形成的椭圆
    vector<float> radius(controus.size());//半径

    vector<RotatedRect>minRects(controus.size());//每个轮廓最终形成的最小的旋转矩形
    vector<RotatedRect>myellipse(controus.size());//每个轮廓最终形成的最小椭圆

    for (size_t i = 0; i < controus.size(); i++) {
        approxPolyDP(Mat(controus[i]), controus_ploy[i], 3, true);//减少轮廓点数,为后面的算法提高效率
        poly_rects[i] = boundingRect(controus_ploy[i]);//得到轮廓周围最小矩形
        minEnclosingCircle(controus_ploy[i], ccs[i], radius[i]);//得到轮廓周围最小椭圆
        if (controus_ploy[i].size() > 5) {
            myellipse[i] = fitEllipse(controus_ploy[i]);//得到最小椭圆,若contours_ploy[i]的点数size小于5会报错
            minRects[i] = minAreaRect(controus_ploy[i]);// 得到一个旋转的矩形,返回旋转矩形
        }
    }
    //绘制矩形
    src.copyTo(dst);
    Point2f pts[4];
    for (size_t j = 0; j < controus.size(); j++) {
        if (controus_ploy[j].size() > 5) {// contours_ploy[i]的点数size小于5的,不处理
            Scalar color = Scalar(rng.uniform(0, 255), rng.uniform(0, 255), rng.uniform(0, 255));
            rectangle(dst, poly_rects[j], color,2);
            circle(dst, ccs[j], radius[j], color,2);
            ellipse(dst, myellipse[j], color);//画椭圆
            minRects[j].points(pts);
            for (int r = 0; r < 4; r++) {
                line(dst, pts[r], pts[(r + 1) % 4], color,2);//通过线,画旋转的矩形
            }
        }
    }
    imshow("dst", dst);
}

int main() {
    src = imread("C:\\Users\\Administrator\\Desktop\\pic\\z2.jpg");
    imshow("input", src);
    cvtColor(src, graysrc, CV_RGB2GRAY);
    getPolyRd(0, 0);
    createTrackbar("yuzhi", "dst", &threadhold_value, threadhold_max, getPolyRd);

    waitKey(0);
}
结果: