一、前言
发现就喜欢研究这些插件,为什么呢,因为方便快捷啊。基本不用研究源代码怎么实现的,只要会有就行了。但是,光这样也不行,还是要多去看看底层代码是怎么实现的,还有人家的框架是怎么搭的。
要不说Unity3D入门容易,提升难呢,因为提升全是靠苦功夫,去研究底层代码。算了,不絮叨了
二、参考文章
Unity3D 装备系统学习Inventory Pro 2.1.2 总结
Unity3D 装备系统学习Inventory Pro 2.1.2 基础篇
三、正文
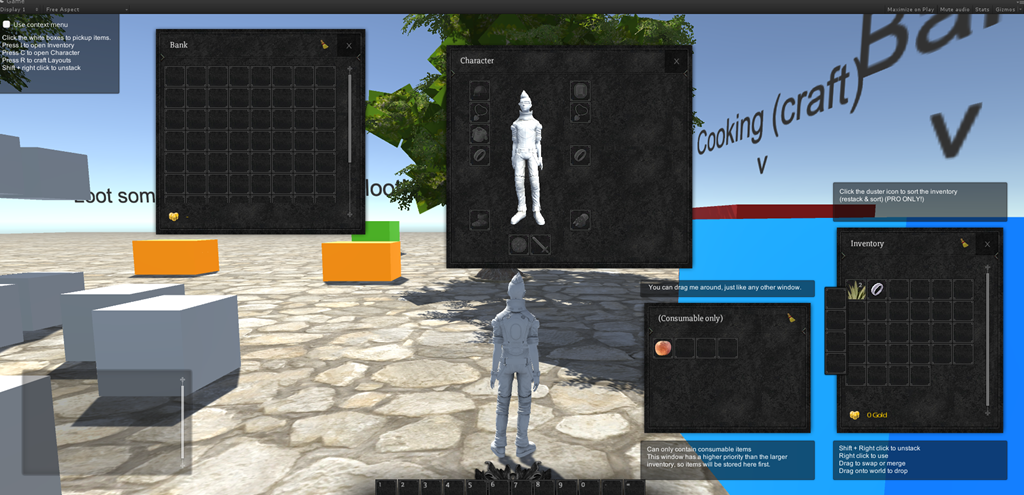
先上一张效果图
下载链接:
https://pan.baidu.com/s/1uxp80cu_zgHTZoESSV-NzQ
无效了记得跟博主说一声哈
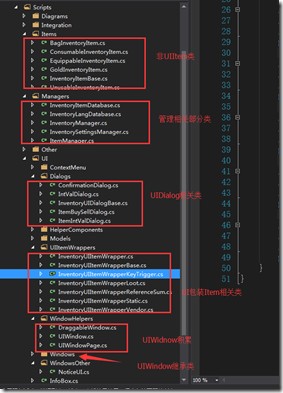
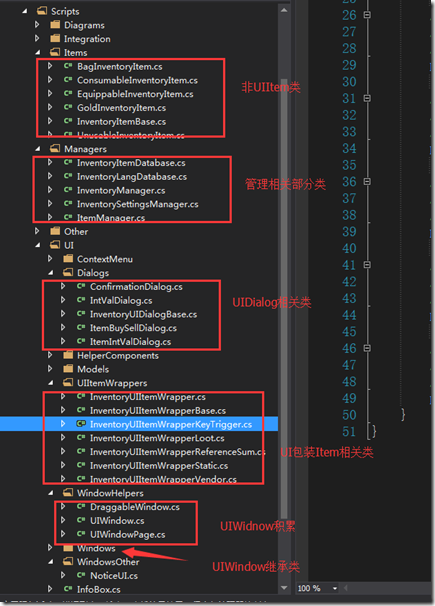
1、总体结构
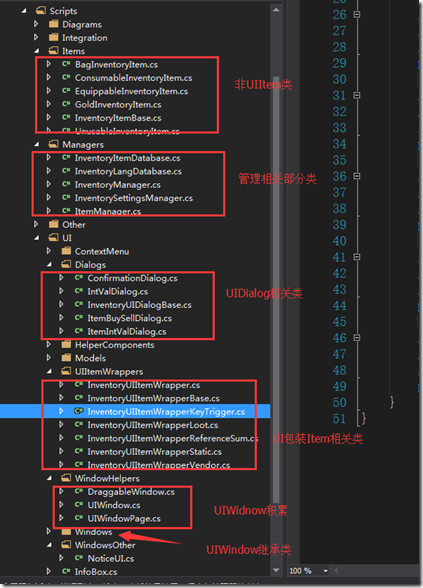
物品相关
非UI相关InventoryItem 物品体系类,具体如装备,消耗品,商店物品等
UI相关InventoryUIItemWrapper 物品体系
UIItem的UI包装的Item继承体系
- ItemCollection这样的类,因为简单的增、删和改肯定是逃不了,复杂的如交换,容器间的交换等操作
UI窗口相关
UIWindow体系的窗口类,具体有角色,银行,技能,店铺等窗口
InventoryUIDialog系统下的对话框类,具体有确认框,买卖,通用提示
特殊窗口(非继承体系窗口),如上下菜单,通知窗口等
管理相关类
配置管理
InvertoryManager
ItemManger
数据库操作
其它
应该是一些辅助类,有UI部分的,事件辅助,定义接口等等吧,这部分还没有深入去阅读应该也是挺复杂的
剩下部分
一些第三方插件,Unity3D特性及Edit扩展等等
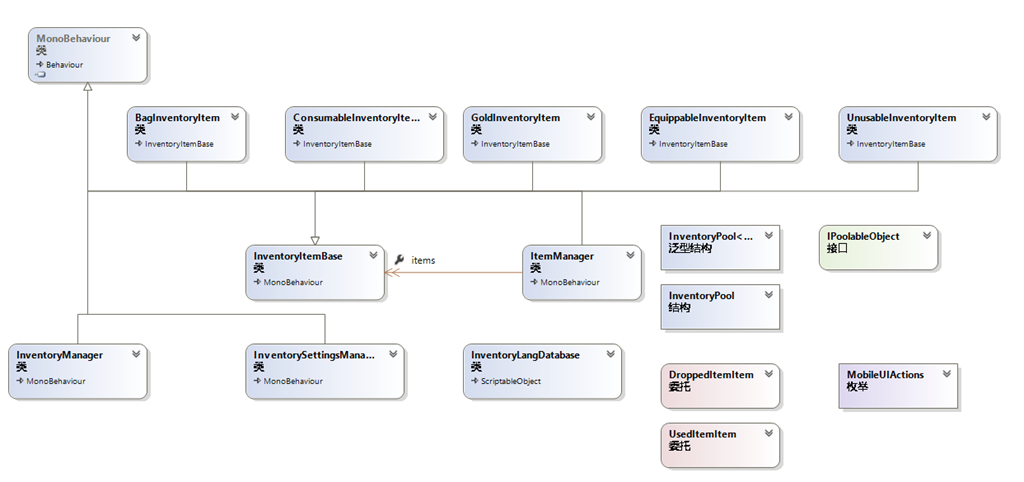
具体类图
2、使用教程
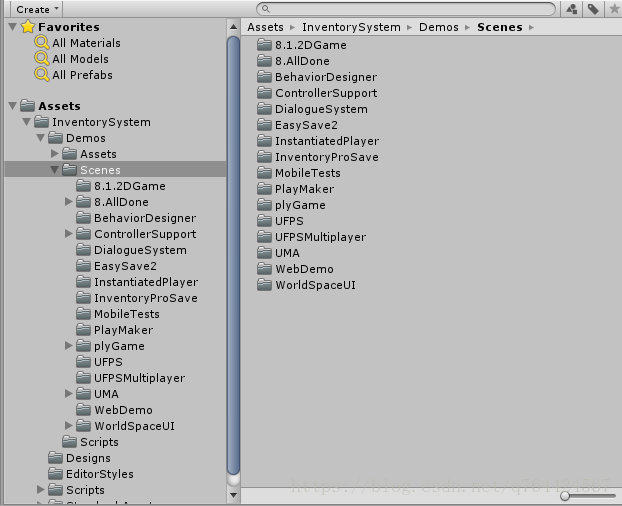
示范项目
在你的Assets/Demos/Scenes 你会发现这些演示场景,这些演示场景会包含所有特性,一定要仔细的看一下哦
建立一个新的项目
- 选择1(自动)
打开设置向导,它可以发现在Tools/Inventory Pro/Setup wizard
对于错误“没有管理者发现的对象”;单击确定按钮和一个管理对象命名为”_managers”将自动添加到你的场景里。 - 选择2(手动)
创建一个空的游戏对象将inventorymanager组成,你可以找到在 库存/经理/ inventorymanager你会得到几个管理器组件包括inventorymanager,inventorysettingsmanager和更多的,我们不需要现在。
数据库建立
itemmanager包含所有项目的项目数据库,你可以创建管理每个场景,并使用不同的数据库,每一个场景。
1. 去你的项目窗口中,找到一个地方,你想创建项目数据库。
2. 右键单击(或点击创建,或者去创建/ 库存亲 /项目数据库)来创建一个新的项目数据库。
3. 一旦创建的数据库将在你的项目中选定。
4. 将项目拖到itemmanager的试题数据库槽。
现在也让我们创建 语言数据库 ,做完全相同的操作,并将它分配给inventorymanager的 lang 。
配置设置
首先打开主编辑器可以发现在 工具/库存亲/主编。当你打开编辑会给你一个错误消息的第一时间(见下图)。
这是因为库存亲需要知道它应该保存新项目。单击“设置”按钮,选择一个文件夹 文件夹里面你的项目。
现在让我们打开整合经理再次看到我们必须配置。
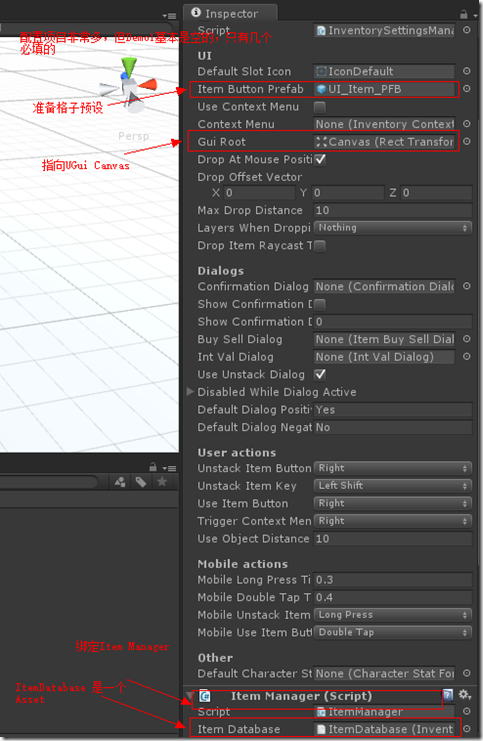
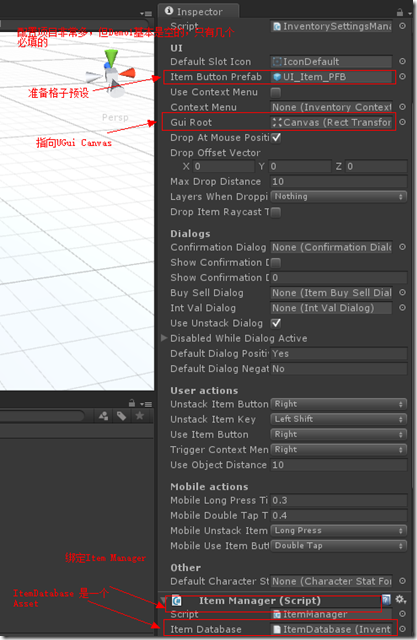
第一个选项卡“UI”包含用于渲染UI的基本要素。为了做到这一点需要至少2个项目的 项目按钮预置 Item Button Prefab和 UIROOT。
这个项目按钮预置是的预置 /槽包含的项目。根是包含所有用户界面窗口的UI画布。
几个演示器可以用来快速上手。你可以在库存/演示/资产/用户界面/ ui_prefabs / ui_item_pfb找到默认的包装
并新建一个UGUI,把UI Canvas 赋值给 GUI ROOT。
对象编辑
- 项目编辑
主编辑器,包括项目编辑器可以打开通过 Tools / Inventory Pro / Main editor
1.1 创建项目Creating items
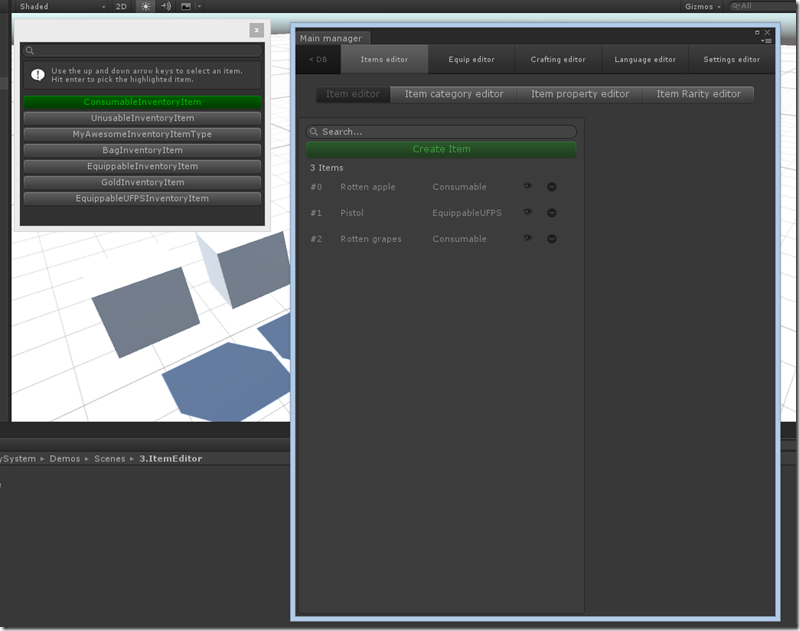
首先,单击“创建项目”按钮,一旦我们做了一个对象选择器将显示。
在对象选择器,我们可以选择的物品类型。每一项类型具有不同的行为或目的,例如当消耗品被使用时将减少1个的堆栈大小,而当武器装备被装备时出现人物在场景中得到呈现。
你可以使用键盘来选择类型来创建,使用向上和向下箭头,选择一个你想要的并回车确认。
让我们抓住一个consummableinventoryitem (可消耗品)现在,并配置。
接下来你会被提示步骤2。在这里你可以选择一个模型,以此为基础的新项目。例如,你已经有了一个预置,例如一把剑,它拥有的纹理图片、可以使用碰撞器和自定义组件,那么只需拖动物品到“Drag object here”字段位置上,或者选择使用“Select model”按钮。
假设你没有一个预先定义的模型,只是想创建一个新的对象选择“No model”,或“2D sprite with trigger“用于2D游戏。
一旦创建的项目将显示一个按键在列表的底部,点击并生成物品。
一旦项目(预制)是创造了你可以修改它通过改变纹理,模型,添加自定义组件,等。
1.2 类别Categories
使用类别编辑器你可以定义项目的具体类别,例如食物,药水,剑,斧,等你可以定义每一类的冷却时间,这样你可以使用消耗品,同一类别中的所有其他项目也将在冷却。就是说,你可以重写每个项目的冷却时间在项目编辑器”选项卡。
1.3 性能Properties
使编辑更强大的性能也增加,属性允许您创建自定义的“变量”。一旦创建,你可以指定的属性项目编辑器内的任何项目,它提供一个值。 属性也可以通过 自定义代码。
值的字符串格式: 格式允许您使用该属性的值在UI格式。 使用{ NR }符号来定义自己的格式。
基准值: 基值的初始值的属性。例如,你可能有5的强度默认和允许它从那里成长。
1.4 稀有性编辑 Rarity editor
最后但并非最不重要的你可以定义你的项目多种多样,各有它的颜色,在工具提示中显示的用户界面元素。
定义物品的稀有程度分级,在UI中显示的颜色区别,还有物品掉落时出现在场景中的预置显示(这里默认是一个袋子)
——
2.装备编辑 Equipment editor
设备系统非常灵活,可用于几乎任何装备/附件系统。人物属性是通过选择一个或多个项目类型的定义,可以使用编辑器选择哪些数据将被计算,最终显示。
除了统计也有装备的类型,这些可以被定义在“装备类型编辑器选项卡 Equip type editor tab ”。装备类型可以限制避免某些组合。例如,当装备单手剑,我确信双手的剑和斧子和匕首双手不兼容。当单手剑装备,装备一把单手匕首,匕首将被装备。
——
3 货币编辑Currency editor
货币 编辑器允许你定义,可以用在你的项目,制定蓝图,供应商的货币,等。
每一种货币可以包含一组转换。这些转换允许你将一个美元兑欧元。
自动转换的定义是否可用于汽车。货币之间转换。例如,许多游戏使用系统的金,银和铜。当跑出来的铜系统可以转换到铜银货币。基本上重新填充它从一个更高的货币,可以转换成。
自动转换可以在编辑器底部的定义。
自动转换最大:允许你转换到一个更值钱的货币一旦你达到定义的最大值。例如,你不能拥有超过100的铜,所以一旦系统发现你有100以上的铜将被转换为1银。
自动转换分数: 当“让分数”(在顶部)不启用的分数也需要转换,或丢弃。例如,当你有1.1银(这是不允许的)系统会把它降到1银10铜。
4 制作编辑
制作经理类,允许你创建“锻造”任何时候,无论是烹饪,锻造或皮。
让我们创建一个新的 category,并开始创造一些蓝图。
制定蓝图 Crafting editor
1. 默认情况下,结果项目名称–项目成功后,工艺–将作为蓝图的名称,但你当然可以,像往常一样,配置。
2. 机会因素表明工艺成功的可能性有多大,0.5种工艺的机会有50%的机会,和1的机会的因素有100%的成功机会。
1. 加速因子是成对的制作时间,在许多游戏(哇)制作一项变快时,创建一个完整的批一次。例如,当制作10烂苹果,第一项需要5秒,第二,1.1(10%)更快,这归结为5 /(1.1 ^ N)。
3. 所需物品说明很多项目所需的工艺给定的项目,这是从布局上分,可以在底部的定义。
一旦你定义的蓝图,你可以创建一个标准或布局的基础工艺窗口允许用户做他的 事。
语言编辑器 Language editor
语言编辑器允许你定义一个特定的动作发生在显示时的库存支持信息。
目前只有1个语言数据库的支持,为多语言数据库支持将来会增加。
如果你喜欢一个特定的消息不出现只是让它空着。
设置编辑
搜索
请注意,您还可以使用搜索栏搜索名称的变量设置/你想改变。
3、Demo解析
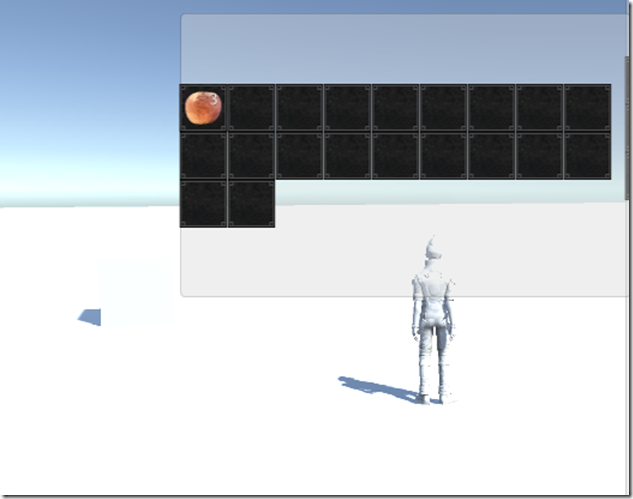
GettingStarted.unity
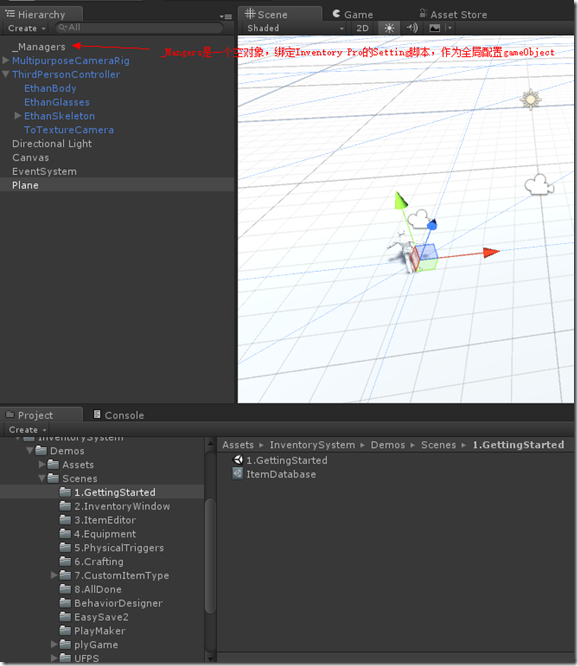
首先说一下Demo1的功能,其实很简单主要是建立起来Inventory Pro的运行环境,首先项目的Demo是3d的所以创建项目时,选择是3D工程。运行环境中,使用标准插件库建立一个第三方视角跟随的角色,角色可以在Panel中自由的移动跑跳;然后才是Inventroy Pro的基础配置,主要是引入Setting,在Setting中进行一些基础的配置。具体的运行后的界面如下图所示
设置一个角色
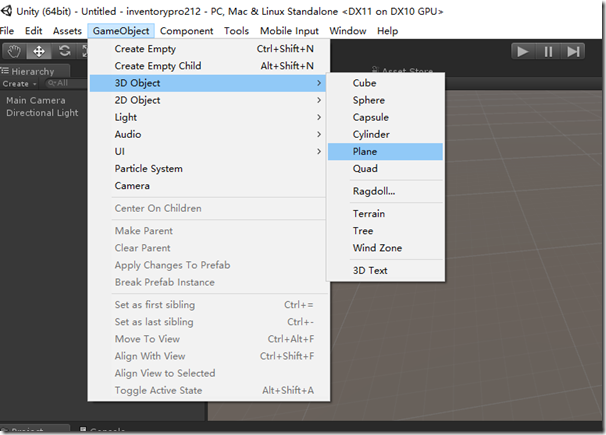
第一步在Scene中添加一个Panel,然后把它设置大点,不然角色会掉下去
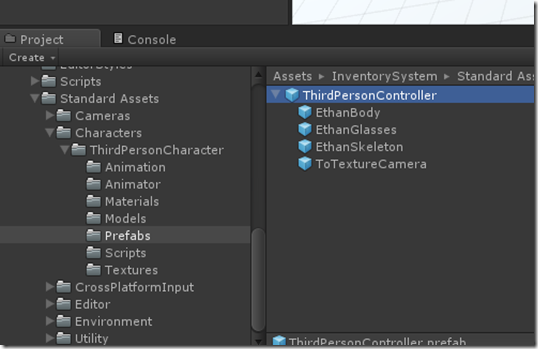
第二步,找到图中的角色prefab然后直接拖到场景中,reset一下即可
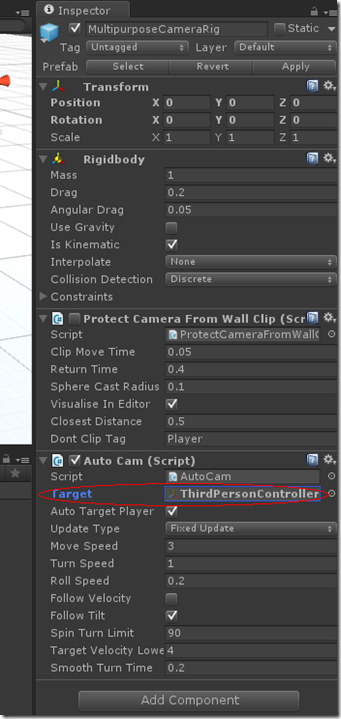
第三方视角相机跟随
第三方视角相机跟随,也是按照标准过程进行
1,删除原来的MainCarmar摄像机
2,从Asset中拖拽我们需要的Prefab到场景中来

第三步,设置相机的Target为我们的控制角色,这里拖拽即可
最后是装备系统配置创建
基础环境创建好了,下面我们需要创建下装备系统的自身的基础环境了,涉及到了Srcript,Manage文件夹中的四大基础类
装备系统配置类,
装备系统管理类
Item管理类(工厂可能不准确,欢迎指正)
装备数据Asset类
Demo1中其实要实现的就两步
第一步,创建空游戏对象,配置InventorySetting类
第二步,初始化游戏Item数据Asset
4、实例
Demo1:使用插件来实现一个装备窗口
功能点:
1、实现了两个窗口,通过点击键盘I来,打开或者关闭窗口也就是Toggle功能
2、装备窗口中的物品栏空格数量动态生成可控,可以在属性窗口手动配置
3、窗口具有拖拽功能
4、窗口物品具有拖拽,及窗口间拖拽
5、可以在窗口使用物品的功能,物品有消耗扇形显示功能
具体效果图如下所示:

插件使用
1、具体在UGUI 中的Canvas中创建一个InventoryWindow
2、在InventoryWindow下创建空GameObject并命名Container,赋予Grid LayOut 插件
3、给InventoryWindow添加InventoryUI组件,插件将自动添加WindowUI也就是通用窗口辅助插件
4、添加拖拽功能组件DraggableWindow,这样窗口就有了拖拽功能了
至此简单的点击I键可以打开和关闭的装备窗口做好了
总结
最后总结下实现通用窗口的三个类,分别是WindowHelper文件夹下的,UIWindow,UIWindowPage和DraggableWindow
1、DraggableWindow有就是拖拽窗口的组件,这里还是比较赞的,也是插件编程的简单例子,这里学过UGui的同学都知道要实现拖拽功能实现IBeginDragHandler和IDargHandler接口即可,原理很简单, 源码如下
using UnityEngine;
using System.Collections;
using UnityEngine.EventSystems;

namespace Devdog.InventorySystem
{
    [AddComponentMenu("InventorySystem/UI Helpers/DraggableWindow")]
    public partial class DraggableWindow : MonoBehaviour, IBeginDragHandler, IDragHandler
    {
        public float dragSpeed = 1.0f;

        private Vector2 dragOffset;


        public void OnBeginDrag(PointerEventData eventData)
        {
            if (InventorySettingsManager.instance.isUIWorldSpace)
                dragOffset = transform.position - eventData.worldPosition;
            else
                dragOffset = new Vector2(transform.position.x, transform.position.y) - eventData.position;
        }

        void IDragHandler.OnDrag(PointerEventData eventData)
        {
            transform.position = new Vector3(eventData.position.x + dragOffset.x * dragSpeed, eventData.position.y + dragOffset.y * dragSpeed, 0.0f);
        }
    }
}
2、UIWindow这个类是窗口的公共类,先上类图主要功能点在类图上标注了,这里就不废话了,主要就是控制的窗口的显示关闭,及组合动画效果比较难的是实现了类似组合窗口的功能(这部分有后有机会再仔细分析)

源码就不全上了,上点有亮点的部分如下:
public virtual void Hide()
{
    if (isVisible == false)
        return;

    isVisible = false;

    if (OnHide != null)
        OnHide();

    if (hideAudioClip != null)
        InventoryUIUtility.AudioPlayOneShot(hideAudioClip);

    if (hideAnimation != null)
    {
        animator.enabled = true;
        animator.Play(hideAnimation.name);

        if (hideCoroutine != null)
        {
            StopCoroutine(hideCoroutine);
        }

        hideCoroutine = _Hide(hideAnimation);
        StartCoroutine(hideCoroutine);
    }
    else
    {
        animator.enabled = false;
        SetChildrenActive(false);
    }
}


/// <summary>
/// Hides object after animation is completed.
/// </summary>
/// <param name="animation"></param>
/// <returns></returns>
protected virtual IEnumerator _Hide(AnimationClip animation)
{
    yield return new WaitForSeconds(animation.length + 0.1f);

    // Maybe it got visible in the time we played the animation?
    if (isVisible == false)
    {
        SetChildrenActive(false);
        animator.enabled = false;
    }
}
以上部分是通过协程实现的具有延时效果的动画关闭窗口的代码,有代表意义。
3、UIWindowPage类,该类是UIWindow的子类,在UIWindow有一个Page的集合用于组合显示UIWindowPage,这块Demo1中没有涉及到该功能这里就不仔细分析了,等后面的例子中出现了再研究,亮点代码如下:
/// <summary>
/// Container that olds the items, if any.
/// </summary>
public RectTransform itemContainer;
public UIWindow windowParent { get; set; }

public override void Awake()
{
    base.Awake();

    windowParent = transform.parent.GetComponentInParent<UIWindow>();
    if (windowParent == null)
        Debug.LogWarning("No UIWindow found in parents", gameObject);

    // Register our page with the window parent
    windowParent.AddPage(this);
}

public override void Show()
{
    if(isEnabled == false)
    {
        Debug.LogWarning("Trying to show a disabled UIWindowPage");
        return;
    }

    base.Show();

    windowParent.NotifyPageShown(this);
}
这里UIWindow和UIWindowPage 本身是继承关系,然又彼此引用,代码可读性有些差了,作者这里通过Page类中Awake和Show来做父类的初始化和调用,也是一种方法,我觉得还行(请高手拍砖)。
总体来说目前的UIWinow和UIWindowPage更像是容器Panel或者Group不像是窗口,等以后的Demo中有复杂的再学习吧。
4、如何通过键盘唤起窗口
这个比较简单用到了U3D的输入输出模块,关键代码如下:
/// <summary>
/// Keys to toggle this window
/// </summary>
public KeyCode[] keyCombination;

public virtual void Update()
{
    if (keyCombination.Length == 0)
        return;

    bool allDown = true;
    foreach (var key in keyCombination)
    {
        if (Input.GetKeyDown(key) == false)
        {
            allDown = false;
        }
    }

    if (allDown)
        Toggle();

}
Demo2:通用窗口的具体实现
功能点:
1、实现了两个窗口,通过点击键盘I来,打开或者关闭窗口也就是Toggle功能
2、装备窗口中的物品栏空格数量动态生成可控,可以在属性窗口手动配置
3、窗口具有拖拽功能
4、窗口物品具有拖拽,及窗口间拖拽
5、可以在窗口使用物品的功能,物品有消耗扇形显示功能
6、通用窗口的类体系结构
具体的插件使用和功能已经在上篇中说明了这里就不多说了
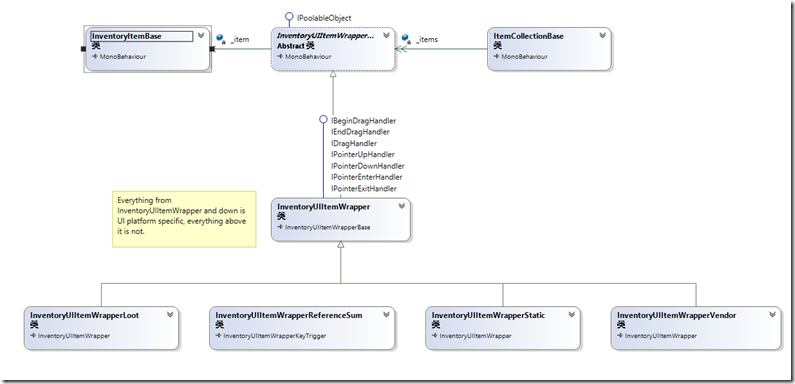
1、本篇重点分析 6通用窗口的类体系结构,类组织和类图如下所示:
类的继承体系结构这里就说了,在第一篇有可以自行查阅
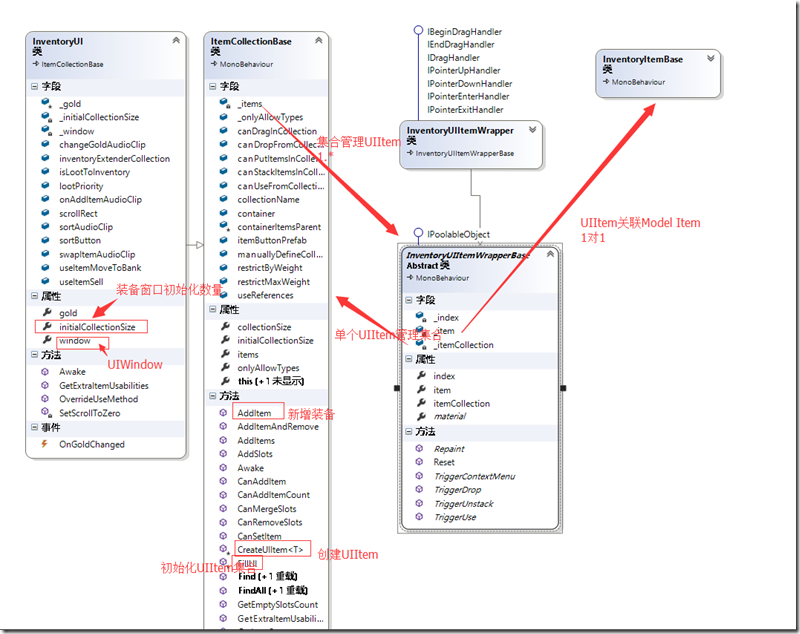
类的引用关系、核心字段和方法已经在类图中标记的很清楚,用简单的几句话说明下,装备窗口中的每个格子是由一个空格子具有背景的UIItem和InventoryItemBase Model组成的,而整个装备窗口是一个InventoryUI,该类继承了ItemCollectionBase类,也就是说它是具有一组UIItem的装备集合窗口,添加上UIWindow组件、DraggableWindow就具有了普通窗口的拖拽移动和显示关闭的功能了。
2、装备窗口中的物品栏空格数量动态生成可控,可以在属性窗口手动配置
如何实现动态装备窗口主要有两个核心技术:一个是UI中的自适应排列,也就是Grid layout Group组件;一个是U3D的prefab实例化技术
动态初始化Cell数据核心代码如下
protected virtual void FillUI()
        {
            if (manuallyDefineCollection == false)
            {
                items = new InventoryUIItemWrapperBase[initialCollectionSize];

                // Fill the container on startup, can add / remove later on
                for (uint i = 0; i < initialCollectionSize; i++)
                {
                    items[i] = CreateUIItem<InventoryUIItemWrapper>(i, itemButtonPrefab != null ? itemButtonPrefab : InventorySettingsManager.instance.itemButtonPrefab);
                }
            }
            else
            {
                for (uint i = 0; i < items.Length; i++)
                {
                    items[i].itemCollection = this;
                    items[i].index = i;
                }
            }
        }

        protected T CreateUIItem<T>(uint i, GameObject prefab) where T : InventoryUIItemWrapperBase
        {
            T item = GameObject.Instantiate<GameObject>(prefab).GetComponent<T>();
            item.transform.SetParent(container);
            item.transform.localPosition = new Vector3(item.transform.localPosition.x, item.transform.localPosition.y, 0.0f);
            item.itemCollection = this;
            item.transform.localScale = Vector3.one;
            item.index = i;

            return item;
        }
是不是很简单 initailCollectionSize是InventoryUI基类的一个共有field也就是说这个装备格子的数量,这个可以根据自己设计的装备窗口手动设置,然后根据这个循环调用CreateUIItem泛型方法通过,GameObject.Instantiate动态实例化预设装备格子对象,并设置Parent和位置
Demo3:通用窗口的具体实现可拖拽功能
窗口间物品的拖拽
自己在学习的过程中,虽然读了源码过了几天来写教程,还是有点不清楚,不能亲车熟路(这也许就是读与写的区别吧),给自己提出了几个问题,在重新去翻代码之前先给自己提出几个问题:
1、拖拽的事件发起者应该是那个类?
2、拖拽的事件的Drag是如何确定下方的UI元素的?
3、拖拽后的逻辑操作,应该由哪个类来承接?
4、窗口与窗口之间的拖拽,既有Drag又有Drop,如何更加合理的解决这个问题?
5、窗口间物品拖拽的以及同窗口物品拖拽的逻辑流程是什么?
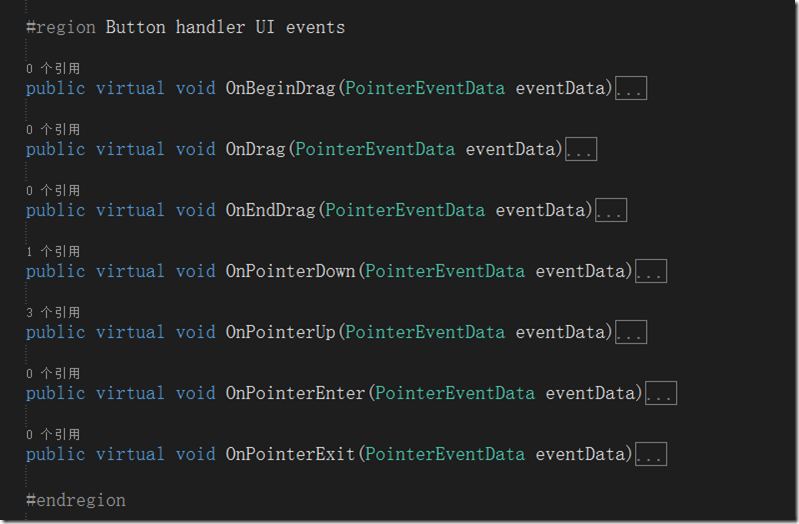
A1 拖拽的事件发起者应该是那个类?:拖拽的发起者必须是UI元素这点是必须的,目前涉及的UI元素有两种一种是窗口容器,一种数据装备格元素,显然装备格元素更有优势,因为少了一层定位逻辑判断,Drag事件直接发起,还可以做Move的相关逻辑,这里Inventory Pro2也确实是怎么做的(这里初次接触UGUI的同学可能要去学习下相关的事件系统,这里就不多说了),这里InventoryUIItemWrapper就是装备格的基类,这里继承了UGUI的相关UI事件,IBeginDragHandler, IEndDragHandler, IDragHandler, IPointerUpHandler, IPointerDownHandler, IPointerEnterHandler, IPointerExitHandler,这么多接口也预示着代码并不简单

这些就是接口实现函数,把他们都弄明白了也就明白了如何实现拖拽
A5 窗口间物品拖拽的以及同窗口物品拖拽的逻辑流程是什么?:先回答这个问题比较合理,在过去的winform的拖拽中并没有这么多接口可以实现,但是我相信拖拽操作的本身逻辑应该是不变的,也就是几个步骤,
1)在物品上点击鼠标左键(记录鼠标点击的元素)->
2)在鼠标不up,且move事件中确认了拖拽开始(Drag事件) –>
3) mouse Move事件中获得鼠标下的元素->
4)mouse up 事件触发Drop,判断鼠标位置及鼠标下元素是否可以drop如果可以进行Drop逻辑至此,这个拖拽操作结束
技术原型就是这么简单。下面看看Uintiy3d ugui Inventory Pro是如何实现的,又读了一遍代码,深深的有体会到了一把,“原理很简单,现实很残酷”,这还是在ugui为我们做了一些封装的情况下,这里其实涉及的函数其实有5个
OnPointerEnter:确定了点击了那个UI元素,对应1)
OnBeginDrag:开始拖拽,对应2)
OnDrag:拖拽中,对应3)
OnEndDrag:结束拖拽,对应4)
OnPointExit:清空选中元素,恢复默认值
具体代码比较多这里不再展开说了,这里庆幸的是,Inventory Pro对拖拽的逻辑进行了封装,在InventoryUIItemWrapper中接口实现函数中,主要做的参数舒适化,主要关于UI的逻辑代码封装在了InventoryUIUtility类中,
以下是主要接口实现函数的代码
public virtual void OnBeginDrag(PointerEventData eventData)
        {
            if (itemCollection == null)
                return;

            if (item != null && eventData.button == PointerEventData.InputButton.Left && itemCollection.canDragInCollection)
            {
                // Create a copy
                var copy = GameObject.Instantiate<InventoryUIItemWrapper>(this);
                copy.index = index;
                copy.itemCollection = itemCollection;

                var copyComp = copy.GetComponent<RectTransform>();
                copyComp.SetParent(InventorySettingsManager.instance.guiRoot);
                copyComp.transform.localPosition = new Vector3(copyComp.transform.localPosition.x, copyComp.transform.localPosition.y, 0.0f);
                copyComp.sizeDelta = GetComponent<RectTransform>().sizeDelta;

                InventoryUIUtility.BeginDrag(copy, (uint)copy.index, itemCollection, eventData); // Make sure they're the same size, copy doesn't handle this.
            }
        }

        public virtual void OnDrag(PointerEventData eventData)
        {
            if (item != null && itemCollection != null && itemCollection.canDragInCollection) // Can only drag existing item
                InventoryUIUtility.Drag(this, index, itemCollection, eventData);
        }

        public virtual void OnEndDrag(PointerEventData eventData)
        {
            if (item != null && itemCollection != null && itemCollection.canDragInCollection)
            {
                var lookup = InventoryUIUtility.EndDrag(this, index, itemCollection, eventData);

                // Didn't end on a button or used wrong key.
                if (lookup == null)
                    return;

                if (lookup.endOnButton)
                {
                    // Place on a slot
                    lookup.startItemCollection.SwapOrMerge((uint)lookup.startIndex, lookup.endItemCollection, (uint)lookup.endIndex);
                }
                else if (lookup.startItemCollection.useReferences)
                {
                    lookup.startItemCollection.SetItem((uint)lookup.startIndex, null);
                    lookup.startItemCollection[lookup.startIndex].Repaint();
                }
                else if(InventoryUIUtility.clickedUIElement == false)
                {
                    TriggerDrop();
                }
            }
        }
以下是InventoryUIUtility类封装的静态函数代码
public static InventoryUIDragLookup BeginDrag(InventoryUIItemWrapper toDrag, uint startIndex, ItemCollectionBase collection, PointerEventData eventData)
        {
            if (draggingItem != null)
            {
                Debug.LogWarning("Item still attached to cursor, can only drag one item at a time", draggingItem.gameObject);
                return null; // Can only drag one item at a time
            }

            if (eventData.button != PointerEventData.InputButton.Left)
                return null;


            draggingItem = toDrag;
            //draggingButtonCollection = collection;

            // Canvas group allows object to ignore raycasts.
            CanvasGroup group = draggingItem.gameObject.GetComponent<CanvasGroup>();
            if(group == null)
                group = draggingItem.gameObject.AddComponent<CanvasGroup>();

            group.blocksRaycasts = false; // Allows rays to go through so we can hover over the empty slots.
            group.interactable = false;

            var lookup = new InventoryUIDragLookup();
            lookup.startIndex = (int)startIndex;
            lookup.startItemCollection = collection;

            return lookup;
        }

        public static void Drag(InventoryUIItemWrapper toDrag, uint startSlot, ItemCollectionBase handler, PointerEventData eventData)
        {
            if(eventData.button == PointerEventData.InputButton.Left)
                draggingItem.transform.position = new Vector3(eventData.position.x, eventData.position.y, 0.0f);
        }

        public static InventoryUIDragLookup EndDrag(InventoryUIItemWrapper toDrag, uint startSlot, ItemCollectionBase handler, PointerEventData eventData)
        {
            if(eventData.button == PointerEventData.InputButton.Left)
            {
                var lookup = new InventoryUIDragLookup();
                lookup.startIndex = (int)draggingItem.index;
                lookup.startItemCollection = draggingItem.itemCollection;

                if (hoveringItem != null)
                {
                    lookup.endIndex = (int)hoveringItem.index;
                    lookup.endItemCollection = hoveringItem.itemCollection;
                }

                Object.Destroy(draggingItem.gameObject); // No longer need it

                draggingItem = null;
                //draggingButtonCollection = null;

                return lookup;
            }

            return null;
        }

        /// <summary>
        /// When the cursor enters an item
        /// </summary>
        public static void EnterItem(InventoryUIItemWrapper item, uint slot, ItemCollectionBase handler, PointerEventData eventData)
        {
            hoveringItem = item;
            //hoveringItemCollection = handler;
        }

        /// <summary>
        /// When the cursor exits an item
        /// </summary>
        /// <param name="item"></param>
        /// <param name="slot">The slot is the IButtonHandler index not the inventory index.</param>
        /// <param name="handler"></param>
        /// <param name="eventData"></param>
        public static void ExitItem(InventoryUIItemWrapper item, uint slot, ItemCollectionBase handler, PointerEventData eventData)
        {
            hoveringItem = null;
            //hoveringItemCollection = null;
        }
A2 拖拽的事件的Drag是如何确定下方的UI元素的?
这里DragDrop中的元素由 OnPointerEnter 来触发获得(有点像Mouse Move事件),具体保存在InventoryUIUtility类的一个静态变量中
public static InventoryUIItemWrapper hoveringItem { get; private set; }A3 拖拽后的逻辑操作,应该由哪个类来承接?
也就是Drop的操作由谁来完成,首先回忆下职责InventoryUIItemWrapper类负责事件的触发,InventoryUIUtility类负责UI相关的逻辑(选中,射线,坐标系统)
再看一遍OnDragEnd函数,具体的Drop逻辑是有Drop的后查找的lookup集合类(装备格集合基类ItemCollectionBase)来处理的,具体又有交换\合并两个逻辑,触发代码如下:
if (lookup.endOnButton)
{
// Place on a slot
lookup.startItemCollection.SwapOrMerge((uint)lookup.startIndex, lookup.endItemCollection, (uint)lookup.endIndex);
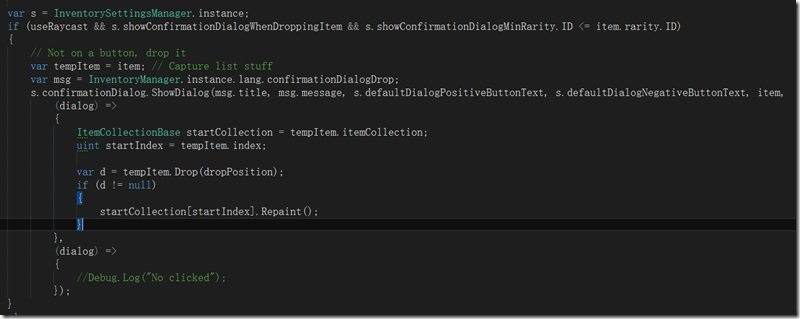
}当然还有一种复杂的逻辑,就是扔掉物品的操作,这个是有具体的Item装备模型类(InventoryItemBase)来处理,核心代码在TriggerDrop方法中来调用,具体如下:
public override void TriggerDrop(bool useRaycast = true)
        {
            if (item == null || itemCollection.canDropFromCollection == false)
                return;

            if(item.isDroppable == false)
            {
                InventoryManager.instance.lang.itemCannotBeDropped.Show(item.name, item.description);
                return;
            }

            Vector3 dropPosition = InventorySettingsManager.instance.playerObject.transform.position;
            Ray ray = Camera.main.ScreenPointToRay(Input.mousePosition);
            RaycastHit hit;
            if (Physics.Raycast(ray, out hit, InventorySettingsManager.instance.maxDropDistance,
                InventorySettingsManager.instance.layersWhenDropping))
            {
                dropPosition = hit.point;
            }
            else
            {
                return; // Couldn't drop item
            }

            var s = InventorySettingsManager.instance;
            if (useRaycast && s.showConfirmationDialogWhenDroppingItem && s.showConfirmationDialogMinRarity.ID <= item.rarity.ID)
            {
                // Not on a button, drop it
                var tempItem = item; // Capture list stuff
                var msg = InventoryManager.instance.lang.confirmationDialogDrop;
                s.confirmationDialog.ShowDialog(msg.title, msg.message, s.defaultDialogPositiveButtonText, s.defaultDialogNegativeButtonText, item,
                    (dialog) =>
                    {
                        ItemCollectionBase startCollection = tempItem.itemCollection;
                        uint startIndex = tempItem.index;

                        var d = tempItem.Drop(dropPosition);
                        if (d != null)
                        {
                            startCollection[startIndex].Repaint();
                        }
                    },
                    (dialog) =>
                    {
                        //Debug.Log("No clicked");
                    });
            }
            else
            {
                var d = item.Drop(dropPosition);
                if (d != null)
                {
                    Repaint();
                }
            }
        }
A4 窗口与窗口之间的拖拽,既有Drag又有Drop,如何更加合理的解决这个问题?
这个问题比较绕,其实也涉及到了问题2,其实无论怎么拖拽也就是两个东西,一个是被拖拽的物体from,一个是要放的地方to,这里其实都是窗口中的格子,只要有了这两个格子类也就确定了from和to的容器,比较特殊的一种情况也就是 from和to两个容器相等,也就是同窗口拖拽了,具体这些对象InventoryUIUtilty类中都做了封装,还是很赞的具体代码如下:
public class InventoryUIDragLookup
        {
            public int startIndex = -1;
            public ItemCollectionBase startItemCollection;

            public int endIndex = -1;
            public ItemCollectionBase endItemCollection;

            public bool endOnButton
            {
                get
                {
                    return endItemCollection != null;
                }
            }
        }


        #region Variables

        private static InventoryUIItemWrapper draggingItem;
        public static InventoryUIItemWrapper hoveringItem { get; private set; }
        public static bool isDraggingItem
        {
            get
            {
                return draggingItem != null;
            }
        }

        public static bool clickedUIElement
        {
            get
            {
                return EventSystem.current.IsPointerOverGameObject();
            }
        }


        public static bool isFocusedOnInput
        {
            get
            {
                if (EventSystem.current.currentSelectedGameObject != null)
                    if (EventSystem.current.currentSelectedGameObject.GetComponent<UnityEngine.UI.InputField>() != null)
                        return true;

                return false;
            }
        }

        #endregion
复杂的物品拖拽逻辑总结完毕,再次向我们印证了,从helloworld到现实是多么的困难,实际的情况可能更复杂比如要加入动画效果,要做网络延时验证,数据同步等等吧
Demo4:通用窗口的具体实现物品有消耗扇形显示功能
功能点:
1、实现了两个窗口,通过点击键盘I来,打开或者关闭窗口也就是Toggle功能
2、装备窗口中的物品栏空格数量动态生成可控,可以在属性窗口手动配置
3、窗口具有拖拽功能
4、窗口物品具有拖拽,及窗口间拖拽
5、可以在窗口使用物品的功能,物品有消耗扇形显示功能
6、通用窗口的类体系结构
这里开动之前给自己提几个问题:
- 1、UGui原生实现使用物品扇形消耗效果(即冷却实现)是如何实现的?
先看看最终效果

如上图,我的技能不是像LOL一样每个技能对应一个按键,而是,先选择一个技能,然后按下某一个键释放 [类似于Button Group]
技能后方有一个灰色的蒙版,有蒙版的技能即为当前选中的技能。
每个技能CD可以在脚本中自定义。
倒计时蒙版与CD会同步。
怎么实现先选择一个技能然后按下键来释放技能不是本教程的目标。
本教程只简单说明怎么实现技能CD。
我们在实现效果之前先简单了解一下UGUI的Image组件。

重点介绍一下Image Type 【显示模式】
Image组件中,Image Type(显示方式)有Simple、Sliced、Tiled、Filled四种。
下面一一介绍。
*Simple【普通】
*此显示模式下,Sprite将直接显示在控件中。如果大小不一致,将通过拉伸来填充控件。
*如果preserve Aspect勾选,图片将保持长宽比
*
*Sliced【切片】
*此显示模式下,Sprite将被视为9个切片[3*3]组成,图片控件只显示中间切片的边缘。
*如果Fill Center勾选,将显示完整切片
*
*Tiled【平铺】
*此显示模式下,sprite尺寸不变
*[自行类比Windows桌面壁纸填充方式中的平铺]
*
*Filled【填充】
*显示模式类似于Simple,但是可以有多个选项来选择展示“从无到有”的变化
*填充方式由Fill-Method属性决定。
*本帖不一一说明各个显示模式。如果你感兴趣,请自行查找资料。
在脚本中,我们需要几个重要的变量来关联各个物体。
比如你需要一个这样的结构体或者类:
[System.Serializable]
public struct skillSprite
{
    public Sprite skill_On;
    public Sprite skill_Off;
    public float skillTimer;
    public Text timerText;
    public Image timerMask;
    public GameObject tipPanel;
    [HideInInspector]
    public bool isOn;   //冷却时间到
    [HideInInspector]
    public bool isOpen; //拥有此技能
    [HideInInspector]
    public bool isPressDown;   //是否使用了技能
}
要实现技能效果,我们会在技能面板中使用Filled模式来实现倒计时效果。
我们在Hierarchy面板中建立这样的父子关系

控制代码如下:
if(skillSprites[index].isOpen)  //如果已经获得该技能执行
{
            //Debug.Log("index = " + index);

            if (skillSprites[index].isPressDown)    //当技能被激活时执行
            {
                skillSprites[index].isOn = false;   //冷却时间重置
                skillSprites[index].timerMask.enabled = true;   //CD蒙版激活
                skillSprites[index].skillTimer -= Time.deltaTime;   //CD时间开始倒计时
                //startTimer[index]为该技能的冷却时间
                //因为在Image组件fillAmount的值范围是[0,1]的float值,所以这里做一个计算转化为百分比
                skillSprites[index].timerMask.fillAmount -= (Time.deltaTime / startTimer[index]);   //更新蒙版状态
                skillSprites[index].timerText.text = skillSprites[index].skillTimer.ToString("F1"); //更新时间显示
            }
}
这样你可以继续完善脚本逻辑来实现效果。
剩下的部分比较简单啦。我就不在这里再做说明了。


OK,搞定
- 2、装备格子是如何与1所提到的方法接合在一起的?
这里回忆下装备格子是用InventoryUItemWrapper这个UI类实现的,所以答案就在这个类里,但使用这个类并非易事,它是用ItemCollectionBase类(集合容器)动态生成的,在前篇讲过这里再温习一下,这里我们发现如果没有值得话,它取的InventorySettingsManager.itemButtonPrefab,也就是个装备格子预设
protected virtual void FillUI()
        {
            if (manuallyDefineCollection == false)
            {
                items = new InventoryUIItemWrapperBase[initialCollectionSize];

                // Fill the container on startup, can add / remove later on
                for (uint i = 0; i < initialCollectionSize; i++)
                {
                    items[i] = CreateUIItem<InventoryUIItemWrapper>(i, itemButtonPrefab != null ? itemButtonPrefab : InventorySettingsManager.instance.itemButtonPrefab);
                }
            }
            else
            {
                for (uint i = 0; i < items.Length; i++)
                {
                    items[i].itemCollection = this;
                    items[i].index = i;
                }
            }
        }

        protected T CreateUIItem<T>(uint i, GameObject prefab) where T : InventoryUIItemWrapperBase
        {
            T item = GameObject.Instantiate<GameObject>(prefab).GetComponent<T>();
            item.transform.SetParent(container);
            item.transform.localPosition = new Vector3(item.transform.localPosition.x, item.transform.localPosition.y, 0.0f);
            item.itemCollection = this;
            item.transform.localScale = Vector3.one;
            item.index = i;

            return item;
        }
回忆一下这个配置是一个必填配置,必须在Setting中进行设置,
找到该预设,找到真相
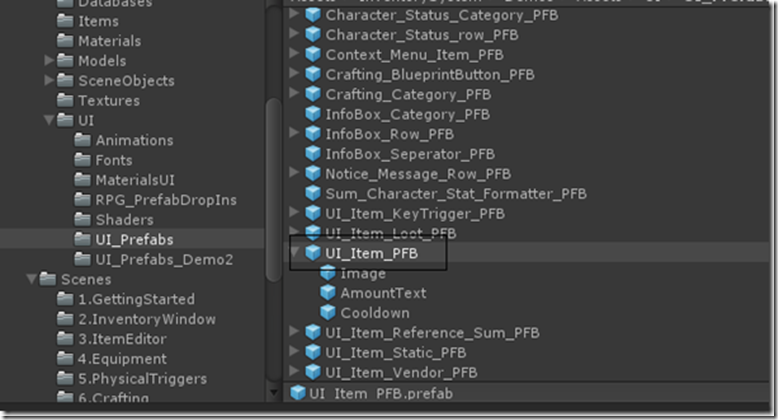

看的出来这个预设绑定了InventoryUIItemWrapper类,其公共的Field也以此列了出来分别是Amout Text物品数量,Item Name物品名称(None),Icon(Image)这就是物品的图标了比如苹果,Cooldown Image 就是图片表面的遮罩层,用来做雷达效果的。
- 3、装备格子是如何与苹果等可以吃的动态物品接合在一起的?
从上面的图片我们也看的出来,其实默认的Icon应该是装备格子的背景(黑底),它是如何变成苹果梨,或者刀剑的呢?这里比较简单的线索就是通过拾取地上的包裹,然后在背包里多了一个物品(这个过程不表述了比较复杂,留在以后专门分析),顺藤摸瓜,最终还是要加入到背包里面,这样我们去看看ItemCollectionBase类中的AddItem方法,这里这个方法本身很复杂主要是有类似20个血瓶1打东西放置的时候需要重新计算格子什么的比较麻烦,核心的函数是SetItem
/// <summary>
        /// This function can be overridden to add custom behavior whenever an object is placed in the inventory.
        /// This happens when 2 items are swapped, items are merged, anytime an object is put in a slot.
        /// <b>Does not handle repainting</b>
        /// </summary>
        /// <param name="slot"></param>
        /// <param name="item"></param>
        /// <returns>Returns true if the item was set, false if not.</returns>
        public virtual bool SetItem(uint slot, InventoryItemBase item)
        {
            if (CanSetItem(slot, item) == false)
                return false;

            // _item ugly work around, but no other way to keep it safe...
            items[slot].item = item;
            return true;
        }
这里我们还记得InventoryUIItemWrapper是Item的包装,所以这里设置了其的Item为新增的Item,顺着这个思路剩下相关的就是绘制部分了,再去看看InventoryUIItemWrapper的绘制部分看看是如何显示的以及冷却效果是如何实现的
public override void Repaint()
        {
            if (item != null)
            {
                if (amountText != null)
                {
                    // Only show when we have more then 1 item.
                    if (item.currentStackSize > 1)
                        amountText.text = item.currentStackSize.ToString();
                    else
                        amountText.text = string.Empty;
                }

                if (itemName != null)
                    itemName.text = item.name;

                if(icon != null)
                    icon.sprite = item.icon;
            }
            else
            {
                if (amountText != null)
                    amountText.text = string.Empty;

                if (itemName != null)
                    itemName.text = string.Empty;

                if(icon != null)
                    icon.sprite = startIcon != null ? startIcon : InventorySettingsManager.instance.defaultSlotIcon;
            }

            //RepaintCooldown(); // Already called by update loop
        }
icon.sprite = item.icon; 这一行代码我们看到了,其实icon这个Image Field 对应Item.icon,而且是一个sprite对象(原来sprite是Image的一个部分),再看下Update Loop的代码,只是在每一帧调用了
RepaintCooldown(),也就是执行冷却刷新,具体代码如下:
public virtual void RepaintCooldown()
        {
            if (cooldownImage == null)
                return;

            if (item != null)
            {
                if(item.isInCooldown)
                {
                    cooldownImage.fillAmount = 1.0f - item.cooldownFactor;
                    return;
                }
            }

            // To avoid GC
            if (cooldownImage.fillAmount != 0.0f)
                cooldownImage.fillAmount = 0.0f;
        }
当然这里有控制cooldown的逻辑,isInCooldown是一个属性逻辑都在里面,包括同类型物品使用的冷却控制(有点复杂,这里先不表了)
- 4、物品是如何被触发使用的?
触发使用一定是在点击的时候触发的,接合UGui的事件机制,Inventory Pro 分别在OnPointerDown和OnPointerUP中进行了实现,有一些触控相关的判断见一下源码
public virtual void OnPointerDown(PointerEventData eventData)
        {
            if (itemCollection == null)
                return;

            pointerDownOnUIElement = InventoryUIUtility.clickedUIElement;
            if (pointerDownOnUIElement == false)
                return;

            if (InventorySettingsManager.instance.useContextMenu && (eventData.button == InventorySettingsManager.instance.triggerContextMenuButton || Application.isMobilePlatform))
            {
                if (item != null)
                    TriggerContextMenu();

                return;
            }

            if (InventorySettingsManager.instance.mobileUnstackItemKey == MobileUIActions.SingleTap)
            {
                TriggerUnstack();
                return;
            }
            else if(InventorySettingsManager.instance.mobileUseItemButton == MobileUIActions.SingleTap)
            {
                TriggerUse();
                return;
            }

            if (item != null && pressing == false && Time.timeSinceLevelLoad - InventorySettingsManager.instance.mobileDoubleTapTime < lastDownTime)
            {
                // Did double tap
                if (InventorySettingsManager.instance.mobileUnstackItemKey == MobileUIActions.DoubleTap)
                {
                    TriggerUnstack();
                    return;
                }
                else if(InventorySettingsManager.instance.mobileUseItemButton == MobileUIActions.DoubleTap)
                {
                    TriggerUse();
                    return;
                }
            }

            lastDownTime = Time.timeSinceLevelLoad;
            pressing = true;
        }
物品的具体使用在TriggerUse() 实现
public override void TriggerUse()
        {
            if (item == null)
                return;

            if (itemCollection.canUseFromCollection == false)
                return;

            int used = item.Use();
            if (used >= 0)
            {
                Repaint();
            }
        }
这里最终物品的使用时调用的Item Model中的Use()来实现的,这个应该是一种基类方法,需要特定的子类Item来实现,具体实现还要和容器有一定关系,比较复杂本文不表,有机会日后再展开,反正使用后调用了Repaint()方法也就是在使用完毕物品后装备格子进行了重绘刷新操作。
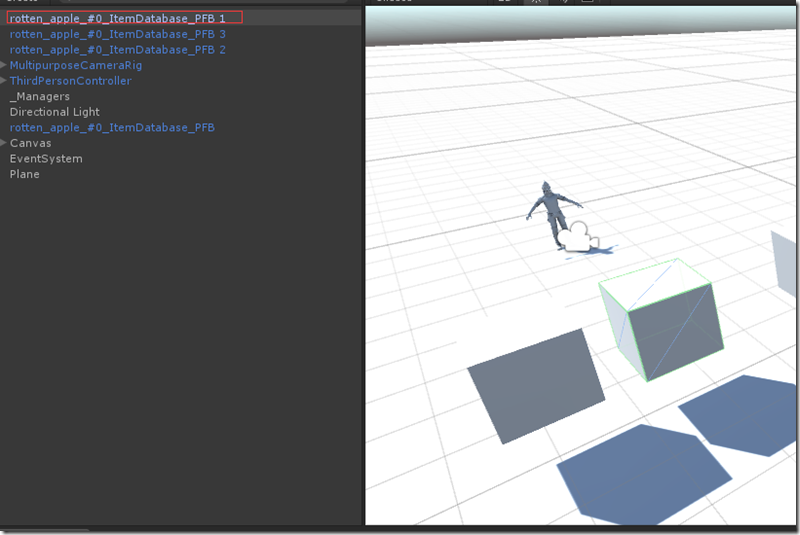
Demo5:Inventory Pro 装备拾取的实现
效果图
1、运行相关的例子,场景中出现4个矩形,这4个矩形是用来模拟物品掉落的包裹,移动Player靠近物品
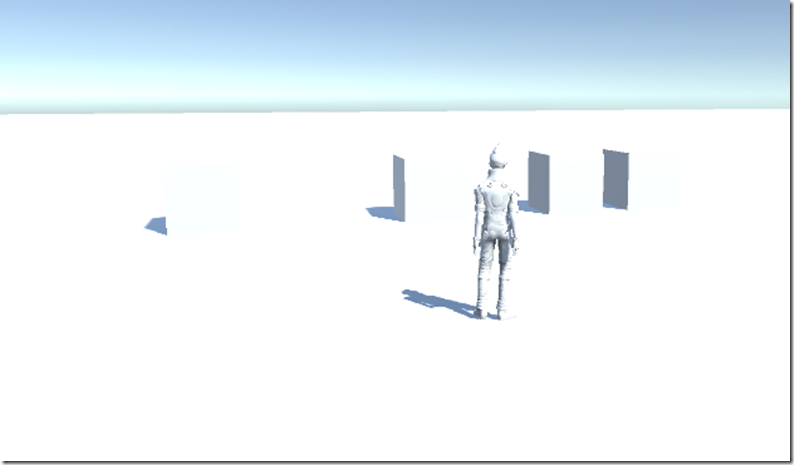
2、使用鼠标点击物品正方体,点击I键打开包裹,这里看到3个掉落包裹正方体已经点没有了,相应的背包里多出三个苹果,至此例子演示完毕
插件使用
使用Inventory Pro进行装备的拾取,有很简单的例子
1、点击菜单Tool,InventorySystem,Main editor 打开自定义Editor

2、在Main manager对话框中点击Items editor选项卡,选中Item editor 点击Create Item 绿色按钮,会弹出左侧的选择子对话框,其中列出了可以创建的Item种类,第一项就是消耗品,当然还有很多别的东西,这里先试验最简单的消耗品
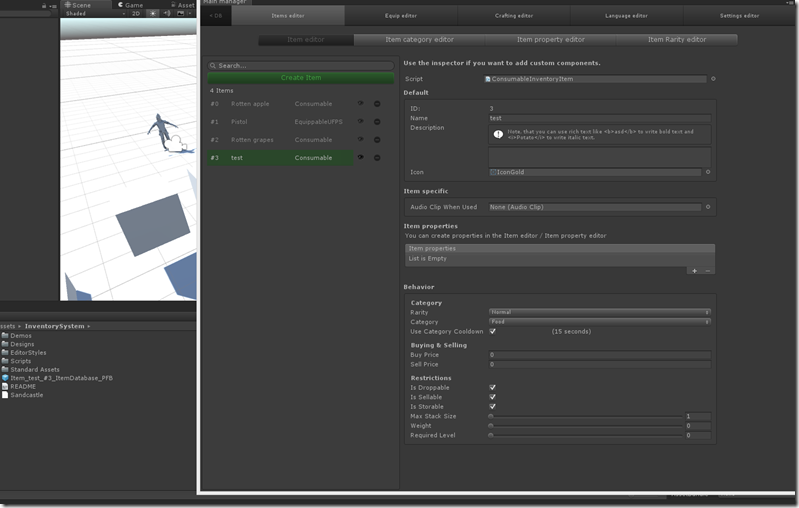
3、点击创建消耗品以后会出来一个Item的详情界面,这里需要添加Item的Name,Icon,Behavier里有类型,冷却时间,价格,是否可以叠放,是否可以丢弃等等属性吧,同时Editor会创建出相应的物品prefab,直接拖拽到场景中即可
问题
1、地上的包裹(Item容器)是如何产生的?
2、地上的包裹是如何对应Item model的,且之间的关系是什么?
3、拾取的过程是怎么样的?
答案
1、地上的包裹(Item容器)是如何产生的?
A1、这里例子里面是通过Unity3d Editor扩展进行添加地上的包裹的且是Cude,其中使用了动态生成预设的技术,这里涉及到很多关于Editor扩展的知识,基本与本章主题无关,Inventory Pro的作者也只是通过例子进行了展示(我想如果是实际游戏可能需要动态生成,比如生长点,怪物掉落什么的),这里列出一个动态生成Prefab的核心代码,也就是类似选择生成消耗品后点击的事件的处理函数,代码如下:
protected override void CreateNewItem()
        {
            var picker = EditorWindow.GetWindow<InventoryItemTypePicker>(true);
            picker.Show(InventoryEditorUtil.selectedDatabase);

            picker.OnPickObject += (type) =>
            {
                string prefabPath = EditorPrefs.GetString("InventorySystem_ItemPrefabPath") + "/item_" + System.DateTime.Now.ToFileTimeUtc() + "_PFB.prefab";

                var obj = GameObject.CreatePrimitive(PrimitiveType.Cube);
                var prefab = PrefabUtility.CreatePrefab(prefabPath, obj);

                AssetDatabase.SetLabels(prefab, new string[] { "InventoryItemPrefab" });

                var comp = (InventoryItemBase)prefab.AddComponent(type);
                comp.ID = crudList.Count == 0 ? 0 : crudList[crudList.Count - 1].ID + 1;
                Object.DestroyImmediate(obj);

                AddItem(comp, true);
            };
        }
2、地方的包裹是如何对应Item model的,且之间的关系是什么?
我们看到1中的代码创建好刚体,碰撞后的正方体后
var comp = (InventoryItemBase)prefab.AddComponent(type);
通过AddComponent添加了用户选择的Type,通过类型转换(InventoryItemBase)我们知道这个类型是Item类型。
然后我们再通过Unity3d 可视化环境来验证一下
通过选中预设我们看到其绑定的相关插件有碰撞和刚体属性,最后绑定的脚本是Consumable Inventory Item (Script),这样也验证了上面代码加入的Type,也就是在类选择所对应的InventoryItemBase 类型
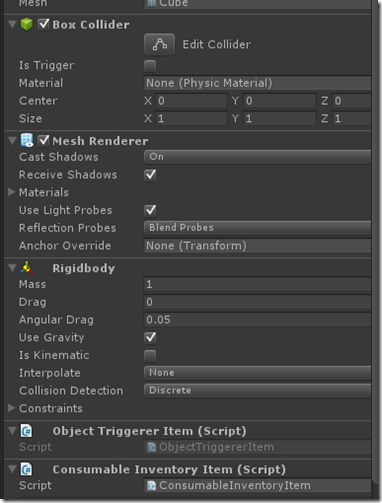
这里需要注意的是Object Triggerer Item脚本是如何绑定到对象上的,这块是一个小技巧,我找了半天才发现的
/// <summary>
/// The base item of all the inventory items, contains some default behaviour for items, which can (almost) all be overriden.
/// </summary>
[RequireComponent(typeof(ObjectTriggererItem))]
public partial class InventoryItemBase : MonoBehaviour
用RequireComponent这个特性就可以不用手动进行相关插件的绑定了。
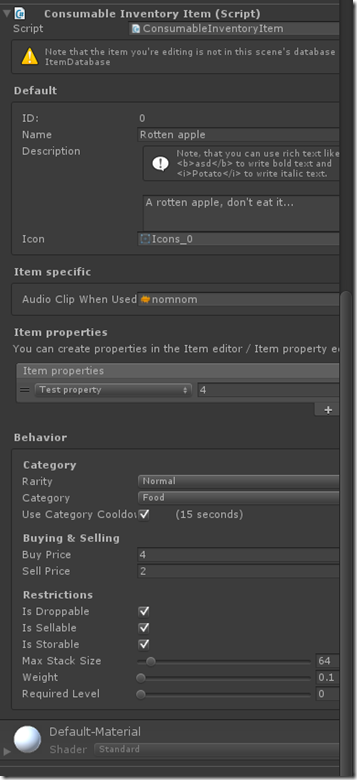
上图是Consumable Inventory Item(script)的public field详情了,是不是似曾相识,就是和Item Editor工具创建Prefab的时候是一样的。
到此第二个问题回答完毕。
3、拾取的过程是怎么样的?
在正式回答前,我先yy下,既然拾取必须是双向,而且应该是触发的(当点击鼠标触发),然后Play接收到触发的调用进行拾取,最后清理空背包(立方体消失),下面去看看代码是否是这么实现的。
触发器这里在2的答案里已经有了,看了下做法出奇的简单,可能这就是框架的力量吧,下面贴出源码
/// <summary>
    /// Used to trigger item pickup, modify the settings in ShowObjectTriggerer.
    /// </summary>
    [AddComponentMenu("InventorySystem/Triggers/Object triggerer item")]
    [RequireComponent(typeof(InventoryItemBase))]
    [RequireComponent(typeof(Rigidbody))]
    public partial class ObjectTriggererItem : MonoBehaviour
    {

        public InventoryItemBase item { get; protected set; }

        public bool inRange
        {
            get
            {
                return Vector3.Distance(InventorySettingsManager.instance.playerObject.transform.position, transform.position) < InventorySettingsManager.instance.useObjectDistance;
            }
        }


        public void Awake()
        {
            item = GetComponent<InventoryItemBase>();
        }

        public virtual void OnMouseDown()
        {
            if (ShowObjectTriggerer.instance != null && ShowObjectTriggerer.instance.itemTriggerMouseClick && InventoryUIUtility.clickedUIElement == false)
            {
                if (inRange)
                    Use();
                else
                {
                    InventoryManager.instance.lang.itemCannotBePickedUpToFarAway.Show(item.name, item.description);
                }
            }
        }

        protected virtual void Use()
        {
            item.PickupItem();
        }
    }
这里我们很容易看到了OnMouseDown触发的物品拾取逻辑,直接调用绑定的InventoryBaseItem的PickupItem()拾取函数即可,这里再次重温下自动绑定的威力
[RequireComponent(typeof(InventoryItemBase))]
当需要使用的时候记得在Awake()函数中设置相关属性即可
public void Awake()
{
    item = GetComponent<InventoryItemBase>();
}
/// <summary>
/// Pickups the item and stores it in the Inventory.
/// </summary>
/// <returns>Returns 0 if item was stored, -1 if not, -2 for some other unknown reason.</returns>
public virtual bool PickupItem(bool addToInventory = true)
{
if(addToInventory)
return InventoryManager.AddItem(this);
return true;
}上面是InventoryItemBase中的PickupItem方法,只用调用InventoryMannager类的静态方法AddItem方法即可,就是这么简单
/// <summary>
        /// Add an item to an inventory.
        /// </summary>
        /// <param name="item">The item to add</param>
        /// <returns></returns>
        public static bool AddItem(InventoryItemBase item, bool repaint = true)
        {
            if (CanAddItem(item) == false)
            {
                instance.lang.collectionFull.Show(item.name, item.description, instance.inventory.collectionName);
                return false;
            }

            //// All items fit in 1 collection
            //if (item.currentStackSize <= item.maxStackSize)
            //    return best.collection.AddItem(item, repaint);

            // Not all items fit in 1 collection, divide them, grab best collection after each iteration
            // Keep going until stack is divided over collections.
            while (item.currentStackSize > 0)
            {
                var bestCollection = instance.GetBestLootCollectionForItem(item, false).collection;
                uint canStoreInCollection = bestCollection.CanAddItemCount(item);

                var copy = GameObject.Instantiate<InventoryItemBase>(item);
                copy.currentStackSize = (uint)Mathf.Min(Mathf.Min(item.currentStackSize, item.maxStackSize), canStoreInCollection);
                bestCollection.AddItem(copy);

                item.currentStackSize -= copy.currentStackSize;
                //item.currentStackSize = (uint)Mathf.Max(item.currentStackSize, 0); // Make sure it's positive
            }

            Destroy(item.gameObject); // Item is divided over collections, no longer need it.

            return true;
        }
InventoryMannager中的AddItem,代码看似简单,却有四个逻辑,是否可以放置,选择最佳容器,叠放逻辑,销毁。
Demo6:Inventory Pro 实现UGUI通用对话框
所谓通用对话框,如果是自己实现的话有以下几点需要解决,窗体显示控制,窗体UI布局,窗体文字显示,窗体事件回调,窗体显示动画控制,窗体显示声音控制,窗体与其他窗体的关系,功能虽然小涉及的方面和知识却不少,自己做真的很不容易,所以别再自己造轮子了。

插件实现的效果
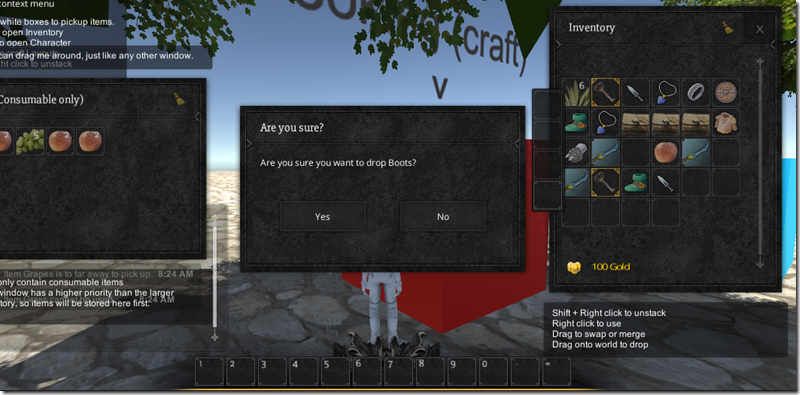
简单的确认对话框提示
当扔物品的时候会提示是否确认对话框
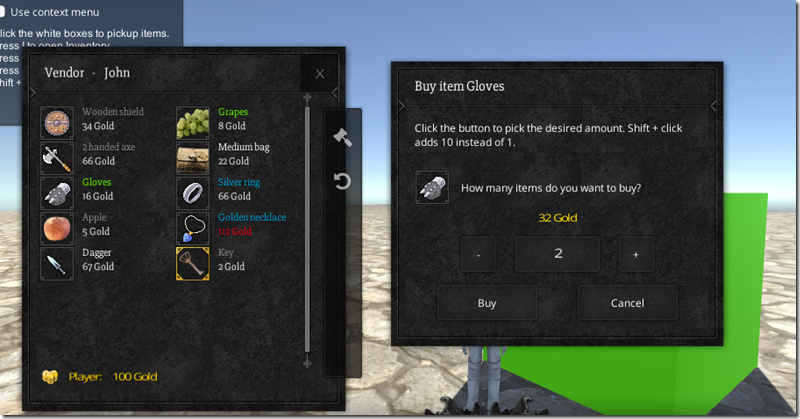
稍微复杂一些的购买物品对话框
当购买物品时会显示出一个购买的物品,物品数量金额的对话框
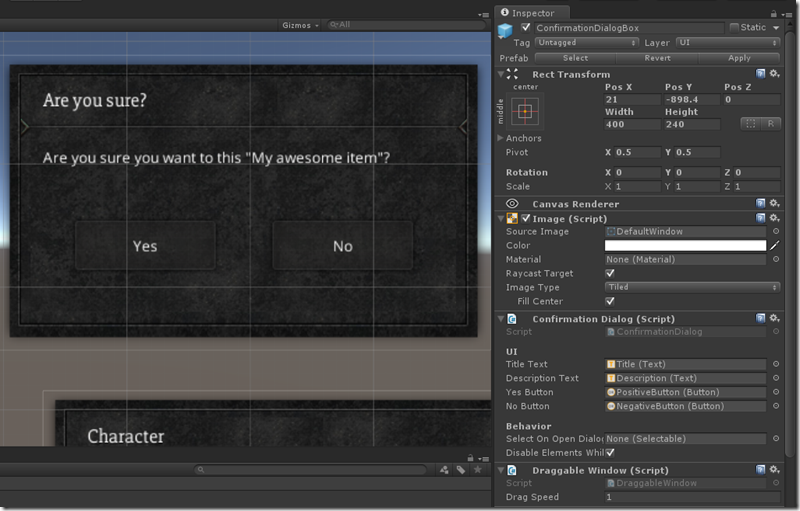
简单确认对话框的使用
1、使用UGUI来设计一个自己使用的对话框,基本几个元素Title,description ,two buttons;
2、给对话框绑定Draggable Window(Script)使其具有拖拽功能
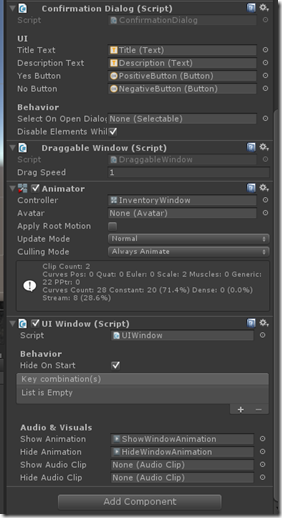
3、添加Animator,定义对话框显示的时候具有动画效果
4、添加UI Windows(script)使其具有打开关闭,声音,动画的效果
5、Confirmation Dialog(script)使其具有事件回调,model对话框的属性,文字绑定等对话框固有的属性
至此简单的对话框就做好了,这里我们充分见识了绑定技术、组件技术、UI解耦和框架的强大威力
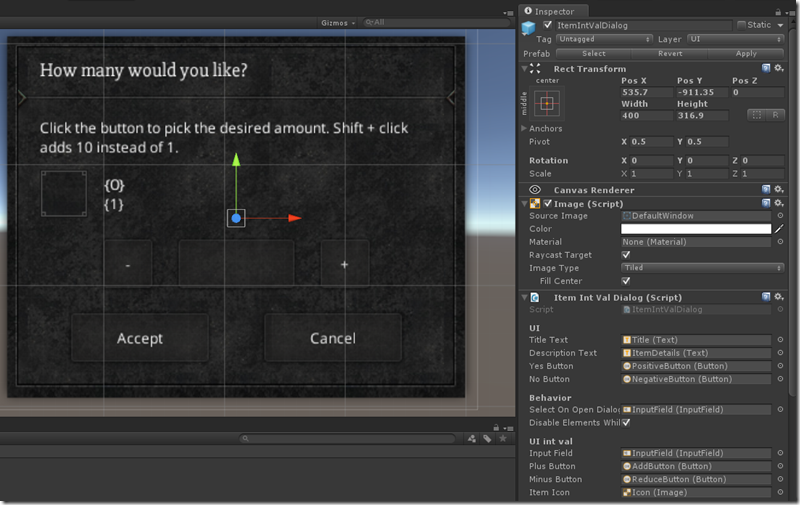
复杂对话框的使用
这里只要知道Item Int Val Dialog(scirpt)其实是ConfirmDialog类的一个子类,剩下的东西就很自然了,这里不详细展开了。
分析
功能需求确定了,如何实现这些功能可能就需要用到一些模式,以及一些经验了,先看一下类图
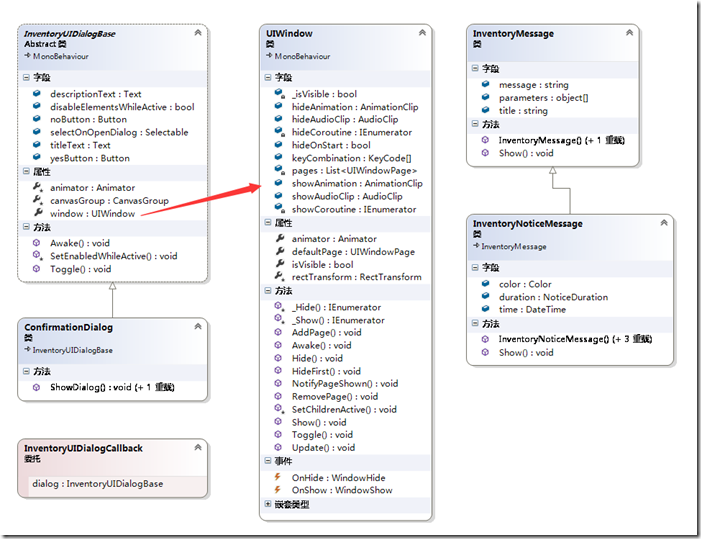
根据前一节的脑图,类图我们逐个分析,InventoryUIDialogBase 是一个抽象类,也是与UI进行绑定的主体,其没有一个无用的属性,这里重点关注几个字段和属性,UIWindow类是通用的窗口显示和动画控制组件,InventoryMessage是字符串Message的封装类。
1)窗体UI布局
UI布局是通过Unity3d UGUI拖拽的方式设计上去的,这个很简单,首先做到了UI分离
2)窗体文字显示
窗体文字的显示首先是通过后台与UI做的绑定,这里使用Unity3d的组件设计时绑定技术(这里做过WPF的同学有是否有印象MVVM中的绑定),这里关键是文字信息,实际发现其实Dialog类并不关心显示的什么string,而是Inventory Pro提供的(类图中的Message类)一层封装后得到的结果,这里为什么要单独拿出来实际是为了做国际化以及一些文字性的扩展,比如颜色,字体显示的方案。
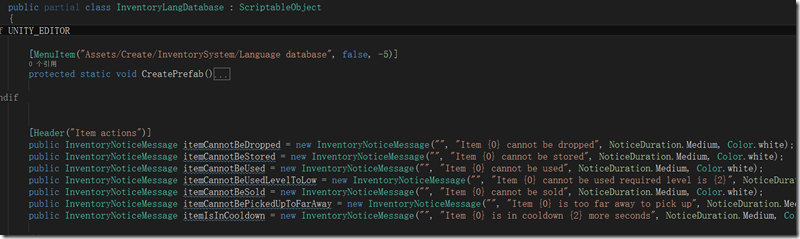
InventoryLangDataBase类对于所有的消息体文字进行了集中处理,而且本身也是Asset,这里有两种好处一种就是可以集中管理,一种就是为国际化文字。
因为Unity3d UGUI可以做文字颜色和字体的格式化操作,这里完全可以扩展添加有颜色和字体大小的文字重载
3)窗体显示控制,窗体显示动画控制,窗体显示声音控制
窗体显示的控制,完全利用Unity3d平台的组件化功能,通过UIWindow专门拿出来控制,这里看到UIWinow类是必须加载Animator动画类的
窗体的动画控制,由主体DialogBase进行设计时的动画效果绑定,由UIWindow类在控制显示和关闭时进行动画的Play,这里还用到了协程
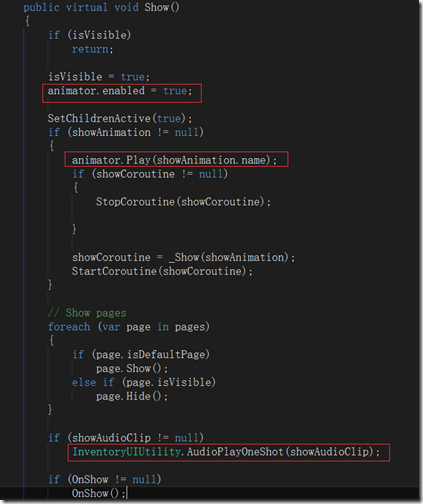
窗体显示声音控制,由全局类静态方法 InventoryUIUtility.AudioPlayOneShot 来播放即可
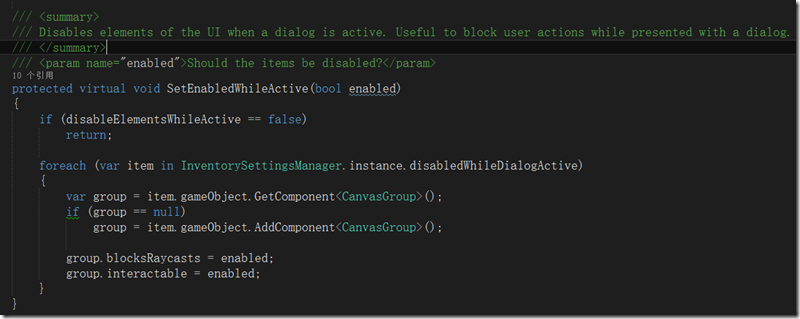
4)窗体与其他窗体的关系
这个功能类似于网页中的遮罩或者winform里的模态(ModelDialog)对话框,这里没有现成的东西可以使用只能自己写了,这里如何关闭UGUI的事件处理主要是通过CanvasGroup这个插件来控制
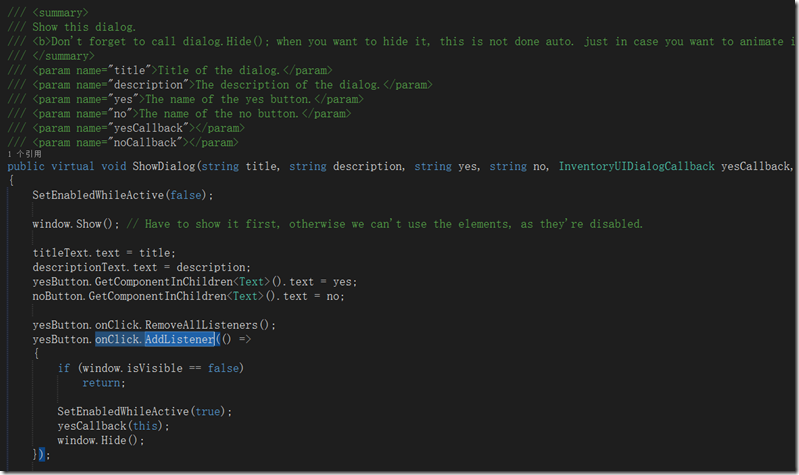
5) 窗体事件回调
窗体中的事件回调交给了Dialog子类来处理,具体是在重载的ShowDialog方法中添加了委托的事件回调函数,然后通过代码绑定的方式(这里是onClick.AddListener,而不是UI手动可视化绑定)进行了按钮事件的绑定,这里有很大的灵活性。我比较喜欢这种通过代码定义显示委托的方式,来完成事件的回调(c++系可能叫做函数指针),同比匿名委托,泛型委托(Action或者Func),Lambda表达式,代码可读性更强
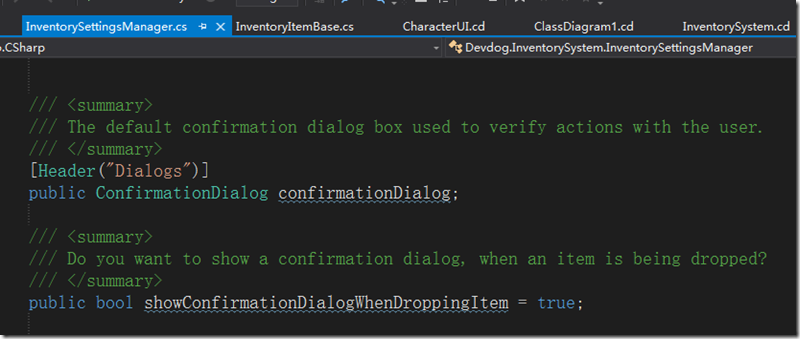
其它
这里留了一个小疑问,对话框的触发显示是如何实现的,我们的(MessageBox.Show)在哪里呢?
看过前面的文章的同学应该知道,Inevntory Pro有一个全局setting类,需要进行一些配置,其中就需要窗体元素与SettingManger脚本进行绑定,而SettingManger是一个单列全局类
最后是如何显示对话框的代码了,看到ShowDialog方法了吗,两个按钮的事件回调函数 Lambda表达式特别显眼
写在最后
分析总结完毕后有一些想法
1、好的框架使开发变得的easy,扩展很方便,通过以上的分析和例子看的出来很容易就能扩展出来一些简单的类似Confirm对话框,而且是对修改封闭,对新增开放的;
2、一个司空见惯的小功能,如果做好了完全可以覆盖到Unity3d的许多知识,剩下的只是不断进行这样的重复,重建你的神经网络即可,总有一天Unity3d的技术就这样印在你的大脑之中;
3、如果你真的看懂了本文,分析一下其实所有的UI系统都是相通的只是API和使用的技术不同而已,只是有些API封装的死,有些封装的松散一些。换句话说如果你自己在某种UI体系中完成一种自己的实现,换到另一个UI体系一样可以实现的;
4、微软体系如Winform过渡的封装是否是好事情?有些时候是好事情,有些时候就未必。根据手上的资源合理的选择技术才是根本;
5、关于使用轮子和造轮子的纠结,这也是一组矛盾,不造轮子就不能深刻的体会技术,造轮子需要大量的时间可造出来未必有已经造好的轮子设计的好,你会选择哪一种呢?
核心代码
UIWindow
using System;
using UnityEngine;
using System.Collections;
using UnityEngine.EventSystems;
using System.Collections.Generic;
namespace Devdog.InventorySystem
{
/// <summary>
/// Any window that you want to hide or show through key combination or a helper (UIShowWindow for example)
/// </summary>
[RequireComponent(typeof(Animator))]
[AddComponentMenu("InventorySystem/UI Helpers/UIWindow")]
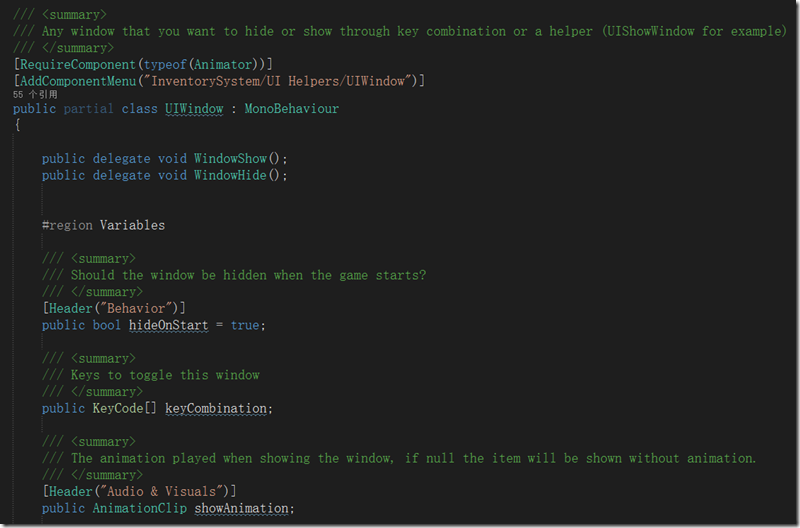
public partial class UIWindow : MonoBehaviour
{
public delegate void WindowShow();
public delegate void WindowHide();
#region Variables
/// <summary>
/// Should the window be hidden when the game starts?
/// </summary>
[Header("Behavior")]
public bool hideOnStart = true;
/// <summary>
/// Keys to toggle this window
/// </summary>
public KeyCode[] keyCombination;
/// <summary>
/// The animation played when showing the window, if null the item will be shown without animation.
/// </summary>
[Header("Audio & Visuals")]
public AnimationClip showAnimation;
/// <summary>
/// The animation played when hiding the window, if null the item will be hidden without animation.
/// </summary>
public AnimationClip hideAnimation;
public AudioClip showAudioClip;
public AudioClip hideAudioClip;
/// <summary>
/// The animator in case the user wants to play an animation.
/// </summary>
public Animator animator { get; set; }
protected RectTransform rectTransform { get; set; }
[NonSerialized]
private bool _isVisible = false;
/// <summary>
/// Is the window visible or not? Used for toggling.
/// </summary>
public bool isVisible
{
get
{
return _isVisible;
}
protected set
{
_isVisible = value;
}
}
private IEnumerator showCoroutine;
private IEnumerator hideCoroutine;
/// <summary>
/// All the pages of this window
/// </summary>
[HideInInspector]
private List<UIWindowPage> pages = new List<UIWindowPage>();
public UIWindowPage defaultPage
{
get;
private set;
}
#endregion
#region Events
/// <summary>
/// Event is fired when the window is hidden.
/// </summary>
public event WindowHide OnHide;
/// <summary>
/// Event is fired when the window becomes visible.
/// </summary>
public event WindowShow OnShow;
#endregion
public void AddPage(UIWindowPage page)
{
pages.Add(page);
if (page.isDefaultPage)
defaultPage = page;
}
public void RemovePage(UIWindowPage page)
{
pages.Remove(page);
}
public virtual void Awake()
{
animator = GetComponent<Animator>();
if (animator == null)
animator = gameObject.AddComponent<Animator>();
rectTransform = GetComponent<RectTransform>();
if (hideOnStart)
HideFirst();
else
{
isVisible = true;
}
}
public virtual void Update()
{
if (keyCombination.Length == 0)
return;
bool allDown = true;
foreach (var key in keyCombination)
{
if (Input.GetKeyDown(key) == false)
{
allDown = false;
}
}
if (allDown)
Toggle();
}
#region Usefull UI reflection functions
/// <summary>
/// One of our children pages has been shown
/// </summary>
public void NotifyPageShown(UIWindowPage page)
{
foreach (var item in pages)
{
if (item.isVisible && item != page)
item.Hide();
}
}
protected virtual void SetChildrenActive(bool active)
{
foreach (Transform t in transform)
{
t.gameObject.SetActive(active);
}
var img = gameObject.GetComponent<UnityEngine.UI.Image>();
if(img != null)
img.enabled = active;
}
public virtual void Toggle()
{
if (isVisible)
Hide();
else
Show();
}
public virtual void Show()
{
if (isVisible)
return;
isVisible = true;
animator.enabled = true;
SetChildrenActive(true);
if (showAnimation != null)
{
animator.Play(showAnimation.name);
if (showCoroutine != null)
{
StopCoroutine(showCoroutine);
}
showCoroutine = _Show(showAnimation);
StartCoroutine(showCoroutine);
}
// Show pages
foreach (var page in pages)
{
if (page.isDefaultPage)
page.Show();
else if (page.isVisible)
page.Hide();
}
if (showAudioClip != null)
InventoryUIUtility.AudioPlayOneShot(showAudioClip);
if (OnShow != null)
OnShow();
}
public virtual void HideFirst()
{
isVisible = false;
animator.enabled = false;
SetChildrenActive(false);
rectTransform.anchoredPosition = Vector2.zero;
}
public virtual void Hide()
{
if (isVisible == false)
return;
isVisible = false;
if (OnHide != null)
OnHide();
if (hideAudioClip != null)
InventoryUIUtility.AudioPlayOneShot(hideAudioClip);
if (hideAnimation != null)
{
animator.enabled = true;
animator.Play(hideAnimation.name);
if (hideCoroutine != null)
{
StopCoroutine(hideCoroutine);
}
hideCoroutine = _Hide(hideAnimation);
StartCoroutine(hideCoroutine);
}
else
{
animator.enabled = false;
SetChildrenActive(false);
}
}
/// <summary>
/// Hides object after animation is completed.
/// </summary>
/// <param name="animation"></param>
/// <returns></returns>
protected virtual IEnumerator _Hide(AnimationClip animation)
{
yield return new WaitForSeconds(animation.length + 0.1f);
// Maybe it got visible in the time we played the animation?
if (isVisible == false)
{
SetChildrenActive(false);
animator.enabled = false;
}
}
/// <summary>
/// Hides object after animation is completed.
/// </summary>
/// <param name="animation"></param>
/// <returns></returns>
protected virtual IEnumerator _Show(AnimationClip animation)
{
yield return new WaitForSeconds(animation.length + 0.1f);
if (isVisible)
animator.enabled = false;
}
#endregion
}
}InventoryUIDialogBase
using UnityEngine;
using System.Collections;
using Devdog.InventorySystem.Dialogs;
using UnityEngine.UI;

namespace Devdog.InventorySystem.Dialogs
{

    public delegate void InventoryUIDialogCallback(InventoryUIDialogBase dialog);

    /// <summary>
    /// The abstract base class used to create all dialogs. If you want to create your own dialog, extend from this class.
    /// </summary>
    [RequireComponent(typeof(Animator))]
    [RequireComponent(typeof(UIWindow))]
    public abstract partial class InventoryUIDialogBase : MonoBehaviour
    {
        [Header("UI")]
        public Text titleText;
        public Text descriptionText;

        public UnityEngine.UI.Button yesButton;
        public UnityEngine.UI.Button noButton;

        /// <summary>
        /// The item that should be selected by default when the dialog opens.
        /// </summary>
        [Header("Behavior")]
        public Selectable selectOnOpenDialog;

        /// <summary>
        /// Disables the items defined in InventorySettingsManager.disabledWhileDialogActive if set to true.
        /// </summary>
        public bool disableElementsWhileActive = true;

        protected CanvasGroup canvasGroup { get; set; }
        protected Animator animator { get; set; }
        public UIWindow window { get; protected set; }

        public virtual void Awake()
        {
            canvasGroup = GetComponent<CanvasGroup>();
            if (canvasGroup == null)
                canvasGroup = gameObject.AddComponent<CanvasGroup>();

            animator = GetComponent<Animator>();
            window = GetComponent<UIWindow>();


            window.OnShow += () =>
            {
                SetEnabledWhileActive(false); // Disable other UI elements

                if (selectOnOpenDialog != null)
                    selectOnOpenDialog.Select();
            };
            window.OnHide += () =>
            {
                SetEnabledWhileActive(true); // Enable other UI elements
            };
        }

        public void Toggle()
        {
            window.Toggle();
            if(window.isVisible)
                SetEnabledWhileActive(false); // Disable other UI elements
            else
                SetEnabledWhileActive(true); // Enable other UI elements
        }

        /// <summary>
        /// Disables elements of the UI when a dialog is active. Useful to block user actions while presented with a dialog.
        /// </summary>
        /// <param name="enabled">Should the items be disabled?</param>
        protected virtual void SetEnabledWhileActive(bool enabled)
        {
            if (disableElementsWhileActive == false)
                return;

            foreach (var item in InventorySettingsManager.instance.disabledWhileDialogActive)
            {
                var group = item.gameObject.GetComponent<CanvasGroup>();
                if (group == null)
                    group = item.gameObject.AddComponent<CanvasGroup>();

                group.blocksRaycasts = enabled;
                group.interactable = enabled;
            }
        }
    }
}
ConfirmationDialog
using UnityEngine;
using System.Collections;
using UnityEngine.UI;

namespace Devdog.InventorySystem.Dialogs
{
    public partial class ConfirmationDialog : InventoryUIDialogBase
    {

        /// <summary>
        /// Show this dialog.
        /// <b>Don't forget to call dialog.Hide(); when you want to hide it, this is not done auto. just in case you want to animate it instead of hide it.</b>
        /// </summary>
        /// <param name="title">Title of the dialog.</param>
        /// <param name="description">The description of the dialog.</param>
        /// <param name="yes">The name of the yes button.</param>
        /// <param name="no">The name of the no button.</param>
        /// <param name="yesCallback"></param>
        /// <param name="noCallback"></param>
        public virtual void ShowDialog(string title, string description, string yes, string no, InventoryUIDialogCallback yesCallback, InventoryUIDialogCallback noCallback)
        {
            SetEnabledWhileActive(false);

            window.Show(); // Have to show it first, otherwise we can't use the elements, as they're disabled.

            titleText.text = title;
            descriptionText.text = description;
            yesButton.GetComponentInChildren<Text>().text = yes;
            noButton.GetComponentInChildren<Text>().text = no;

            yesButton.onClick.RemoveAllListeners();
            yesButton.onClick.AddListener(() =>
            {
                if (window.isVisible == false)
                    return;

                SetEnabledWhileActive(true);
                yesCallback(this);
                window.Hide();
            });

            noButton.onClick.RemoveAllListeners();
            noButton.onClick.AddListener(() =>
            {
                if (window.isVisible == false)
                    return;

                SetEnabledWhileActive(true);
                noCallback(this);
                window.Hide();
            });
        }

        /// <summary>
        /// Show the dialog.
        /// <b>Don't forget to call dialog.Hide(); when you want to hide it, this is not done auto. just in case you want to animate it instead of hide it.</b>
        /// </summary>
        /// <param name="title">The title of the dialog. Note that {0} is the item ID and {1} is the item name.</param>
        /// <param name="description">The description of the dialog. Note that {0} is the item ID and {1} is the item name.</param>
        /// <param name="yes">The name of the yes button.</param>
        /// <param name="no">The name of the no button.</param>
        /// <param name="item">
        /// You can add an item, if you're confirming something for that item. This allows you to use {0} for the title and {1} for the description inside the title and description variables of the dialog.
        /// An example:
        ///
        /// ShowDialog("Are you sure you want to drop {0}?", "{0} sure seems valuable..", ...etc..);
        /// This will show the item name at location {0} and the description at location {1}.
        /// </param>
        /// <param name="yesCallback"></param>
        /// <param name="noCallback"></param>
        public virtual void ShowDialog(string title, string description, string yes, string no, InventoryItemBase item, InventoryUIDialogCallback yesCallback, InventoryUIDialogCallback noCallback)
        {
            ShowDialog(string.Format(string.Format(title, item.name, item.description)), string.Format(description, item.name, item.description), yes, no, yesCallback, noCallback);
        }
    }
}
5、其他补充
前言
Inventory Pro插件中的基于预设(Prefab)的泛型对象池实现
本文讲的就是基于UI的局部(从某个Scene,到某个Dialog)对象池,范围不同,需要的对象池就有不同的要求。
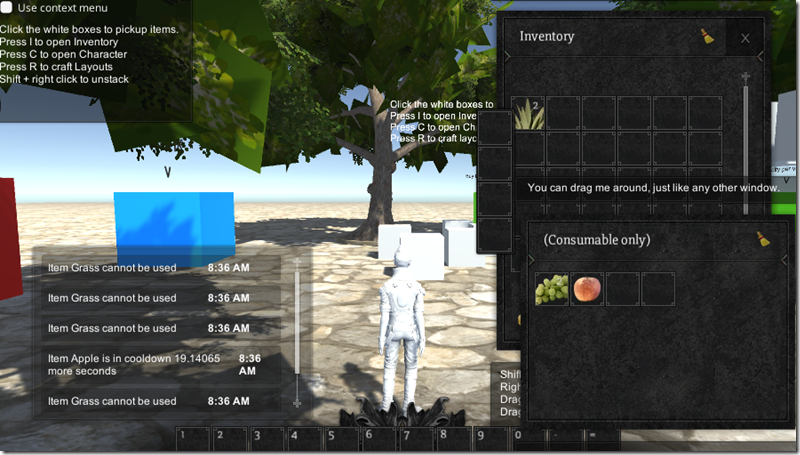
演示
左下角信息提示窗口NoticeUI中的信息提示比较多时,具有滚动条和超出自动隐藏的功能,就是通过对象池技术实现,从而提高性能和效率
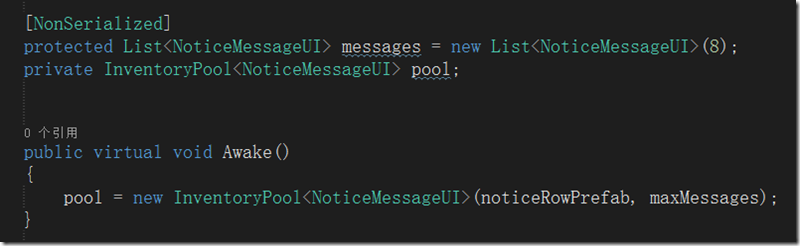
下面代码是在NoticeUI中 设置对象池的相关代码
分析
老规矩先上类图,不过其实没有什么好分析的,就是对象池的标准接口,取Get和回收这里是Destroy。还有出现两个类一个是泛型的,一个是非泛型的,至于为什么是结构体而不是类,这块我也没有深究。
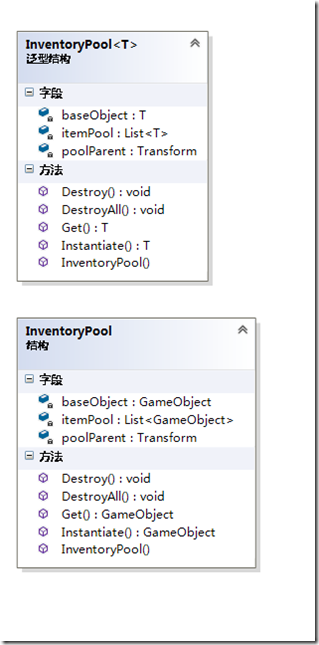
下面我们仔细分析下这个UI对象池的类,首先看下类的
声明和构造函数
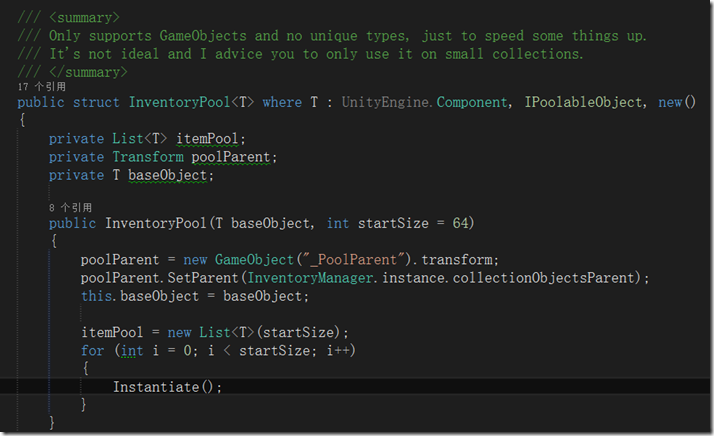
1、类注释写的很清楚,告诉你这个对象池支持的对象是GameObjects,限制了必须是Unity3D的类型,该类的功能仅为了提高速度。
它并不完善,建议使用小规模的数据。明白了这点很重要,也就是我在背景里说的每种场景使用的对象池是不一样的,一定不能混用和滥用。
2、泛型结构体的声明,这里我们T限定了类型是UnityEngine.Component也就是Unity3D的组件基类,所以为什么注释里面说了只适合GameObjects了,剩下的就是new()关键字约束,确保类是可以new的。IPoolableObject是面向接口的一种实现约束(框架层考虑就是不一样),实际是强制要求在代码级别做好对象池类的管理。
3、构造函数是用了缺省值StatSize64很贴心,下面三句初始化代码,创建了一个_PoolParent GameObject,并挂到了全局的组件树上,我觉得的这点特别重要,这使得在Edit下可以看见池对象的动态创建和状态,特别是让组件树特别清晰,点个赞,第三句,也就是保存了泛型对象
poolParent = new GameObject("_PoolParent").transform;
poolParent.SetParent(InventoryManager.instance.collectionObjectsParent);
this.baseObject = baseObject;
泛型池对象的初始化
池对象初始化创建
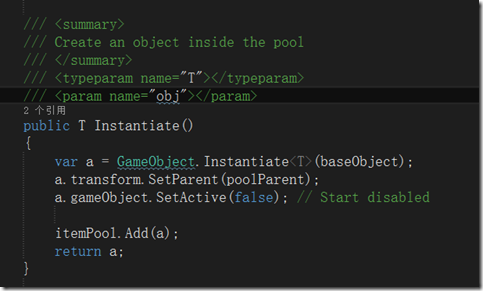
泛型池对象的初始化其实是调用了GameObject.Instantiate的泛型方法重载,也就是深克隆。这也就是解释了为什么可以完成对于预设(Prefab)的对象池了,然后设置其父对象,挂接到组件树上,最后调用gameObject.SetActivie(false)让UI对象不可见,其实是一个开关。
池对象的获取和销毁
池对象的获取
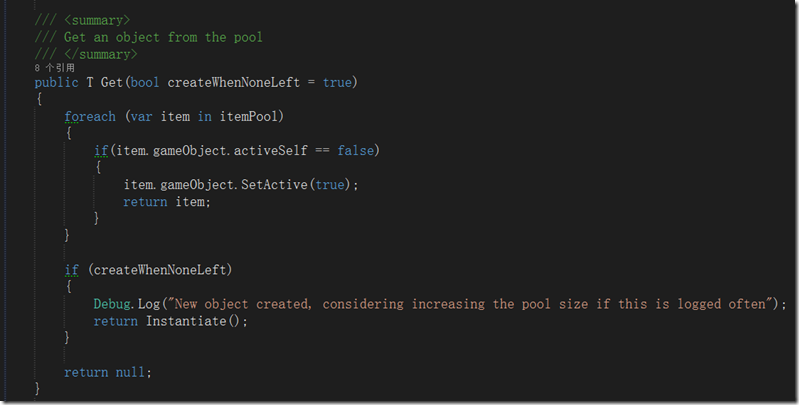
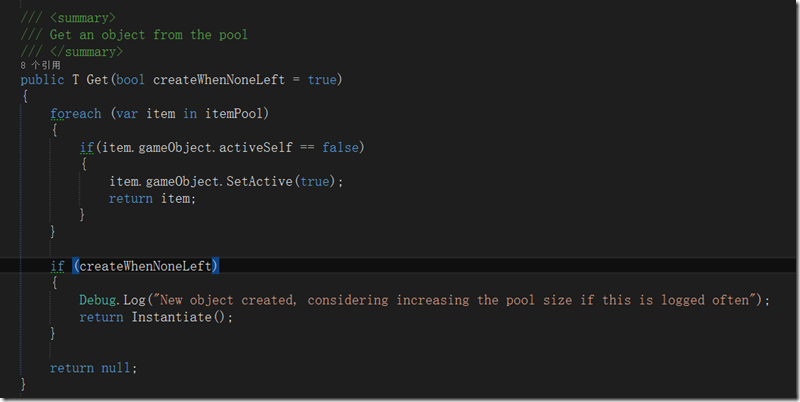
有了创建时候的开关,获取UI池对象就可以通过这个开关来判断对象是否已经使用了,然后如果active是false的,通过设置成true打开就完成了池对象的创建,这里createWhenNoneLeft参数默认是true,用来解决当构造函数预设池对象都被使用后如何扩展的问题,这里其实很简单了当所有预设都用完了直接再创建一个即可,多亏了c#的动态数组List,不然还要像c++那样动态调整数组的大小。池对象的销毁
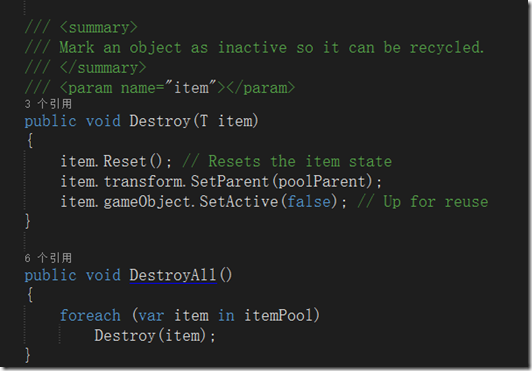
对象的销毁其实是回收,这里对象最简单的一步就是SetActive(false)也就是把UI开关给关上,让对象不可见。其实重要的是调用IPoolObject接口的Reset函数实现,进行一些善后工作,让然也要通过 transform.SetParent()进行组件树的重置。所有对象的销毁和回收就很简单了只需要循环遍历销毁即可。
核心代码
using System;
using System.Collections.Generic;
using Devdog.InventorySystem;
using Devdog.InventorySystem.Models;
using UnityEngine;

namespace Devdog.InventorySystem
{
    /// <summary>
    /// Only supports GameObjects and no unique types, just to speed some things up.
    /// It's not ideal and I advice you to only use it on small collections.
    /// </summary>
    public struct InventoryPool<T> where T : UnityEngine.Component, IPoolableObject, new()
    {
        private List<T> itemPool;
        private Transform poolParent;
        private T baseObject;

        public InventoryPool(T baseObject, int startSize = 64)
        {
            poolParent = new GameObject("_PoolParent").transform;
            poolParent.SetParent(InventoryManager.instance.collectionObjectsParent);
            this.baseObject = baseObject;

            itemPool = new List<T>(startSize);
            for (int i = 0; i < startSize; i++)
            {
                Instantiate();
            }
        }


        /// <summary>
        /// Create an object inside the pool
        /// </summary>
        /// <typeparam name="T"></typeparam>
        /// <param name="obj"></param>
        public T Instantiate()
        {
            var a = GameObject.Instantiate<T>(baseObject);
            a.transform.SetParent(poolParent);
            a.gameObject.SetActive(false); // Start disabled

            itemPool.Add(a);
            return a;
        }


        /// <summary>
        /// Get an object from the pool
        /// </summary>
        public T Get(bool createWhenNoneLeft = true)
        {
            foreach (var item in itemPool)
            {
                if(item.gameObject.activeSelf == false)
                {
                    item.gameObject.SetActive(true);
                    return item;
                }
            }

            if (createWhenNoneLeft)
            {
                Debug.Log("New object created, considering increasing the pool size if this is logged often");
                return Instantiate();
            }

            return null;
        }


        /// <summary>
        /// Mark an object as inactive so it can be recycled.
        /// </summary>
        /// <param name="item"></param>
        public void Destroy(T item)
        {
            item.Reset(); // Resets the item state
            item.transform.SetParent(poolParent);
            item.gameObject.SetActive(false); // Up for reuse
        }

        public void DestroyAll()
        {
            foreach (var item in itemPool)
                Destroy(item);
        }
    }

    /// <summary>
    /// InventoryPool only good for gameObjects
    /// </summary>
    public struct InventoryPool
    {
        private List<GameObject> itemPool;
        private Transform poolParent;
        private GameObject baseObject;

        public InventoryPool(GameObject baseObject, int startSize = 64)
        {
            poolParent = new GameObject("_PoolParent").transform;
            poolParent.SetParent(InventoryManager.instance.collectionObjectsParent);
            this.baseObject = baseObject;

            itemPool = new List<GameObject>(startSize);
            for (int i = 0; i < startSize; i++)
            {
                Instantiate();
            }
        }


        /// <summary>
        /// Create an object inside the pool
        /// </summary>
        /// <typeparam name="T"></typeparam>
        /// <param name="obj"></param>
        public GameObject Instantiate()
        {
            GameObject a = null;
            if (baseObject != null)
                a = GameObject.Instantiate<GameObject>(baseObject);
            else
                a = new GameObject();

            a.transform.SetParent(poolParent);
            a.gameObject.SetActive(false); // Start disabled

            itemPool.Add(a);
            return a;
        }


        /// <summary>
        /// Get an object from the pool
        /// </summary>
        public GameObject Get(bool createWhenNoneLeft = true)
        {
            foreach (var item in itemPool)
            {
                if (item.gameObject.activeInHierarchy == false)
                {
                    item.gameObject.SetActive(true);
                    return item;
                }
            }

            if (createWhenNoneLeft)
            {
                Debug.Log("New object created, considering increasing the pool size if this is logged often");
                return Instantiate();
            }

            return null;
        }


        /// <summary>
        /// Mark an object as inactive so it can be recycled.
        /// </summary>
        /// <param name="item"></param>
        public void Destroy(GameObject item)
        {
            item.transform.SetParent(poolParent);
            item.gameObject.SetActive(false); // Up for reuse
        }


        public void DestroyAll()
        {
            foreach (var item in itemPool)
                Destroy(item);
        }
    }
}
6、Inventory Pro学习总结
背景
游戏中的UI系统或者叫做GUI窗口系统主要有:主要装备窗口(背包,角色窗口也是一种特殊窗口)、确实提示窗口(如购买确认)、信息提示窗口(一遍没有按钮,ContexntMenu)和特殊窗口(聊天记录或者技能树),前篇已经介绍分析了Inventory Pro确认提示窗口的设计和实现方式,这篇主要讲一下信息提示窗口的实现。本以为提示窗口是比较简单的,毕竟没有按钮事件交互的问题,但是分析了下源代码还是让我有些惊讶,插件作者在提示窗口中考虑到了性能问题,由于本人一直在PC端开发程序没有移动端的经验,所以在移动端对于性能优化还是比较关注的。
插件效果及使用
左下角即为信息提示窗口NoticeUI,当信息提示比较多时,具有滚动条和超出自动隐藏的功能,是通过对象池技术实现,提高性能和效率

通过拖拽的方式创建好UI界面,红框中我们看到了组件树的结构和类型
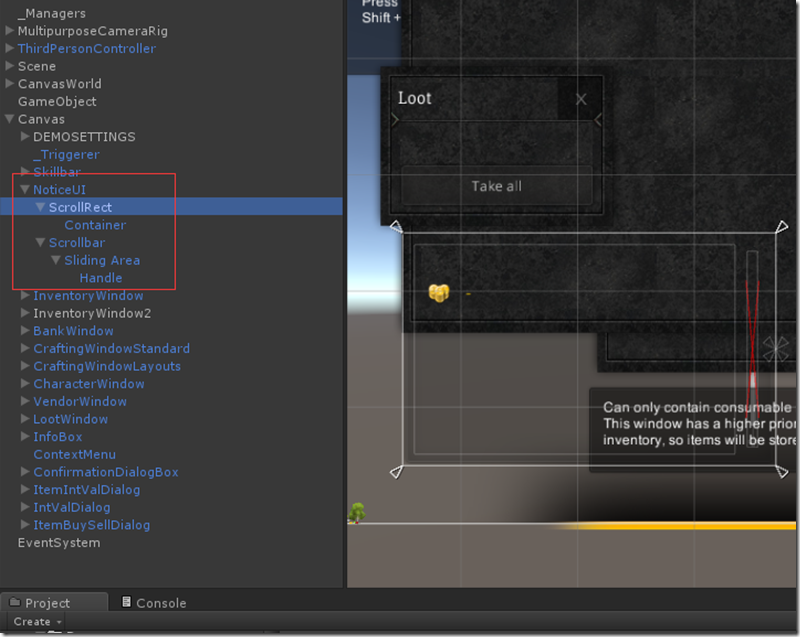
在NoticeUI上绑定NoticeUI脚本,设置好每一行显示的预设NoticeMessageUI,ScrollRect等相关属性,基本就已经完成了关于信息提示窗口的实现了

源代码分析
类图分析
经过这段时间的学习,我真的慢慢爱上了VS的类图分析了,希望新手同学也能习惯这点。VS的类图很强大能自动生成关联关系和继承接口等信息,是特别舒心的类图工具。
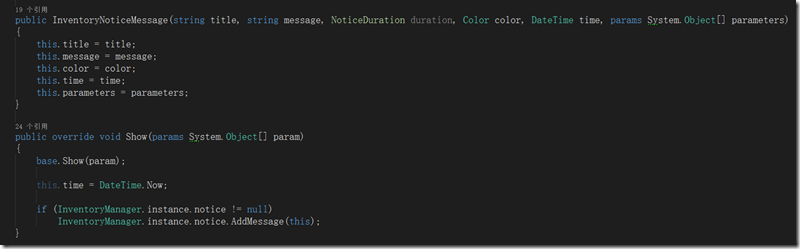
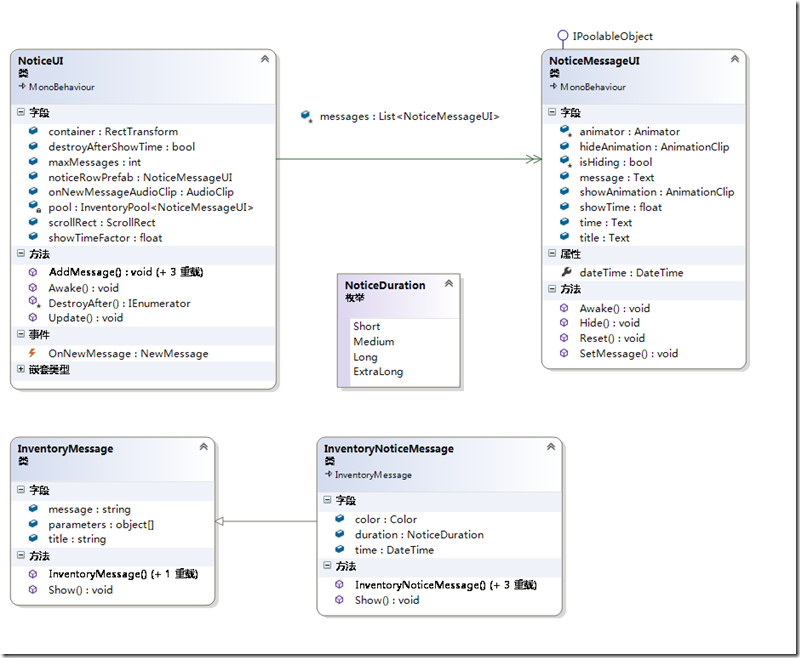
A、先看下Message模型(Model)类,InventoryNoticeMessage继承了InventoryMessage,继承后拥有的字段有,消息,标题,颜色,消失延时,时间看到这些字段我们大致也可以猜到信息提示窗口有哪些功能了吧(其实是可以扩展的),这里需要重点关注下Show方法(后面源码分析再表述)
B、NoticeUI和NoticeMessageUI都是MonoBehavior的子类,也就是说他们都是组件,分析其字段有具有ScrollRect和Text说明他们都是需要和UI进行绑定的。这里特变关注下VS使用双箭头表示组合关联,所以NoticeUI组合关联NoticeMessageUI,而继承了IPoolableObject接口顾名思义它具有入对象池的能力,也就是可以加入对象池,我们也看到了NoticeUI有一个InventoryPool,我们大概可以猜到NoticeUI中List和InevntoryPool猥琐的关系。
调用流程分析
调用的流程其实可以画一个流程图,这里只是简单的描述一下
- 1、InventoryNoticeMessage.Show()
- 2、 全局NoticeUI.AddMessage()
- 3、InventoryPool池对象NoticeMessageUI.SetMessage()
- 4、NoticMessageUI通过setAictive(true)进行显示
- 5、NoticeUI.Update,通过循环调用NoticMessageUI的showTime.deltaTime做控制隐藏
1、InventoryNoticeMessage.Show()
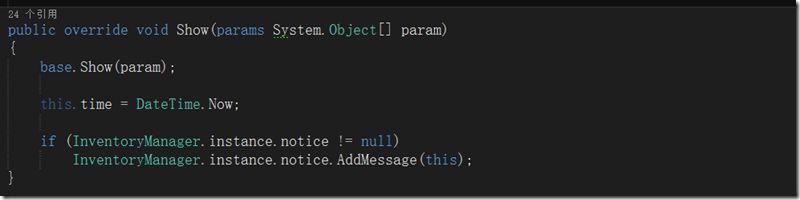
通过以上代码我们看的出来其实notice也是一个全局的UI,所以才可以通过单例来访问,应该是有固定区域的。
2、 全局NoticeUI.AddMessage()
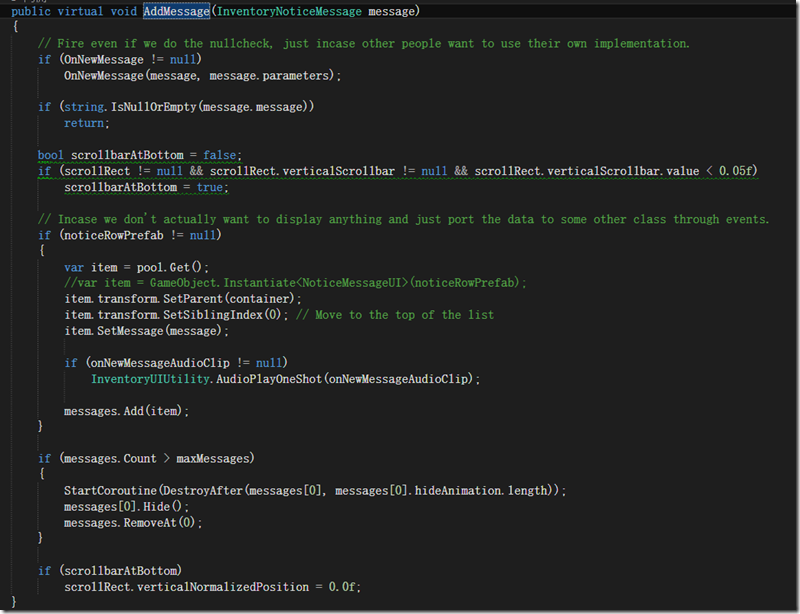
NoticeUI中的AddMessage就比较复杂了,主要要处理几个事情A、事件触发;B、滚动处理;C、对象池获取NoticeMessageUI并激活显示D、List和InventoryPool好基友的处理(对象池的回收及引用数组的移除)
3、InventoryPool池对象NoticeMessageUI.SetMessage()
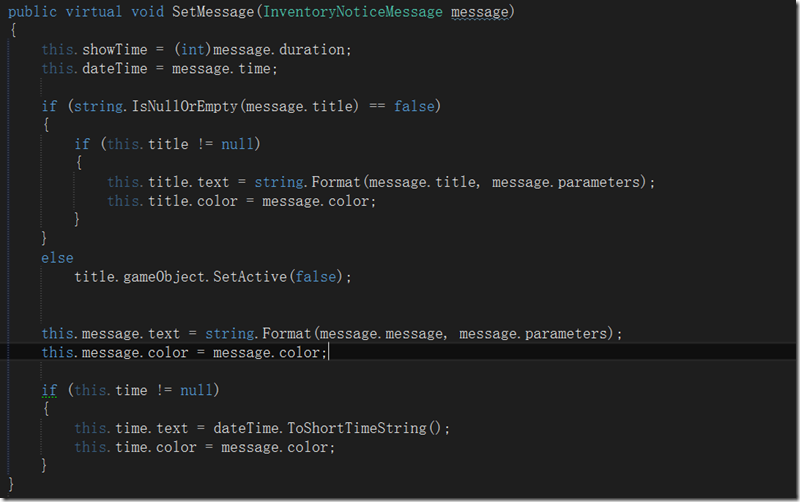
SetMessage() 就像它的方法名一样好像什么也没有做的样子,只是设置了一些简单字段的内容以及显示时间,实际的显示激活却是在4对象池获取的时候置位的。
4、NoticMessageUI通过setAictive(true)进行显示
对象池的使用和回收是通过池对象的activeSelf属性来确定的,这个开关有一箭双雕的意思,既通过它来控制对象池的使用和回收,又用于控制UI对象的演示与否。
5、NoticeUI.Update,通过循环调用NoticMessageUI的showTime.deltaTime控制隐藏

通过显示时间来控制信息的隐藏
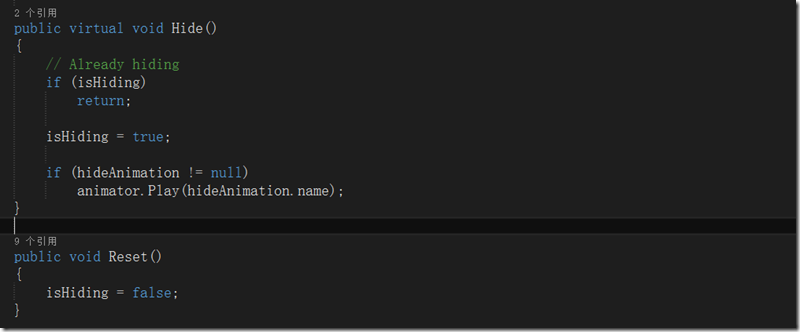
隐藏函数使用了动画效果,由于动画是有显示时间的,所以通过一个字段isHiding做为状态判断。
核心源码
NoticeUI
using UnityEngine;
using UnityEngine.EventSystems;
using System;
using System.Collections;
using System.Collections.Generic;
using Devdog.InventorySystem.Models;
using Devdog.InventorySystem.UI.Models;
using UnityEngine.UI;

namespace Devdog.InventorySystem
{
    /// <summary>
    /// How long a message should last.
    /// Parse to int to get time in seconds.
    /// </summary>
    public enum NoticeDuration
    {
        Short = 2,
        Medium = 4,
        Long = 6,
        ExtraLong = 8
    }


    [AddComponentMenu("InventorySystem/Windows/Notice")]
    public partial class NoticeUI : MonoBehaviour
    {
        #region Events

        /// <summary>
        /// Note that it also fired when message == null or empty, even though the system won't process the message.
        /// This is because someone might want to implement their own system and just use the event as a link to connect the 2 systems.
        /// </summary>
        /// <param name="title"></param>
        /// <param name="message"></param>
        /// <param name="duration"></param>
        /// <param name="parameters"></param>
        public delegate void NewMessage(InventoryNoticeMessage message, params System.Object[] parameters);
        public event NewMessage OnNewMessage;

        #endregion

        [Header("General")]
        public NoticeMessageUI noticeRowPrefab;

        [InventoryRequired]
        public RectTransform container;

        public ScrollRect scrollRect;
        public AudioClip onNewMessageAudioClip;


        /// <summary>
        /// When more messages come in the last items will be removed.
        /// </summary>
        [Header("Messages")]
        public int maxMessages = 50;

        /// <summary>
        /// Remove the item after the show time has passed, if false, the item will continue to exist.
        /// </summary>
        public bool destroyAfterShowTime = true;

        /// <summary>
        /// All show times are multiplied by this value, if you want to increase all times, use this value.
        /// </summary>
        public float showTimeFactor = 1.0f;

        [NonSerialized]
        protected List<NoticeMessageUI> messages = new List<NoticeMessageUI>(8);
        private InventoryPool<NoticeMessageUI> pool;


        public virtual void Awake()
        {
            pool = new InventoryPool<NoticeMessageUI>(noticeRowPrefab, maxMessages);
        }

        public virtual void Update()
        {
            if (destroyAfterShowTime == false)
                return;

            foreach (var message in messages)
            {
                message.showTime -= Time.deltaTime;
                if (message.showTime < 0.0f)
                {
                    message.Hide();
                }
            }
        }

        public virtual void AddMessage(string message, NoticeDuration duration = NoticeDuration.Medium)
        {
            AddMessage(message, duration);
        }

        public virtual void AddMessage(string message, NoticeDuration duration, params System.Object[] parameters)
        {
            AddMessage(string.Empty, message, duration, parameters);
        }

        public virtual void AddMessage(string title, string message, NoticeDuration duration, params System.Object[] parameters)
        {
            AddMessage(new InventoryNoticeMessage(title, message, duration));
        }

        public virtual void AddMessage(InventoryNoticeMessage message)
        {
            // Fire even if we do the nullcheck, just incase other people want to use their own implementation.
            if (OnNewMessage != null)
                OnNewMessage(message, message.parameters);

            if (string.IsNullOrEmpty(message.message))
                return;

            bool scrollbarAtBottom = false;
            if (scrollRect != null && scrollRect.verticalScrollbar != null && scrollRect.verticalScrollbar.value < 0.05f)
                scrollbarAtBottom = true;

            // Incase we don't actually want to display anything and just port the data to some other class through events.
            if (noticeRowPrefab != null)
            {
                var item = pool.Get();
                //var item = GameObject.Instantiate<NoticeMessageUI>(noticeRowPrefab);
                item.transform.SetParent(container);
                item.transform.SetSiblingIndex(0); // Move to the top of the list
                item.SetMessage(message);

                if (onNewMessageAudioClip != null)
                    InventoryUIUtility.AudioPlayOneShot(onNewMessageAudioClip);

                messages.Add(item);
            }

            if (messages.Count > maxMessages)
            {
                StartCoroutine(DestroyAfter(messages[0], messages[0].hideAnimation.length));
                messages[0].Hide();
                messages.RemoveAt(0);
            }

            if (scrollbarAtBottom)
                scrollRect.verticalNormalizedPosition = 0.0f;
        }

        protected virtual IEnumerator DestroyAfter(NoticeMessageUI item, float time)
        {
            yield return new WaitForSeconds(time);
            pool.Destroy(item);
        }
    }
}
NoticeMessageUI
using System;
using System.Collections;
using System.Collections.Generic;
using Devdog.InventorySystem.Models;
using UnityEngine;
using UnityEngine.UI;

namespace Devdog.InventorySystem.UI.Models
{
    /// <summary>
    /// A single message inside the message displayer
    /// </summary>
    [RequireComponent(typeof(Animator))]
    public partial class NoticeMessageUI : MonoBehaviour, IPoolableObject
    {
        public UnityEngine.UI.Text title;
        public UnityEngine.UI.Text message;
        public UnityEngine.UI.Text time;

        public AnimationClip showAnimation;
        public AnimationClip hideAnimation;

        [HideInInspector]
        public float showTime = 4.0f;

        public DateTime dateTime { get; private set; }

        [NonSerialized]
        protected Animator animator;
        [NonSerialized]
        protected bool isHiding = false; // In the process of hiding

        public virtual void Awake()
        {
            animator = GetComponent<Animator>();

            if (showAnimation != null)
                animator.Play(showAnimation.name);
        }

        public virtual void SetMessage(InventoryNoticeMessage message)
        {
            this.showTime = (int)message.duration;
            this.dateTime = message.time;

            if (string.IsNullOrEmpty(message.title) == false)
            {
                if (this.title != null)
                {
                    this.title.text = string.Format(message.title, message.parameters);
                    this.title.color = message.color;
                }
            }
            else
                title.gameObject.SetActive(false);


            this.message.text = string.Format(message.message, message.parameters);
            this.message.color = message.color;

            if (this.time != null)
            {
                this.time.text = dateTime.ToShortTimeString();
                this.time.color = message.color;
            }
        }

        public virtual void Hide()
        {
            // Already hiding
            if (isHiding)
                return;

            isHiding = true;

            if (hideAnimation != null)
                animator.Play(hideAnimation.name);
        }

        public void Reset()
        {
            isHiding = false;
        }
    }
}
InventoryNoticeMessage
using System;
using System.Collections.Generic;
using System.Threading;
using UnityEngine;

namespace Devdog.InventorySystem.Models
{
    [System.Serializable]
    public partial class InventoryNoticeMessage : InventoryMessage
    {
        public DateTime time;

        public Color color = Color.white;
        public NoticeDuration duration = NoticeDuration.Medium;


        /// <summary>
        /// Required for PlayMaker...
        /// </summary>
        public InventoryNoticeMessage()
        { }

        public InventoryNoticeMessage(string title, string message, NoticeDuration duration, params System.Object[] parameters)
            : this(title, message, duration, Color.white, DateTime.Now, parameters)
        { }

        public InventoryNoticeMessage(string title, string message, NoticeDuration duration, Color color, params System.Object[] parameters)
            : this(title, message, duration, color, DateTime.Now, parameters)
        { }

        public InventoryNoticeMessage(string title, string message, NoticeDuration duration, Color color, DateTime time, params System.Object[] parameters)
        {
            this.title = title;
            this.message = message;
            this.color = color;
            this.time = time;
            this.parameters = parameters;
        }

        public override void Show(params System.Object[] param)
        {
            base.Show(param);

            this.time = DateTime.Now;

            if (InventoryManager.instance.notice != null)
                InventoryManager.instance.notice.AddMessage(this);
        }
    }
}