一、简要介绍
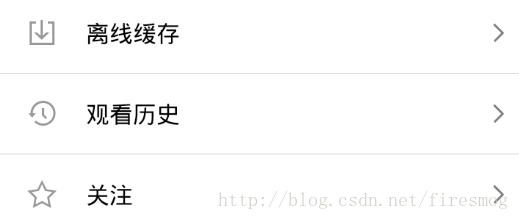
之前写过自定义view与viewgroup但是那里阐述的是写一个可以设置多属性的可以设置响应事件的view,但是很多场景下又有很多不同,比如下图所示的由几个控件组合起来一个自定义控件来实现布局代码复用、逻辑清晰等作用
二、组合控件优势
一般,我们在布局的时候,如果出来多个类似的样式,比如上图的ImagVIew+TextVIew+ImagVIew会出现多次,我们可以有多种写法,比如使用线性布局,将如图所示的布局从上到下一个个堆叠起来。或者使用include来导入一个设置好的布局,且每次都要修改一下属性。很明显,在这里使用自定义布局会高效许多,尤其是复用次数越多,则越高效。
三、自定义组合控件步骤
(1)确定需要用的组件哪些需要自定义属性
在values文件夹下新建attrs.xml,将需要自定义的属性在其中定义。代码示例:
<?xml version="1.0" encoding="utf-8"?>
<resources>
    <!--字体-->
    <attr name="text1" format="string" />
    <!--字体颜色-->
    <attr name="text2" format="string" />
    <!--字体大小-->
    <attr name="titleTextSize" format="dimension" />
     <!--资源名为CustomTitleView-->
    <declare-styleable name="CustomTitleView">
        <attr name="text1" />
        <attr name="text2" />
        <attr name="titleTextSize" />
    </declare-styleable>
</resources>
(2)实现自定义View布局
(3)实现自定义View类,一般继承自某个viewgroup
(4)在布局中引用该view
(5)在activity中使用该view,并设置属性
四、示例demo
本次使用的demo如图所示,效果很简单,两个TextView加一个可以点击的view,点击事件的实现有多种方式哈。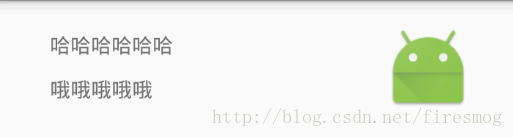
ok,按照如上步骤,先确立属性,两个TextView的text以及TextSize,颜色什么的就不设置了,太多了,反而代码驳杂。代码如下:
<?xml version="1.0" encoding="utf-8"?>
<resources>
    <!--字体-->
    <attr name="text1" format="string" />
    <!--字体颜色-->
    <attr name="text2" format="string" />
    <!--字体大小-->
    <attr name="titleTextSize" format="dimension" />
    <declare-styleable name="CustomTitleView">
        <attr name="text1" />
        <attr name="text2" />
        <attr name="titleTextSize" />
    </declare-styleable>
</resources>
然后自定义view布局:
<?xml version="1.0" encoding="utf-8"?>
<LinearLayout xmlns:android="http://schemas.android.com/apk/res/android"
    android:layout_width="match_parent"
    android:layout_height="match_parent"
    android:orientation="horizontal">
 <RelativeLayout
     android:layout_width="0dp"
     android:layout_weight="1"
     android:layout_height="wrap_content">
     <TextView
         android:id="@+id/tv_tv1"
         android:layout_marginTop="5dp"
         android:layout_marginLeft="20dp"
         android:layout_width="wrap_content"
         android:layout_height="30dp"
         />
     <TextView
         android:id="@+id/tv_tv2"
         android:layout_marginLeft="20dp"
         android:layout_width="wrap_content"
         android:layout_height="30dp"
         android:layout_below="@id/tv_tv1"
       />
 </RelativeLayout>
    <ImageView
        android:id="@+id/iv_click"
        android:onClick="true"
        android:layout_marginTop="10dp"
        android:layout_marginRight="20dp"
        android:layout_gravity="right"
        android:layout_width="60dp"
        android:layout_height="60dp"
        android:background="@mipmap/ic_launcher"/>
</LinearLayout>
然后自定义view,这里继承自Linearlayout,代码如下:
/**
 * Created by firesmog on 2017/3/20.
 */

public class MySwitcher extends LinearLayout {
    private ImageView iv;
    private TextView tv1;

    private TextView tv2;
    //文本1
    private String text1;
    //文本的颜色
    private String  text2;
    //文本的大小
    private int textSize;
    String TAG="TAG";
    //用于下文注释掉的setclicklistener点击事件中(点击事件实现方式一)
    private Context context;
    //用于在activity中获取该imagview来设置点击事件(点击事件实现方式二)
    public ImageView getIv() {
        return iv;
    }
    //在 activity中设置属性text1
     public void setText1(String text1) {
        tv1.setText(text1);
    }
    //在 activity中设置属性text2
    public void setText2(String text2) {
        tv2.setText(text2);
    }
    //获取属性1的text1
     public String getText1() {
            return tv1.getText().toString();
        }
   //获取属性2的text2
     public String getText2() {
            return tv2.getText().toString();
        }
    public MySwitcher(Context context) {
        super(context);
    }
    public MySwitcher(Context context, AttributeSet attrs) {
        super(context, attrs);
        //传入activity的context
        this.context=context;
        View view=LayoutInflater.from(context).inflate(R.layout.myswicther_layout, this);
        tv1= (TextView)view.findViewById(R.id.tv_tv1);
        tv2=(TextView)view.findViewById(R.id.tv_tv2);
        iv=(ImageView)view.findViewById(R.id.iv_click);
       //获取资源类型Array
        TypedArray ta = context.obtainStyledAttributes(attrs, R.styleable.CustomTitleView);
        //从activity布局文件中获取属性1
        String text = ta.getString(R.styleable.CustomTitleView_text1);
        //从activity布局文件中获取属性2
        String textAttr = ta.getString(R.styleable.CustomTitleView_text2);
        Log.i(TAG, "text = " + text + " , textAttr = " + textAttr);
        tv1.setText(text);
        tv2.setText(textAttr);
        ta.recycle();
    }
    //设置点击事件(方式一,提供函数给activity调用)
 /*   public void setclickListener(){
        iv.setOnClickListener(new OnClickListener() {
            @Override
            public void onClick(View v) {
                Toast.makeText(context,"hahahhahah",Toast.LENGTH_LONG).show();
            }
        });
    }
*/
    public MySwitcher(Context context, AttributeSet attrs, int defStyleAttr) {
        super(context, attrs, defStyleAttr);

    }
    @RequiresApi(api = Build.VERSION_CODES.LOLLIPOP)
    public MySwitcher(Context context, AttributeSet attrs, int defStyleAttr, int defStyleRes) {
        super(context, attrs, defStyleAttr, defStyleRes);
    }
}
在activity的布局文件中使用该自定义view
<?xml version="1.0" encoding="utf-8"?>
<RelativeLayout xmlns:android="http://schemas.android.com/apk/res/android"
    xmlns:tools="http://schemas.android.com/tools"
    <!--这里引用前缀为my,res-auto自定义属性,一定要记得添加这句来使用自定义view-->
    xmlns:my="http://schemas.android.com/apk/res-auto"
    android:id="@+id/activity_main"
    android:layout_width="match_parent"
    android:layout_height="match_parent"
    android:paddingBottom="@dimen/activity_vertical_margin"
    android:paddingLeft="@dimen/activity_horizontal_margin"
    android:paddingRight="@dimen/activity_horizontal_margin"
    android:paddingTop="@dimen/activity_vertical_margin"
    tools:context="example.com.testcuston.MainActivity">
    <example.com.testcuston.MySwitcher
        android:id="@+id/my_view"
        android:layout_width="match_parent"
        android:layout_height="match_parent"
        my:text1="哈哈哈哈哈哈"
        my:text2="哦哦哦哦哦"
        my:titleTextSize="30dp"
        >
    </example.com.testcuston.MySwitcher>
</RelativeLayout>
在activity中使用自定义view
public class MainActivity extends AppCompatActivity {
    private MySwitcher my;
    @Override
    protected void onCreate(Bundle savedInstanceState) {
        super.onCreate(savedInstanceState);
        setContentView(R.layout.activity_main);
        my=(MySwitcher)findViewById(R.id.my_view);
        //第二种设置点击事件的方式
        my.getIv().setOnClickListener(new View.OnClickListener() {
            @Override
            public void onClick(View v) {
                Toast.makeText(MainActivity.this,"hahahhahah",Toast.LENGTH_LONG).show();
                //设置属性一text1
                my.setText1("hahhbasfasasfasf");
            }
        });
    }
}
五、总结
本文已经贴出了所有代码,就不再提供源码了,仍然是希望能帮助到需要帮助的人。。。