以下博客转载于:牧野的博客,zhaocj的博客和执剑天涯的博客
这三篇博客可能是最好的了。
霍夫圆变换的基本思路是认为图像上每一个非零像素点都有可能是一个潜在的圆上的一点,跟霍夫线变换一样,也是通过投票,生成累积坐标平面,设置一个累积权重来定位圆。
在笛卡尔坐标系中圆的方程为:

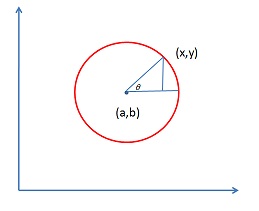
其中(a,b)是圆心,r是半径,也可以表述为:
即
所以在abr组成的三维坐标系中,一个点可以唯一确定一个圆。
而在笛卡尔的xy坐标系中经过某一点的所有圆映射到abr坐标系中就是一条三维的曲线:
经过xy坐标系中所有的非零像素点的所有圆就构成了abr坐标系中很多条三维的曲线。
在xy坐标系中同一个圆上的所有点的圆方程是一样的,它们映射到abr坐标系中的是同一个点,所以在abr坐标系中该点就应该有圆的总像素N0个曲线相交。通过判断abr中每一点的相交(累积)数量,大于一定阈值的点就认为是圆。
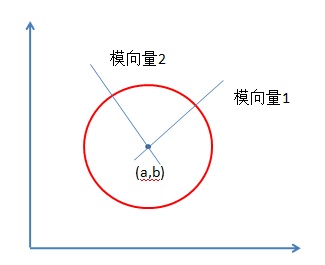
以上是标准霍夫圆变换实现算法,问题是它的累加面试一个三维的空间,意味着比霍夫线变换需要更多的计算消耗。Opencv霍夫圆变换对标准霍夫圆变换做了运算上的优化。它采用的是“霍夫梯度法”。它的检测思路是去遍历累加所有非零点对应的圆心,对圆心进行考量。如何定位圆心呢?圆心一定是在圆上的每个点的模向量上,即在垂直于该点并且经过该点的切线的垂直线上,这些圆上的模向量的交点就是圆心。
霍夫梯度法就是要去查找这些圆心,根据该“圆心”上模向量相交数量的多少,根据阈值进行最终的判断。
以下是Opencv中霍夫圆变换的实现:
-
#include "opencv2/imgproc/imgproc.hpp"
-
#include "opencv2/highgui/highgui.hpp"
-
-
using
namespace cv;
-
using
namespace
std;
-
-
int main( int argc, char* argv[] )
-
{
-
Mat image=imread(argv[
1]);
-
Mat imageGray;
-
cvtColor(image,imageGray,CV_RGB2GRAY);
-
GaussianBlur(imageGray,imageGray,Size(
3,
3),
1,
2);
-
imshow(
"Gaussian Image",imageGray);
-
vector<Vec3f>circles;
-
HoughCircles(imageGray,circles,CV_HOUGH_GRADIENT,
1,
1,
200,
160,
0);
-
for(
int i=
0;i<circles.size();i++)
-
{
-
Point circleCenter(circles[i][0],circles[i][1]);
-
int radius=circles[i][
2];
-
circle(image,circleCenter,radius,Scalar(
0,
0,
255),
3);
//做圆
-
circle(image,circleCenter,
3,Scalar(
255,
0,
0),
3);
//圆心
-
}
-
imshow(
"Circle Image",image);
-
waitKey();
-
}
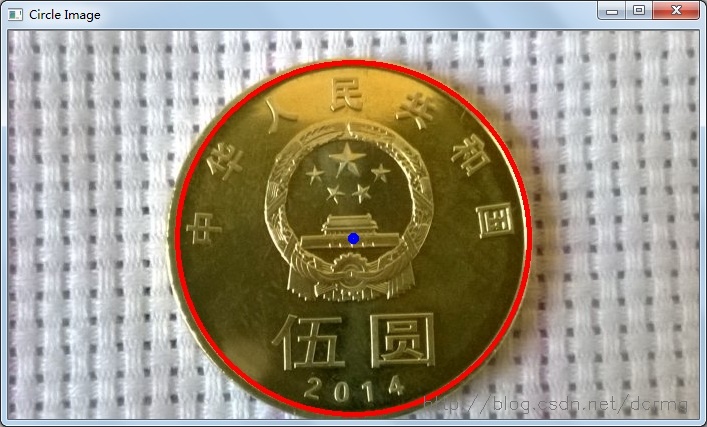
在当前参数下只有一个圆被检测出来,检测效果:
HoughCircles方法对参数比较敏感,很小的改动就可能导致差别很大的检测效果,需要针对不同图像的不同检测用途进行调试。
函数原型:
-
void HoughCircles( InputArray image, OutputArray circles,
-
int method,
double dp,
double minDist,
-
double param1=
100,
double param2=
100,
-
int minRadius=
0,
int maxRadius=
0 );
第一个参数image是输入图像矩阵,要求是灰度图像;
第二个参数 circles是一个包含检测到的圆的信息的向量,向量内第一个元素是圆的横坐标,第二个是纵坐标,第三个是半径大小;
第三个参数 methodmethod是所使用的圆检测算法,目前只有CV_HOUGH_GRADIENT一个可选;
第四个参数 dp是累加面与原始图像相比的分辨率的反比参数,dp=2时累计面分辨率是元素图像的一半,宽高都缩减为原来的一半,dp=1时,两者相同。(关于这个分辨率的概念没有理解透,按道理低分辨率应该意味着更快的检测速度,然而实测恰恰相反)
第五个参数 minDist定义了两个圆心之间的最小距离;
第六个参数param1是Canny边缘检测的高阈值,低阈值被自动置为高阈值的一半;
第七个参数param2是累加平面对是否是圆的判定阈值;
第八和第九个参数定义了检测到的圆的半径的最大值和最小值;
Here I’ll tell you how to detect circles (which are quite important in computer vision application) using a technique similar to the standard Hough transform. This article assumes you know how the Hough transform works, or you’ve understood the previous articles in this series (The Hough Transform).
The parameterization
A circle can be described completely with three pieces of information: the center (a, b) and the radius. (The center consists of two parts, hence a total of three)
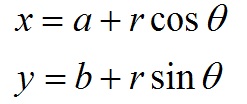
x = a + Rcosθ
y = b + Rsinθ
When the θ varies from 0 to 360, a complete circle of radius R is generated.
So with the Circle Hough Transform, we expect to find triplets of (x, y, R) that are highly probably circles in the image. That is, we want to find three parameters. Thus, the parameter space is 3D… meaning things can get ugly if you don’t tread slowly. Out of memory errors are common even if your programming language uses virtual memory.
So we’ll start simple.
Assuming R is known
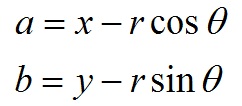
To begin, we’ll start with the assumption that you’re looking for circles of a particular radius, that is, R is known. The equation of each circle is:
x = a + Rcosθ
y = b + Rsinθ
So, every point in the xy space will be equivalent to a circle in the ab space (R isn’t a parameter, we already know it). This is because on rearranging the equations, we get:
a = x1 – Rcosθ
b = y1 – Rsinθ
for a particular point (x1, y1). And θ sweeps from 0 to 360 degrees.
So, the flow of events is something like this:
Load an image
Detect edges and generate a binary image
For every ‘edge’ pixel, generate a circle in the ab space
For every point on the circle in the ab space, cast ‘votes’ in the accumulator cells
The cells with greater number of votes are the centers
When R is not known
When the radius is not known, the simplest solution is to just guess. Assume R = 1, and then run the same algorithm. Then assume R = 2, and run it again. Assume R = 3…. and so on.
Whats the upper limit of R? A safe limit would be the length of the diagonal of the image. No possible circle on the image can have a radius greater than or equal to the diagonal.
图形可以用一些参数进行表示,标准霍夫变换的原理就是把图像空间转换成参数空间(即霍夫空间),例如霍夫变换的直线检测就是在距离-角度空间内进行检测。圆可以表示成:
(x-a)2+(y-b)2=r2 (1)
其中a和b表示圆心坐标,r表示圆半径,因此霍夫变换的圆检测就是在这三个参数组成的三维空间内进行检测。
原则上,霍夫变换可以检测任何形状。但复杂的形状需要的参数就多,霍夫空间的维数就多,因此在程序实现上所需的内存空间以及运行效率上都不利于把标准霍夫变换应用于实际复杂图形的检测中。所以一些改进的霍夫变换就相继提出,它们的基本原理就是尽可能减小霍夫空间的维数。
HoughCircles函数实现了圆形检测,它使用的算法也是改进的霍夫变换——2-1霍夫变换(21HT)。也就是把霍夫变换分为两个阶段,从而减小了霍夫空间的维数。第一阶段用于检测圆心,第二阶段从圆心推导出圆半径。检测圆心的原理是圆心是它所在圆周所有法线的交汇处,因此只要找到这个交点,即可确定圆心,该方法所用的霍夫空间与图像空间的性质相同,因此它仅仅是二维空间。检测圆半径的方法是从圆心到圆周上的任意一点的距离(即半径)是相同,只要确定一个阈值,只要相同距离的数量大于该阈值,我们就认为该距离就是该圆心所对应的圆半径,该方法只需要计算半径直方图,不使用霍夫空间。圆心和圆半径都得到了,那么通过公式1一个圆形就得到了。从上面的分析可以看出,2-1霍夫变换把标准霍夫变换的三维霍夫空间缩小为二维霍夫空间,因此无论在内存的使用上还是在运行效率上,2-1霍夫变换都远远优于标准霍夫变换。但该算法有一个不足之处就是由于圆半径的检测完全取决于圆心的检测,因此如果圆心检测出现偏差,那么圆半径的检测肯定也是错误的。2-1霍夫变换的具体步骤为:
第一阶段:检测圆心
1.1、对输入图像边缘检测;
1.2、计算图形的梯度,并确定圆周线,其中圆周的梯度就是它的法线;
1.3、在二维霍夫空间内,绘出所有图形的梯度直线,某坐标点上累加和的值越大,说明在该点上直线相交的次数越多,也就是越有可能是圆心;
1.4、在霍夫空间的4邻域内进行非最大值抑制;
1.5、设定一个阈值,霍夫空间内累加和大于该阈值的点就对应于圆心。
第二阶段:检测圆半径
2.1、计算某一个圆心到所有圆周线的距离,这些距离中就有该圆心所对应的圆的半径的值,这些半径值当然是相等的,并且这些圆半径的数量要远远大于其他距离值相等的数量;
2.2、设定两个阈值,定义为最大半径和最小半径,保留距离在这两个半径之间的值,这意味着我们检测的圆不能太大,也不能太小;
2.3、对保留下来的距离进行排序;
2.4、找到距离相同的那些值,并计算相同值的数量;
2.5、设定一个阈值,只有相同值的数量大于该阈值,才认为该值是该圆心对应的圆半径;
2.6、对每一个圆心,完成上面的2.1~2.5步骤,得到所有的圆半径。
HoughCircles函数的原型为:
void HoughCircles(InputArray image,OutputArray circles, int method, double dp, double minDist, double param1=100, double param2=100, int minRadius=0,int maxRadius=0 )
image为输入图像,要求是灰度图像
circles为输出圆向量,每个向量包括三个浮点型的元素——圆心横坐标,圆心纵坐标和圆半径
method为使用霍夫变换圆检测的算法,Opencv2.4.9只实现了2-1霍夫变换,它的参数是CV_HOUGH_GRADIENT
dp为第一阶段所使用的霍夫空间的分辨率,dp=1时表示霍夫空间与输入图像空间的大小一致,dp=2时霍夫空间是输入图像空间的一半,以此类推
minDist为圆心之间的最小距离,如果检测到的两个圆心之间距离小于该值,则认为它们是同一个圆心
param1为边缘检测时使用Canny算子的高阈值
param2为步骤1.5和步骤2.5中所共有的阈值
minRadius和maxRadius为所检测到的圆半径的最小值和最大值
HoughCircles函数在sources/modules/imgproc/src/hough.cpp文件内被定义:
-
void cv::HoughCircles( InputArray _image, OutputArray _circles,
-
int method,
double dp,
double min_dist,
-
double param1,
double param2,
-
int minRadius,
int maxRadius )
-
{
-
//定义一段内存
-
Ptr<CvMemStorage> storage = cvCreateMemStorage(STORAGE_SIZE);
-
Mat image = _image.getMat();
//提取输入图像矩阵
-
CvMat c_image = image;
//矩阵转换
-
//调用cvHoughCircles函数
-
CvSeq* seq = cvHoughCircles( &c_image, storage, method,
-
dp, min_dist, param1, param2, minRadius, maxRadius );
-
//把序列转换为矩阵
-
seqToMat(seq, _circles);
-
}
-
CV_IMPL CvSeq*
-
cvHoughCircles
( CvArr* src_image, void* circle_storage,
-
int method,
double dp,
double min_dist,
-
double param1,
double param2,
-
int min_radius,
int max_radius )
-
{
-
CvSeq* result =
0;
-
-
CvMat stub, *img = (CvMat*)src_image;
-
CvMat* mat =
0;
-
CvSeq* circles =
0;
-
CvSeq circles_header;
-
CvSeqBlock circles_block;
-
int circles_max = INT_MAX;
//输出最多圆形的数量,设为无穷多
-
//canny边缘检测中双阈值中的高阈值
-
int canny_threshold = cvRound(param1);
-
//累加器阈值
-
int acc_threshold = cvRound(param2);
-
-
img = cvGetMat( img, &stub );
-
//确保输入图像是灰度图像
-
if( !CV_IS_MASK_ARR(img))
-
CV_Error( CV_StsBadArg,
"The source image must be 8-bit, single-channel" );
-
//内存空间是否存在
-
if( !circle_storage )
-
CV_Error( CV_StsNullPtr,
"NULL destination" );
-
//确保参数的正确性
-
if( dp <=
0 || min_dist <=
0 || canny_threshold <=
0 || acc_threshold <=
0 )
-
CV_Error( CV_StsOutOfRange,
"dp, min_dist, canny_threshold and acc_threshold must be all positive numbers" );
-
//圆的最小半径要大于0
-
min_radius = MAX( min_radius,
0 );
-
//圆的最大半径如果小于0,则设最大半径为图像宽和长度的最大值,
-
//如果最大半径小于最小半径,则设最大半径为最小半径加两个像素的宽度
-
if( max_radius <=
0 )
-
max_radius = MAX( img->rows, img->cols );
-
else
if( max_radius <= min_radius )
-
max_radius = min_radius +
2;
-
-
if( CV_IS_STORAGE( circle_storage ))
-
{
-
circles = cvCreateSeq( CV_32FC3,
sizeof(CvSeq),
-
sizeof(
float)*
3, (CvMemStorage*)circle_storage );
-
}
-
else
if( CV_IS_MAT( circle_storage ))
-
{
-
mat = (CvMat*)circle_storage;
-
-
if( !CV_IS_MAT_CONT( mat->type ) || (mat->rows !=
1 && mat->cols !=
1) ||
-
CV_MAT_TYPE(mat->type) != CV_32FC3 )
-
CV_Error( CV_StsBadArg,
-
"The destination matrix should be continuous and have a single row or a single column" );
-
-
circles = cvMakeSeqHeaderForArray( CV_32FC3,
sizeof(CvSeq),
sizeof(
float)*
3,
-
mat->data.ptr, mat->rows + mat->cols -
1, &circles_header, &circles_block );
-
circles_max = circles->total;
-
cvClearSeq( circles );
-
}
-
else
-
CV_Error( CV_StsBadArg,
"Destination is not CvMemStorage* nor CvMat*" );
-
//选择哪种算法检测圆,目前只有2-1霍夫变换
-
switch( method )
-
{
-
case CV_HOUGH_GRADIENT:
-
//调用icvHoughCirclesGradient函数
-
icvHoughCirclesGradient( img, (
float)dp, (
float)min_dist,
-
min_radius, max_radius, canny_threshold,
-
acc_threshold, circles, circles_max );
-
break;
-
default:
-
CV_Error( CV_StsBadArg,
"Unrecognized method id" );
-
}
-
-
if( mat )
-
{
-
if( mat->cols > mat->rows )
-
mat->cols = circles->total;
-
else
-
mat->rows = circles->total;
-
}
-
else
-
result = circles;
-
//输出圆
-
return result;
-
}
-
static void
-
icvHoughCirclesGradient
( CvMat* img, float dp, float min_dist,
-
int min_radius, int max_radius,
-
int canny_threshold, int acc_threshold,
-
CvSeq* circles, int circles_max )
-
{
-
//为了提高运算精度,定义一个数值的位移量
-
const
int SHIFT =
10, ONE =
1 << SHIFT;
-
//定义水平梯度和垂直梯度矩阵的地址指针
-
cv::Ptr<CvMat> dx, dy;
-
//定义边缘图像、累加器矩阵和半径距离矩阵的地址指针
-
cv::Ptr<CvMat> edges, accum, dist_buf;
-
//定义排序向量
-
std::
vector<
int> sort_buf;
-
cv::Ptr<CvMemStorage> storage;
-
-
int x, y, i, j, k, center_count, nz_count;
-
//事先计算好最小半径和最大半径的平方
-
float min_radius2 = (
float)min_radius*min_radius;
-
float max_radius2 = (
float)max_radius*max_radius;
-
int rows, cols, arows, acols;
-
int astep, *adata;
-
float* ddata;
-
//nz表示圆周序列,centers表示圆心序列
-
CvSeq *nz, *centers;
-
float idp, dr;
-
CvSeqReader reader;
-
//创建一个边缘图像矩阵
-
edges = cvCreateMat( img->rows, img->cols, CV_8UC1 );
-
//第一阶段
-
//步骤1.1,用canny边缘检测算法得到输入图像的边缘图像
-
cvCanny( img, edges, MAX(canny_threshold/
2,
1), canny_threshold,
3 );
-
//创建输入图像的水平梯度图像和垂直梯度图像
-
dx = cvCreateMat( img->rows, img->cols, CV_16SC1 );
-
dy = cvCreateMat( img->rows, img->cols, CV_16SC1 );
-
//步骤1.2,用Sobel算子法计算水平梯度和垂直梯度
-
cvSobel( img, dx,
1,
0,
3 );
-
cvSobel( img, dy,
0,
1,
3 );
-
/确保累加器矩阵的分辨率不小于
1
-
if( dp <
1.f )
-
dp =
1.f;
-
//分辨率的倒数
-
idp =
1.f/dp;
-
//根据分辨率,创建累加器矩阵
-
accum = cvCreateMat( cvCeil(img->rows*idp)+
2, cvCeil(img->cols*idp)+
2, CV_32SC1 );
-
//初始化累加器为0
-
cvZero(accum);
-
//创建两个序列,
-
storage = cvCreateMemStorage();
-
nz = cvCreateSeq( CV_32SC2,
sizeof(CvSeq),
sizeof(CvPoint), storage );
-
centers = cvCreateSeq( CV_32SC1,
sizeof(CvSeq),
sizeof(
int), storage );
-
-
rows = img->rows;
//图像的高
-
cols = img->cols;
//图像的宽
-
arows = accum->rows -
2;
//累加器的高
-
acols = accum->cols -
2;
//累加器的宽
-
adata = accum->data.i;
//累加器的地址指针
-
astep = accum->step/
sizeof(adata[
0]); /累加器的步长
-
// Accumulate circle evidence for each edge pixel
-
//步骤1.3,对边缘图像计算累加和
-
for( y =
0; y < rows; y++ )
-
{
-
//提取出边缘图像、水平梯度图像和垂直梯度图像的每行的首地址
-
const uchar* edges_row = edges->data.ptr + y*edges->step;
-
const
short* dx_row = (
const
short*)(dx->data.ptr + y*dx->step);
-
const
short* dy_row = (
const
short*)(dy->data.ptr + y*dy->step);
-
-
for( x =
0; x < cols; x++ )
-
{
-
float vx, vy;
-
int sx, sy, x0, y0, x1, y1, r;
-
CvPoint pt;
-
//当前的水平梯度值和垂直梯度值
-
vx = dx_row[x];
-
vy = dy_row[x];
-
//如果当前的像素不是边缘点,或者水平梯度值和垂直梯度值都为0,则继续循环。因为如果满足上面条件,该点一定不是圆周上的点
-
if( !edges_row[x] || (vx ==
0 && vy ==
0) )
-
continue;
-
//计算当前点的梯度值
-
float mag =
sqrt(vx*vx+vy*vy);
-
assert( mag >=
1 );
-
//定义水平和垂直的位移量
-
sx = cvRound((vx*idp)*ONE/mag);
-
sy = cvRound((vy*idp)*ONE/mag);
-
//把当前点的坐标定位到累加器的位置上
-
x0 = cvRound((x*idp)*ONE);
-
y0 = cvRound((y*idp)*ONE);
-
// Step from min_radius to max_radius in both directions of the gradient
-
//在梯度的两个方向上进行位移,并对累加器进行投票累计
-
for(
int k1 =
0; k1 <
2; k1++ )
-
{
-
//初始一个位移的启动
-
//位移量乘以最小半径,从而保证了所检测的圆的半径一定是大于最小半径
-
x1 = x0 + min_radius * sx;
-
y1 = y0 + min_radius * sy;
-
//在梯度的方向上位移
-
// r <= max_radius保证了所检测的圆的半径一定是小于最大半径
-
for( r = min_radius; r <= max_radius; x1 += sx, y1 += sy, r++ )
-
{
-
int x2 = x1 >> SHIFT, y2 = y1 >> SHIFT;
-
//如果位移后的点超过了累加器矩阵的范围,则退出
-
if( (
unsigned)x2 >= (
unsigned)acols ||
-
(
unsigned)y2 >= (
unsigned)arows )
-
break;
-
//在累加器的相应位置上加1
-
adata[y2*astep + x2]++;
-
}
-
//把位移量设置为反方向
-
sx = -sx; sy = -sy;
-
}
-
//把输入图像中的当前点(即圆周上的点)的坐标压入序列圆周序列nz中
-
pt.x = x; pt.y = y;
-
cvSeqPush( nz, &pt );
-
}
-
}
-
//计算圆周点的总数
-
nz_count = nz->total;
-
//如果总数为0,说明没有检测到圆,则退出该函数
-
if( !nz_count )
-
return;
-
//Find possible circle centers
-
//步骤1.4和1.5,遍历整个累加器矩阵,找到可能的圆心
-
for( y =
1; y < arows -
1; y++ )
-
{
-
for( x =
1; x < acols -
1; x++ )
-
{
-
int base = y*(acols+
2) + x;
-
//如果当前的值大于阈值,并在4邻域内它是最大值,则该点被认为是圆心
-
if( adata[base] > acc_threshold &&
-
adata[base] > adata[base
-1] && adata[base] > adata[base+
1] &&
-
adata[base] > adata[base-acols
-2] && adata[base] > adata[base+acols+
2] )
-
//把当前点的地址压入圆心序列centers中
-
cvSeqPush(centers, &base);
-
}
-
}
-
//计算圆心的总数
-
center_count = centers->total;
-
//如果总数为0,说明没有检测到圆,则退出该函数
-
if( !center_count )
-
return;
-
//定义排序向量的大小
-
sort_buf.resize( MAX(center_count,nz_count) );
-
//把圆心序列放入排序向量中
-
cvCvtSeqToArray( centers, &sort_buf[
0] );
-
//对圆心按照由大到小的顺序进行排序
-
//它的原理是经过icvHoughSortDescent32s函数后,以sort_buf中元素作为adata数组下标,adata中的元素降序排列,即adata[sort_buf[0]]是adata所有元素中最大的,adata[sort_buf[center_count-1]]是所有元素中最小的
-
icvHoughSortDescent32s( &sort_buf[
0], center_count, adata );
-
//清空圆心序列
-
cvClearSeq( centers );
-
//把排好序的圆心重新放入圆心序列中
-
cvSeqPushMulti( centers, &sort_buf[
0], center_count );
-
//创建半径距离矩阵
-
dist_buf = cvCreateMat(
1, nz_count, CV_32FC1 );
-
//定义地址指针
-
ddata = dist_buf->data.fl;
-
-
dr = dp;
//定义圆半径的距离分辨率
-
//重新定义圆心之间的最小距离
-
min_dist = MAX( min_dist, dp );
-
//最小距离的平方
-
min_dist *= min_dist;
-
// For each found possible center
-
// Estimate radius and check support
-
//按照由大到小的顺序遍历整个圆心序列
-
for( i =
0; i < centers->total; i++ )
-
{
-
//提取出圆心,得到该点在累加器矩阵中的偏移量
-
int ofs = *(
int*)cvGetSeqElem( centers, i );
-
//得到圆心在累加器中的坐标位置
-
y = ofs/(acols+
2);
-
x = ofs - (y)*(acols+
2);
-
//Calculate circle's center in pixels
-
//计算圆心在输入图像中的坐标位置
-
float cx = (
float)((x +
0.5f)*dp), cy = (
float)(( y +
0.5f )*dp);
-
float start_dist, dist_sum;
-
float r_best =
0;
-
int max_count =
0;
-
// Check distance with previously detected circles
-
//判断当前的圆心与之前确定作为输出的圆心是否为同一个圆心
-
for( j =
0; j < circles->total; j++ )
-
{
-
//从序列中提取出圆心
-
float* c = (
float*)cvGetSeqElem( circles, j );
-
//计算当前圆心与提取出的圆心之间的距离,如果两者距离小于所设的阈值,则认为两个圆心是同一个圆心,退出循环
-
if( (c[
0] - cx)*(c[
0] - cx) + (c[
1] - cy)*(c[
1] - cy) < min_dist )
-
break;
-
}
-
//如果j < circles->total,说明当前的圆心已被认为与之前确定作为输出的圆心是同一个圆心,则抛弃该圆心,返回上面的for循环
-
if( j < circles->total )
-
continue;
-
// Estimate best radius
-
//第二阶段
-
//开始读取圆周序列nz
-
cvStartReadSeq( nz, &reader );
-
for( j = k =
0; j < nz_count; j++ )
-
{
-
CvPoint pt;
-
float _dx, _dy, _r2;
-
CV_READ_SEQ_ELEM( pt, reader );
-
_dx = cx - pt.x; _dy = cy - pt.y;
-
//步骤2.1,计算圆周上的点与当前圆心的距离,即半径
-
_r2 = _dx*_dx + _dy*_dy;
-
//步骤2.2,如果半径在所设置的最大半径和最小半径之间
-
if(min_radius2 <= _r2 && _r2 <= max_radius2 )
-
{
-
//把半径存入dist_buf内
-
ddata[k] = _r2;
-
sort_buf[k] = k;
-
k++;
-
}
-
}
-
//k表示一共有多少个圆周上的点
-
int nz_count1 = k, start_idx = nz_count1 -
1;
-
//nz_count1等于0也就是k等于0,说明当前的圆心没有所对应的圆,意味着当前圆心不是真正的圆心,所以抛弃该圆心,返回上面的for循环
-
if( nz_count1 ==
0 )
-
continue;
-
dist_buf->cols = nz_count1;
//得到圆周上点的个数
-
cvPow( dist_buf, dist_buf,
0.5 );
//求平方根,得到真正的圆半径
-
//步骤2.3,对圆半径进行排序
-
icvHoughSortDescent32s( &sort_buf[
0], nz_count1, (
int*)ddata );
-
-
dist_sum = start_dist = ddata[sort_buf[nz_count1
-1]];
-
//步骤2.4
-
for( j = nz_count1 -
2; j >=
0; j-- )
-
{
-
float d = ddata[sort_buf[j]];
-
-
if( d > max_radius )
-
break;
-
//d表示当前半径值,start_dist表示上一次通过下面if语句更新后的半径值,dr表示半径距离分辨率,如果这两个半径距离之差大于距离分辨率,说明这两个半径一定不属于同一个圆,而两次满足if语句条件之间的那些半径值可以认为是相等的,即是属于同一个圆
-
if( d - start_dist > dr )
-
{
-
//start_idx表示上一次进入if语句时更新的半径距离排序的序号
-
// start_idx – j表示当前得到的相同半径距离的数量
-
//(j + start_idx)/2表示j和start_idx中间的数
-
//取中间的数所对应的半径值作为当前半径值r_cur,也就是取那些半径值相同的值
-
float r_cur = ddata[sort_buf[(j + start_idx)/
2]];
-
//如果当前得到的半径相同的数量大于最大值max_count,则进入if语句
-
if( (start_idx - j)*r_best >= max_count*r_cur ||
-
(r_best < FLT_EPSILON && start_idx - j >= max_count) )
-
{
-
r_best = r_cur;
//把当前半径值作为最佳半径值
-
max_count = start_idx - j;
//更新最大值
-
}
-
//更新半径距离和序号
-
start_dist = d;
-
start_idx = j;
-
dist_sum =
0;
-
}
-
dist_sum += d;
-
}
-
// Check if the circle has enough support
-
//步骤2.5,最终确定输出
-
//如果相同半径的数量大于所设阈值
-
if( max_count > acc_threshold )
-
{
-
float c[
3];
-
c[
0] = cx;
//圆心的横坐标
-
c[
1] = cy;
//圆心的纵坐标
-
c[
2] = (
float)r_best;
//所对应的圆的半径
-
cvSeqPush( circles, c );
//压入序列circles内
-
//如果得到的圆大于阈值,则退出该函数
-
if( circles->total > circles_max )
-
return;
-
}
-
}
-
}
-
#include "opencv2/core/core.hpp"
-
#include "opencv2/highgui/highgui.hpp"
-
#include "opencv2/imgproc/imgproc.hpp"
-
-
#include <iostream>
-
using
namespace cv;
-
using
namespace
std;
-
-
int main( int argc, char** argv )
-
{
-
Mat src, gray;
-
src=imread(
"coins.jpg");
-
if( !src.data )
-
return
-1;
-
-
cvtColor( src, gray, CV_BGR2GRAY );
-
//高斯模糊平滑
-
GaussianBlur( gray, gray, Size(
9,
9),
2,
2 );
-
-
vector<Vec3f> circles;
-
//霍夫变换
-
HoughCircles( gray, circles, CV_HOUGH_GRADIENT,
1, gray.rows/
20,
100,
60,
0,
0 );
-
-
//在原图中画出圆心和圆
-
for(
size_t i =
0; i < circles.size(); i++ )
-
{
-
//提取出圆心坐标
-
Point center(cvRound(circles[i][0]), cvRound(circles[i][1]));
-
//提取出圆半径
-
int radius = cvRound(circles[i][
2]);
-
//圆心
-
circle( src, center,
3, Scalar(
0,
255,
0),
-1,
8,
0 );
-
//圆
-
circle( src, center, radius, Scalar(
0,
0,
255),
3,
8,
0 );
-
}
-
-
namedWindow(
"Circle", CV_WINDOW_AUTOSIZE );
-
imshow(
"Circle", src );
-
-
waitKey(
0);
-
return
0;
-
}

从实际运行的结果来看,我们发现HoughCircles函数不足之处是所需要的参数较多,而且每个参数的改变对结果影响都很大,即漏检和错检的几率很大。
执剑天涯:https://blog.csdn.net/qq_35759050/article/details/71158200
牧野: https://blog.csdn.net/dcrmg/article/details/52506538
zcj:https://blog.csdn.net/zhaocj/article/details/50454847