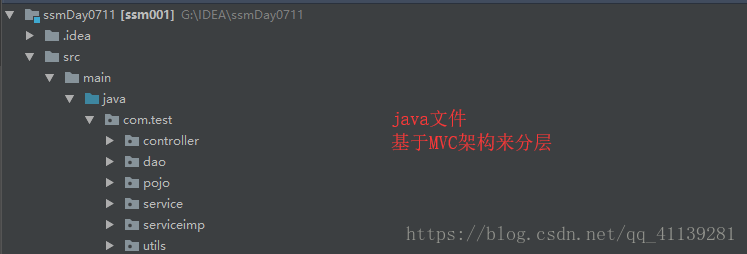
一、IDEA创建java web项目
用到的开发工具是IntelliJ IDEA,项目创建可能和eclipse有所不同,按照自己的需要来创建就好,用什么就按照什么步骤来创建。
以下是完整目录结构:


二、配置文件
(1)db.properties
jdbc_driver=com.mysql.jdbc.Driver
jdbc_url=jdbc:mysql://127.0.0.1:3306/bookdb?useUnicode=true&characterEncoding=utf8&zeroDateTimeBehavior=convertToNull&useSSL=false&serverTimezone=UTC
jdbc_username=root
jdbc_password=root
(2)mybatis-generator-config.xml
<?xml version="1.0" encoding="UTF-8"?>
<!DOCTYPE generatorConfiguration
        PUBLIC "-//mybatis.org//DTD MyBatis Generator Configuration 1.0//EN"
        "http://mybatis.org/dtd/mybatis-generator-config_1_0.dtd">
<generatorConfiguration>
    <properties resource="db.properties"/>
    <!-- 数据库驱动 -->
    <classPathEntry location="C:\Users\Administrator\.m2\repository\mysql\mysql-connector-java\5.1.30\mysql-connector-java-5.1.30.jar" />
    <context id="DB2Tables" targetRuntime="MyBatis3">
        <commentGenerator>
            <property name="suppressDate" value="true" />
            <!-- 是否去除自动生成的注释 true:是 : false:否 -->
            <property name="suppressAllComments" value="true" />
        </commentGenerator>
        <!--数据库链接URL,用户名、密码 -->
        <jdbcConnection driverClass="${jdbc_driver}"
                        connectionURL="${jdbc_url}" userId="${jdbc_username}" password="${jdbc_password}">
        </jdbcConnection>
        <!-- 默认false,把JDBC DECIMAL 和 NUMERIC 类型解析为 Integer true,把JDBC DECIMAL 和
            NUMERIC 类型解析为java.math.BigDecimal -->
        <javaTypeResolver>
            <property name="forceBigDecimals" value="false" />
        </javaTypeResolver>
        <!-- 生成模型的包名和位置 -->
        <javaModelGenerator targetPackage="com.test.pojo"
                            targetProject="src/main/java">
            <!-- enableSubPackages:是否让schema作为包的后缀 -->
            <property name="enableSubPackages" value="true" />
            <!-- 从数据库返回的值被清理前后的空格 -->
            <property name="trimStrings" value="true" />
        </javaModelGenerator>
        <!-- 生成映射文件的包名和位置 -->
        <sqlMapGenerator targetPackage="com.test.dao"
                         targetProject="src/main/java">
            <property name="enableSubPackages" value="true" />
        </sqlMapGenerator>
        <!-- 生成DAO的包名和位置 -->
        <javaClientGenerator type="XMLMAPPER"
                             targetPackage="com.test.dao" targetProject="src/main/java">
            <property name="enableSubPackages" value="true" />
        </javaClientGenerator>
        <!-- 要生成哪些表 -->
        <!-- tableName:用于自动生成代码的数据库表;domainObjectName:对应于数据库表的javaBean类名 -->
        <!--book_info数据库表明-->                  <!--别名Book_Info  pojo(实体类明)-->
        <table tableName="book_info"
               domainObjectName="BookInfo"
               enableCountByExample="false"
               enableUpdateByExample="false"
               enableDeleteByExample="false"
               enableSelectByExample="false"
               selectByExampleQueryId="false"></table>
        <table tableName="book_types" domainObjectName="BookType"
               enableCountByExample="false" enableUpdateByExample="false"
               enableDeleteByExample="false" enableSelectByExample="false"
               selectByExampleQueryId="false"></table>
    </context>
</generatorConfiguration>
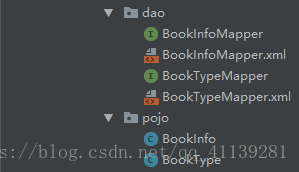
其中的XXXMapper.xml当然就是Mybatis动态实现所需要的Mapper文件,Dao接口就可以不用再编写实现类。这里的Mapper和Dao中的接口是对应的。
(3)applicationContext.xml
在这个配置文件中,我们主要配置数据源,Spring的事务管理和Dao接口的扫描,以及对Mybatis的一些列相关配置文件的扫描。
<?xml version="1.0" encoding="UTF-8"?>
<beans xmlns="http://www.springframework.org/schema/beans"
       xmlns:xsi="http://www.w3.org/2001/XMLSchema-instance"
       xmlns:context="http://www.springframework.org/schema/context"
       xmlns:tx="http://www.springframework.org/schema/tx"
       xmlns:aop="http://www.springframework.org/schema/aop"
       xsi:schemaLocation="
http://www.springframework.org/schema/beans
http://www.springframework.org/schema/beans/spring-beans-3.0.xsd
http://www.springframework.org/schema/context
http://www.springframework.org/schema/context/spring-context-3.0.xsd
http://www.springframework.org/schema/tx
http://www.springframework.org/schema/tx/spring-tx-3.0.xsd
http://www.springframework.org/schema/aop
http://www.springframework.org/schema/aop/spring-aop-3.0.xsd
">

    <!-- 1.引入db.properties -->
    <context:property-placeholder location="classpath:db.properties" />
    <!-- 2.开启spring ioc注解及扫描 -->
    <context:annotation-config />
    <context:component-scan base-package="com.test" />
    <!--3.开启aop注解-->
    <aop:aspectj-autoproxy/>
    <!-- 4.配置连接池 druid -->
    <bean id="dataSource" class="com.alibaba.druid.pool.DruidDataSource"
          init-method="init" destroy-method="close">
        <property name="url" value="${jdbc_url}" />
        <property name="username" value="${jdbc_username}" />
        <property name="password" value="${jdbc_password}" />
        <!-- 数据源初始化自动创建10个连接 -->
        <property name="initialSize" value="10" />
        <property name="maxActive" value="20" />
        <property name="minIdle" value="0" />
    </bean>
    <!-- 5.配置sqlsessionfactroy -->
    <bean id="sqlSessionFactory" class="org.mybatis.spring.SqlSessionFactoryBean">
        <!-- 4.1配置数据源 -->
        <property name="dataSource" ref="dataSource" />
        <!-- 4.2加载mapper文件 -->
        <property name="mapperLocations" value="classpath:com/test/dao/*.xml" />
        <property name="typeAliasesPackage" value="com.test.po" />
        <!--4.3 分页工具pagehelper的配置-->
        <property name="plugins">
            <array>
                <bean class="com.github.pagehelper.PageInterceptor">
                    <property name="properties">
                        <value>
                            helperDialect=mysql
                            reasonable=true
                        </value>
                    </property>
                </bean>
            </array>
        </property>
    </bean>
    <!-- 6.配置扫描器dao层接口 -->
    <bean class="org.mybatis.spring.mapper.MapperScannerConfigurer">
        <!--5.1 将映射文件与接口建立关联 -->
        <property name="basePackage" value="com.test.dao" />
        <!-- 5.2此处配置的是value 防止读取不到db.properties配置文件中的信息 -->
        <property name="sqlSessionFactoryBeanName" value="sqlSessionFactory" />
    </bean>
    <!-- 6.配置事务 -->
    <bean id="transactionManager"
          class="org.springframework.jdbc.datasource.DataSourceTransactionManager">
        <property name="dataSource" ref="dataSource" />
    </bean>
    <!-- 7开启事务的注解 -->
    <tx:annotation-driven transaction-manager="transactionManager" />
</beans>
(4)springmvc-servlet.xml
<?xml version="1.0" encoding="UTF-8"?>
<beans xmlns="http://www.springframework.org/schema/beans"
       xmlns:xsi="http://www.w3.org/2001/XMLSchema-instance" xmlns:context="http://www.springframework.org/schema/context"
       xmlns:mvc="http://www.springframework.org/schema/mvc"
       xsi:schemaLocation="
        http://www.springframework.org/schema/beans
        http://www.springframework.org/schema/beans/spring-beans-3.0.xsd
            http://www.springframework.org/schema/mvc
        http://www.springframework.org/schema/mvc/spring-mvc-3.0.xsd
        http://www.springframework.org/schema/context
        http://www.springframework.org/schema/context/spring-context-3.0.xsd">


    <!-- 静态资源处理器 location属性必须放到前面,mapping放后面 -->
    <mvc:resources location="/resource/" mapping="/resource/**" />

    <!-- 添加springmvc扫描器 只扫描扫描 @Controller注解 -->
    <context:component-scan base-package="com.test.controller">
        <context:include-filter type="annotation"
                                expression="org.springframework.stereotype.Controller" />
    </context:component-scan>


    <!--   文件上传 -->
    <bean id="multipartResolver"   class="org.springframework.web.multipart.commons.CommonsMultipartResolver" >
        <property name="defaultEncoding" value="utf-8"/> <!-- 默认编码 (ISO-8859-1) -->
        <property name="maxInMemorySize" value="10240"/> <!-- 最大内存大小 (10240)-->
        <property name="uploadTempDir" value="/resource/upload/"/> <!-- 上传后的目录名 -->
        <property name="maxUploadSize" value="-1"/> <!-- 最大文件大小,-1为无限止(-1) -->
    </bean>
    <!-- 全局日期转换器 -->
    <bean id="formattingConversionServiceFactoryBean"
          class="org.springframework.format.support.FormattingConversionServiceFactoryBean">
        <property name="converters">
            <list>
                <bean id="dateConverter" class="com.test.utils.DateConverter"></bean>
            </list>
        </property>
    </bean>
    <!-- 进行注册 -->
    <mvc:annotation-driven conversion-service="formattingConversionServiceFactoryBean" />

    <!-- 配置视图解析器 -->
    <bean id="viewResolver" class="org.springframework.web.servlet.view.UrlBasedViewResolver">
        <!-- 配置前缀 -->
        <property name="prefix" value="/WEB-INF/jsp/" />
        <!-- 配置后缀 -->
        <property name="suffix" value=".jsp" />
        <!-- 使用jstl的配置 -->
        <property name="viewClass"
                  value="org.springframework.web.servlet.view.JstlView" />
    </bean>
</beans>
(5)web.xml
在web.xml中加载Spring配置,并且将所有的请求都过滤给Spring MVC来处理,同时设置编码过滤器解决编码问题,其中Spring MVC的请求过滤就是一个简单的Servlet配置。
<!DOCTYPE web-app PUBLIC"-//Sun Microsystems, Inc.//DTD Web Application 2.3//EN"
 "http://java.sun.com/dtd/web-app_2_3.dtd" >
<web-app xmlns:xsi="http://www.w3.org/2001/XMLSchema-instance"
         xmlns="http://java.sun.com/xml/ns/javaee"
         xsi:schemaLocation="http://java.sun.com/xml/ns/javaee http://java.sun.com/xml/ns/javaee/web-app_3_0.xsd"
         id="WebApp_ID" version="3.0">
  <display-name>Archetype Created Web Application</display-name>

  <!-- utf-8解决中文乱码 -->
  <filter>
    <filter-name>CharacterEncodingFilter</filter-name>
    <filter-class>org.springframework.web.filter.CharacterEncodingFilter</filter-class>
    <init-param>
      <param-name>encoding</param-name>
      <param-value>utf-8</param-value>
    </init-param>
  </filter>
  <filter-mapping>
    <filter-name>CharacterEncodingFilter</filter-name>
    <url-pattern>/*</url-pattern>
  </filter-mapping>
  <!--  启动spring监听器,加载spring核心配置文件 -->
  <listener>
    <listener-class>org.springframework.web.context.ContextLoaderListener</listener-class>
  </listener>
  <context-param>
    <param-name>contextConfigLocation</param-name>
    <param-value>classpath:applicationContext-Config.xml</param-value>
  </context-param>

  <!--配置前端核心控制器DispatcherServlet,加载springmvc的核心配置文件-->
  <servlet>
    <servlet-name>springMVC</servlet-name>
    <servlet-class>org.springframework.web.servlet.DispatcherServlet</servlet-class>
    <init-param>
      <param-name>contextConfigLocation</param-name>
      <param-value>classpath:springmvc-servlet.xml</param-value>
    </init-param>
    <load-on-startup>1</load-on-startup>
  </servlet>
  <servlet-mapping>
    <servlet-name>springMVC</servlet-name>
    <url-pattern>/</url-pattern>
  </servlet-mapping>
</web-app>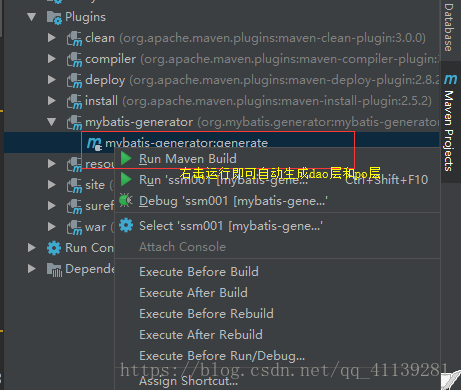
运行成功后如下图所示: