SSM整合(SpringMvc+Spring+Mybatis)
首先创建一个Dynamic Web Project(JavaWeb动态工程)
-
创建一个xxx.xxx.xxx.controller包用来存放controller文件
-
创建一个xxx.xxx.xxx.dao包用来存放”接口+实体映射文件”
-
创建一个xxx.xxx.xxx.pojo包用来存放实体映射文件
-
创建一个config包用来存放spring主配置文件+Mabatis主配置文件
包名自定义,但是你要知道对应的包是用来干什么的
-
在WEB-INF目录下创建一个包用来存放你的自定义jsp文件
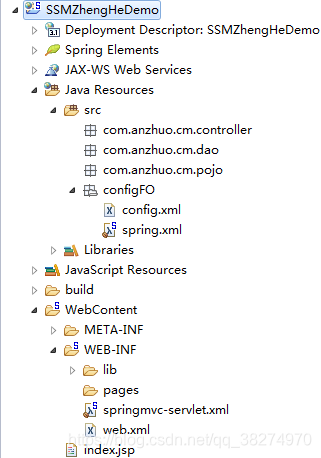
第二步导ssm整合的jar包(放在lib包下)
第三步配置web.xml(
- 配置中央前端控制器
- 配置容器监听器
- 配置过滤器 )
web.xml
<?xml version="1.0" encoding="UTF-8"?>
<web-app xmlns:xsi="http://www.w3.org/2001/XMLSchema-instance" xmlns="http://xmlns.jcp.org/xml/ns/javaee" xsi:schemaLocation="http://xmlns.jcp.org/xml/ns/javaee http://xmlns.jcp.org/xml/ns/javaee/web-app_3_1.xsd" id="WebApp_ID" version="3.1">
  <display-name>SSM</display-name>
  <welcome-file-list>
    <welcome-file>index.html</welcome-file>
    <welcome-file>index.htm</welcome-file>
    <welcome-file>index.jsp</welcome-file>
    <welcome-file>default.html</welcome-file>
    <welcome-file>default.htm</welcome-file>
    <welcome-file>default.jsp</welcome-file>
  </welcome-file-list>

  <!-- 配置过滤器 ,设置字符编码过滤器,防止中文乱码问题,该过滤器要求放在所有过滤器的前面 -->
  <filter>
 <!--  CharacterEncodingFilter:代表我是个字符编码过滤器 -->
  <filter-name>CharacterEncodingFilter</filter-name>
  <filter-class>org.springframework.web.filter.CharacterEncodingFilter</filter-class>
  <init-param>
  <param-name>encoding</param-name>
  <param-value>UTF-8</param-value>
  </init-param>
  <init-param>
  <param-name>forceRequestEncoding</param-name>
  <param-value>true</param-value>
  </init-param>
  <init-param>
  <param-name>forceResponseEncoding</param-name>
  <param-value>true</param-value>
  </init-param>
  </filter>
  <filter-mapping>
  <filter-name>CharacterEncodingFilter</filter-name>
  <url-pattern>/*</url-pattern>
  </filter-mapping>
  <!-- 配置容器监听事件 -->
	<context-param>
		<param-name>contextConfigLocation</param-name>
		<!-- 监听所有类路径下的config文件夹下的applicationContext.xml,spring主配置文件 -->
		<param-value>classpath*:config/spring.xml</param-value>
	</context-param>
  <!-- 配置启动容器监听事件 -->
	<listener>
		<listener-class>org.springframework.web.context.ContextLoaderListener</listener-class>
	</listener>
  <!-- 配置容器销毁事件 -->
  <listener>
	<listener-class>org.springframework.web.context.ContextCleanupListener</listener-class>
	</listener>
  <!-- 配置中央前端控制器 -->
	<servlet>
		<servlet-name>springmvc</servlet-name>
		<servlet-class>org.springframework.web.servlet.DispatcherServlet</servlet-class>
		<load-on-startup>1</load-on-startup>
	</servlet>
	<servlet-mapping>
		<servlet-name>springmvc</servlet-name>
		<url-pattern>/</url-pattern>
	</servlet-mapping>
</web-app>
第三步:创建一个SpringMvc的主配置文件,且配置:
- 开启注解并扫描指定包
- 配置视图资源解析器(配置前缀,后缀)
springmvc-servlet.xml
扫描二维码关注公众号,回复:
5283590 查看本文章

<?xml version="1.0" encoding="UTF-8"?>
<beans xmlns="http://www.springframework.org/schema/beans"
	xmlns:xsi="http://www.w3.org/2001/XMLSchema-instance"
	xmlns:aop="http://www.springframework.org/schema/aop"
	xmlns:context="http://www.springframework.org/schema/context"
	xmlns:mvc="http://www.springframework.org/schema/mvc"
	xsi:schemaLocation="http://www.springframework.org/schema/beans http://www.springframework.org/schema/beans/spring-beans.xsd
		http://www.springframework.org/schema/aop http://www.springframework.org/schema/aop/spring-aop-3.0.xsd
		http://www.springframework.org/schema/context http://www.springframework.org/schema/context/spring-context-3.0.xsd
		http://www.springframework.org/schema/mvc http://www.springframework.org/schema/mvc/spring-mvc-3.0.xsd">
   <context:component-scan base-package="com.anzhuo.cm.controller"></context:component-scan>
   <bean class="org.springframework.web.servlet.view.InternalResourceViewResolver">
      <property name="prefix" value="/WEB-INF/pages/"></property>
       <property name="suffix" value=".jsp"></property>
   </bean>
</beans>
第四步:在configFO包下创建一个spring的主配置文件,且配置:
- 配置数据源
- 配置事物管理
- 配置数据库会话工厂
- 配置映射扫描器
spring.xml
<?xml version="1.0" encoding="UTF-8"?>
<beans xmlns="http://www.springframework.org/schema/beans"
	xmlns:xsi="http://www.w3.org/2001/XMLSchema-instance" xmlns:aop="http://www.springframework.org/schema/aop"
	xmlns:context="http://www.springframework.org/schema/context"
	xmlns:jdbc="http://www.springframework.org/schema/jdbc" xmlns:jee="http://www.springframework.org/schema/jee"
	xmlns:lang="http://www.springframework.org/schema/lang" xmlns:mvc="http://www.springframework.org/schema/mvc"
	xmlns:p="http://www.springframework.org/schema/p" xmlns:task="http://www.springframework.org/schema/task"
	xmlns:tx="http://www.springframework.org/schema/tx"
	xsi:schemaLocation="http://www.springframework.org/schema/beans http://www.springframework.org/schema/beans/spring-beans.xsd
		http://www.springframework.org/schema/aop http://www.springframework.org/schema/aop/spring-aop-3.0.xsd
		http://www.springframework.org/schema/context http://www.springframework.org/schema/context/spring-context-3.0.xsd
		http://www.springframework.org/schema/jdbc http://www.springframework.org/schema/jdbc/spring-jdbc-3.0.xsd
		http://www.springframework.org/schema/jee http://www.springframework.org/schema/jee/spring-jee-3.0.xsd
		http://www.springframework.org/schema/lang http://www.springframework.org/schema/lang/spring-lang-3.0.xsd
		http://www.springframework.org/schema/mvc http://www.springframework.org/schema/mvc/spring-mvc-3.0.xsd
		http://www.springframework.org/schema/task http://www.springframework.org/schema/task/spring-task-3.0.xsd
		http://www.springframework.org/schema/tx http://www.springframework.org/schema/tx/spring-tx-3.0.xsd">
	<!-- 连接数据源 -->
	<bean id="dataSource" class="org.apache.commons.dbcp.BasicDataSource">
		<property name="driverClassName" value="com.mysql.jdbc.Driver"></property>
		<property name="url" value="jdbc:mysql://localhost:3306/ssm"></property>
		<property name="username" value="root"></property>
		<property name="password" value="123"></property>
	</bean>

	<!-- 事物管理 -->
	<bean id="dataSourceTransactionManager" class="org.springframework.jdbc.datasource.DataSourceTransactionManager">
		<property name="dataSource" ref="dataSource"></property>
	</bean>

	<!-- 生产SqlSessionFactoryBean的bean -->
	<bean id="sessionFactoryBean" class="org.mybatis.spring.SqlSessionFactoryBean">
		<property name="dataSource" ref="dataSource"></property>
		<property name="configLocation" value="classpath:configFO/config.xml"></property>
		<property name="mapperLocations" value="classpath*:com/anzhuo/cm/dao/*.xml"></property>
	</bean>

	<!-- MapperScannerConfigurer:(配置映射掃描儀)专门用来扫描包下面的类或接口 -->
	<bean id="mapperScannerConfigurer" class="org.mybatis.spring.mapper.MapperScannerConfigurer">
		<property name="basePackage" value="com.anzhuo.cm.dao"></property>
	</bean>
</beans>
第五步:在configFO包下创建一个config的主配置文件,且配置:
- 配置别名(实体类)
config.xml
<?xml version="1.0" encoding="UTF-8"?>
<!DOCTYPE configuration PUBLIC "config" "mybatis-3-config.dtd" >
<configuration>
<typeAliases>
<package name="com.anzhuo.cm.pojo"/>
</typeAliases>
</configuration>
第六步:在WebContent包下创建一个index.jsp页面(名字必须要为index不可修改),作用是为了测试框架搭建成功之后给我返回一个结果,让我知道是否搭建成功
index.jsp
<%@ page language="java" contentType="text/html; charset=UTF-8"
    pageEncoding="UTF-8"%>
<!DOCTYPE html PUBLIC "-//W3C//DTD HTML 4.01 Transitional//EN" "http://www.w3.org/TR/html4/loose.dtd">
<html>
<head>
<meta http-equiv="Content-Type" content="text/html; charset=UTF-8">
<title>搭建框架</title>
</head>
<body>
<h1>搭建框架成功!!!</h1>
</body>
</html>
这样我的框架就搭建成功了,假如报错怎么解决?
下期解答