一个简易的小程序架构,如下图所示:
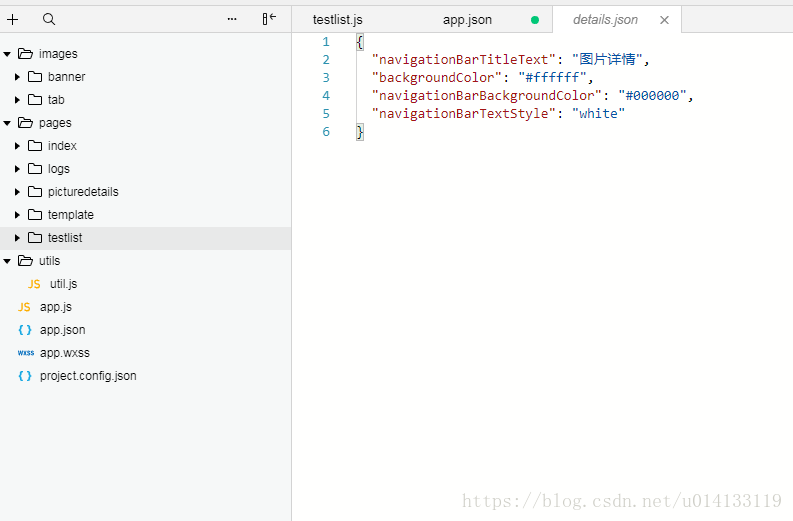
目录
那么模版定义完成,接下来我们要做的是如何引用这个模版,我们需要建立一个testList.wxml文件,具体代码如下:
小程序官网请点击https://developers.weixin.qq.com/miniprogram/dev/
一.底部tabBar实现
app.json 是对当前小程序的全局配置,包括了小程序的所有页面路径、界面表现、网络超时时间、底部 tab 等
{
  "pages": [
    "pages/index/index",
    "pages/logs/logs",
    "pages/testlist/testlist",
    "pages/picturedetails/details"
  ],
  "window": {
    "backgroundTextStyle": "light",
    "navigationBarBackgroundColor": "#ff9000",
    "navigationBarTitleText": "WeChat",
    "navigationBarTextStyle": "black",
    "backgroundColor": "#000000",
    "enablePullDownRefresh": true
  },
  "tabBar": {
    "list": [
      {
        "pagePath": "pages/index/index",
        "text": "首页",
        "color": "#6e6d6b",
        "selectedColor": "#000000",
        "backgroundColor": "#fff",
        "iconPath": "images/tab/cash-manage-false.png",
        "selectedIconPath": "images/tab/cash-manage-true.png"
      },
      {
        "pagePath": "pages/logs/logs",
        "text": "日志",
        "iconPath": "images/tab/edu-manage-false.png",
        "selectedIconPath": "images/tab/edu-manage-true.png"
      },
      {
        "pagePath": "pages/testlist/testlist",
        "text": "测试",
        "iconPath": "images/tab/my-false.png",
        "selectedIconPath": "images/tab/my-true.png"
      }
    ]
  },
  "networkTimeout": {
    "request": 10000,
    "downloadFile": 10000
  },

  "debug": true

}
上面代码配置tabBar,就是底部tab切换的各项配置。
我们简单说一下这个配置各个项的含义:
- pages字段 —— 用于描述当前小程序所有页面路径,这是为了让微信客户端知道当前你的小程序页面定义在哪个目录。
- window字段 —— 小程序所有页面的顶部背景颜色,文字颜色定义在这里的。
- 其他配置项细节可以参考文档https://developers.weixin.qq.com/miniprogram/dev/framework/config.html
二.Banner轮播实现(swiper)
在微信小程序我们是通过关键字swiper实现图片轮播,那么接下来我们通过具体的代码实现,实现效果图如下所示:
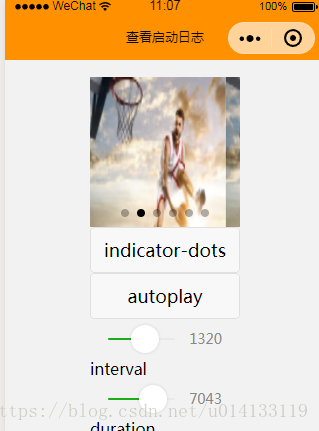
swiper实现轮播代码1如下:
.wxml代码:
<swiper indicator-dots="{{indicatorDots}}"
autoplay="{{autoplay}}" interval="{{interval}}" duration="{{duration}}">
<block wx:for="{{imgUrls}}">
<swiper-item>
<image src="{{item}}" bindtap="tapBanner" class="slide-image" height="350" />
</swiper-item>
</block>
</swiper>
<button bindtap="changeIndicatorDots"> indicator-dots </button>
<button bindtap="changeAutoplay"> autoplay </button>
<slider bindchange="intervalChange" show-value min="500" max="2000"/> interval
<slider bindchange="durationChange" show-value min="1000" max="10000"/> duration
[点击并拖拽以移动]
.js代码如下:
Page({
  data: {
    imgUrls: [
      'http://img02.tooopen.com/images/20150928/tooopen_sy_143912755726.jpg',
      'http://img06.tooopen.com/images/20160818/tooopen_sy_175866434296.jpg',
      'http://img06.tooopen.com/images/20160818/tooopen_sy_175833047715.jpg'
    ],
    indicatorDots: false,
    autoplay: false,
    interval: 5000,
    duration: 1000
  },
  changeIndicatorDots: function(e) {
    this.setData({
      indicatorDots: !this.data.indicatorDots
    })
  },
  changeAutoplay: function(e) {
    this.setData({
      autoplay: !this.data.autoplay
    })
  },
  intervalChange: function(e) {
    this.setData({
      interval: e.detail.value
    })
  },
  durationChange: function(e) {
    this.setData({
      duration: e.detail.value
    })
  }
})以上代码就可以实现我们图1效果,详细细节请查看https://developers.weixin.qq.com/miniprogram/dev/component/swiper.html
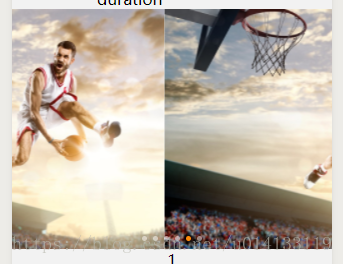
自定义swiper轮播代码如下:
.wxml文件代码如下:
    <view class="swiper-container">
    <swiper class="swiper_box" autoplay="{{autoplay}}" interval="{{interval}}" duration="{{duration}}" bindchange="swiperchange" >
      <block wx:for="{{imgUrls}}" wx:key="id">
        <swiper-item>
          <image bindtap="tapBanner" src="{{item}}" class="slide-image" width="750rpx" height="562.5rpx" />
        </swiper-item>
      </block>
    </swiper>

    <view class="dots">
      <block wx:for="{{imgUrls}}" wx:key="unique">
            <view class="dot{{index == swiperCurrent ? ' active' : ''}}"></view>
      </block>
    </view>
  </view>
wxss代码如下:
.container {
  background-color: #F2f2f2;
  min-height: 100%;
}
.swiper-container{
  width: 750rpx;
  position: relative;
}
.swiper_box {
  width: 100%;
  height:562.5rpx;
}

swiper-item image {
  width: 100%;
  display: inline-block;
  overflow: hidden;
  height:562.5rpx;
}
.swiper-container .dots{
  position: absolute;
  left: 0;
  right: 0;
  bottom: 20rpx;
  display: flex;
  justify-content: center;
}
.swiper-container .dots .dot{
  margin: 0 8rpx;
  width: 14rpx;
  height: 14rpx;
  background: #fff;
  border-radius: 50%;
  transition: all .6s;
  opacity: .5;
}
.swiper-container .dots .dot.active{
  width: 14rpx;
  opacity: 1;
}
在.js文件中绑定相应的事件及赋值,具体代码如下:
//logs.js
const util = require('../../utils/util.js')

Page({
  data: {

     imgUrls: [
       'http://img02.tooopen.com/images/20150928/tooopen_sy_143912755726.jpg',
       'http://img06.tooopen.com/images/20160818/tooopen_sy_175866434296.jpg',
       'http://img06.tooopen.com/images/20160818/tooopen_sy_175833047715.jpg',
       'http://img06.tooopen.com/images/20160818/tooopen_sy_175833047715.jpg',
       'http://img06.tooopen.com/images/20160818/tooopen_sy_175833047715.jpg',
       "http://img.tuku.cn/file_thumb/201506/m2015060317184193.jpg"
     ],
     indicatorDots: true,
     autoplay: true,
     interval: 5000,
     duration: 1000,
     swiperCurrent: 0


  },
  onShareAppMessage: function () {
    return {
      title: '自定义转发标题',
      path: '/page/user?id=123'
    }
  },
  onLoad: function () {
    this.setData({
      logs: (wx.getStorageSync('logs') || []).map(log => {
        return util.formatTime(new Date(log))
      })
    })
  },
  changeIndicatorDots: function (e) {
    this.setData({
      indicatorDots: !this.data.indicatorDots
    })
  },
  changeAutoplay: function (e) {
    this.setData({
      autoplay: !this.data.autoplay
    })
  },

  swiperchange: function (e) {
    this.setData({

      swiperCurrent: e.detail.current
    })
  },
  intervalChange: function (e) {
    this.setData({
      interval: e.detail.value
    })
  },
  durationChange: function (e) {
    this.setData({
      duration: e.detail.value
    })
  },
  tapBanner: function (e) {
    wx.showToast({
      title: 'sdfsd',
      success: function (res) { },
      fail: function (res) { },
      complete: function (res) { },
    })
    if (e.currentTarget.dataset.id != 0) {

      // wx.navigateTo({
      //   // url: "/pages/goods-details/index"
      // })
    }
  }
})
至此,我们实现第二个swiper轮播就完成了。
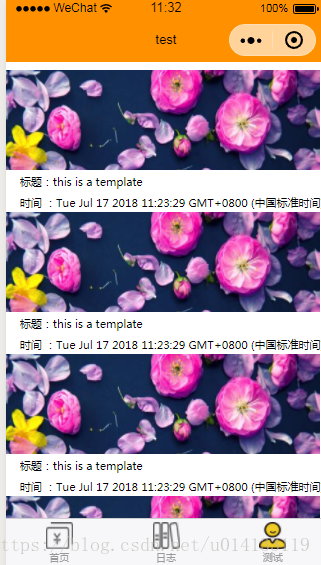
三.实现列表展示
谈到列表我们必然会想到 "模板(template)"这个字样。那么什么是模版呢? 微信小程序是这样的定义模版: WXML提供模板(template),可以在模板中定义代码片段,然后在不同的地方调用。具体详细请查看https://developers.weixin.qq.com/miniprogram/dev/framework/view/wxml/template.html。那么我们接下来就实现一下列表展示,效果图入下:
1.定义一个模版template.wxml文件,代码如下
<template name="msgItem">

 <view class="gooods" wx:for="{{list}}" wx:key="{{index}}">

    <view class="img-box">
      <image src="{{imgsrc}}" class="imgs" bindtap='clickedEvent' />
    </view>
    <view class="goods-title">标题:{{msg}}</view>
    <view class="goods-time">时间 :{{time}}</view>
  </view>

</template>
2.模版样式设置template.wxss代码如下
page{
    /*height: 100%;*/
}
.container{
    justify-content:initial;
}
.img-box {
  width: 100%;
  height: 100px;
  overflow: hidden;
  margin-right: 20rpx;
  background-color: #fff;
}

.goods-title {
  font-size: 28rpx;
  text-overflow: ellipsis;
  white-space: nowrap;
  overflow: hidden;
  margin-left: 20px;
  padding: 10rpx 20rpx 5rpx 0;
}

.goods-time {
  font-size: 28rpx;
  text-overflow: ellipsis;
  white-space: nowrap;
  overflow: hidden;
  margin-left: 20px;
  padding: 10rpx 20rpx 5rpx 0;
}
那么模版定义完成,接下来我们要做的是如何引用这个模版,我们需要建立一个testList.wxml文件,具体代码如下:
1.testList.wxml文件代码如下:
<import src="../template/template.wxml" />


<view class="container">
  <template is="msgItem" data="{{...item}}" />
</view>
2.testList.js文件代码如下:
//获取应用实例
var app = getApp();

Page({
  data: {
    item: {
      index: 0,
      msg: 'this is a template',
      time: ""+new Date(),

      list: [1, 2, 3, 4, 5,],
      imgsrc:"https://ss3.bdstatic.com/70cFv8Sh_Q1YnxGkpoWK1HF6hhy/it/u=494333513,2366496562&fm=200&gp=0.jpg"
    }
  },

  //事件
  clickedEvent: function () {
    // wx.showToast({
    //   title: '点击事件',
    //   icon: '',
    //   image: '',
    //   duration: 1000,
    //   mask: true,
    //   success: function(res) {},
    //   fail: function(res) {},
    //   complete: function(res) {},
    // })

    wx.navigateTo({
      url: '/pages/picturedetails/details',
    })
  }
  ,
  onShareAppMessage: function () {
    return {
      title: "标题",
      path: "https://ss3.bdstatic.com/70cFv8Sh_Q1YnxGkpoWK1HF6hhy/it/u=494333513,2366496562&fm=200&gp=0.jpg",
      success: function (res) {
        // 转发成功
      },
      fail: function (res) {
        // 转发失败
      }
    }
  },


})
3.testList.wxss样式设置如下代码:
/**index.wxss**/
@import "../template/template.wxss";

page {
  min-height: 100%;
  background: #fff;
}

.container {
  background-color: #fff;
  min-height: 100%;
}

.pos-fiexd{
  position: fixed;
  bottom: 0;
  left: 0;
  top: 0;
}
4.testList.json文件配置导航标题,代码如下
{
  "navigationBarTitleText": "test"
}
到此!我们的列表功能也就实现了,如上述效果图。
定义模版详情请点击查看https://developers.weixin.qq.com/miniprogram/dev/framework/view/wxml/template.html
其他参考
1.事件请查看https://developers.weixin.qq.com/miniprogram/dev/framework/view/wxml/event.html
2.数据绑定请查看https://developers.weixin.qq.com/miniprogram/dev/framework/view/wxml/data.html
3.相关配置请查看https://developers.weixin.qq.com/miniprogram/dev/framework/config.html
4.条件判断请查看https://developers.weixin.qq.com/miniprogram/dev/framework/view/wxml/conditional.html
5.分享请查看https://developers.weixin.qq.com/miniprogram/dev/api/share.html
6.页面路由请查看https://developers.weixin.qq.com/miniprogram/dev/framework/app-service/route.html