背景:用ARM(PS:zynq7 processing system)控制Mig调用了DDR3,我们希望用IPcore控制Mig调用DDR3
FPGA实践教程(五)调用DDR
目的:看懂xilinx用PS调用DDR3的测试代码,找到用Mig调用DDR的代码行。
结果非常简单,系统搭建正确的话,PS直接用指针调用DDR,指针地址为DDR对应的地址。
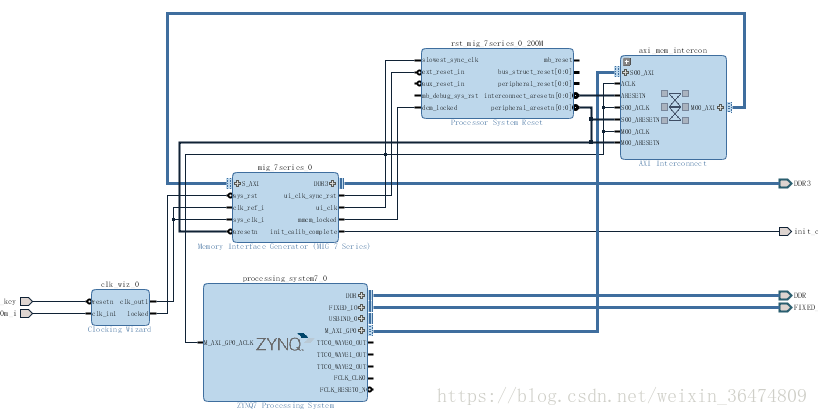
搭建的系统:PS通过MIG模块与DDR3相连。
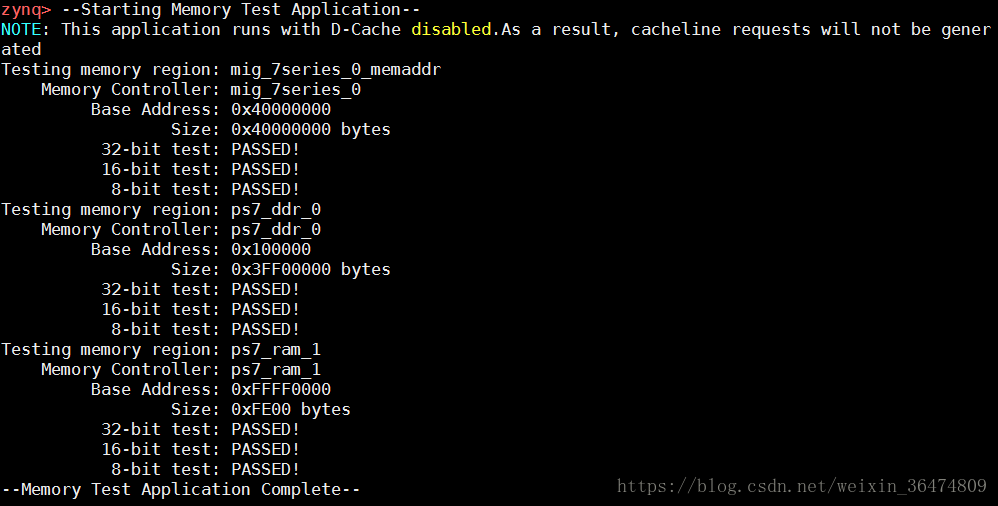
程序运行结果
1 platform.h与platform.h
1.1 d-cache与i-cache
两者为两种不同的cache,不同类型的缓冲区
https://blog.csdn.net/bytxl/article/details/50275377
// platform.c
#include "xparameters.h"
#include "xil_cache.h"

#include "platform_config.h"

#ifdef STDOUT_IS_16550
#include "xuartns550_l.h"
#endif

void
enable_caches()
{
#ifdef __PPC__
    Xil_ICacheEnableRegion(XPAR_CACHEABLE_REGION_MASK);
    // Do not enable caches for memory tests, this has pros and cons
    // Pros - If caches are enabled, under certain configurations, there will be very few
    //        transactions to external memory
    // Con  - This might not generate a burst cacheline request
    // Xil_DCacheEnableRegion(CACHEABLE_REGION_MASK);
#elif __MICROBLAZE__
#ifdef XPAR_MICROBLAZE_USE_ICACHE
    Xil_ICacheEnable();
#endif
#ifdef XPAR_MICROBLAZE_USE_DCACHE
    // See reason above for not enabling D Cache
    // Xil_DCacheEnable();
#endif
#elif __arm__
    // For ARM, BSP enables caches by default.
#endif
}

void
disable_caches()
{
    Xil_DCacheDisable();
    Xil_ICacheDisable();
}

void
init_platform()
{
    enable_caches();

#ifdef __arm__
    // For ARM, BSP enables caches by default. Disable them here.
    // See reason above for disabling D Cache
    Xil_DCacheDisable();
#endif

    /* if we have a uart 16550, then that needs to be initialized */
#ifdef STDOUT_IS_16550
    XUartNs550_SetBaud(STDOUT_BASEADDR, XPAR_XUARTNS550_CLOCK_HZ, 9600);
    XUartNs550_SetLineControlReg(STDOUT_BASEADDR, XUN_LCR_8_DATA_BITS);
#endif
}

void
cleanup_platform()
{
    disable_caches();
}
platform.h使能了两个函数,一个是init_platform,一个是cleanup_platform。
platform.c中定义了具体的对中cache的enable和disable的操作
推测单片机具体的cache驱动与使能等等存在于#include "xparameters.h"和#include "xil_cache.h"这两个头文件中。
1.3 enable_caches 函数使能了I-cache,
disable_caches与cleanup_platform函数中disable了D-cache与I-cache
init_platform函数,首先使能I-cache,然后disable D-cache,然后运行了:
#ifdef STDOUT_IS_16550
    XUartNs550_SetBaud(STDOUT_BASEADDR, XPAR_XUARTNS550_CLOCK_HZ, 9600);
    XUartNs550_SetLineControlReg(STDOUT_BASEADDR, XUN_LCR_8_DATA_BITS);
#endif
这段函数意义不明,大致与UART有关。
2 . memory_config.h与memory_config_g.c
//memory_config.h
struct memory_range_s {
    char *name;
    char *ip;
    unsigned long base;
    unsigned long size;
};

/* generated memory ranges defined in memory_ranges_g.c */
extern struct memory_range_s memory_ranges[];
extern int n_memory_ranges;
// memory_config_g.c
/* This file is automatically generated based on your hardware design. */
#include "memory_config.h"
struct memory_range_s memory_ranges[] = { { "mig_7series_0_memaddr",
"mig_7series_0", 0x40000000, 1073741824, }, { "ps7_ddr_0", "ps7_ddr_0",
0x00100000, 1072693248, },
/* ps7_ram_0 memory will not be tested since application resides in the same memory */
{ "ps7_ram_1", "ps7_ram_1", 0xFFFF0000, 65024, }, };
int n_memory_ranges = 3;
2.1 memory_config.h中定义了memory_range_s的结构体,一个name字符串,一个IP字符串,base与size,分别表示:Testing memory region, Memory controller, Base address, Size
memory_ranges为结构体串,也是一个结构体指针。extern表明为全局变量,所有程序都能用。n_memory_ranges=3表示有三个这样的字符串。
2.2 memory_config_g.c 定义了三个具体的结构体,后两个分别表示PS的DDR与RAM,第一个是用mig控制的DDR3,这个是最重要的。我们需要将此结构体记下来。
运用Mig控制的DDR3的参数:Testing memory region, memory controller, Base address, size分别为
{ "mig_7series_0_memaddr",
"mig_7series_0",
0x40000000,
1073741824, }
2.3 程序前说这个程序是基于hardware design自动生成的。(我们是否需要保证用IPcore调用DDR3时重新生成?)相应的mig的IPcore的名称为mig_7series_0,size为1072693248个字节则刚好为1GB。表明FPGA的片上DDR3的大小为1GB
PS的DDR将近1GB,PS的RAM约63.5KB
3 主程序
//主函数
int main()
{
    int i;

    init_platform();

    print("--Starting Memory Test Application--\n\r");
    print("NOTE: This application runs with D-Cache disabled.");
    print("As a result, cacheline requests will not be generated\n\r");

    for (i = 0; i < n_memory_ranges; i++) {
        test_memory_range(&memory_ranges[i]);
    }

    print("--Memory Test Application Complete--\n\r");

    cleanup_platform();
    return 0;
}
3.1 根据前面memory_config定义的表示内存空间的结构体,结构体串memory_ranges表示三个需要测试的内存空间的定义。
首先使能ARM的I-cache,不使能D-cache,然后分别测试三个内存空间,分别为Mig控制的DDR3,PS的DDR,PS的RAM,然后取消使能整个Cache
void test_memory_range(struct memory_range_s *range) {
    XStatus status;

    print("Testing memory region: "); print(range->name);  print("\n\r");
    print("    Memory Controller: "); print(range->ip);  print("\n\r");
    #ifdef __MICROBLAZE__
        print("         Base Address: 0x"); putnum(range->base); print("\n\r");
        print("                 Size: 0x"); putnum(range->size); print (" bytes \n\r");
    #else
        xil_printf("         Base Address: 0x%lx \n\r",range->base);
        xil_printf("                 Size: 0x%lx bytes \n\r",range->size);
    #endif

    status = Xil_TestMem32((u32*)range->base, 1024, 0xAAAA5555, XIL_TESTMEM_ALLMEMTESTS);
    print("          32-bit test: "); print(status == XST_SUCCESS? "PASSED!":"FAILED!"); print("\n\r");
    status = Xil_TestMem16((u16*)range->base, 2048, 0xAA55, XIL_TESTMEM_ALLMEMTESTS);
    print("          16-bit test: "); print(status == XST_SUCCESS? "PASSED!":"FAILED!"); print("\n\r");
    status = Xil_TestMem8((u8*)range->base, 4096, 0xA5, XIL_TESTMEM_ALLMEMTESTS);
    print("           8-bit test: "); print(status == XST_SUCCESS? "PASSED!":"FAILED!"); print("\n\r");
}
3.2 test_memory_range
这个函数为输入的三个区域的Testing memory region, Memory controller, Base address, Size
然后用Xil_TestMem32,Xil_TestMem16,Xil_TestMem8对每一个内存空间进行检查,分别为32位测试,16位测试和8位测试。
3.3 我们发现真正对于DDR的调用还在更细的子函数中,我们需要找到xil_testmem.h这个头文件进而找到相应的函数来调用DDR。最终发现这个函数在xil_testmem.c中,通过SDK软件可以打开相应的函数,可以拷出来到notepad中
s32 Xil_TestMem32(u32 *Addr, u32 Words, u32 Pattern, u8 Subtest)
{
	u32 I;
	u32 j;
	u32 Val;
	u32 FirtVal;
	u32 WordMem32;
	s32 Status = 0;

	Xil_AssertNonvoid(Words != (u32)0);
	Xil_AssertNonvoid(Subtest <= (u8)XIL_TESTMEM_MAXTEST);
	Xil_AssertNonvoid(Addr != NULL);

	Val = XIL_TESTMEM_INIT_VALUE;
	FirtVal = XIL_TESTMEM_INIT_VALUE;

	if((Subtest == XIL_TESTMEM_ALLMEMTESTS) || (Subtest == XIL_TESTMEM_INCREMENT)) {
		/ * Fill the memory with incrementing
		 * values starting from 'FirtVal'    */
		for (I = 0U; I < Words; I++) {
			*(Addr+I) = Val;
			Val++;
		}

		/*
		 * Restore the reference 'Val' to the
		 * initial value
		 */
		Val = FirtVal;

		/*
		 * Check every word within the words
		 * of tested memory and compare it
		 * with the incrementing reference
		 * Val
		 */

		for (I = 0U; I < Words; I++) {
			WordMem32 = *(Addr+I);

			if (WordMem32 != Val) {
				Status = -1;
				goto End_Label;
			}
			Val++;
		}
	}

	if((Subtest == XIL_TESTMEM_ALLMEMTESTS) || (Subtest == XIL_TESTMEM_WALKONES)) {
		/*
		 * set up to cycle through all possible initial
		 * test Patterns for walking ones test
		 */

		for (j = 0U; j < (u32)32; j++) {
			/*
			 * Generate an initial value for walking ones test
			 * to test for bad data bits
			 */

			Val = (1U << j);

			/*
			 * START walking ones test
			 * Write a one to each data bit indifferent locations
			 */

			for (I = 0U; I < (u32)32; I++) {
				/* write memory location */
				*(Addr+I) = Val;
				Val = (u32) RotateLeft(Val, 32U);
			}

			/*
			 * Restore the reference 'val' to the
			 * initial value
			 */
			Val = 1U << j;

			/* Read the values from each location that was
			 * written */
			for (I = 0U; I < (u32)32; I++) {
				/* read memory location */

				WordMem32 = *(Addr+I);

				if (WordMem32 != Val) {
					Status = -1;
					goto End_Label;
				}

				Val = (u32)RotateLeft(Val, 32U);
			}
		}
	}


End_Label:
	return Status;
}
4. DDR3的调用
xil_memtest 函数就是用不同的方式填充内存,如果之后对填充后的内存进行对比,我们不关心这个函数是怎么工作的,我们只关心内存比如DDR3是如何被调用的。
//核心的调用语句用指针Addr实现DDR的调用
for (I = 0U; I < Words; I++) {
    *(Addr+I) = Val;
    Val++;
}

//函数的声明语句
extern s32 Xil_TestMem32(u32 *Addr, u32 Words, u32 Pattern, u8 Subtest);

//主函数中给此函数传递参数的语句
status = Xil_TestMem32((u32*)range->base, 1024, 0xAAAA5555, XIL_TESTMEM_ALLMEMTESTS);

//相应的参数
struct memory_range_s memory_ranges[] = { { "mig_7series_0_memaddr",
        "mig_7series_0", 0x40000000, 1073741824, }, { "ps7_ddr_0", "ps7_ddr_0",
        0x00100000, 1072693248, },
/* ps7_ram_0 memory will not be tested since application resides in the same memory */
{ "ps7_ram_1", "ps7_ram_1", 0xFFFF0000, 65024, }, };
找到调用内存的核心是指针,根据Addr指针一个一个向前回溯,内存是DDR3的rage->base,例如这里Addr指针就是0x40000000,也是对应DDR分配的地址。
我们在vivado集成系统时设置的参数也是这样,地址0x40000000,内存大小1G。

结果就是PS用MIG调用DDR3的过程中,直接运用了MIG的offset address的地址指针位置。
到此我们弄清楚了MIG调用DDR3的原理,系统搭建与相应的程序。后面,我们就要研究如何用IPcore对DDR3进行相应的调用。