本篇博客主要介绍基于PyTorch深度学习框架来实现MNIST经典的手写数字,运用CNN卷积神经网络。
MNIST数据集来自美国国家标准与技术研究所,其中训练数据有60000张,测试数据有10000张,每张图片的大小是28*28像素
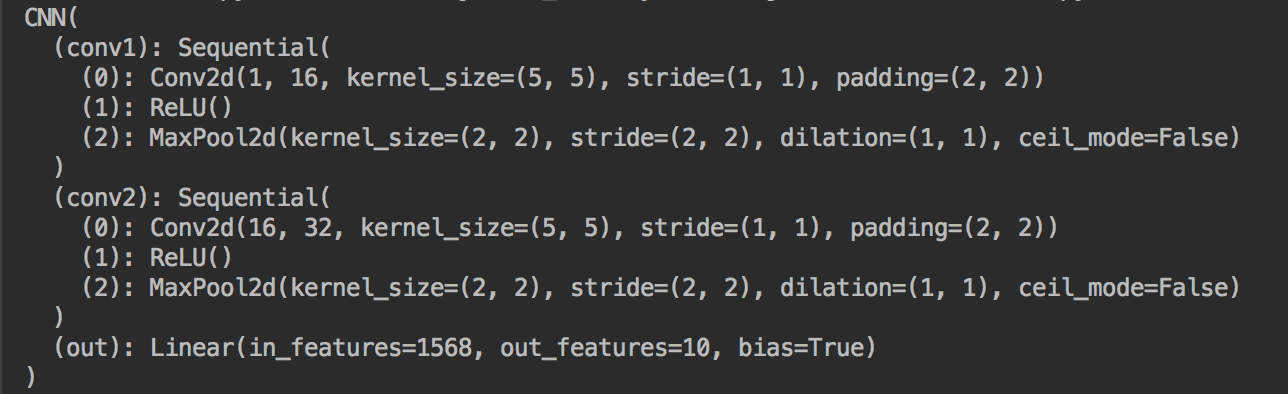
我们可以基于PyTorch直接下载该数据集。该识别程序先使用一层卷积层(卷积核数量16,卷积核大小5*5,步长为1,允许边缘扩充),紧接着激活层使用ReLU函数,之后紧跟着一个max pooling层,大小是2*2. 之后再设置同样的卷积层(卷积核为2种)、激活层、降采样层,最后跟一个全连接层,输出为10个神经元表示有十类,分别是0,1,2,3……9
在各层网络中数据的规模变化如下:
初始情况:1*28*28 (表示只有一个颜色通道,一张图片像素大小是28*28)
第一层卷积之后:16*28*28 (使用了16种卷积核,步长为1,两边各扩充1格,大小不变28*28)
第一层max pooling之后: 16*14*14 (使用2*2的大小进行降采样,图的大小迅速缩小一半)
第二层卷积之后:32*14*14
第二层max pooling之后:32*7*7
全连接层:10 (共有十个类别)
扫描二维码关注公众号,回复:
196301 查看本文章

代码展示:
import torch
import torch.nn as nn
from torch.autograd import Variable
import torch.utils.data as Data
import torchvision
import matplotlib.pyplot as plt

torch.manual_seed(1)   #结果可复现

#设置超参数
EPOCH = 5
BATCH_SIZE= 50
LR = 0.01
DOWNLOAD_MNIST = True #是否下载数据

train_data = torchvision.datasets.MNIST(
    root = './mnist/', #保存的位置
    train = True,   #表示是训练数据
    transform=torchvision.transforms.ToTensor(),
    download = DOWNLOAD_MNIST,
)

test_data = torchvision.datasets.MNIST(root='./mnist/',train=False)

train_loader = Data.DataLoader(dataset=train_data,batch_size=BATCH_SIZE,shuffle=True)

test_x = Variable(torch.unsqueeze(test_data.test_data,dim=1),volatile=True).type(torch.FloatTensor)[:2000]/255
test_y = test_data.test_labels[:2000]

class CNN(nn.Module):
    def __init__(self):
        super(CNN,self).__init__()
        self.conv1 = nn.Sequential(
            nn.Conv2d(
                in_channels=1,    #高度是1,就一个通道
                out_channels=16,  #卷积核数量
                kernel_size=5,    #卷积核大小
                stride=1,         #设置步长为1
                padding=2,        #边缘扩充两格
            ),
            nn.ReLU(),
            nn.MaxPool2d(kernel_size=2),
        )
        self.conv2 = nn.Sequential(
            nn.Conv2d(16,32,5,1,2),
            nn.ReLU(),
            nn.MaxPool2d(2),
        )
        self.out = nn.Linear(32*7*7,10)

    def forward(self,x):
        x = self.conv1(x)
        x = self.conv2(x)
        x = x.view(x.size(0),-1)  #展平多维的卷积图
        output = self.out(x)
        return output

cnn = CNN()
print(cnn)

optimizer = torch.optim.Adam(cnn.parameters(),lr=LR)
loss_func = nn.CrossEntropyLoss()

for epoch in range(EPOCH):
    for step,(x,y) in enumerate(train_loader):
        b_x = Variable(x)
        b_y = Variable(y)

        output = cnn(b_x)
        loss = loss_func(output,b_y)
        optimizer.zero_grad()
        loss.backward()
        optimizer.step()

    test_output=cnn(test_x)
    pred_y = torch.max(test_output,1)[1].data.squeeze()
    accuracy = sum(pred_y==test_y) / float(test_y.size(0))
    print('Epoch: ',epoch, '| train loss: %.4f' %loss.data[0],'| test accuracy: %.2f' %accuracy)

test_output = cnn(test_x[:10])
pre_y = torch.max(test_output,1)[1].data.numpy().squeeze()
print(pre_y,'prediction number')
print(test_y[:10].numpy(),'real number')
输出CNN卷积网路的形态:
输出前2000个测试数据的准确率:

输出前10个测试数据的预测数据和真实值:
