什么事zabbix
Zabbix由Alexei Vladishev创建,目前由Zabbix SIA积极开发和支持。
Zabbix是企业级开源分布式监控解决方案。
Zabbix是监控网络的众多参数以及服务器的健康和完整性的软件。Zabbix使用灵活的通知机制,允许用户为几乎任何事件配置基于电子邮件的警报。这样可以快速反应服务器问题。Zabbix基于存储的数据提供出色的报告和数据可视化功能。这使Zabbix成为容量规划的理想选择。
Zabbix支持轮询和捕获。所有Zabbix报告和统计信息以及配置参数都可通过基于Web的前端进行访问。基于Web的前端确保您的网络状态和服务器的运行状况可以从任何位置进行评估。正确配置,Zabbix可以在监控IT基础设施方面发挥重要作用。对于具有少量服务器的小型组织和拥有大量服务器的大型公司也同样如此。
Zabbix是免费的。Zabbix是根据GPL通用公共许可证版本2 编写和分发的。这意味着它的源代码是免费分发的,可供公众使用。
zabbix功能
Zabbix是一个高度集成的网络监控解决方案,在单个软件包中提供了多种功能。
数据采集
可用性和性能检查
支持SNMP(捕获和轮询),IPMI,JMX,VMware监控
定制检查
以定制的间隔收集所需的数据
由服务器/代理和代理执行
灵活的阈值定义
您可以定义非常灵活的问题阈值,称为触发器,从后端数据库引用值
高度可配置的警报
可以为升级计划,收件人,媒体类型定制发送通知
使用宏变量可以使通知变得有意义和有用
自动操作包括远程命令
实时绘图
使用内置的图形功能立即绘制被监视的项目
Web监控功能
Zabbix可以按照网站上模拟鼠标点击的路径,并检查功能和响应时间
广泛的可视化选项
能够创建可以将多个项目组合成单个视图的自定义图形
网络地图
自定义屏幕和幻灯片,以显示仪表板风格的概述
报告
监控资源的高级(业务)视图
历史数据存储
存储在数据库中的数据
可配置历史
内置内务程序
轻松配置
将监控的设备添加为主机
主机被拾取用于监视,一次在数据库中
将模板应用于受监控设备
使用模板
在模板中分组检查
模板可以继承其他模板
网络发现
自动发现网络设备
代理商自动注册
发现文件系统,网络接口和SNMP OID
快速的Web界面
PHP中的基于Web的前端
可从任何地方访问
你可以点击你的方式
审核日志
Zabbix API
Zabbix API为Zabbix 提供了可编程接口,用于大规模操作,第三方软件集成和其他目的。
权限系统
安全的用户认证
某些用户可以限于某些视图
全功能和易于扩展的代理
部署在监测目标上
可以部署在Linux和Windows上
二进制程序
写在C中,用于性能和小内存占用
容易携带
准备复杂的环境
通过使用Zabbix代理,远程监控变得容易
zabbix 2.4的安装方法
安装zabbix server
CentOS系统版本:

[root@linux-node1 ~]# cat /etc/redhat-release

CentOS release 6.7 (Final)

[root@linux-node1 ~]# uname -r

2.6.32-573.el6.x86_64

[root@linux-node1 ~]# uname -m

x86_64

[root@linux-node1 ~]# tail -2 /etc/hosts

10.0.0.7 linux-node1.oldboyedu.com linux-node1

10.0.0.8 linux-node2.oldboyedu.com linux-node2

[root@linux-node1 ~]# ping www.baidu.com

PING www.a.shifen.com (220.181.112.244) 56(84) bytes of data.

64 bytes from 220.181.112.244: icmp_seq=1 ttl=128 time=7.91 ms

确保服务器可以上网。
安装zabbix服务器端
官方安装参考:https://www.zabbix.com/documentation/2.4/manual/installation/install_from_packages
linux的基础优化必须要做,时间同步、防火墙配置、selinux配置等。
下面是2.4的安装方法
安装zabbix-release包
[root@linux-node1 ~]# mkdir -p /home/oldboy/tools

[root@linux-node1 ~]# cd /home/oldboy/tools

[root@linux-node1 tools]# wget -q http://repo.zabbix.com/zabbix/2.4/rhel/6/x86_64/zabbix-release-2.4-1.el6.noarch.rpm

[root@linux-node1 tools]# ls -lh zabbix-release-2.4-1.el6.noarch.rpm

-rw-r–r– 1 root root 12K 9月 11 2014 zabbix-release-2.4-1.el6.noarch.rpm

[root@linux-node1 tools]# rpm -ivh zabbix-release-2.4-1.el6.noarch.rpm

warning: zabbix-release-2.4-1.el6.noarch.rpm: Header V4 DSA/SHA1 Signature, key ID 79ea5ed4: NOKEY

Preparing… (1########################################### [100%]

1:zabbix-release ( ########################################### [100%]

zabbix-release包安装结果

[root@linux-node1 tools]# rpm -ql zabbix-release

/etc/pki/rpm-gpg/RPM-GPG-KEY-ZABBIX

/etc/yum.repos.d/zabbix.repo

/usr/share/doc/zabbix-release-2.4

/usr/share/doc/zabbix-release-2.4/GPL

[root@linux-node1 tools]# ll /etc/yum.repos.d/zabbix.repo

-rw-r–r– 1 root root 401 9月 11 2014 /etc/yum.repos.d/zabbix.repo
开始安装zabbix
1)保留yum安装的rpm包

[root@linux-node1 tools]# sed -i 's#keepcache=1#keepcache=0#g' /etc/yum.conf

[root@linux-node1 tools]# grep keepcache /etc/yum.conf

keepcache=0
开始安装zabbix
yum -y install zabbix zabbix-server zabbix-server-mysql #<==ZABBIX SERVER相关

yum -y install zabbix-web zabbix-web-mysql #<==Apache、Php Web界面环境

yum -y install zabbix-agent #<== ZABBIX客户端

yum -y install mysql-server mysql #<==MySQL客户端与服务端

yum -y install zabbix-get #<==zabbix命令行工具
配置zabbix服务相关
配置并启动MySQL

[root@linux-node1 tools]# \cp /usr/share/mysql/my-medium.cnf /etc/my.cnf

[root@linux-node1 tools]# vi /etc/my.cnf

然后在[mysqld](第26行)标签下增加如下三行后保存

[mysqld]

character-set-server = utf8

init-connect = 'SET NAMES utf8'

collation-server = utf8_general_ci

2)启动zabbix存储数据的数据库MySQL

[root@linux-node1 tools]# /etc/init.d/mysqld start

……

Please report any problems with the /usr/bin/mysqlbug script!


[确定]

正在启动 mysqld:
[确定]

[root@linux-node1 tools]# netstat -lntup|grep mysql

tcp 0 0 0.0.0.0:3306 0.0.0.0:* LISTEN 26982/mysqld

[root@linux-node1 tools]# mysql

Welcome to the MySQL monitor. Commands end with ; or \g.

Your MySQL connection id is 2

Server version: 5.1.73-log Source distribution

……

Type ‘help;’ or ‘\h’ for help. Type ‘\c’ to clear the current input statement.

mysql>
初始化zabbix存储数据的数据库MySQL
[root@linux-node1 ~]# mysql -e "create database zabbix character set utf8 collate utf8_bin;"

[root@linux-node1 ~]# mysql -e "grant all on zabbix.* to zabbix@localhost identified by 'zabbix';"

[root@linux-node1 ~]# cd /usr/share/doc/zabbix-server-mysql-2.4.8/create/

[root@linux-node1 create]# mysql zabbix<schema.sql

[root@linux-node1 create]# mysql zabbix<images.sql

[root@linux-node1 create]# mysql zabbix<data.sql

[root@linux-node1 create]# mysqladmin -uroot password oldboy

4)初始化apache服务的zabbix配置

[root@linux-node1 create]# sed -i 's#\# php_value date.timezone Europe/Riga#php_value date.timezone Asia/Shanghai#g' /etc/httpd/conf.d/zabbix.conf

[root@linux-node1 create]# grep Shanghai /etc/httpd/conf.d/zabbix.conf
php_value date.timezone Asia/Shanghai
初始化zabbix server配置
[root@linux-node1 create]# cp /etc/zabbix/zabbix_server.conf /etc/zabbix/zabbix_server.conf.oldboy.ori

[root@linux-node1 create]# sed -i 's@# DBPassword=@DBPassword=zabbix@g' /etc/zabbix/zabbix_server.conf

[root@linux-node1 create]# grep DBPassword= /etc/zabbix/zabbix_server.conf

DBPassword=zabbix

[root@linux-node1 create]# sed -i 's@# DBHost=localhost@DBHost=localhost@g' /etc/zabbix/zabbix_server.conf

[root@linux-node1 create]# grep DBHost= /etc/zabbix/zabbix_server.conf DBHost=localhost

修改前后对比:

[root@linux-node1 create]# diff /etc/zabbix/zabbix_server.conf /etc/zabbix/zabbix_server.conf.oldboy.ori

65d64

< ### Option: DBHost

72,73c71

< DBHost=localhost

<

—

> # DBHost=localhost

106c104

< DBPassword=zabbix

—

> # DBPassword=
启动zabbix server及web服务
[root@linux-node1 create]# /etc/init.d/zabbix-server start

Starting Zabbix server: [确定]

[root@linux-node1 create]# lsof -i :10051|wc -l

55

[root@linux-node1 create]# /etc/init.d/httpd start

正在启动 httpd:httpd: apr_sockaddr_info_get() failed for linux-node1.example.com

httpd: Could not reliably determine the server’s fully qualified domain name, using 127.0.0.1 for ServerName

[确定]

[root@linux-node1 create]# lsof -i :80|wc -l

10
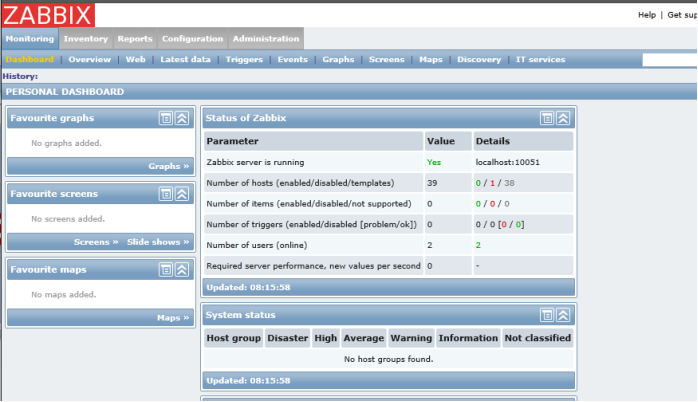
到此,zabbix server端的命令行配置告一段落了,接下来就是Web界面里管理了,使用Web管理对我这样老鸟实在不习惯,还是喜欢Nagios批量自动化脚本管理,更快,更舒服。

安装zabbix Client
客户端CentOS系统版本
CentOS系统版本:

[root@linux-node2 ~]# cat /etc/redhat-release

CentOS release 6.7 (Final)

[root@linux-node2 ~]# uname -r

2.6.32-573.el6.x86_64

[root@linux-node2 ~]# uname -m

x86_64

[root@linux-node2 ~]# ping www.baidu.com

PING www.a.shifen.com (220.181.112.244) 56(84) bytes of data.

64 bytes from 220.181.112.244: icmp_seq=1 ttl=128 time=7.91 ms

确保服务器可以上网。
安装zabbix agent端
官方安装参考:https://www.zabbix.com/documentation/2.4/manual/installation/install_from_packages
linux的基础优化必须要做,时间同步、防火墙配置、selinux配置等。
安装zabbix-release包
[root@linux-node2 ~]# mkdir -p /home/oldboy/tools

[root@linux-node2 ~]# cd /home/oldboy/tools

[root@linux-node2 tools]# wget -q http://repo.zabbix.com/zabbix/2.4/rhel/6/x86_64/zabbix-release-2.4-1.el6.noarch.rpm

[root@linux-node2 tools]# ls -lh zabbix-release-2.4-1.el6.noarch.rpm

-rw-r–r– 1 root root 12K 9月 11 2014 zabbix-release-2.4-1.el6.noarch.rpm

[root@linux-node2 tools]# rpm -ivh zabbix-release-2.4-1.el6.noarch.rpm

warning: zabbix-release-2.4-1.el6.noarch.rpm: Header V4 DSA/SHA1 Signature, key ID 79ea5ed4: NOKEY

Preparing… ########################################### [100%]

1:zabbix-release ########################################### [100%]

zabbix-release包安装结果

[root@linux-node2 tools]# rpm -ql zabbix-release

/etc/pki/rpm-gpg/RPM-GPG-KEY-ZABBIX

/etc/yum.repos.d/zabbix.repo

/usr/share/doc/zabbix-release-2.4

/usr/share/doc/zabbix-release-2.4/GPL

[root@linux-node2 tools]# ll /etc/yum.repos.d/zabbix.repo

-rw-r–r– 1 root root 401 9月 11 2014 /etc/yum.repos.d/zabbix.repo
开始安装zabbix
1)保留yum安装的rpm包

[root@linux-node2 tools]# sed -i ‘s#keepcache=1#keepcache=0#g’ /etc/yum.conf

[root@linux-node2 tools]# grep keepcache /etc/yum.conf

keepcache=0

2)开始安装zabbix agent

yum -y install zabbix-agent #<== ZABBIX客户端

yum -y install zabbix-get #<==zabbix命令行工具

提示:也可以去官方下载rpm http://repo.zabbix.com/zabbix/2.4/rhel/

3、配置zabbix agent服务相关

[root@linux-node2 tools]# grep Server= /etc/zabbix/zabbix_agentd.conf

# Server=

Server=127.0.0.1

[root@linux-node2 tools]# sed -i ‘s#Server=127.0.0.1#Server=10.0.0.7#g’ /etc/zabbix/zabbix_agentd.conf

[root@linux-node2 tools]# grep Server= /etc/zabbix/zabbix_agentd.conf

# Server=

Server=10.0.0.7

4、启动zabbix agent

[root@linux-node2 tools]# /etc/init.d/zabbix-agent start

Starting Zabbix agent: [确定]

[root@linux-node2 tools]# netstat -tunlp|grep 10050

tcp 0 0 0.0.0.0:10050 0.0.0.0:* LISTEN 26560/zabbix_agentd

tcp 0 0 :::10050 :::* LISTEN 26560/zabbix_agentd

[root@linux-node2 tools]# tailf /var/log/zabbix/zabbix_agentd.log

26560:20151028:185412.799 Starting Zabbix Agent [Zabbix server]. Zabbix 2.4.6 (revision 54796).

26560:20151028:185412.799 using configuration file: /etc/zabbix/zabbix_agentd.conf

26560:20151028:185412.799 agent #0 started [main process]

26564:20151028:185412.800 agent #4 started [listener #3]

26563:20151028:185412.800 agent #3 started [listener #2]

26565:20151028:185412.800 agent #5 started [active checks #1]

26562:20151028:185412.801 agent #2 started [listener #1]
至此,linux下zabbix客户端安装完毕。
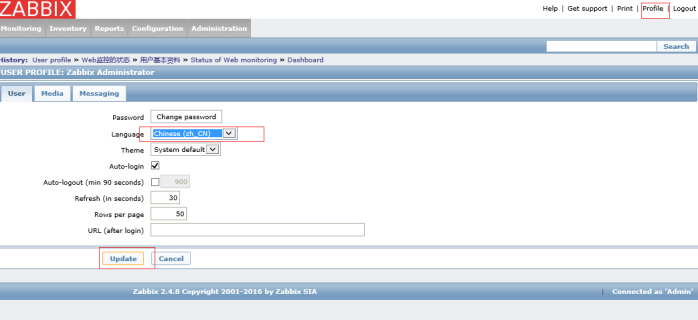
1.2 设置zabbix的中文界面