前导博文:https://blog.csdn.net/cs_hnu_scw/article/details/80720206
情景引入:
小白:快起床快起床,起来学习起来学习~~~~
我:你能不能让我安心点,今天周末,咱们不学习,放假放假!(适当的休息还是很有用的哦,劳逸结合~!)
小白:不行,昨天不是才休息的吗?我遇到问题遇到问题了~~
我:快说,你又有什么问题?你是十万个为什么吗?
小白:我学习完你上次对我说的关于通用Mapper的内容了,并且确实相比我之前的开发编码快很多,但是,但是,我现在有个想法,我想进一步的进行优化。
我:很不错,看样子,你是有认真学习我给你讲的内容嘛。通用Mapper的配置确实是很有用的,也是用的比较多的方式之一。
小白:你看,像我原来使用过Hibernate,我觉得这样的ORM架构就非常好,它内置很多的数据层操作的API,那么有没有什么更好的方法,可以类似这样,而不需要编写mapper.xml文件的呢?感觉好麻烦。。。。。
我:这个嘛。。你的意思是说,想直接利用接口就进行数据层操作是吗?就类似通用Mapper这样的形式是么?
小白:对的对的,你真聪明。。。
我:emmmmmmm,那看在你夸我的面子上,我就教你一个新知识吧。这就是Spring Data!!!!
情景分析:
在JavaWeb开发中,不管你用什么框架,开发的什么功能项目。都存在着对于数据库的数据交互。我们可能会针对某些烦人的操作感到无聊,总想有什么好的方式进行项目的开发。是的,这确实就是我们工作中遇到的实际存在的问题。一个好的架构,对于我们编程人员来说就是一种福音,那么,我就用这篇博文来讲一种数据库交互的方式---------Spring Data!
博文目录:
一:Spring Data简介
二:传统方式的数据库访问方式-----JDBC
三:基于Spring框架数据库访问方式---------JdbcTemplate模板
四:Spring Data的入门
五:Spring Data的进阶
六:让我给你总结总结
温馨提示:本博文的环境都是基于:IDEA+windows7+Mysql 5.7
简介
Spring Data的使命是为数据访问提供熟悉且一致的基于Spring的编程模型,同时仍保留底层数据存储的特殊特性。
它使得使用数据访问技术,关系数据库和非关系数据库,map-reduce框架以及基于云的数据服务变得很容易。 这是一个总括项目,其中包含许多特定于特定数据库的子项目。 这些项目是通过与许多支持这些令人兴奋的技术的公司和开发人员合作开发的。 -------Spring Data官网翻译
另外,用通俗的话来说:在企业级JavaEE应用开发中,对数据库的访问和操作是必须的。Spring Data作为SpringSource的其中一个子项目,旨在统一和简化对各类型持久化存储和访问,而不拘泥于是关系型数据库还是NoSQL数据存储,使得对数据库的访问变得方便快捷,并支持MapReduce框架及云计算服务;对于拥有海量数据的项目,可以用Spring Data来简化项目的开发,就如Spring Framework对JDBC、ORM的支持一样,Spring Data会让数据的访问变得更加方便,极大提高开发效率。
传统的数据库访问方式
当我们在学习JavaWeb的初级阶段的时候,我想,大家肯定学习过一种与数据库进行交互的方式,那就是-----JDBC。是的,它是最原始的一种方式,然而,它却有着很多的不足之处。
或许,你已经忘记了JDBC是如何操作数据库的了,没关系,我就用个简单的例子,来帮助大家进行回顾。这样对于我们后续的学习还是很有帮助的。
(一)让我们来搭一搭JDBC的开发实例(IDEA编辑器+Maven+mysql)
步骤:
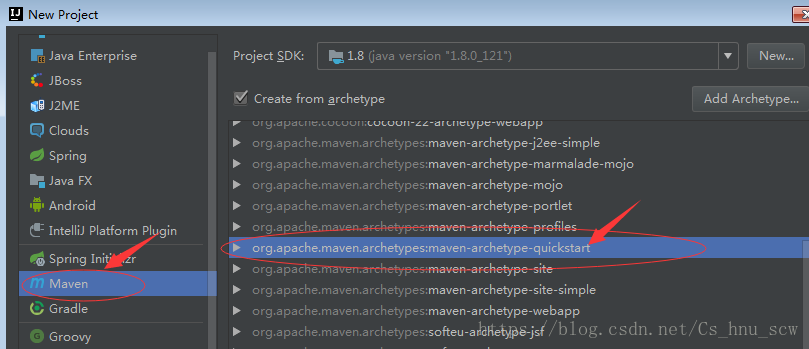
1:使用IDEA编辑器创建一个Maven项目,不明白的欢迎看我Maven知识点的博文
2:在pom.xml文件中添加下面的依赖(顺便配置一下下载依赖的仓库---基于之前没有配置过的朋友)
 <!-- 配置阿里云仓库,要不然从中央maven库下载很慢-->
  <repositories>
    <repository>
      <id>nexus-aliyun</id>
      <name>nexus-aliyun</name>
      <url>http://maven.aliyun.com/nexus/content/groups/public/</url>
      <releases>
        <enabled>true</enabled>
      </releases>
      <snapshots>
        <enabled>false</enabled>
      </snapshots>
    </repository>
  </repositories>

 <!-- mysql -->
    <dependency>
      <groupId>mysql</groupId>
      <artifactId>mysql-connector-java</artifactId>
      <version>5.1.38</version>
</dependency>3:新建一个文件夹resource(和java目录同级,并且创建之后记得将这个文件右击然后选择Mark Dirctory as 然后选择resource即可),用于存储相关的配置文件,这里主要是放置jdbc.properties,便于灵活性的修改数据库连接等内容。
jdbc.url = jdbc:mysql:///springdata
jdbc.username = root
jdbc.password = 123456
jdbc.driverClass = com.mysql.jdbc.Driver
4:创建JDBC获取连接和释放资源的工具类(这个还是比较有用的,方便后续操作)
package com.hnu.scw.utils;

import javax.xml.transform.Result;
import java.io.InputStream;
import java.sql.*;
import java.util.Properties;

/**
 * @ Author     :scw
 * @ Date       :Created in 下午 8:48 2018/6/21 0021
 * @ Description:JDBC相关的工具类
 * @ Modified By:
 * @Version: $version$
 */
public class JDBCUtil {
    /**
     * 根据properties获取数据库连接
     * @return
     * @throws Exception
     */
    public static Connection getConnection() throws Exception {
        InputStream resourceAsStream = JDBCUtil.class.getClassLoader().getResourceAsStream("jdbc.properties");
        Properties properties = new Properties();
        properties.load(resourceAsStream);

        String url = properties.getProperty("jdbc.url");
        String userName = properties.getProperty("jdbc.username");
        String password = properties.getProperty("jdbc.password");
        String dirverClass = properties.getProperty("jdbc.driverClass");

        Class.forName(dirverClass);
        Connection connection = DriverManager.getConnection(url, userName, password);
        return connection;
    }

    /**
     * 释放数据库连接的相关对象
     * @param resultSet
     * @param statement
     * @param connection
     */
    public static void release(ResultSet resultSet , Statement statement , Connection connection){
        if(resultSet != null){
            try {
                resultSet.close();
            } catch (SQLException e) {
                e.printStackTrace();
            }
        }
        if(statement != null){
            try {
                statement.close();
            } catch (SQLException e) {
                e.printStackTrace();
            }
        }
        if(connection != null){
            try {
                connection.close();
            } catch (SQLException e) {
                e.printStackTrace();
            }
        }
    }
}
5:在数据库中创建一个数据表,并且同时创建一个实体类(以student学生实体为例子)
表结构如下:

package com.hnu.scw.model;
/**
 * @ Author     :scw
 * @ Date       :Created in 下午 5:14 2018/6/22 0022
 * @ Description:定义一个实体对象
 * @ Modified By:
 * @Version: $version$
 */
public class Student {
    private Integer id;
    private String name;
    private Integer age ;

    public Integer getId() {
        return id;
    }

    public void setId(Integer id) {
        this.id = id;
    }

    public String getName() {
        return name;
    }

    public void setName(String name) {
        this.name = name;
    }

    public Integer getAge() {
        return age;
    }

    public void setAge(Integer age) {
        this.age = age;
    }

    @Override
    public String toString() {
        return "Student{" +
                "id=" + id +
                ", name='" + name + '\'' +
                ", age=" + age +
                '}';
    }
}
6:编写Dao层操作数据库接口方法
package com.hnu.scw.dao;
import com.hnu.scw.model.Student;
import java.util.List;
/**
 * @ Author     :scw
 * @ Date       :Created in 下午 5:16 2018/6/22 0022
 * @ Description:定义操作student的dao接口层
 * @ Modified By:
 * @Version: $version$
 */
public interface StudentDao {
    /**
     * 查询所有的学生信息
     * @return
     */
    List<Student> selectAllStudent();
}
7:编写Dao层接口的实现类
package com.hnu.scw.dao.impl;
import com.hnu.scw.dao.StudentDao;
import com.hnu.scw.model.Student;
import com.hnu.scw.utils.JDBCUtil;
import java.sql.Connection;
import java.sql.PreparedStatement;
import java.sql.ResultSet;
import java.util.ArrayList;
import java.util.List;

/**
 * @ Author     :scw
 * @ Date       :Created in 下午 5:22 2018/6/22 0022
 * @ Description:${description}
 * @ Modified By:
 * @Version: $version$
 */
public class StudentDaoImpl implements StudentDao {

    @Override
    public List<Student> selectAllStudent() {
        Connection connection = null;
        PreparedStatement statement = null;
        ResultSet resultSet = null;
        ArrayList<Student> students = new ArrayList<>();

        try {
            String sql = "select * from Student ";
            connection = JDBCUtil.getConnection();
            statement = connection.prepareStatement(sql);
            resultSet = statement.executeQuery();
            Student student = null ;
            while(resultSet.next()){
                int id = resultSet.getInt("id");
                String name = resultSet.getString("name");
                int age = resultSet.getInt("age");
                student = new Student();
                student.setId(id);
                student.setName(name);
                student.setAge(age);
                students.add(student);
            }
        }catch (Exception e){
            e.printStackTrace();
        }finally {
            JDBCUtil.release(resultSet,statement , connection);
        }
        return students;
    }
}
8:进行jdbc方法的测试。编写单元测试类
package com.hnu.scw;
import static org.junit.Assert.assertTrue;
import com.hnu.scw.dao.StudentDao;
import com.hnu.scw.dao.impl.StudentDaoImpl;
import com.hnu.scw.model.Student;
import com.hnu.scw.utils.JDBCUtil;
import org.junit.Test;
import java.sql.Connection;
import java.util.List;
/**
 * Unit test for simple App.
 */
public class JDBCTest {
    /**
     * 测试jdbc连接是否成功
     * @throws Exception
     */
    @Test
    public void testConnection() throws Exception {
        JDBCUtil.getConnection();
    }

    /**
     * 测试jdbc操作数据库方法(查询所有的学生表信息)
     */
    @Test
    public void testQuerySQL(){
        StudentDao studentDao = new StudentDaoImpl();
        List<Student> students = studentDao.selectAllStudent();
        for (Student s : students) {
            System.out.println(s.toString());
        }
    }
}
温馨提示:当执行了方法之后,如果提示单元测试成功,并打印我们预期的内容的话,那就说明我们的流程是成功的了哦!
JDBC操作的总结:
(1)首先,我们发现代码很冗余,因为对于数据库的连接的资源都需要我们进行手动的释放
(2)数据库操作的代码重复性过多,在我们的实例中,我们仅仅写了一个查询所有数据的方法就有那么多的代码,而如果我们还有其他的数据库,比如增删改查,那么可想而知,代码有多少的重复。
既然,JDBC有这么多的问题,那我们肯定就要想一个解决的办法,那么继续,别停下,看下面的内容:
基于Spring框架的JDBCTemplate模板方法
同理,这个方式,我想大家在初学Spring的时候都有接触过,可能在实际项目中不会用这样的方式,毕竟有很多的数据库操作框架,比如Mybatis和Hibernate。但是,这也是一种方式的改进,所以,我觉得还是有必要进行说明一下的。
(一)让我们搭建一下JdbcTemplate模板方法(IDEA编辑器+Spring +Maven+mysql,直接基于上面的环境就可以)
步骤:
1:在pom.xml文件中添加spring的相关依赖
 <!-- spring-jdbc 为了获取jdbtTemplete的处理-->
    <dependency>
      <groupId>org.springframework</groupId>
      <artifactId>spring-jdbc</artifactId>
      <version>4.3.5.RELEASE</version>
    </dependency>
    <!-- spring 为了进行spring的配置-->
    <dependency>
      <groupId>org.springframework</groupId>
      <artifactId>spring-context</artifactId>
      <version>4.3.5.RELEASE</version>
    </dependency>
2:编写Spring的相关配置(这里命名为applicationcontext.xml),文件放在之前创建的resource目录即可
<?xml version="1.0" encoding="utf-8" ?>
<beans xmlns="http://www.springframework.org/schema/beans"
        xmlns:xsi = "http://www.w3.org/2001/XMLSchema-instance"
        xsi:schemaLocation = "http://www.springframework.org/schema/beans
        http://www.springframework.org/schema/beans/spring-beans.xsd">
    <bean id="dataSource" class="org.springframework.jdbc.datasource.DriverManagerDataSource">
        <property name="url" value="jdbc:mysql:///springdata" />
        <property name="username" value="root" />
        <property name="password" value="123456" />
        <property name="driverClassName" value="com.mysql.jdbc.Driver" />
    </bean>
    <bean id="jdbcTemplate" class="org.springframework.jdbc.core.JdbcTemplate">
        <property name="dataSource" ref="dataSource"/>
    </bean>
    <!--让操作数据库的对象由spring进行管理-->
    <bean id="jdbcTemplateStudentDaoImpl" class="com.hnu.scw.spring.jdbctemplate.dao.impl.JDBCTemplateStudentDaoImpl">
        <property name="jdbcTemplate" ref="jdbcTemplate" />
    </bean>
</beans>
3:编写Dao层接口代码
package com.hnu.scw.spring.jdbctemplate.dao;
import com.hnu.scw.model.Student;
import java.util.List;

/**
 * @ Author     :scw
 * @ Date       :Created in 下午 7:56 2018/6/22 0022
 * @ Description:基于jdbctemplate的模板方法的dao接口
 * @ Modified By:
 * @Version: $version$
 */
public interface JDBCTemplateStudentDao {
    /**
     * 查询所有的学生数据
     * @return
     */
    List<Student> selectAllStudent();
}
4:编写Dao层实体类代码
package com.hnu.scw.spring.jdbctemplate.dao.impl;
import com.hnu.scw.model.Student;
import com.hnu.scw.spring.jdbctemplate.dao.JDBCTemplateStudentDao;
import org.springframework.jdbc.core.JdbcTemplate;
import org.springframework.jdbc.core.RowCallbackHandler;
import java.sql.ResultSet;
import java.sql.SQLException;
import java.util.ArrayList;
import java.util.List;
/**
 * @ Author     :scw
 * @ Date       :Created in 下午 7:50 2018/6/22 0022
 * @ Description:测试jdbctemplate进行操作数据库
 * @ Modified By:
 * @Version: $version$
 */
public class JDBCTemplateStudentDaoImpl implements JDBCTemplateStudentDao{
    private JdbcTemplate jdbcTemplate ;

    public JdbcTemplate getJdbcTemplate() {
        return jdbcTemplate;
    }
    //注入JdbcTemplate
    public void setJdbcTemplate(JdbcTemplate jdbcTemplate) {
        this.jdbcTemplate = jdbcTemplate;
    }

    /**
     * 进行jdbctemplate模板来操作数据库
     * @return
     */
    @Override
    public List<Student> selectAllStudent() {
        final ArrayList<Student> students = new ArrayList<>();
        String sql = "select * from student";
        jdbcTemplate.query(sql, new RowCallbackHandler() {
            @Override
            public void processRow(ResultSet resultSet) throws SQLException {
                int id = resultSet.getInt("id");
                String name = resultSet.getString("name");
                int age = resultSet.getInt("id");
                Student student = new Student();
                student.setAge(age);
                student.setName(name);
                student.setId(id);
                students.add(student);
            }
        });
        return students;
    }
}
5:编写单元测试方法。
package com.hnu.scw;
import com.hnu.scw.model.Student;
import com.hnu.scw.spring.jdbctemplate.dao.JDBCTemplateStudentDao;
import com.hnu.scw.spring.jdbctemplate.dao.impl.JDBCTemplateStudentDaoImpl;
import org.junit.Assert;
import org.junit.Before;
import org.junit.Test;
import org.springframework.context.ApplicationContext;
import org.springframework.context.support.ClassPathXmlApplicationContext;
import org.springframework.jdbc.core.JdbcTemplate;
import javax.sql.DataSource;
import java.util.List;
/**
 * @ Author     :scw
 * @ Date       :Created in 下午 7:37 2018/6/22 0022
 * @ Description:关于Spring中jdbctemplete的相关测试
 * @ Modified By:
 * @Version: $version$
 */
public class SpringJDBCTempleteTest {
    private ApplicationContext context = null;
    private JDBCTemplateStudentDao jdbcTemplateStudentDao ;
    /**
     * 在进行测试单元之前进行的操作(这里主要就是注入bean)
     */
    @Before
    public void setContextTool(){
        System.out.println("提前注入context");
        context  = new ClassPathXmlApplicationContext("applicationContext.xml");
        jdbcTemplateStudentDao  = (JDBCTemplateStudentDao) context.getBean("jdbcTemplateStudentDaoImpl");
    }

    /**
     * 测试注入DataSource
     */
    @Test
    public void testDataSource(){
        DataSource dataSource = (DataSource) context.getBean("dataSource");
        //通过断言进行判断
        Assert.assertNotNull(dataSource);
    }

    /**
     * 测试jdbcTemplate注入是否成功
     */
    @Test
    public void testJDBCTemplate(){
        JdbcTemplate jdbcTemplate = (JdbcTemplate) context.getBean("jdbcTemplate");
        //通过断言进行判断
        Assert.assertNotNull(jdbcTemplate);
    }

    /**
     * 测试通过jdbctemplate进行的数据库操作
     */
    @Test
    public void testJdbcTemplateStudentDaoImpl(){
        List<Student> students = jdbcTemplateStudentDao.selectAllStudent();
        for (Student s : students) {
            System.out.println(s.toString());
        }
    }

}温馨提示:如果执行了上面的几个单元测试后,都是绿色,那就说明我们的环境都是正确的哦。!(单元测试要一个个来,这样在我们的项目开发中是非常有必要的,这样可以方便我们找到错误最早 出现的位置,而别写了很多代码之后,才进行一次性的测试,这是非常不好的习惯!)
JdbcTemplate操作数据库的总结
(1)通过spring我们可以方便对于对象的管理,这里就是jdbcTemplate对象
(2)但是,还是存在一个很多的问题,就是操作过于麻烦,想想,我们上面就是简单的操作一个查询,就需要编写这样的代码,而我们项目中还有其他的方法,这想想就很可怕了吧。
OK,这个方式还是没有解决我们的问题,那么接下来,Spring Data闪亮登场!!!!
Spring Data的入门
经过前两种方式的编写,我们都发现了很多的问题。而为什么我要这样写,就是让大家有一种慢慢熟悉的感觉,这样才会觉得Spring Data的方便之处,对于其的内容就更加的有兴趣。
(一)让我们来搭建Spring Data的开发环境(还是和上面一样哦!)
步骤:
1:在pom,xml文件中添加Spring Data的相关依赖
 <!-- spring-data-jpa -->
    <dependency>
      <groupId>org.springframework.data</groupId>
      <artifactId>spring-data-jpa</artifactId>
      <version>1.8.0.RELEASE</version>
    </dependency>
    <!-- 配置hibernate的实体管理依赖-->
    <dependency>
      <groupId>org.hibernate</groupId>
      <artifactId>hibernate-entitymanager</artifactId>
      <version>4.3.6.Final</version>
</dependency>2:编写JavaBean实体。(我这里就不用上面的student,而用一个新的teacher来演示,便于大家进行查看,而且我们不需要提前在数据库中创建表哦,当我们没有的时候,这个是会自动创建表的呢!方便不?)
package com.hnu.scw.model;
import javax.persistence.Column;
import javax.persistence.Entity;
import javax.persistence.GeneratedValue;
import javax.persistence.Id;
/**
 * @ Author     :scw
 * @ Date       :Created in 下午 8:37 2018/6/22 0022
 * @ Description:编写一个老师实体类
 * @ Modified By:
 * @Version: $version$
 */
@Entity
public class Teacher {
    //配置表的id,并且是使用自增
    @Id
    @GeneratedValue
    private Integer id;
    //设置列的长度为15,并且不能为空
    @Column(length = 15 ,nullable = false)
    private String name ;
    private String classNumber ;

    public Integer getId() {
        return id;
    }

    public void setId(Integer id) {
        this.id = id;
    }

    public String getName() {
        return name;
    }

    public void setName(String name) {
        this.name = name;
    }

    public String getClassNumber() {
        return classNumber;
    }

    public void setClassNumber(String classNumber) {
        this.classNumber = classNumber;
    }

    @Override
    public String toString() {
        return "Teacher{" +
                "id=" + id +
                ", name='" + name + '\'' +
                ", classNumber='" + classNumber + '\'' +
                '}';
    }
}
表结构如下:

3:编写Spring 和Spring Data的相关配置文件(我命名为springdatacontext.xml),放在resource文件目录下。
<?xml version="1.0" encoding="UTF-8" ?>
<beans xmlns="http://www.springframework.org/schema/beans"
       xmlns:xsi="http://www.w3.org/2001/XMLSchema-instance"
       xmlns:jpa="http://www.springframework.org/schema/data/jpa" xmlns:tx="http://www.springframework.org/schema/tx"
       xmlns:context="http://www.springframework.org/schema/context"
       xsi:schemaLocation="http://www.springframework.org/schema/beans
        http://www.springframework.org/schema/beans/spring-beans.xsd
        http://www.springframework.org/schema/data/jpa
        http://www.springframework.org/schema/data/jpa/spring-jpa.xsd http://www.springframework.org/schema/tx http://www.springframework.org/schema/tx/spring-tx.xsd http://www.springframework.org/schema/context http://www.springframework.org/schema/context/spring-context.xsd">
    <!--配置数据源-->
    <bean id="dataSource" class="org.springframework.jdbc.datasource.DriverManagerDataSource">
        <property name="url" value="jdbc:mysql:///springdata" />
        <property name="username" value="root" />
        <property name="password" value="123456" />
        <property name="driverClassName" value="com.mysql.jdbc.Driver" />
    </bean>
    <!--配置entityManagerFactory 用于管理实体的一些配置-->
    <bean id="entityManagerFactory" class="org.springframework.orm.jpa.LocalContainerEntityManagerFactoryBean">
        <property name="dataSource" ref="dataSource" />
        <property name="jpaVendorAdapter">
            <bean class="org.springframework.orm.jpa.vendor.HibernateJpaVendorAdapter"/>
        </property>
        <property name="packagesToScan" value="com.hnu.scw"/>
        <property name="jpaProperties">
            <props>
                <prop key="hibernate.ejb.naming_strategy" >org.hibernate.cfg.ImprovedNamingStrategy</prop>
                <prop key="hibernate.dialect" >org.hibernate.dialect.MySQL5InnoDBDialect</prop>
                <prop key="hibernate.show_sql" >true</prop>
                <prop key="hibernate.format_sql" >true</prop>
                <!--配置是否实体自动生成数据表-->
                <prop key="hibernate.hbm2ddl.auto" >update</prop>
            </props>
        </property>
    </bean>
    <!--配置事务管理器-->
    <bean id="transactionManager" class="org.springframework.orm.jpa.JpaTransactionManager">
        <property name="entityManagerFactory" ref="entityManagerFactory"/>
    </bean>
    <!--配置支持事务注解-->
    <tx:annotation-driven transaction-manager="transactionManager"/>
    <!--配置spring data-->
    <jpa:repositories base-package="com.hnu.scw" entity-manager-factory-ref="entityManagerFactory"/>
    <!--配置spring的扫描包-->
    <context:component-scan base-package="com.hnu.scw"/>
</beans>
进入我们真正的使用了哦!!!!!!重点来了~~~~~
4:编写我们需要进行操作实体的Dao层接口-------------------重点,,好好看这接口的内容!
package com.hnu.scw.repository;
import com.hnu.scw.model.Teacher;
import org.springframework.data.jpa.repository.Modifying;
import org.springframework.data.jpa.repository.Query;
import org.springframework.data.repository.Repository;
import org.springframework.data.repository.RepositoryDefinition;
import org.springframework.data.repository.query.Param;
import java.util.List;
/**
* @ Author :scw
* @ Date :Created in 下午 9:17 2018/6/22 0022
* @ Description:基于Spring Data接口的dao层开发接口
* @ Modified By:
* @Version: $version$
*/
//有两种方式,要么用注解要么用继承
//@RepositoryDefinition(domainClass = Teacher.class ,idClass = Integer.class)
public interface TeacherRepository extends Repository<Teacher , Integer> {
//===============使用springdata默认方式=============================
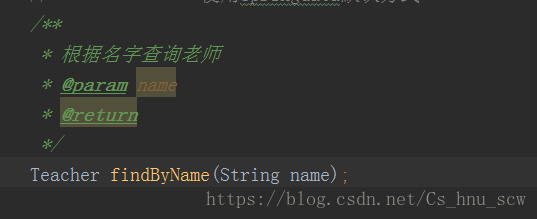
/**
* 根据名字查询老师
* @param name
* @return
*/
Teacher findByName(String name);
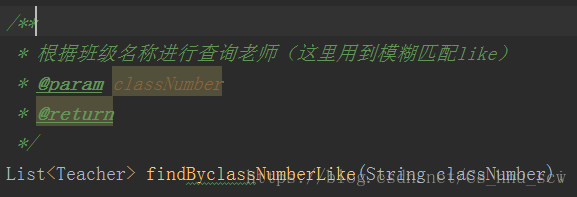
/**
* 根据班级名称进行查询老师(这里用到模糊匹配like)
* @param classNumber
* @return
*/
List<Teacher> findByclassNumberLike(String classNumber);
}重点分析一波:
(1)首先,我们这个接口是需要继承Repository这个接口
(2)泛型参数:第一个是我们制定这个接口所需要进行操作的实体JavaBean
第二个是我们实体JavaBean中主键的类型。(因为我这主键是id,用的Integer类型)
(3)继承的Repository这个接口有什么用?让我们看看源码分析一下
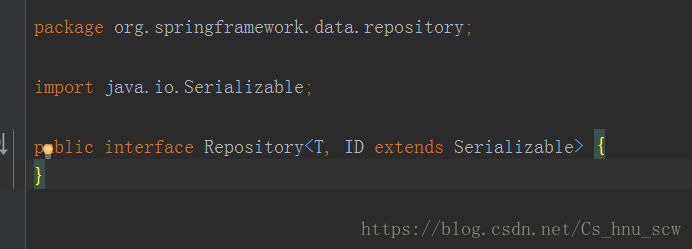
什么?????这个接口啥都没有呀。。。对的,这个接口是什么都没有,就类似Serializable接口一样,就是一个空接口,专业点说就是标记接口。。那么,这个到底有什么用呢?
大家,,认真看认真看!!!!!!!!!()
第一点:Repository是一个空接口,即是一个标记接口。
第二点:若我们定义的接口继承了Repository,则该接口会被IOC容器识别为一个Repository Bean,纳入到IOC容器中,进而可以在该接口中定义满足一定规范的方法。IOC容器中实际存放了继承了Repository的接口的实现类,而这个实现类由spring帮助完成 。在applicationContext.xml中我们配置了springdata:这里的base-package指定了Repository Bean所在的位置,在这个包下的所有的继承了Repository的接口都会被IOC容器识别并纳入到容器中,如果没有继承Repository则IOC容器无法识别。
第三点:我们也可以通过注解的方式替代继承Repository接口@RepositoryDefinition(domainClass=需要处理的实体类的类型,IdClass=主键的类型)。
第四点:看看它有哪些子类:

那这些子类都有什么用呢?别急,这在我后面都会提到哦!!!!
5:好了,我们来进行单元测试吧!
注意:阿,为什么不需要写接口的实现类吗?是不是博文你忘记说了呀。。。。。不不不不,咱们就是不写,你先按照我上面的接口定义两个方法就可以了。(不过,你要保证你的实体和我的是一样的teacher哦!要不然肯定不行的)
package com.hnu.scw;
import com.hnu.scw.model.Teacher;
import com.hnu.scw.repository.TeacherRepository;
import org.junit.Before;
import org.junit.Test;
import org.springframework.beans.factory.annotation.Autowired;
import org.springframework.context.ApplicationContext;
import org.springframework.context.support.ClassPathXmlApplicationContext;
import java.util.List;
/**
 * @ Author     :scw
 * @ Date       :Created in 下午 8:41 2018/6/22 0022
 * @ Description:${description}
 * @ Modified By:
 * @Version: $version$
 */
public class SpringDataTest {
    //用于加载spring配置文件
    private ApplicationContext context = null;

    //用于操作老师实体的接口
    @Autowired
    private TeacherRepository teacherRepository = null;
    @Before
    public void getContext(){
        context = new ClassPathXmlApplicationContext("springdatacontext.xml");
        //通过类名进行注入
        teacherRepository = context.getBean(TeacherRepository.class);
    }

    /**
     * 直接执行这个测试方法,然后就再去看一下数据库就会发生对应实体中的内容到数据库中了
     */
    @Test
    public void testCreateTableAuto(){

    }

    /**
     * 测试springdata中的findByName方法(没有任何的实现,这就是springdata的强大)
     */
    @Test
    public void testSpringDataFindName(){
        Teacher teacher = teacherRepository.findByName("哈哈");
        System.out.println(teacher);
    }

    /**
     * 测试使用springdata进行模糊匹配
     */
    @Test
    public void testSpringDataLike(){
        List<Teacher> teachers = teacherRepository.findByclassNumberLike("%班班%");
        for (Teacher teacher:teachers) {
            System.out.println(teacher);
        }
    }
}
温馨提示:当我们直接上面的代码后,就会发现,竟然竟然能够进行数据操作耶,但是我并没有写实现类,这是为什么为什么为什么呢?
好的,咱们的重点来了,好好看看~~~~
知识点1:为什么只需要在接口中写方法名称,而不需要写实现类就可以进行数据库的操作?
解析:是否还记得我们的接口是继承的Respository这个接口呢?是的,这个就是它的强大的地方。一切的一切都是归根于它。这个原因我在上面已经说过了哦。
知识点2:在接口中方法名称是随便写的吗?有没有什么规范呢?
解析:这个当然不能随便写了,而且我们要实现我们想要的操作,我们必须满足Spring Data定义的规范。
我来分析一下我写的示例的方法,为什么这样命名就可以实现我们想要的操作了。
第一:
首先:findBy就表示我们要进行查询操作,所以,如果你需要进行查询操作,那你就就需要前缀是findBy
其次:Name :这个也不是随便的哦。如果我们想根据实体类中的名字属性进行查询,那么就是Name,如果是想根据班级,那么我们就要写classNumber。当然,里面的参数的命名就是随便的啦,参数名字就没什么影响了
最后:Teacher返回类型:这个没什么特别,我们查询的就是这个实体的数据,当然就是返回这个类型的对象啦。
第二:
首先:findBy这个和上面解释一样,我就不多说。
其次:classNumber这个也不多说,因为,我是要进行这个属性的模糊查询呀!
最后:Like:这个可是很重要的哦。这后缀就代表是进行模糊匹配啦。所以,如果你要进行模糊匹配就要Like结束方法名。
OK,如果这样,那我数据库操作麻烦起来的话,那么方法名不是特别长,特别难记了,而且好多规范都不知道,怎么办呢?别着急呀,下面我就来给你介绍一下,有哪些命令的规范。。(其实嘛,后面当然有解决办法啦~哈哈)
| 关键字 | 方法命名 | sql where字句 |
| And | findByNameAndPwd | where name= ? and pwd =? |
| Or | findByNameOrSex | where name= ? or sex=? |
| Is,Equals | findById,findByIdEquals | where id= ? |
| Between | findByIdBetween | where id between ? and ? |
| LessThan | findByIdLessThan | where id < ? |
| LessThanEquals | findByIdLessThanEquals | where id <= ? |
| GreaterThan | findByIdGreaterThan | where id > ? |
| GreaterThanEquals | findByIdGreaterThanEquals | where id > = ? |
| After | findByIdAfter | where id > ? |
| Before | findByIdBefore | where id < ? |
| IsNull | findByNameIsNull | where name is null |
| isNotNull,NotNull | findByNameNotNull | where name is not null |
| Like | findByNameLike | where name like ? |
| NotLike | findByNameNotLike | where name not like ? |
StartingWith |
findByNameStartingWith | where name like '?%' |
| EndingWith | findByNameEndingWith | where name like '%?' |
| Containing | findByNameContaining | where name like '%?%' |
| OrderBy | findByIdOrderByXDesc | where id=? order by x desc |
| Not | findByNameNot | where name <> ? |
| In | findByIdIn(Collection<?> c) | where id in (?) |
| NotIn | findByIdNotIn(Collection<?> c) | where id not in (?) |
| True | findByAaaTue |
where aaa = true |
| False | findByAaaFalse | where aaa = false |
| IgnoreCase | findByNameIgnoreCase | where UPPER(name)=UPPER(?) |
咳咳咳咳,这么多,记不住,怎么办?那么,我就教你进一步的优化~毕竟先苦后甜嘛~~~~
(二)通过@Query注解来优化Spring Data接口中的方法
我们在上面已经看到了,一般接口定义方法的名字是比较麻烦的,当然,如果Spring Data只能做到这样的程度,那就也太low了,所以如果解决上面的方法呢?很简单,通过注解就可以解决了。
1:示例代码:(这个还是写在上面接口中即可,请注意我代码里面的注释)
 //==============使用query注解开发==============================================
    /**
     * 通过query注解进行开发模糊匹配(利用索引参数的方法)
     * @param classNumber
     * @return
     */
    @Query("select t from Teacher t where t.classNumber like %?1%")
    List<Teacher> queryTeacher(String classNumber);

    /**
     * 通过老师的名字来进行查询数据
     * @param name
     * @return
     */
    @Query("select t from Teacher t where t.name = ?1")
    Teacher queryTeacherByName(String name );
    /**
     * 通过老师的名字来进行查询数据(利用命名参数的方法,注意query注解的写法不一样的)
     * @param name
     * @return
     */
    @Query("select t from Teacher t where t.name = :name")
    Teacher queryTeacherByName2(@Param("name") String name );

    /**
     * 使用原生的SQL语句进行操作(注意from这时候用的就是数据库的表名,而不是实体类名)
     * 必须添加nativeQuery = true,因为默认是false的
     * @return
     */
    @Query(nativeQuery = true , value = "select count(1) from teacher")
    long countTeacherNumber();
2:编写单元测试;
    /**
     * 测试使用springdata中的query注解进行开发模糊查询
     */
    @Test
    public void testQueryTeacher(){
        List<Teacher> teachers = teacherRepository.queryTeacher("班班");
        for (Teacher teacher:teachers) {
            System.out.println(teacher);
        }
    }

    /**
     * 测试通过占位符进行操作查询
     */
    @Test
    public void testQueryTeacherByName(){
        Teacher teacher = teacherRepository.queryTeacherByName("哈哈");
        System.out.println(teacher);
    }
    /**
     * 测试通过别名进行操作查询
     */
    @Test
    public void testQueryTeacherByName2(){
        Teacher teacher = teacherRepository.queryTeacherByName2("哈哈");
        System.out.println(teacher);
    }

    /**
     * 测试使用原生的SQL语句进行开发
     */
    @Test
    public void testCountTeacherNumber(){
        long number = teacherRepository.countTeacherNumber();
        System.out.println("数据总条数为:" + number);
    }
(三)如何使用Spring Data进行删除更新的数据库操作
我们之前都是写的查询操作,那么如果进行更新和删除操作,是不是也是一样的?
然而,请注意,并不是的,而且特别要注意下面两点:
(1)对于更新和删除操作,必须在接口的方法上面添加@Modifying注解,这样就用于标识这是一个修改的操作
(2)必须在调用这个接口方法的地方(一般就是service层)使用事务,即用@Transactional注解进行标识。
示例代码:
1:编写接口方法:
 //================进行springdata的更新删除的处理======================

    /**
     * 根据老师表的id进行修改对应数据的老师名字
     * 必须要添加@Modifying注解,并且要在调用的方法上添加事务注解@Transactional
     * @param name
     * @param id
     */
    @Modifying
    @Query("update Teacher  t set t.name = ?1 where t.id = ?2")
    void updateTeacherById(String name , Integer id);:
2:编写service层代码
package com.hnu.scw.service;
import com.hnu.scw.model.Teacher;
import com.hnu.scw.repository.TeacherCrudRespository;
import com.hnu.scw.repository.TeacherRepository;
import org.springframework.beans.factory.annotation.Autowired;
import org.springframework.stereotype.Service;

import javax.transaction.Transactional;
import java.util.List;

/**
 * @ Author     :scw
 * @ Date       :Created in 下午 5:29 2018/6/23 0023
 * @ Description:编写springdata相关的service层代码
 * @ Modified By:
 * @Version: $version$
 */
@Service
public class SpringDataService {
    @Autowired
    private TeacherRepository teacherRepository;

    @Autowired
    private TeacherCrudRespository teacherCrudRespository;
    /**
     * 根据id进行修改老师的名字
     * @param name
     * @param id
     */
    @Transactional
    public void updateTeacher(String name , Integer id){
        teacherRepository.updateTeacherById(name , id);
    }
}
3:单元测试代码:
package com.hnu.scw.service;
import com.hnu.scw.model.Teacher;
import com.hnu.scw.repository.TeacherRepository;
import org.junit.Before;
import org.junit.Test;
import org.springframework.beans.factory.annotation.Autowired;
import org.springframework.context.ApplicationContext;
import org.springframework.context.support.ClassPathXmlApplicationContext;

import java.util.ArrayList;

/**
 * @ Author     :scw
 * @ Date       :Created in 下午 5:27 2018/6/23 0023
 * @ Description:测试service层的方法
 * @ Modified By:
 * @Version: $version$
 */
public class SpringDataServiceTest {
    //用于加载spring配置文件
    private ApplicationContext context = null;

    @Autowired
    private SpringDataService springDataService = null ;

    @Before
    public void getContext(){
        context = new ClassPathXmlApplicationContext("springdatacontext.xml");
        //通过类名进行注入
        springDataService = context.getBean(SpringDataService.class);
    }

    /**
     * 测试springdata的更新操作的方法
     * 注意点:接口必须添加@Modifying注解
     * 调用层service必须有事务注解@Transactional
     */
    @Test
    public void testUpdateTeacher(){
        springDataService.updateTeacher("呵呵" , 1);
    }
}:
Spring Data的进阶
根据我们上面的内容,已经学会了基本的Spring Data的操作。那么,它就这么点技能么?当然不是,请看下面的内容。
(一)接口继承CrudRespository接口
说明: CrudRepository 接口继承于 Repository 接口,并新增了简单的增、删、查等方法。
主要的方法如下:
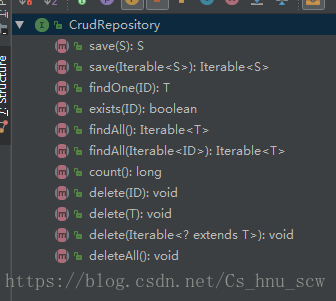
示例代码:
package com.hnu.scw.repository;
import com.hnu.scw.model.Teacher;
import org.springframework.data.repository.CrudRepository;

/**
 * @ Author     :scw
 * @ Date       :Created in 下午 5:38 2018/6/23 0023
 * @ Description:通过继承CrudRespository接口(因为可以快速进行crud相关的方法开发)
 * @ Modified By:
 * @Version: $version$
 */
public interface TeacherCrudRespository extends CrudRepository<Teacher , Integer>{

}
示例单元测试类:大家就可以根据我上面贴的方法进行随便编写就好了啦。就不多写测试方法了~~~~~~
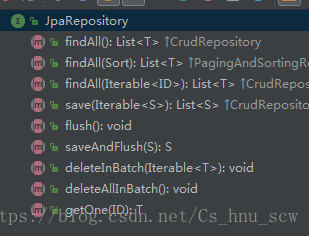
(二)接口继承JpaRespository接口
说明:JpaRepository支持接口规范方法名查询。意思是如果在接口中定义的查询方法符合它的命名规则,就可以不用写实现了。这个我在前面就说了有哪些命名规则的哦~
主要的接口如下:
示例代码:
package com.hnu.scw.repository;
import com.hnu.scw.model.Teacher;
import org.springframework.data.jpa.repository.JpaRepository;

/**
 * @ Author     :scw
 * @ Date       :Created in 下午 5:59 2018/6/23 0023
 * @ Description:测试继承JpaRepository接口的方法
 * @ Modified By:
 * @Version: $version$
 */
public interface TeacherJpaRepository extends JpaRepository<Teacher ,Integer>{
}
单元测试代码:
package com.hnu.scw;
import com.hnu.scw.model.Teacher;
import com.hnu.scw.repository.TeacherJpaRepository;
import com.hnu.scw.repository.TeacherPagingAndSortRespository;
import org.junit.Before;
import org.junit.Test;
import org.springframework.beans.factory.annotation.Autowired;
import org.springframework.context.ApplicationContext;
import org.springframework.context.support.ClassPathXmlApplicationContext;
/**
* @ Author :scw
* @ Date :Created in 下午 6:00 2018/6/23 0023
* @ Description:测试继承Respositoty接口的相关的操作
* @ Modified By:
* @Version: $version$
*/
public class JpaRespositotyTest {
//用于加载spring配置文件
private ApplicationContext context = null;
//用于操作老师实体的接口
@Autowired
private TeacherJpaRepository teacherJpaRepository = null;
@Before
public void getContext(){
context = new ClassPathXmlApplicationContext("springdatacontext.xml");
//通过类名进行注入
teacherJpaRepository = context.getBean(TeacherJpaRepository.class);
}
/**
* 测试JpaRepository接口中相关的查找数据的方法
*/
@Test
public void testJpaFind(){
//查询id=20的数据
Teacher oneTeacher = teacherJpaRepository.findOne(20);
System.out.println(oneTeacher);
//判断id=100的数据是否存在于数据库中
boolean exists = teacherJpaRepository.exists(100);
System.out.println("数据存在吗?" + exists);
}
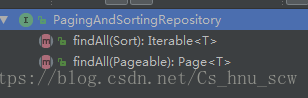
}(三)接口继承PagingAndSortRespository接口
说明:这个接口主要就是实现了分页和排序的方法。。。所以,分页很重要哦~
方法接口如下:
接口示例代码:
package com.hnu.scw.repository;

import com.hnu.scw.model.Teacher;
import org.springframework.data.repository.PagingAndSortingRepository;

/**
 * @ Author     :scw
 * @ Date       :Created in 下午 5:48 2018/6/23 0023
 * @ Description:通过继承PagingAndSortRespository接口来快速进行分页开发
 * @ Modified By:
 * @Version: $version$
 */
public interface TeacherPagingAndSortRespository extends PagingAndSortingRepository<Teacher ,Integer>{
}package com.hnu.scw;
import com.hnu.scw.model.Teacher;
import com.hnu.scw.repository.TeacherPagingAndSortRespository;
import com.hnu.scw.repository.TeacherRepository;
import org.junit.Before;
import org.junit.Test;
import org.springframework.beans.factory.annotation.Autowired;
import org.springframework.context.ApplicationContext;
import org.springframework.context.support.ClassPathXmlApplicationContext;
import org.springframework.data.domain.Page;
import org.springframework.data.domain.PageRequest;
import org.springframework.data.domain.Sort;
/**
* @ Author :scw
* @ Date :Created in 下午 5:49 2018/6/23 0023
* @ Description:测试PagingAndSortRespository接口的分页方法
* @ Modified By:
* @Version: $version$
*/
public class PagingAndSortRespositoryTest {
//用于加载spring配置文件
private ApplicationContext context = null;
//用于操作老师实体的接口
@Autowired
private TeacherPagingAndSortRespository teacherPagingAndSortRespository = null;
@Before
public void getContext(){
context = new ClassPathXmlApplicationContext("springdatacontext.xml");
//通过类名进行注入
teacherPagingAndSortRespository = context.getBean(TeacherPagingAndSortRespository.class);
}
/**
* 测试通过继承PagingAndSortRespository进行分页的相关开发
* 相当的方便
*/
@Test
public void testPagingTeacher(){
PageRequest pageRequest = new PageRequest(0, 5);
Page<Teacher> page = teacherPagingAndSortRespository.findAll(pageRequest);
System.out.println("查询的总页数:" + page.getTotalPages());
System.out.println("查询的总数据条数:" + page.getTotalElements());
System.out.println("查询的当前页数:" + (page.getNumber() + 1));
System.out.println("查询的数据的内容:" + page.getContent());
System.out.println("查询的当前页的数据条数:" + page.getNumberOfElements());
}
/**
* 测试分页和排序的方法
*/
@Test
public void testPagingAndSortTeacher(){
//按照id的降序进行排序
Sort.Order sortOrder = new Sort.Order(Sort.Direction.DESC, "id");
//构建排序对象
Sort sort = new Sort(sortOrder);
//把分页和排序对象放入参数
PageRequest pageRequest = new PageRequest(0, 5 , sort);
Page<Teacher> page = teacherPagingAndSortRespository.findAll(pageRequest);
System.out.println("查询的总页数:" + page.getTotalPages());
System.out.println("查询的总数据条数:" + page.getTotalElements());
System.out.println("查询的当前页数:" + (page.getNumber() + 1));
System.out.println("查询的数据的内容:" + page.getContent());
System.out.println("查询的当前页的数据条数:" + page.getNumberOfElements());
}
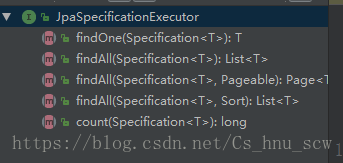
}(四)接口继承JpaSpecificationExcutor接口
说明:不属于Repository体系,实现一组 JPA Criteria 查询相关的方法。Specification:封装 JPA Criteria 查询条件。通常使用匿名内部类的方式来创建该接口的对象。
主要接口方法如下:主要就是条件过滤,比如我们在分页的时候需要一些条件,这样就可以更好的进行分页处理。
示例代码如下:(用于实现分页和过滤的作用)
package com.hnu.scw.repository;
import com.hnu.scw.model.Teacher;
import org.springframework.data.jpa.repository.JpaSpecificationExecutor;
import org.springframework.data.repository.PagingAndSortingRepository;

/**
 * @ Author     :scw
 * @ Date       :Created in 下午 6:04 2018/6/23 0023
 * @ Description:继承JpaSpecificationExecutorRepository接口
 * @ Modified By:
 * @Version: $version$
 */
public interface TeacherJpaSpecificationExecutorRepository extends PagingAndSortingRepository<Teacher , Integer> ,JpaSpecificationExecutor<Teacher >{
}
单元测试如下:
package com.hnu.scw;
import com.hnu.scw.model.Teacher;
import com.hnu.scw.repository.TeacherJpaSpecificationExecutorRepository;
import com.hnu.scw.repository.TeacherRepository;
import jdk.nashorn.internal.runtime.Specialization;
import org.junit.Before;
import org.junit.Test;
import org.springframework.beans.factory.annotation.Autowired;
import org.springframework.context.ApplicationContext;
import org.springframework.context.support.ClassPathXmlApplicationContext;
import org.springframework.data.domain.Page;
import org.springframework.data.domain.PageRequest;
import org.springframework.data.domain.Sort;
import org.springframework.data.jpa.domain.Specification;
import javax.persistence.criteria.*;

/**
 * @ Author     :scw
 * @ Date       :Created in 下午 6:11 2018/6/23 0023
 * @ Description:继承JpaSpecificationExecutor接口的方法
 * @ Modified By:
 * @Version: $version$
 */
public class JpaSpecificationExecutorTest {
    //用于加载spring配置文件
    private ApplicationContext context = null;

    //用于操作老师实体的接口
    @Autowired
    private TeacherJpaSpecificationExecutorRepository teacherJpaSpecificationExecutorRepository = null;
    @Before
    public void getContext(){
        context = new ClassPathXmlApplicationContext("springdatacontext.xml");
        //通过类名进行注入
        teacherJpaSpecificationExecutorRepository = context.getBean(TeacherJpaSpecificationExecutorRepository.class);
    }

    /**
     * 进行测试JpaSpecificationExecutor这个接口的相关方法
     * 实现查询第一页的前五条数据根据id升序排序,并且id要大于20
     */
    @Test
    public void testJpaSpecificationExecutor(){
        //设置分页要进行过滤的条件
        Specification specification = new Specification<Teacher>(){
            @Override
            public Predicate toPredicate(Root<Teacher> root,
                                         CriteriaQuery<?> criteriaQuery,
                                         CriteriaBuilder criteriaBuilder) {
                Path path = root.get("id");
                //设置过滤条件为id大于20 ,其中的gt就是表示大于
                Predicate predicate = criteriaBuilder.gt(path , 20);
                return predicate;
            }
        };
        //按照id的降序进行排序
        Sort.Order sortOrder = new Sort.Order(Sort.Direction.ASC, "id");
        //构建排序对象
        Sort sort = new Sort(sortOrder);
        PageRequest pageRequest = new PageRequest(0, 5 , sort);
        //把分页和排序对象以及过滤对象放入参数
        Page<Teacher> page = teacherJpaSpecificationExecutorRepository.findAll(specification ,pageRequest);
        System.out.println("查询的总页数:" + page.getTotalPages());
        System.out.println("查询的总数据条数:" + page.getTotalElements());
        System.out.println("查询的当前页数:" + (page.getNumber() + 1));
        System.out.println("查询的数据的内容:" + page.getContent());
        System.out.println("查询的当前页的数据条数:" + page.getNumberOfElements());
    }
}
让我给你总结总结Spring Data
(1)上面就是关于Spring Data相关的一些处理操作,总体来说还是比较容易掌握的。
(2)我们在使用任何的框架或者插件的时候,我们都需要想个问题,我们为什么要用这个而不用其他的?那么其他的又有什么缺点,而我们用的又有什么好处呢?这些都是该思考的东西,而不要只是进行学习,而不会其原理。
(3)Spring Data刚开始接触可能还是需要个过程,毕竟它的接口比较多,操作数据库的方法也比较灵活,所以,还是需要多进行练习的。
(4)Spring Data相比通用Mapper插件来说,其减少了xml文件的编写,而是用更加灵活的注解和方法命名规范来进行处理,但是他们各自有好处,不能说哪个完全不好,完全看开发需求和场景来决定的。
(5)这里讲解的只是入门,当然是需要各位进行不断扩展的哦~~~~~欢迎进行交流
(6)最后,我把项目的源码放到百度云网方便各位进行学习:
链接:https://pan.baidu.com/s/1Cc2MP6zM-NWDKQbNqpRfVA 密码:5hur