情景引入:
小白:起床起床了,,,,太阳都晒屁股了。
我:好不容易有个睡懒觉的机会,你又把我吵起来干嘛呢?不能给我放一个假吗?
小白:不可以不可以,我又遇到了一个问题,我需要你的帮忙,你赶紧帮我想想办法呗。
我:又怎么了?你怎么有这么多的问题呢?这次又是什么呢?
小白:就是,就是,平常在用mybatis框架的时候,老是遇到很多的增删改查的方法,每次都要重复性的写一些重复性的代码,我觉得这个好麻烦。
我:对呀,增删改查是我们必须要做的事情,这怎么了呢?
小白:但是,这样看起来代码冗余太多了,而且,还要不断的编写实体类对应数据库中的字段内容,有时候还把里面的内容写错了,后面还花时间去解决这个不必要的问题呢。。
我:那这就告诉你,不管做任何的事情,都要认真仔细呀!我觉得挺好的嘛。
小白:有没有什么好方法,可以自动生成实体类和mapper映射文件的方法呀?这样就可以帮我更加快速的写代码了,我就可以多花时间到业务上去了呢。
我:你还真会想着偷懒的嘛。。
小白:嘻嘻,嘻嘻。。。
我:好的,既然你这么想学习的话,那么我就给你稍微介绍一下,在我们平常的时候,用得比较多的处理小技巧好了。
情景分析:
本篇文章,主要是讲解如下两个方面的知识点,而且这两个在于我们的开发中是经常用到的,并且还可以加快我们的快发速度哦,我觉得,还是有必要学会的。毕竟俗话说得好“工善其事必先利其器”,所以,学着点呗。
知识点一:教你如何用插件解决我们在mybatis中经常写单表的“增删改查”操作。
知识点二:教你如何用插件解决我们对于数据库表和字段生成项目中对应的实体类以及mapper映射。
如何玩转分页插件(干货):https://blog.csdn.net/cs_hnu_scw/article/details/80718467
一:玩转通用Mapper插件
情景环境一:SpringBoot + Mybatis
通用Mapper定义:就是将单表操作的增删改查都是系统方法进行了实现,而不需要我们独自进行编写对应的mapper.xml的SQL语句,这样就可以方便我们对于平常使用到的映射而不用手动编写。
使用步骤:
(1)在pom.xml中添加依赖
<!-- 通用mapper,方便进行单标查询语句的封装而不用自己进行编写 -->
		<dependency>
			<groupId>tk.mybatis</groupId>
			<artifactId>mapper-spring-boot-starter</artifactId>
			<version>1.1.0</version>
		</dependency>
(2)编写通过mapper接口(这个和我们正常编写的java类最好分开一个目录,原因后续会说)
注意:比如,我一般我的controller,service,dao,mapper类的文件都是放在目录:com.hun.scw.*目录
而我的这个通用mapper接口我就放在:com.utils目录下即可。(因为,我的扫描类都是直接扫描com.hnu.scw.*目录的文件,而通用的mapper接口是不能被扫描的,否则会报classNotFind的错误,所以要特别注意)。目录如下所示:

package com.utils;
import tk.mybatis.mapper.common.Mapper;
import tk.mybatis.mapper.common.MySqlMapper;

/**
 * @ Author     :scw
 * @ Date       :Created in 下午 4:24 2018/6/17 0017
 * @ Description:配置通用mapper的接口
 * @ Modified By:
 * @Version: $version$
 */
public interface CommonMapper<T> extends Mapper<T> , MySqlMapper<T>{
}
解析:看着这个接口没有编写任何的方法,但是它继承了Mapper接口,这就很强大了。
(3)在application.properties文件(或者application.yml)添加通用mapper配置
# 配置通用mapper插件的内容
# 第一个是配置通用接口所在的目录
mapper.mappers=com.utils.CommonMapper
mapper.not-empty=false
mapper.identity=MYSQL(4)编写我们根据不同实体pojo类需要进行的mapper操作接口。(我这里就随便写两个额外的操作,但是你使用的时候你就会发现很奇妙的事情,就是比如增删改查的单表的操作都已经写好了,而不用自己编写mapper.xml文件哦,强大不强大?)
package com.hnu.scw.mapper;
import com.hnu.scw.pojo.Person;
import com.utils.CommonMapper;
import org.apache.ibatis.annotations.Mapper;
import org.springframework.stereotype.Repository;
import java.util.List;

/**
 * @ Author     :scw
 * @ Date       :Created in 下午 1:53 2018/6/14 0014
 * @ Description:用于处理person pojo相关的数据库操作(这里实现了通用mapper接口)
 * @ Modified By:
 * @Version: $version$
 */
@Mapper
public interface PersonMapper extends CommonMapper<Person>{
    /**
     * 添加一个人的数据信息
     * @param person
     */
     void personAdd(Person person);
    /**
     * 查询所有的person信息
     * @return
     */
    List<Person> findPersonList();
}(5)进行测试效果。(实现通用mapper接口的增删改查,这样就方便大家进行比较,明明mapper没有写这些方法为什么还可以执行呢?这就是通用mapper的作用)
package com.example.springbootmanytest;
import com.hnu.scw.config.SpringbootmybatisbyxmlApplication;
import com.hnu.scw.mapper.PersonMapper;
import com.hnu.scw.pojo.Person;
import org.junit.Test;
import org.junit.runner.RunWith;
import org.springframework.beans.factory.annotation.Autowired;
import org.springframework.boot.test.context.SpringBootTest;
import org.springframework.test.context.junit4.SpringJUnit4ClassRunner;
import org.springframework.test.context.junit4.SpringRunner;

import java.util.List;

@RunWith(SpringJUnit4ClassRunner.class)
@SpringBootTest(classes = SpringbootmybatisbyxmlApplication.class)
public class SpringbootmanytestApplicationTests {
	@Autowired
	private PersonMapper personMapper;
	//查询所有的数据
	@Test
	public void test1() {
		List<Person> people = personMapper.selectAll();
		for (Person p: people) {
			System.out.println(p.getName());
		}
	}
	//根据id进行查询数据(根据通用mapper实现)
	@Test
	public void test2() {
		Person person  = new Person();
		person.setId(1);
		Person i = personMapper.selectOne(person);
		System.out.println("查询结果:" + i.toString());
	}

	//插入记录的测试(通过通用mapper接口实现)
	@Test
	public void test3() {
		Person newUser = new Person();
		newUser.setName("测试1");
		personMapper.insertSelective(newUser);
		System.out.println("插入成功");
	}

	//更新记录的测试(通过通用mapper接口实现)
	//注意这个方法的时候,在实体pojo类中一定要定义主键用@Id这样进行标识,否则无法更新
	@Test
	public void test4() {
		Person person  = new Person();
		person.setId(2);
		person.setName("123");
		personMapper.updateByPrimaryKeySelective(person);
		System.out.println("更新成功");
	}
	//删除一条数据
	@Test
	public void test5() {
		Person person  = new Person();
		person.setId(2);
		personMapper.deleteByPrimaryKey(person);
		//如果想直接通过id进行更新,那么就必须在pojo中主键有@Id标识,否则执行失败
		//personMapper.deleteByPrimaryKey(3);
		System.out.println("删除成功");
	}
}
情景环境2:Spring + Mybatis + Maven
使用步骤:
(1)添加通用mapper插件依赖和持久化注解依赖
<dependency>
    <groupId>tk.mybatis</groupId>
    <artifactId>mapper</artifactId>
    <version>3.3.7</version>
</dependency>
<dependency>
    <groupId>javax.persistence</groupId>
    <artifactId>persistence-api</artifactId>
    <version>1.0</version>
</dependency>
(2)在spring配置文件中,注入通用mapper的bean到容器中
<bean class="tk.mybatis.spring.mapper.MapperScannerConfigurer">
    <property name="basePackage" value="com.hnu.scw.mapper" /> //配置扫描的mapper接口的路径,这个和配置mybatis一样
    <property name="sqlSessionFactoryBeanName" value="sqlSessionFactory" />
</bean>
(3)编写自定义业务的mapper接口
package com.hnu.scw.mapper;
import com.hnu.scw.pojo.Person;
import com.utils.CommonMapper;
import org.apache.ibatis.annotations.Mapper;
import org.springframework.stereotype.Repository;
import java.util.List;

/**
 * @ Author     :scw
 * @ Date       :Created in 下午 1:53 2018/6/14 0014
 * @ Description:用于处理person pojo相关的数据库操作(这里实现了通用mapper接口)
 * @ Modified By:
 * @Version: $version$
 */
public interface PersonMapper extends Mapper<Person>{
    /**
     * 添加一个人的数据信息
     * @param person
     */
     void personAdd(Person person);
    /**
     * 查询所有的person信息
     * @return
     */
    List<Person> findPersonList();
}
(4)在service实现类层中使用mapper接口即可。
总结:这上面就是针对两种不同的环境情况进行了说明如何使用通用的mapper插件了,这样就方便我们减少很多的平常接口的实现了哦。。感觉还是非常不错的插件。
==============手动分割线,哈哈 =============================================
二:玩转Mybatis generator插件
Mybatis generator插件定义:帮助我们能够快速生成数据库中对应的pojo实体类,mapper接口以及mapper.xml映射文件。当然,其只能够帮我们自动生成常用的,而并非是所有的。
情景一:SpringBoot + Mybatis环境
使用步骤:
(1)在pom.xml中添加插件的依赖
<plugin>
				<groupId>org.mybatis.generator</groupId>
				<artifactId>mybatis-generator-maven-plugin</artifactId>
				<version>1.3.2</version>
				<executions>
					<execution>
						<id>Generate MyBatis Artifacts</id>
						<goals>
							<goal>generate</goal>
						</goals>
					</execution>
				</executions>
				<configuration>
					<!-- generator 工具配置文件的位置 -->
					<configurationFile>src/main/resources/generatorConfig.xml</configurationFile>
					<verbose>true</verbose>
					<overwrite>true</overwrite>
				</configuration>
				<dependencies>
					<dependency>
						<groupId>mysql</groupId>
						<artifactId>mysql-connector-java</artifactId>
						<version>5.1.6</version>
					</dependency>
					<dependency>
						<groupId>org.mybatis.generator</groupId>
						<artifactId>mybatis-generator-core</artifactId>
						<version>1.3.2</version>
					</dependency>
				</dependencies>
			</plugin>
(2)编写mybatis generator对应的配置文件,这个名字要与pom.xml依赖中设置的是对应的关系。(主要是用于自定义生成的相关配置内容)
<?xml version="1.0" encoding="UTF-8"?>
<!DOCTYPE generatorConfiguration
        PUBLIC "-//mybatis.org//DTD MyBatis Generator Configuration 1.0//EN"
        "http://mybatis.org/dtd/mybatis-generator-config_1_0.dtd">
<!-- 配置生成器 -->
<generatorConfiguration>
    <!--执行generator插件生成文件的命令: call mvn mybatis-generator:generate -e -->
    <!-- 引入配置文件 -->
    <properties resource="mybatisGeneratorinit.properties"/>
    <!--classPathEntry:数据库的JDBC驱动,换成你自己的驱动位置 可选 -->
    <!--<classPathEntry location="D:\generator_mybatis\mysql-connector-java-5.1.24-bin.jar" /> -->

    <!-- 一个数据库一个context -->
    <!--defaultModelType="flat" 大数据字段,不分表 -->
    <context id="MysqlTables" targetRuntime="MyBatis3Simple" defaultModelType="flat">
        <!-- 自动识别数据库关键字,默认false,如果设置为true,根据SqlReservedWords中定义的关键字列表;
        一般保留默认值,遇到数据库关键字(Java关键字),使用columnOverride覆盖 -->
        <property name="autoDelimitKeywords" value="true" />
        <!-- 生成的Java文件的编码 -->
        <property name="javaFileEncoding" value="utf-8" />
        <!-- beginningDelimiter和endingDelimiter:指明数据库的用于标记数据库对象名的符号,比如ORACLE就是双引号,MYSQL默认是`反引号; -->
        <property name="beginningDelimiter" value="`" />
        <property name="endingDelimiter" value="`" />

        <!-- 格式化java代码 -->
        <property name="javaFormatter" value="org.mybatis.generator.api.dom.DefaultJavaFormatter"/>
        <!-- 格式化XML代码 -->
        <property name="xmlFormatter" value="org.mybatis.generator.api.dom.DefaultXmlFormatter"/>
        <plugin type="org.mybatis.generator.plugins.SerializablePlugin" />

        <plugin type="org.mybatis.generator.plugins.ToStringPlugin" />

        <!-- 注释 -->
        <commentGenerator >
            <property name="suppressAllComments" value="false"/><!-- 是否取消注释 -->
            <property name="suppressDate" value="true" /> <!-- 是否生成注释代时间戳-->
        </commentGenerator>

        <!-- jdbc连接 -->
        <jdbcConnection driverClass="${jdbc_driver}" connectionURL="${jdbc_url}" userId="${jdbc_user}" password="${jdbc_password}" />
        <!-- 类型转换 -->
        <javaTypeResolver>
            <!-- 是否使用bigDecimal, false可自动转化以下类型(Long, Integer, Short, etc.) -->
            <property name="forceBigDecimals" value="false"/>
        </javaTypeResolver>

        <!-- 生成实体类地址 -->
        <javaModelGenerator targetPackage="com.hnu.scw.pojo" targetProject="${project}" >
            <property name="enableSubPackages" value="false"/>
            <property name="trimStrings" value="true"/>
        </javaModelGenerator>
        <!-- 生成mapxml文件 -->
        <sqlMapGenerator targetPackage="mappers" targetProject="${resources}" >
            <property name="enableSubPackages" value="false" />
        </sqlMapGenerator>
        <!-- 生成mapxml对应client,也就是接口dao -->
        <javaClientGenerator targetPackage="com.hnu.scw.mapper" targetProject="${project}" type="XMLMAPPER" >
            <property name="enableSubPackages" value="false" />
        </javaClientGenerator>
        <!-- table可以有多个,每个数据库中的表都可以写一个table,tableName表示要匹配的数据库表,也可以在tableName属性中通过使用%通配符来匹配所有数据库表,只有匹配的表才会自动生成文件 -->
        <table tableName="test" enableCountByExample="true" enableUpdateByExample="true" enableDeleteByExample="true" enableSelectByExample="true" selectByExampleQueryId="true">
            <property name="useActualColumnNames" value="false" />
            <!-- 数据库表主键 -->
            <generatedKey column="id" sqlStatement="Mysql" identity="true" />
        </table>
    </context>
</generatorConfiguration>
(3)为了让我们的生成配置文件具有更好的灵活性,所以,在上面中都是用的引用方式,所以,在(2)中的同级目录中创建一个便于修改的配置文件,取名字为:mybatisGeneratorinit.properties
#Mybatis Generator configuration
#dao类和实体类的位置
project =src/main/java
#mapper文件的位置
resources=src/main/resources/mybatis
#根据数据库中的表生成对应的pojo类、dao、mapper
jdbc_driver =com.mysql.jdbc.Driver
jdbc_url=jdbc:mysql://localhost:3306/test
jdbc_user=root
jdbc_password=123456
(4)上面的配置基本完成,但是这时候,你要确保你的数据库中有对应的数据库名和数据表内容,否则,就需要先进行创建表这些内容哦。
(5)运行插件,进行生成pojp实体类,mapper接口以及mapper.xml映射文件。
注意:
方法一:
步骤:
一:进入电脑的cmd窗口。(windows7:电脑的左下角点击图标-》然后输入cmd即可)
二:进入到当前工程下的pom.xml文件所在的目录
三:在命令行中,输入:
mvn mybatis-generator:generate四:然后慢慢的等待一会即可。时间主要是根据你的表的内容来决定。
五:返回到项目中,你就会发现对应的目录中,生成了我们所需要的内容。如果,你对生成的不是很满意,需要修改生成的内容,那么就回到mybatis generator的配置文件进行修改再生成即可。
方法二:
步骤:
一:找到界面中的最下角的如下图标:
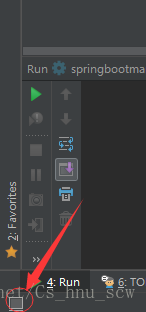
二:点击图标,并选择maven project
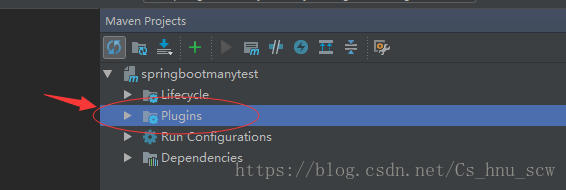
三:选择Plugins目录
四:根据如图所示进行:
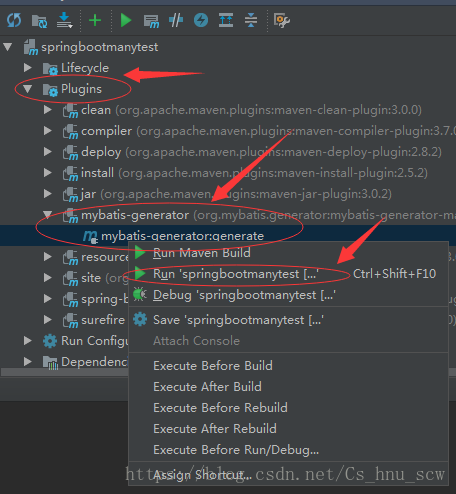
五:点击上面run即可。。等待一会,就会在对应的目录中生成相应的内容了。
方法三:
一:点击IDEA界面的右上角,如下的图标:
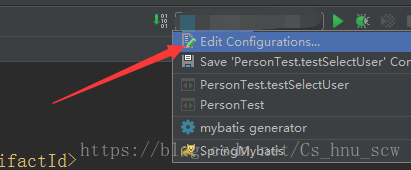
二:选择‘+’号,找到maven
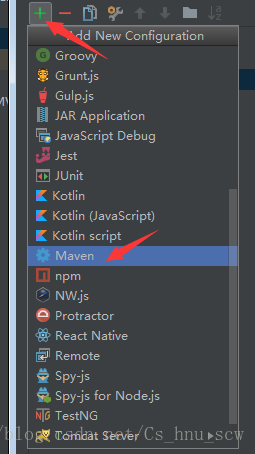
三:如下进行配置

四:切换内容,点击绿色三角形进行运行即可。
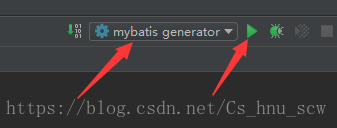
五:稍微等待一会,就会在对应的目录文件中生成我们所想要的内容。
情景二:Spring + Mybatis + Maven环境
使用步骤:配置的步骤和情景一是一模一样,只是对应的配置的目标文件的目录要对应就好了,所以这里不多说。
注意:这个直接按照上面情景一中提到的方法一和方法三都是可以的。所以,就不多介绍。毕竟SpringBoot其实就是一种Maven结构的开发框架,所以,大体的都是一样的。
总结:mybatis generator插件是方便我们生成我们在配置文件中进行配置的数据库所对应的数据库表和列,这能够方便我们进行一些快速生成pojo实体类,mapper接口以及mapper.xml映射。所以,还是具有一定的作用的。
=================手动分割线============================================
知识点总结:
通过介绍的两个插件的使用,我想大家应该多多少少的有收获吧。当然,它们的使用场景也是不一样的,而且作用也是不尽相同的,所以这个都需要各自根据需求来进行的,而不要一味的套用。
(1)针对通用mapper插件的作用,是方便我们写很多常用的数据库操作,能够方便我们进行开发。
(2)针对mybatis generator插件的作用,是方便我们生成与数据库对应的pojo实体,mapper以及常用的mapper.xml操作内容。
好了,就介绍这么多了,欢迎大家阅读我其他的文章哦。。互相学习,,,,