本文版权归作者所有,欢迎转载,但未经作者同意必须保留此段声明,且在文章页面明显位置给出原文连接出处:https://blog.csdn.net/qq_3076499,否则保留追究法律责任的权利。 如果文中有什么错误,欢迎指出,以免更多的人被误导。 |
Spring Boot提供了多种模板引擎的默认配置支持,但嵌入式容器JSP有限制,2010年后Velocity停止更新,所以这JSP与Velocity两个不建议使用,然实际在企业中,还是有很多在使用。那么这里主要是springboot整合FreeMarker模块。
Spring Boot提供了默认配置的模板引擎主要有以下几种:
· Thymeleaf
· FreeMarker
· Velocity
· Groovy
· Mustache
· JSP
2,在pom.xml中引入相应的配置:
<project xmlns="http://maven.apache.org/POM/4.0.0" xmlns:xsi="http://www.w3.org/2001/XMLSchema-instance"
xsi:schemaLocation="http://maven.apache.org/POM/4.0.0 http://maven.apache.org/xsd/maven-4.0.0.xsd">
<modelVersion>4.0.0</modelVersion>
<groupId>com.springboot.web</groupId>
<artifactId>springboot-web</artifactId>
<version>0.0.1-SNAPSHOT</version>
<packaging>war</packaging>
<!--springboot配置父目录依赖的版本,必须要添加 -->
<parent>
<groupId>org.springframework.boot</groupId>
<artifactId>spring-boot-starter-parent</artifactId>
<version>1.5.2.RELEASE</version>
</parent>
<dependencies>
<!--springboot的web支持 -->
<dependency>
<groupId>org.springframework.boot</groupId>
<artifactId>spring-boot-starter-web</artifactId>
</dependency>
<!-- 引入freeMarker的依赖包. -->
<dependency>
<groupId>org.springframework.boot</groupId>
<artifactId>spring-boot-starter-freemarker</artifactId>
</dependency>
<!-- 引入thymeleaf的依赖包. -->
<dependency>
<groupId>org.springframework.boot </groupId>
<artifactId>spring-boot-starter-thymeleaf </artifactId>
</dependency>
<!-- 引入jsp的依赖包. -->
<dependency>
<groupId>org.apache.tomcat.embed</groupId>
<artifactId>tomcat-embed-jasper</artifactId>
</dependency>
<build>
<plugins>
<!--添加Spring boot的插件,这里是maven启动方式需要加的,建议加上 -->
<plugin>
<groupId>org.springframework.boot</groupId>
<artifactId>spring-boot-maven-plugin</artifactId>
</plugin>
<!-- java编译插件,设置jdk的版本 -->
<plugin>
<groupId>org.apache.maven.plugins</groupId>
<artifactId>maven-compiler-plugin</artifactId>
<configuration>
<source>1.7</source>
<target>1.7</target>
<encoding>UTF-8</encoding>
</configuration>
</plugin>
</plugins>
<pluginManagement>
<plugins>
<!-- 配置Tomcat插件 -->
<plugin>
<groupId>org.apache.tomcat.maven</groupId>
<artifactId>tomcat7-maven-plugin</artifactId>
<version>2.2</version>
</plugin>
</plugins>
</pluginManagement>
</build>
</project>
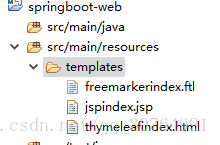
3.在src/main/resources/创建一个templates文件夹,再分别创建freeMarker,thymeleaf,jsp三个模板引擎所对应的文件后缀分别为*.ftl -*.html -*.jsp(Thymeleaf是一个java类库,他是一个xml/xhtml/html5的模板引擎,可以作为mvc的web应用的view层。)如图所示;
4.编写模块引擎所对应的controller如图所示:

FreeMarkerIndexController.java具体代码如下:
package com.demo.controller;
import java.util.ArrayList;
import java.util.List;
import java.util.Map;
import org.springframework.stereotype.Controller;
import org.springframework.web.bind.annotation.RequestMapping;
@Controller //标示为controller层
public class FreeMarkerIndexController {
@RequestMapping("/freemarkerindexController")//请求路径,会去templates下去寻找freemarkerindex
public String freemarkerindexController(Map<String, Object> result) {
System.out.println("hello world");//在控制台输出打印hello world
result.put("name", "wangwu");//添加姓名
result.put("sex", 1);//添加性别
List<String> list = new ArrayList<String>();//创建一个无序集合
list.add("zhangsan");//添加张三
list.add("lisi");//添加李四
result.put("userlist", list);//添加结果
return "freemarkerindex";//返回templates的结果
}
}
5.创建springboot的主入口,我这里叫Main,(有的可能叫App主口,这个根据自己的习惯)。如图所示:


启动访问路径:http://localhost:8080/freemarkerindexController